In 1937, the
Reichluftfahrtministerium (RLM) issued a request for proposals from the German aviation industry for a new fighter aircraft to serve alongside the Messerschmitt Bf 109. Kurt Tank, Focke-Wulf's chief engineer responded with a number of designs. However, only a design featuring an air-cooled, 14-cylinder BMW 139 radial got the RLM's attention. Use of radial engines for a fighter was rare in Europe at that time as it was believed the wide radial engines would create a higher drag than inline engines, degrading performance (the relative failure of the Italian fighters such as the G.50, MC200 and Re.2000 seemed to support this belief). However, Tank, having seen the successful use of radials in US Navy fighters, decided that it wasn't so and felt that a properly designed installation would minimise the drag.

Eventually, the first prototype, Fw 190 V1 flew on 1 June 1939. It soon exhibited excellent handling qualities and speed. At the same time, BMW was testing a larger engine, the BMW 801, which the RLM persuaded Tank to install it in the Fw 190. Whilst of the same diameter as the BMW 132, the 801 was heavier and longer. This resulted in a redesign of the airframe for Prototype V5 which first flew in Spring 1940. After further redesign, 28 the pre-production Fw 190A-0 was ordered in November 1940.
Erprobungsstaffel 190 was formed in March 1941 to test, help iron out remaining bugs and approve the Fw 190 before it is accepted for full service in the Luftwaffe. In June 1941, the first production model, Fw 190A-1 entered service, equipping II./JG26. The aircraft was armed with four 7.92mm MG17 machine guns (2 in fuselage, 2 in wing roots) and two wing-mounted 20mm MG FF/M cannons.
The Fw 190 was developed continuously during the war; for ground attack, the A series was developed into the F and G variants whilst the quest for better high-altitude performance led to the re-engined D series. As for the A series itself, production of the A-8 variant was started in February 1944. This variant was powered by the standard BMW 801 D-2 engine or the BMW 801Q. Armour for the front cowling was increased from 6mm to 10mm. The A-8 also included the
Erhöhte Notleistung emergency boost system, allowing power to be raised to 1,953hp for a short duration. The A-8 can also be fitted with a new wooden paddle-bladed propellers and, on some aircraft, with bulged canopy to improve the view to the rear. Standard armament was a pair of 13mm MG 131 machine guns in the fuselage and four 20mm MG 151 cannons ; two in the wing roots and another two in mid-wing mounts. There were also numerous
Rüstsätze kits available for the A-8. The A-8 was the most numerous of all A series, with over 6,655 built between March 1944 to May 1945.
When introduced in August 1941, the Fw 190 (nicknamed
Würger = shrike aka butcher bird) was superior in all respects except for turn radius to Spitfire Mk. V, the main variant of the British fighter at the time. This enabled the Germans to wrest air superiority from the RAF until the Spitfire Mk. IX entered service in July 1942. The Fw 190 soon form the backbone of the
Jagdwaffe along with the Bf 109. They fought almost everywhere, from the Western Front to Russia. With the coming of Allied strategic bombing campaign, the Fw 190 also fought over Germany as part of the
Reichsverteidigung (RVD = Defence Of the Reich). The USAAF's heavy bombers, especially the B-17s caused problems for the Luftwaffe. The bombers can absorb heavy punishment at the time when the German aircraft weapons were inadequate for bomber-destroying missions. The heavy defensive firepower of individual aircraft, together with the mutually supporting combat box formation made approach highly risky. Since the Fw 190 had interception missions as part of the design, it was considered ideal for further modifications for anti-bomber operations.
The new method for attacking the bombers was proposed by one Major von Komatski, an associate of the General der Jagdfliger, Adolf Galland. He suggested that specially armoured fighters are to get as close as possible to the bombers before opening fire and, as a last resort, to ram the bombers. The A-6 version was first modified for this mission, using
Rüstsatz (field conversion) kits. The most numerous
Sturmböcke (battering ram) conversion was the A-8/R-2 which had the outer MG 151s replaced with the harder hitting 30mm MK 108 cannons, extra armour around the cockpit sides and thicker armoured windshield glass. The additional weapon and armour however reduced the
Sturmböcke aircraft's performance so that they had to be escorted by Bf 109s and/or standard Fw 190s. A special unit, Sturmstaffel 1 was formed to test the viability of the tactic. Attached to JG 3 'Udet', the unit achieved success that it was expanded into a full Gruppe - Gruppe IV of JG 3. Soon II./JG 300 was converted into a
Sturmgruppe along with II./JG 4. The Sturmgruppen's greatest success came on 7 July 1944 when IV/JG 3, escorted by two Gruppen of Bf 109s from JG 300 downed 28 B-24s attacking aircraft factories in Leipzig and synthetic oil plants. With the increasing effectiveness of USAAF fighter escorts, the heavy and awkward-handling sturmjagers' success began to decline with the lack of fuel becoming the last nail in their (indeed, the whole of the Luftwaffe) coffin.
The Kit
Tamiya's kit of the A-8/R-2 was their fourth Fw 190 in 1/48 scale (after F-8, A-3 and D-9). The kit came in four medium grey and one clear sprues, a small flexible plastic (vinyl?) sheet for the side armour plates, canopy painting mask and a decal sheet. The quality of the parts are typically Tamiya. In real life, the F-8 attack version was derived from the A-8; Tamiya's A-8 shared the same moulding with the earlier F-8. This was evident from the sprues holding ground attack ordnance and mounts. New sprues include bottom wing plates and the barrels for the MK 108 cannons and wider chord prop used by some Sturmböcke aircraft. Clear parts includes both standard and blown canopies, plus armoured glass panel, also unique to some sturmbocke aircraft. In fact, with aftermarket decals, one can build the F-8 or the standard A-8 from this kit. Decals were provided for five aircraft:
1. Unteroffizier Willi Maximowitz IV./JG3, June 1944
2. Leutnant Klaus Bretschneider II./JG 300 October 1944
3. Hauptmann Wilhelm Moritz IV./JG 3 August 1944
4. Unteroffizier Matthaus Erdhardt II./JG 300 October 1944
5. Unteroffizier Ernst Schroeder II./ JG 300 November 1944
Construction
Before building commences, it should be noted that there are subtle differences between some of the marking options with regards to the side armour panels, armoured glass panels and armament. I settled for Option B, Leutnant Bretschneider's plane. Construction, as usual, started with the cockpit. The cockpit parts are virtually the same with the previous Tamiya Wurgers, the main difference was the inclusion of decals for the instrument panel and the seat belt. The seat belt should really be substituted with a PE aftermarket one (or having the seat replaced with a resin aftermarket with moulded-on seat belt) but I simply used the one provided in the kit. The cockpit, and sidewall colour of RLM 66
Schwarzgrau was painted using Tamiya XF-63 German Grey with details painted X-18 Semi-Gloss Black, XF-16 Flat Aluminium and Khaki ( I use Gunze acrylic) where appropriate.
The fuselage halves were then mated as per instructions. The applique armour plates were then attached to the outside of the cockpit. The armour parts were self-adhesive but not pre-cut so I had to carefully trim out the parts from their sheet. The exhaust stubs were then attached after they have been painted Burnt Iron. This was followed by assembling the engine parts which was then painted X-18 and Steel, followed by a dry-brushing of silver. The engine assembly was then glued to the fuselage and the cockpit slid into its place.

Next up was the wing assembly. The wheel well parts were painted Tamiya XF-22 RLM Grey while still on the sprues. Holes were the drilled in the bottom part of the wing to accommodate the ETC501 rack and at top of the wing halves to accommodate the cannon breech covers. The wing top and bottom were then mated together. Tamiya provided different underwing panels for the cartridge ejection chutes according to the aircraft modelled (Option 5 has a different panel) and these were attached accordingly. The cannon muzzles were however set aside until later. The wing was then mated to the fuselage, along with the horizontal stabilizers and the engine cowl. Finally before painting, I attach the fuselage gun covers, after cutting off the moulded gun barrels and adding fairings for the gun troughs. If doing the other options, one would leave the gun barrels as they were (Option 5) or just cutting off the gun muzzles (option 1). The canopy and windscreen were then masked off using the provided masks. They weren't pre-cut but easily done with sharp, preferably new blade.
Painting and Decaling
Mid-war Luftwaffe fighter planes were usually painted RLM 74
Graugrun and RLM 75
Grauviolett for upper camouflage and RLM 76
Lichtblau for the rest of the airframe. All colours were painted using Gunze Sangyo acrylics. However, when I apply the Graugrun, it didn't look right - it looked more brownish rather than greenish. I quickly consulted the internet and found out that Gunze's RLM 74 is 'wrong', so to speak. Fortunately, the same website (
Plastic Surgery) suggested that Tamiya's XF-61 Dark Green when sufficiently lightened, made an adequate RLM 74. Now, the airplane I'm making the model of have mottles of RLM 74 and 75 on the sides and the tail, and there is only one way to paint them convincingly - by airbrush. I do not own one and how can I make the mottling? So, I try to create the illusion of mottling. First I thin down the respective paints until they resemble dirty thinner. It was then dabbed onto the model at the appropriate places. After it has dried I added a thicker paint solution. To my eyes they look like mottling with the thinner paint pretending to be oversprays. It won't pass muster at close-up but quite OK from 6 feet away! I also painted the underside of the nose RLM 04
Gelb using XF-3 Flat Yellow accented with some XF-7 Flat Red. It wasn't on the instructions but I painted it so after seeing some profiles and online builds.
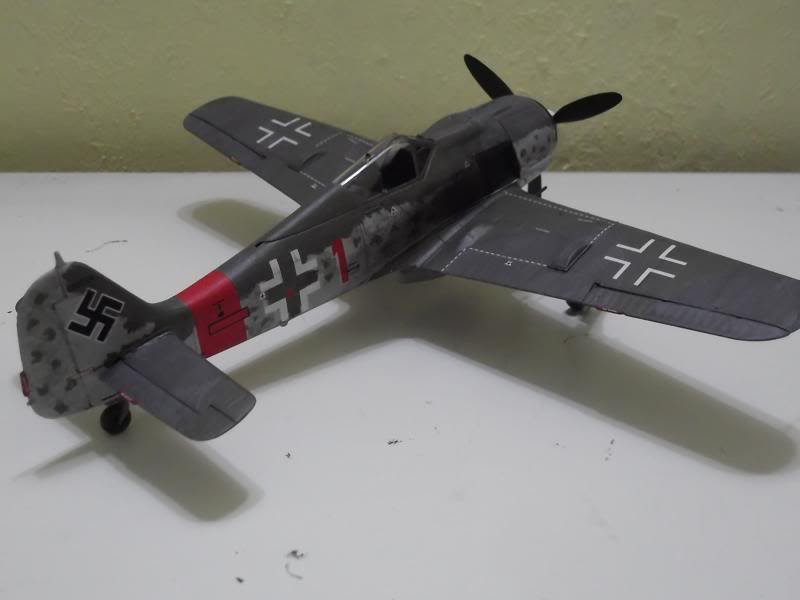
The decals went on next. The reason I chose Lt. Bretschneider's plane was the nose (or rather, fuselage) art : 'Rauhbautz VII'. Rahbautz is German for 'tough guy' and I felt that it was appropriate for the aircraft (and the unit) that was expected to get close to the thirteen .50 cal machine guns of a B-17 in order to shoot it down, and were also also expected to ram their target should the need arise. They were of the usual Tamiya quality - good colour density and register although a bit thick. They went on well with a dash of Mr. Mark Softer.
Finishing
The still lose parts can now be attached onto the model. I started by gluing the MK 108 muzzles into place and attaching the landing gears. Fit is good but online reviews mention that Tamiya's Wurgers all suffer from inadequate main landing gear length. This, coupled with undersized tyres resulted in a lowered stance as compared to the real aircraft.
Afterwards, I attached the drop tank into place. Once the gear had fully set, I attached the most vulnerable parts such as the pitot tube, loop aerial, and the FuG 16ZY radio aerial. The prop spinner was sprayed Tamiya TS-27 Flat White and the spiral decal applied. The prop blades were painted Tamiya XF-27 Black Green and the prop assembly was then pushed into place.
All that remains was some weathering. I started with a sludge wash using watercolours. I also added exhaust stains on the fuselage sides using Tamiya Weathering Master 'Soot'. Although I believe it to be incorrect, (as it was a DROP tank) I added some fuel stains onto the drop tank using Tamiya X-19 Smoke. Finally, a layer of Tamiya TS-79 Flat Clear was sprayed onto the model. The masks were then peeled off, completing the build.
Conclusion
Tamiya has come up with another fine, although not perfect, scale model. Although there is that issue with the landing gear, it was still a good model kit with ease of build being its main hallmark. Those who wish to have a more accurate stance for their Tamiya Wurger can invest in various aftermarket parts available.