Wednesday 18 March 2015

Tiger Killer, At Last!


Historical Background
The M4 Sherman was the American and other Western Allies' main combat tank during World War 2. The Sherman was originally armed with a short-barreled, medium velocity M3 75mm gun. Against the workhorse Panzer III and IV, the gun could penetrate their armour within 910 meters (1,000 yards). That was considered sufficient and Intelligence reports of the more powerful Tiger and Panther tanks were discounted (as both of them were originally deduced to be heavy tanks and thus being more limited in number). Furthermore tests of the follow-on 76mm gun seemed to indicate that it was able to destroy both of the German 'cats'. However, the Army Ground Forces rejected the 76mm gun. By 1943, most German Panzer IVs of 1943 was armed with the 7.5-cm KwK 40, causing a disparity in firepower between the panzers and the Shermans. This however provided the impetus to re-arm the Sherman with the M1 76mm gun, beginning in April 1944. Despite new gun, the Sherman still cannot penetrate the frontal armour of a Panther or a Tiger unless under favourable circumstances. While the Allies can afford it, it is said that it took 5 Shermans to knock out a single Tiger through shots on the Tiger's thinner side or rear armor (4 Shermans to draw the Tiger's fire in order for the fifth Sherman to maneuver into position).

The British were more astute in anticipating the development of German panzers and had begun development of a 76mm anti-tank gun even before the earlier 57mm predecessor (the Ordnance QF 6-pounder AT gun) entered service. An idea was floated to mount the 76 mm/ 17-pounder gun on Shermans but was rejected by the Ministry of Supply's Tank Decision Board. The decision was made as it was intended that the Shermans then in service with the British Army would be replaced  by a new generation of British tanks in the anti-tank role such as the Cromwell (originally intended to be armed with a Vickers high velocity 75-mm gun with superior performance to the M1 and M3), A30 Challenger (armed with the 17-pounder) and the A34 Comet and A41 Centurion. All of these tanks were expected to replace the Sherman and the prospect of mounting the 17-pounder on the Sherman was not seen to be desirable. Nevertheless unofficial attempts continued. In early 1943, Major George Brighty of the Royal Tank Regiment was convinced that the Sherman would make a better platform for the 17-pounder than the A30 Challenger. However, his attempt was stymied by the Sherman's turret, which was too small to allow for the recoil of the gun. In June 1943, Lt. Colonel George Witheridge, a friend of Brighty, was transferred to Lulworth Armoured Fighting School, where Brighty was posted. Like many others, Witheridge was critical of the A30. Upon learning of Brighty's attempt, he lent his assistance, advising Brighty on how to resolve the recoil issue. The Department of Tank Design however gave notice to the duo to stop their efforts. Witheridge however used his connection with Major General Raymond Briggs, Director of the Royal Armoured Corps and successfully lobbied Claude Gibb, the Director General of Weapon and Instrument Production at the Ministry of Supply to make it an official Ministry project. 

Now an official government study, the prototype was transformed into a working tank by W.G.K Kilbourn, a Vickers engineer working at the Department of Tank Design. The basic problem of the long recoil was solved by totally redesigning the recoil system. The original towed 17-pounder was loaded from the top and taking into account the loader's position and the height restrictions inside the turret, the breech was rotated 90°. The radio would have to be relocated further to the back by cutting a hole at the rear face and adding a bustle to mount the radio. The gun cradle would have to be shortened to allow the gun to fit inside the turret. This however affected the stability of the gun and a new barrel was designed to help solve the problem. The larger breech and and the recoil system of the 17-pounder restricted the ability of the loader to escape through the single turret hatch in an emergency and a new hatch was cut over his position. Finally, the co-driver/hull machine gunner's position was eliminated to make room for ammunition, as the 17-pounder ammo took more room than 75-mm rounds.

The Ordnance QF 17-pounder gun was the most powerful British tank weapon of the time, able to penetrate 131mm of armour at 30° from 1,000 meters using APCBC round. The more powerful, but more limited APDS rounds can penetrate 209 mm of armour from the same distance. Nevertheless, the 17-pounder was inferior against 'soft' targets due to lack of effective HE rounds. The powerful blast of the gun also kicked up huge amount of dust and smoke, making it difficult for the gunner to adjust the fall of the shot, not to mention revealing the tank's position to the enemy. The cramped turret and large 76mm rounds also restricted crew mobility inside the turret, reducing the rate of fire compared to regular Shermans. The bright muzzle flash of the gun also gave rise to the tank's nickname: 'Firefly'. Apart from massively improved firepower, the Firefly offered no mobility nor protection advantage over regular Shermans although the mantlet was 13 mm thicker.

Towards the end of 1943, enthusiasm for the Firefly began to grow, helped by the fact that the A30 Challenger was suffering from delays and only a few would be ready for Operation Overlord. Worse, it was also realised that the Cromwell's turret ring is too small to mount the high-velocity 75mm gun, leaving it armed with the general purpose Ordnance QF 75mm. In February 1944, an order for 2,100 Fireflies were placed. The Fireflies were distributed among the British armored formations, initially within the 21st Army Group for Operation Overlord, at the ratio of one Firefly to three regular Shermans (or Cromwells) in a troop. By the end of the war, the composition was 50:50. During the Normandy campaign, the Panthers and Tigers only comprised 30% of German panzer strength at Normandy. However, the British and Commonwealth forces actually faced up to 70% of the total panzer strength, as well as half of the elite Waffen-SS Panzer Divisions at Normandy. Although the majority of the panzers were the 'regular' Panzer IVs and Sturmgeschutzes, the Firefly became a most valued British tank as it was the only one capable of defeating a Tiger or a Panther at normal combat ranges.

The Germans noticed that these long-barreled Shermans pose a greater threat to their heavy Panzers and instructed tank and anti-tank gun crews to make the destruction of Fireflies a priority. In turn the Firefly crews understand that their long gun barrel was now a distinctive identification and proceeded to disguise it with camouflage netting or painting the front half of the barrel in a counter-shade pattern in order to disguise it. However, despite the countermeasures, it was actually the manner in which the Fireflies were deployed that reduced the chance of a Firefly being knocked out early. Fireflies took part in battles from Normandy until the end of the war but perhaps their most well-known engagement was on 8 August 1944 during Operation Totalize. Fireflies from A Squadron, 1st Northamptonshire Yeomanry, 33rd Armoured Brigade, B Squadron, 144th Regiment Royal Armoured Corps, 33rd Brigade and A Squadron, Sherbrooke Fusiliers Regiment, 2nd Canadian Armoured Brigade ambushed a group of four Tiger tanks and several Panzer IV tanks and Sturmgeschutz IV assault guns of the 3rd and HQ Companies of the schwere SS-Panzer Abteilung 101. A Squadron of the 1st Northamptonshire Yeomanry positioned themselves at the Delle de la Roque woods near the village of Saint-Aignan-de-Cramesnil. When the panzers appear the squadron (and others in the ambush position) hold their fire until the enemy gets in range. When the order was given, Firefly Velikye Luki (the 1st Northants' tanks were named after Russian towns and villages) of A Squadron managed to destroy three Tiger tanks, one of them was Tiger '007' commanded by the notable ace SS-Haupsturmfuhrer Michael Wittman. Velikye Luki's gunner, Trooper Joe Elkins was generally credited as the man who killed Michael Wittman although there is a possibility that Wittman was killed by the tanks of the Sherbrooke Fusiliers, who opened fire at a closer range.    

Although an order for 2,100 Fireflies were made, the actual number was difficult to determine. The Firefly conversion was based on the hulls of the M4 (Sherman I), M4 Composite (Sherman I Composite) and M4A4 (Sherman V). The suffix 'c' was added after the mark number to denote 17-pounder armed vehicle.


The Kit
Dragon has released a number of Sherman Firefly kits over the years with more improvements with each release. Until Tasca (now Asuka) came out with their Firefly kit in 2006, the third (I think) incarnation of Dragon's Firefly (kit number 6182)  in 2003 was the best Firefly in the market. This release feature, among others, a shortened (corrected) hull, thicker turret cheek armor, barrel travel lock and better details overall. However the weld seams are of the recessed type whilst most, if not all, Shermans have raised weld beads. Furthermore, according to Terry Ashley of Perth Military Modelling Site, the gun barrel is too long by 10mm. Tracks, as usual with Dragon at the time, is of the separate link type (not Magic Track though). Also included are 'duckbill' extended track end connectors.

This is a limited-release boxing of kit 6182, in conjunction with Dragon Expo '06. Also included in this kit is a sprue from Dragon's M26 Pershing kit (12.7mm MG and the obviously not to be used turret fittings) and a sprue from their Sherman Tulip kit for the turret rear extension (also included are the rockets for the 'Tulip' Shermans). Decals are the same with kit 6182 which provide markings for two vehicles: 'Carole', a Firefly attached to 13/18th Royal Hussars (Queen Mary's Own), 27th Armoured Brigade, in which Trooper Douglas Kay served as her gunner during the Normandy campaigns, and 'Allakeefek', 4th County of London Yeomanry. A correction sheet was included to rectify some of the marking errors for 'Carole'. However, the bonus figures originally included in kit 6182 were not included in this limited release. A small PE fret rounds up the package.


Construction
I started the building process with the suspension. The six sets of vertical volute suspension system (VVSS) took some time although the build was not as complicated as certain other companies' VVSS. Yet, the Dragon VVSS lacked the bolts on the skids; perhaps Dragon should take a leaf from Academy and include bolt-heads on the sprue. After finishing the VVSS, they were set aside and I turned my attention to the lower hull. The rear panel and the mounting for the suspensions were cemented on the main body. The transmission cover was also added at this time. Since the running gear would be mounted by this time, I painted them and the lower hull first. After reading build articles of Sherman III in Tamiya Model Magazine International and KV-1 in Fine Scale Modeler, I decided to experiment with Mr Surfacer 500 to enhance the looks of cast armor. Dipping a brush in MS500, I apply it by stippling the brush onto the transmission cover. Once dry, I sanded it a bit. The turret also received the similar treatment.

The upper hull was then mated to the lower portion. The upper hull, like the rest of the kit, was well done but still sporting the recessed weld beads. I reminded myself to place stretched sprue on the panel lines, flood them with Tamiya Extra Thin cement and turn them into raised weld beads but end up realising I have not done so only after decaling! The fairing around the hull machinegun port was removed, a rather difficult job using hobby knife. This was then followed by the rest of the fixtures and fittings on the hull except the pioneer tools. A  bit of confusion was raised when the stowage box was shown placed on both its usual place at the end of the hull and another position on the glacis plate. After looking at available photos, Carole was shown having its storage box relocated on the glacis plate for D-Day so that she can be fitted with deep wading trunks; the box was placed in its original location once ashore. So I placed the storage box on its regular location. Now comes the love-hate part of the build: the tracks! The track assembly come in three pieces - two end connectors and the link itself. In order to have some flexibility, I only glued one side of the end connector, leaving the other to move freely. I believe I took the longest time in completing the track run, as I am not familiar with the multi-piece system, yet it wasn't that hard.. When complete, the track run, together with the uncemented idler and sprocket wheels were removed for painting.

The turret was next on the line and there wasn't much of a problem here, except the interior was devoid of any details. The surface texture was enhanced using the method I mentioned above. Although PMMS mentioned that barrel was too long, I left it as it was as I weren't confident of my ability to make a straight, perpendicular cut.  There is a slight gap between the bustle extension and the turret itself, which I closed using stretched sprue. As I intended to build Carole, the turret mounted storage box was fitted. By the way, I should have consulted reference photos  of Carole - the turret-mounted box was placed higher than the position shown in the instructions. The PE parts were then attached, comprising of antenna base, light brush guards and air intake grill on the rear hull. The commander's hatch was left unattached as I was thinking of adding a figure.

Painting and Decaling
I painted the model using Mike Starmer's mix of SCC15 Olive Drab of XF-61 Dark Green, XF-62 Olive Drab (I substituted it with Gunze OD) and XF-3 Flat Yellow.  Once dry, I applied the decals. The corrected sheet however did not include properly-shaped recognition star on the rear hull and Dragon still instructed modellers to use the funny-looking one in the original decal sheet. The number at the back of the turret was actually not painted onto the tank itself but on a piece of cloth. I replicated it by placing the decal onto a plain paper, paint the back of the paper and hang it onto the stowage box using white glue. The tank was then given a wash to bring out details and in order to have that used look. meanwhile I painted the tools using Steel for the metal parts and XF15 Flat Flesh for the wooden ones. The wooden parts were then given a wash using Tamiya XF64 Red Brown. Once dry, they were attached to their respective locations on the tank.

Finishing
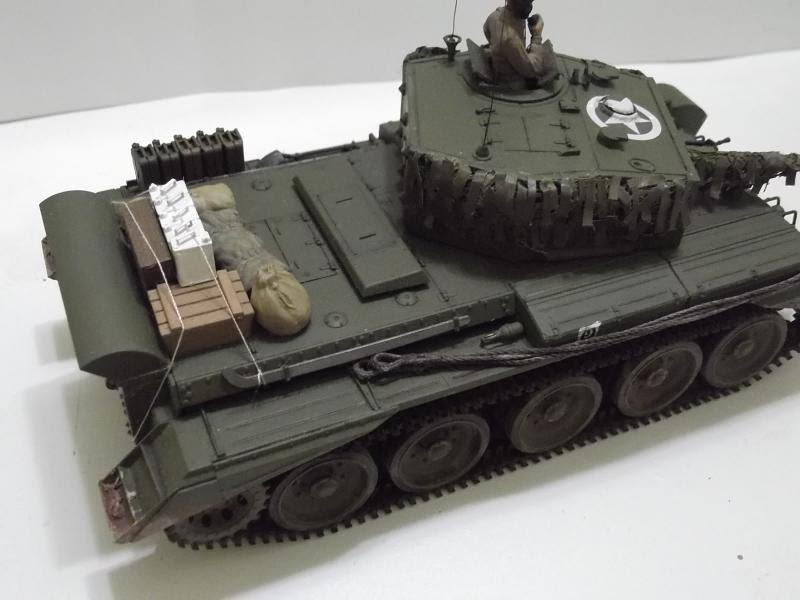
Even though Dragon provided an M2 12.7mm MG for the commander's station, pictures I found on the internet shows that a Browning M1919 7.62mm was used instead. I used one from Academy's US Machine Gun Set. The gun is painted XF69 NATO Black and drybrushed with silver and graphite powder. I used a figure from Miniart's British Tank Crew Set to sit in the open hatch. Comm wires for the headphone was made from copper wires found in speaker cables. For stowage, I used bags from Academy's Allied and German Tank Supplies Set, a generic box from Academy's Tank Supplies Set II, 17-pounder ammo boxes from Bronco (which I painted with Tamiya's 'wrong' batch of XF-62 Olive Drab just to differentiate it from the colour of the tank). Jerricans from Tamiya's Allied Vehicle Accessory Set (just to make a difference, I used the US-pattern cans) and a 2-gallon 'flimsy' from Bronco.  A pair of spare track links were placed on both sides of the turret. A strip of plastic was cemented between the front mudguards and a length of spare track from Tamiya's old M4A3 kit was placed between the strip and the transmission cover, together with a flimsy.

Finally, Mig Productions' European Dust pigment was mixed with water and applied all over the bottom half of the model. When dry, a stiff brush was used to remove the excess.

Conclusion
The kit is very nice although it took Dragon three times to get it (mostly) right. The parts fit well and have nice details. It has been however been eclipsed by Fireflies from Tasca/Asuka. Yet, it is still perfectly acceptable especially those who are not rivet counters. The tree-part track link was quite tedious (to me at least) although by making it workable, it eases the job a bit. Recommended as an alternative to the Asuka Firefly (should you be able to find it nowadays).

Epilogue
In Issue 7, Volume 35 of Military Modelling, there is an article about 'Carole' and C Squadron in general, which I reproduce here. C Squadron, of which Carole was assigned to, was designated the 'wading' squadron of the 13/18 Royal Hussars for D-Day. It consisted of the HQ troop with two Sherman Mk.III and four troops, numbered 1 to 4, each equipped with three Sherman III and one Sherman VC. The Hussar's tanks had individual names beginning with squadron alphabet painted in red on black rectangle on the forward upper hull. To the rear of the name panel was the squadron's tactical symbol (circle for C Squadron). As the Royal Hussars were the senior regiment, the tactical markings were in red. Carole was assigned to 2 Troop, C Squadron on 6 June 1944. The other Shermans in 2 Troop were 68 Charmer, 69 Cameo and 70 Cavalier. Carole was crewed by Sergeant Fred Scamp (commander), Trooper Douglas Kay (gunner), Trooper Fred Shaw (loader) and Trooper Bill Humphries (driver). The tank took its name after Sergeant Scamp's daughter, who was born in that year. Carole and her comrades took part in the Normandy campaign from 6 June 1944 to 20 August of the same year.

In July however, the 27th Armoured Brigade was disbanded and the 13/18 Royal Hussars were transferred to the 8th Armoured Brigade. They continued the advance into Germany and unfortunately on 12th February 1945, Carole was knocked out by a German anti-tank gun near the town of Goch. The shot pierced the turret front, killing the commander, Sgt Scamp and Trooper Kay's replacement, Trooper Wilcox (Kay was on leave that day). Trooper Kay was then reassigned to another Firefly. The 8th Armoured Brigade finished the war near the city of Bremen.


Sunday 15 March 2015

Desert Short-Gun


Historical Background
Conceived by Generaloberst Heinz Guderian, the Panzer IV was intended as a support tank for use against enemy anti-tank guns and fortifications. It was not intended to fight enemy tanks (which was the job of the Panzer III). In 1934, the German army issued out what is now called a request for proposals to a number of defence contractors. The new vehicle would have a short 75mm gun as main armament and weighed 24 tonnes. As Germany was still (in theory at least) bound by the Versailles Treaty, the RFP was given the cover name Begleitwagen (accompanying vehicle). Krupp's proposal was selected to be developed further. Production began in 1936.

The first production version, Ausf. A was powered by a Maybach HL 108TR engine producing 183.87 kW of power. Maximum road speed was 31 km/h. it was armed with a KwK 37 L/24 7.5 cm low-velocity tank gun and two 7.92 mm MG-34 machine gun (1 co-axial with the main gun and another in the front plate of the hull). Armour was 14.5 mm on the front plate of the chassis and 20 mm on the turret - only good for stopping shell fragments, small arms fire and light anti-tank rounds. Subsequent variants have progressively thicker armour and correspondingly higher weights with Ausf. F started production in April 1941. This variant is protected by 50mm thick armour on turret and hull and 30mm on sides. Weight has increased to 22.3 tonnes (from 15 tonnes in Ausf. A) necessitating the usage of a wider track (400mm from 380mm) to reduce ground pressure. 464 units of Ausf F were built. In May 1941, as a result of combat experience, it was decided to upgun the Panzer IV with KwK 40 L/43 7.5cm gun. Ausf. F tanks were selected to be the first recipient of this new gun. This resulted in the short-gunned Ausf F to be redesignated Ausf F1 and the long-gunned variants Ausf. F2.  The Panzer IV was given ordnance inventory designation Sd.Kfz. 161.

The Panzer IV was the only German panzer that remained in production and combat throughout World War 2. Measured over the entire course of the war, it formed 30% of the Wehrmacht's total panzer strength. At the start of the war however, it and the Panzer III only formed 10% of the total strength. Despite increased production rates, the majority of German tank strength on 10 May 1940 were still light tanks. Even the 75mm L/24-armed Panzer IVs found it difficult to engage tanks such as the British Matilda II and the French Char B1 and Somua S35. The KwK 37 gun could only penetrate 43mm of armour at a range of 700 meters whereas the Somua was protected by 55mm of armour while the Matilda II had 70mm of frontal armour. The Germans only managed to defeat the Allied armour through the usage of tactical radios, better training and superior tactics and also through the usage of the 88mm flak cannon in the anti-tank role.

In the North African campaign, the Panzer IV equipped the 5th Light Division (later the 21st Panzer Division) and the 15th Panzer Division of the Afrika Korps. The short-gunned Panzer IV was still handicapped against British infantry tanks and it was also outperformed by the Panzer III (especially those armed with the KwK 39 L/60 50mm gun) with respect to armour penetration. Consequently they saw limited tank vs. tank engagements and mainly serving in their original purpose as an infantry support tank. The Afrika Korps only received small numbers of the longer-barreled Ausf. F2 variant which was able to penetrate all British and American tanks in the theatre at ranges up to 1,500 meters. The appearance of KV-1 and T-34 tanks during Operation Barbarossa also prompted the upgunning of the Panzer IV. The longer KwK 40 L/43 75mm gun allowed the Panzer IV to destroy the T-34 at ranges up to 1,600 meters.

The Panzer IV, being the workhorse armour of the Wehrmacht,  was also used as the chassis for other armoured fighting vehicles such as the Panzerbefehlswagen IV command tank, Panzerbeobachtungswagen IV artillery obervation vehicle, Bergepanzer IV armoured recovery vehicle, Hummel self-propelled howitzer, Sturmgeschütz IV assault gun, Jagdpanzer IV and Hornisse/Nashorn tank destroyers, Sturmpanzer IV Brummbär infantry support self-propelled gun, and antiaircraft tanks Möbelwagen, Wirbelwind and Ostwind. More than 8,500 Panzer IVs of all marks were built during the war.

The Kit
In 2008, Dragon released a 1/35 kit of the Panzer IV Ausf F1 as part of a new wave of Panzer IVs from them which utilized the 'Smart Kit' concept, starting with the new-tool Panzer IV Ausf F2(G) in 2007. The kit came in massive 18 light grey sprues, one clear sprue, a hull pan, 'Magic Track' track links, a twisted metal wire, a small PE fret and a decal sheet. The plastic parts feature slide mouldings to capture difficult shapes while reducing reliance on PE parts. All the hatches and ports can be opened although no engine or transmission parts are included. There is however a rudimentary interior for the turret and all hatches have clear plastic inserts. Decals provide markings for ten F1s:
1. Pz.Rgt. 31,5 Pz. Div. Russia 1942
2. 3./Pz.Rgt. 35, 4 Pz. Div. Russia 1942
3. 4./Pz.Rgt. 31, 5 Pz. Div. Eastern Front 1942
4. 8./Pz.Rgt. 36, 14 Pz. Div. Eastern Front 1941
5. 3./Pz.Rgt. 21, 20th Pz. Div. Eastern Front 1943
6. Unidentified Unit, Kursk 1943
7. Pz.Gren. Div "Großdeutschland" Voronezh 1942
8. Major Szalimov's Battalion, Leningrad Front 1942
9. 4./Pz.Rgt. 5, 21 Pz.Div. Libya 1942
10. 8./Pz.Rgt.8, 15 Pz.Div. Libya 1942  

Construction
As usual, construction started at the lower hull. The first step is concerned with the assembly of the wheels and I decided to stick to them, just to get the second most tedious job of building a Panzer IV out of the way. Once assembled, they were set aside and I continue with the lower hull. The hull tub was mated with the rear panel and various small parts were assembled onto it, from the tow eye mounting to the final drive cover. As this is a 'Smart Kit' there are no PE parts, but there are plenty of small plastic parts which are small and need some care in handling. The suspension is fitted to the hull and the completed wheels were placed onto the model. They are not glued at this time however. Next came the most tedious part - assembling the tracks. However, by this time I am quite comfortable with Dragon's Magic Tracks and did not take too long a time as before. Once the cement has fully cured, the tracks and the wheels were removed and set aside.

I then continued with the hull, adding the glacis plate first. The upper hull was in the main, made up of six panels, of which detail parts were added to where appropriate and these include the vision blocks for the driver. The bow machine gun deserves a mention here, being made of six parts, ensuring great detail although it would be mostly hidden. The completed wall panels were then cemented to the upper hull plate, taking care of the alignment of the parts. The fenders were cemented first onto the lower hull and this was followed by the completed upper hull shell. Other details were then cemented onto the hull and the fenders but I leave the on-vehicle equipments off to facilitate painting. The headlight was fitted but like the tools, the clear part was also left off temporarily. At the same time I added a strip of plastic on the left of the hull to act as a bracket for jerry cans. Another bracket was made on top of the rear hull.

Work on the turret began with the assembly of the main gun. Dragon provide a fairly complete assembly, allowing the interior to look quite 'busy'. The turret also include the vision blocks as with the driver's position. They were duly assembled and fixed to the interior of the turret. The completed gun assembly was then affixed to the turret. Perhaps I should have dry-fit the turret face on the turret first to check its angle and then glue the gun to it at the desired angle. The angle which I actually fixed the gun is OK and within the range of the real stuff and with hindsight, perhaps the best (more on this later). Like the Panzer III Ausf. J I did before, the Panzer IV kit also include complete vision blocks for the commander's cupola (and cause problem to fit figures inside it). The turret hatch doors are left off as I was thinking of adding figures. Finally the storage box was assembled and cemented to the back of the turret.

Painting and Decaling
As mentioned before, Dragon includes 10 marking options for this kit and I was quite at a loss as to which colour scheme to pick. Anyway, looking at the models I have already completed, I found that I have only one panzer in North African markings, a Tamiya Tiger I. So without further ado, I chose an Afrika Korps Panzer IV. There are two of them however and at a toss of a coin, I chose 'Black 8' of the 15th Panzer Division. Afrika Korps panzers were originally painted Schwarzgrau and were repainted Gelbbraun as base colour. I can't remember the exact mixture but I used a mix of Tamiya XF-59 Desert Yellow and XF-64 Red Brown. It might not be accurate for purists but it looked good enough. I then add 'scratches' using XF-63 German grey, simulating the original paint exposed by scratched/peeled Gelbbraun. It started as just as a handful but end up with the ones you see in the photos!

Remembering that I wanted to pose the doors open, the interior was painted the ivory colour (Elfenbein) seen inside German tanks. I do not have such colour in my arsenal and decided to simply tint XF-2 Flat White with a bit of XF-60 Dark Yellow. The decals were then applied with no problems. I however replaced the kit's Afrika Korps' palm tree-and-swastika emblem with an old Tamiya spare decals in my stash. The reason is that the kit decals was made up of three parts while the old Tamiya decal is a one-piece affair, so the Tamiya one was easier to apply. Sometimes being politically incorrect does have its advantages!  

Finishing
The wheels and the painted tracks were permanently fixed to the model. Once that was done, the remaining loose parts were cemented.  In the meantime, I managed to buy Tank Models' Afrika Korps Tank Crew figures set. They certainly lived up to their billing (yes, they're expensive and costs almost as much as the model itself) being well-sculpted. The uniform for the commander and the (I believe) gunner was painted Desert Yellow while the loader's was painted light olive green. The pipings and armbands were from Tamiya's excellent WWII German Military Insignia decal set. The figures were duly placed on the open hatches. The loader and gunner figures had some problem fitting inside their hatches, so to help them fit, I amputated their legs at the ankles. Even so, I found that the figure sitting on the left-hand turret hatch sat rather awkwardly with the moulded-on crease on his thigh did not match up with the hatch sill.  I eventually swapped the figures (although now both of them have rather awkward arm poses!). While the figure of the commander includes a pair of headphones, I decided to leave it off.

A trio of jerry cans from Academy's Allied and German Tank Supplies Set was placed on the bracket on the left side of the hull. For the bracket on the rear of the hull, I added jerry cans from AFV Club - 14 of them! Most of the cans were painted XF-63 German Grey while the remainder were painted XF-60 Dark Yellow. At one point I actually thought of substituting a number of them with other accessories but since there are 12 of Heer fuel cans and 12 water cans and the remainder of my German AFV models do not need that many cans (or to be build as SS vehicles), I decided to load up the rear hull entirely with jerry cans. The leftover track links was assembled, formed to shape and hanged between the front towing hooks with the space between the spare tracks and the hull filled with the spare road wheels. There is still quite a number of leftover tracks from this kit plus from my earlier Panzer III Ausf. J build (they are the same 40-cm wide track common to Panzers III and IV) so I was thinking of adding a length of the track to be draped on the turret roof. But with the model already looking overloaded, I decided not to.

Conclusion
What else can I say? Another great kit from Dragon. The parts are well-moulded and have great fit while the 'Smart Kit' concept simplify matters (although not by much) without sacrificing detail. The Magic Track track links also reduces the amount of work when dealing with separate link tracks. Despite being not workable, the kit tracks lend itself in building tanks which have sags in the tracks. 

Sunday 1 March 2015

Cromwell: New Model Cruiser


Historical Background
In mid-1940, the British Army was considering a follow-on cruiser tank design. A specification, including the use of the Ordnance QF 6-pounder gun was drawn up by the Directorate of Tanks and Transport. This led to General Staff specifications A23 for a Churchill Tank-based cruiser tank from Vauxhall, A24 from Nuffield Mechanisation and Aero Ltd based on the Crusader tank and A25 from Birmingham Railway Carriage and Wagon Company (BRCW), also based on the Crusader. At a Tank Board meeting in January 1941, it was decided that as the new tank needed to be in production by early 1942, it should be based on an existing design to avoid the need for prototypes. Six of the Nuffield design was ordered. The Nuffield design was based on the 410 hp Liberty aero engine with an expected top speed of 24 mph. Armour would be 63-70 mm at the front. The schedule had slipped in the meantime and the first tank only began trials in March 1942, with the tank judged unsatisfactory. At the same time, Rolls-Royce's design team was working on a tank engine based on the famous Merlin aero engine. Working with Leyland, they produced the Meteor, which gave a higher power output while having the same size as the Liberty. The lead designer met with BRCW and produced a prototype powered by the Meteor. However Leyland expressed doubts about the Meteor and wanted to manufacture the Liberty instead. By now, the General Staff requirement was changed to A24 Cromwell I from Nuffield, A27L ('Liberty') Cromwell II from Leyland and A27M ('Meteor') Cromwell III from BRCW.

In November 1942, to avoid confusion, A24 was renamed 'Cavalier', A27L 'Centaur' and A27L dropped the 'III' suffix, becoming the Cromwell. The Cavalier was not selected for mass production and those built were used in training and auxiliary roles. The A27 was to start production in November 1942. Rolls-Royce were unable to build any Meteors as they were fully committed in building Merlin, and manufacture was turned over to the Rover Car Company. Since Rover would need time to set up the production lines for the Meteor, the Liberty-engined Centaurs were built first. In January 1943, sufficient Meteor engines were available and production switched to the Cromwell. The Centaur was designed so that it can be fitted with Meteor engine, so although many entered service as they are, others were converted into Cromwells, simply by changing the engine.

The Cromwell used the Christie suspension as with the previous cruisers, with five road wheels per side and with no track return rollers. It has a lower profile than the Sherman although protection level was roughly the same. The Cromwell however was made of flat surfaces which maximises the risk of armour penetration by the more powerful German tank guns, this was not helped by riveted construction used in the early batches of the tank, The armour plate was bolted onto the chassis, with large bosses on the outside on the turret. The first three variants of the Cromwell was armed with the Ordnance QF 6-pounder gun but this was replaced in the Cromwell IV by a Ordnance QF 75 mm gun, essentially the 6-pounder redesigned to fire the US M3 75 mm gun ammunition. The new gun gave better capability against soft targets than the 6-pounder (or for that matter, the 17-pounder) but performance against armour was poor, penetrating only 68 mm of RHA at 500 yards at a 30 degree angle of attack. Two 7.92 mm Besa machine guns formed the secondary armament. One is mounted co-axially with the main gun and another in a gimbal mount on the hull front. A 2-in 'bombthrower' was mounted on the top of the turret.

The Cromwell first saw action in Normandy where it formed the bulk of the 7th Armoured Division (The Desert Rats), specifically the 22nd Armoured Brigade. Because of its low silhouette, it was also used in the armoured reconnaissance regiments of the 11th Armoured Division (2nd Northamptonshire Yeomanry) and the Guards Armoured Division (2nd Battalion of the Welsh Guards). Later on the Cromwell equipped the 10th Mounted Rifle Regiment of the Polish 1st Armoured Division and the three regiments of the 1st (Czechoslovak) Independent Armoured Brigade. The bocage country of Normandy restricted the Cromwell's best asset, its mobility but following the breakout, the Cromwell came on its own. Despite its inferiority in firepower, the tank was generally well-liked by its crews, being reliable and having good peformance, allowing it to outflank and outmaneuver (once in open country) the more ponderous Tiger and Panther tanks. The Cromwell was also used by Portugal, Israel, Finland and Greece post-war.

There were eight variants of the Cromwell with Marks VI and VIII being close-support version, armed with a 95-mm howitzer. The Cromwell was also built with five types of hull with alphabetical designations A to F. The difference was related to the hull crew hatches and engine door arrangement. The Cromwell chassis was also used for other vehicles, most notably the A30 Challenger and the post-war A30 Avenger and FV 4101 Charioteer tanks/self-propelled guns. A total of 3,066 Cromwells were built.

The Kit
Tamiya's Military Miniatures Series Kit No.35221 was released in 1997 and I believe was one of the most welcomed kit at that time. The kit comprises of 165 parts spread over five dark green sprues, one clear sprue, a lower hull tub, two lengths of vinyl tracks, a length of nylon string, nylon mesh, the ubiquitous polycaps plus a decal sheet. The parts are well moulded although to keep up with the Tamiya philosophy, some parts are simplified (plus, after all, this was a 1990s kit) to ease the building process. A commander's figure is included and the clear parts include extras such as bottles and goggles.

Decals provide markings for four vehicles:
1. C Squadron, 5th Royal Tank Regiment, 22nd Armoured Brigade, 7th Armoured Division
2. B Squadron, 2nd Battalion, Welsh Guards Armoured Reconnaissance Regiment, Guards Armoured Division
3. Armoured Observation Post Tank, 5th Royal House* Artillery, 7th Armoured Division (*it should be 'Horse')
4. 'Hela', Division HQ Squadron, 1st Polish Armoured Division
5. 'Taureg II', Division HQ, 11th Armoured Division

Construction
The building steps in the instruction sheet are slightly out of the usual sequence by having you assemble the rear panel first. There wasn't any problem here although I can't help but note the well-executed bolt details. The next construction was the wheels which I skipped, although the wheels were cut off the sprue. The suspension arms were then cemented to the lower hull, together with the front and rear panels. The outer panels were then cemented and the first option was encountered here. The option was that modelers can chose whether to use the external or internal track tensioning system. After pausing for thought, I added parts C26 and C27. Luckily my guess was right, as the external system was used on Cromwells while the internal system was used on Centaurs - the instructions didn't say which is which.

Afterwards I moved on to the upper hull. The upper hull parts were moulded as one piece, which also include the fenders. While normally I would have to fit the wheels and tracks before adding the upper hull, the Cromwell's usage of the Christie suspension plus the fairly generous space between the fender and the top of the road wheels (plus no return rollers) meant that I don't have to. The upper and lower hull were attached together without any problems. The hull machine gun was assembled and placed in position on the front panel. This was followed by the engine deck side panels and all the hatches, which I cemented in the closed position. The storage boxes were assembled and fixed in their positions. The mesh was cut and placed inside its frame. Tamiya do have a PE set for the grilles, but this being  the Tamiya of the 1990s, was only available separately. Soon after, I decided to add the Normandy cowl. Even though the instructions mentioned that the mesh should not be attached if the cowl is used, I left it as it was. The mudguards were then cemented but I left the outer panels off at this time.

Finally, it was time to assemble the turret. The gun barrel is a two-part affair and a bit of care is needed in the assembly to avoid visible seam lines. There is also a fairly complete breech assembly. The gun was assembled and mounted onto the front plate of the turret. The turret shell was assembled and mimicking the real tank, the turret armour plates were separate pieces. Once the basic turret was completed, its fittings were then cemented. The commander's hatch was posed open as I intended to use the figure.

Painting and Decaling
For painting, Tamiya suggested that the Cromwell be painted a mixture of 1 part XF-1 Flat Black, 4 parts XF-26 Deep Green and 4 parts XF-52 Dark Earth.  However, using research done by Mark Starmer, I painted the Cromwell SCC15 Olive Drab, using Mr. Starmer's suggestion of 5 parts XF-61 Dark Green, 2 parts XF-62 Olive Drab and 2 parts XF-3 Flat Yellow. This mixture is quite dark and it was suggested that a bit more Flat Yellow can be added. I however think I added too much! Once the painting was done, it was time tho choose the markings. After discounting the HQ and OP tanks (as they really weren't in the thick of combat and usually armed with dummy guns), I was left with the Desert Rat and the Welsh Guards options. I almost unhesitatingly chose the latter as they are more 'colourful' with four markings on the lower hull (bridge classification, arms of service, unit designator and divisional insignia). The decals are old, not a problem really, but I neglected to put them back in their plastic packaging, causing the unit designator marking on the right side of the hull and the small star at the back of the turret to disintegrate. I managed to rescue them mostly, and then did an unconvincing repair job using paints. The worst case scenario however was the air ID star on the turret roof. While it still maintained its integrity, its location across the ventilator caused trouble. I used a lot of Mr Mark Softer and also had to retouch it using white paint. 

Finishing
I wanted to try something new with this kit and decided to add camouflage nets (as befits this particular tank's reconnaissance role). While I should use ready-made scale camo nets, I decided to just made them using medical gauze. The gauze were painted first - yes, a messy affair- with olive drab and khaki. The hessian tape strips found on British camo nets were made using Tamiya tapes, also painted OD and khaki. A length of copper wire was tied between the turret's lifting eyes to act as hangers for the net. The gauze was cut into roughly 1 cm square pieces and were hung on the turret and was kept in place using a water-white glue mixture. The net were hung in layers although it looked matted together, without volume. Another group of camo net was placed on the gun barrel. The camo net looks OK from 3 feet away but looked horrendous close-up!

I scratch-build a bracket on the left-hand side fender for fuel can storage using plastic strips. The cans themselves came from Tamiya's Allied Vehicle Accessories Set. On the rear deck I placed 6-pounder ammo boxes and 2-gallons flimsies from Bronco, a generic box from Academy and a rolled tarp, barracks and duffel bags from Tamiya. The jerricans and the ammo boxes were painted in SCC15 Olive Drab and SCC2 Brown while the flimsies were painted white. The bags were painted XF-57 Buff and the tarp was painted XF-49 Khaki. They were tied-up (sort-of) using a thread from my wife's sewing kit. And yes, in real life, with the way I tie them up, they would soon come crashing down when the tank started to move. Weathering was limited to application of Tamiya Weathering Stick and Mig Productions' European Dust pigments. The tank commander uniform was painted a mix of Khaki and Flat Earth instead of Dark Green as per the instructions. Lengths of copper wire was cut, painted Flat Black and placed on the model as radio aerials.

Conclusion
Another fine kit from Tamiya and one of the then-new generation of their kits which upped kit-moulding technology in the 1990s. The fit is good and the kit didn't give any trouble during construction. It's introduction partly filled (at that time) the need for British subjects in a genre awash with panzers and Shermans. The rather low parts count aided in a relatively quick construction, allowing modellers to concentrate their effort elsewhere. It's a relatively old kit which can still stand up to its more recent rivals.