Saturday, 8 February 2014

Wild Ponies Of The Eighth


Historical Background
In 1938 with the clouds of war gathering on the horizon, the British government set up the so-called British Purchasing Commission in the United States where it arranged the production and purchase of armaments from North American weapons manufacturers. Sir Henry Self, the head of Commission approached North American Aviation with the intention of asking whether they could build Curtiss' P-40 under licence (Curtiss-Wright's own factory was running at full capacity, causing a backlog of delivery). James H. 'Dutch' Kindelberger, NAA's President however offered a new, better aircraft than the P-40 which could get in the air sooner than establishing a new P-40 production line. The British then stipulated a fighter armed with four 7.7mm machine guns, an Allison V-1710 inline engine, a unit cost of no more than $40,000 and delivery of the first production aircraft by January 1941.  In March 1940 an order for 320 aircraft was made.

The result was the NA-73X. It was of fairly conventional design but included a number of new features such as laminar-flow wings which allow high speeds with low drag. It also incorporated a radiator design which took advantage of the so-called Meredith Effect, in which the heated air exited the radiator with a slight jet thrust. The prototype was rolled out in September 1940 and first flew on 26 October 1940 - a period of less than 150 days after the order had been taken. Two of the aircraft from the first order were sent to the USAAF as the XP-51 for evaluation. The first USAAC order for the P-51 was placed on 7 July 1940. The NA-73 was given the name Mustang Mk I by the British and entered service with No. 26 Squadron in February 1942. The Mustang, with its excellent low-altitude performance and long range, made good tactical reconnaissance and ground attack aircraft, although thought to be an inferior air-superiority fighter because of its poor performance above 15,000 feet.

In April 1942, the Air Fighting Development Unit of the RAF, with the help from Rolls-Royce equipped a Mustang I with the Merlin 61 engine. Known as Mustang Mk X, the result was remarkable : the Merlin engine gave the Mustang speeds reaching 433 mph at 22,000 feet. The Army also tested the P-51A with Packard-built Merlin engines with the designation XP-51B, which first flew on 30 November 1942. Flight tests confirmed the potential of the new fighter. Usage of 75 gallon drop tanks enabled the P-51B to be used as bomber escort, with a range of 750 miles. The range was further extended when the Mustang was fitted with a 85 gallon fuel tank behind the pilot's seat. When full however, the CG of the Mustang moved dangerously aft. As a result maneuvers were limited until the tank was down to 25 gallons and the external tanks dropped. Even so, the Mustang (P-51B to P-51D/K, but especially the early D) still suffered from snap-roll under the right (or wrong) circumstances. To cure this problem a modification kit in the shape of a dorsal fin was introduced. The P-51Bs started to arrive at the ETO in August 1943 and they were also deployed in the CBI theatre. To improve the view to the rear, the bubbletop canopy was introduced in the P-51D. The D version also featured redesigned wings and gun arrangement. The P-51D (and the similar, Dallas factory-built P-51K) arrived at the ETO in mid-1944 and became the primary US fighter in the theatre.

The P-51 was the solution to the Eighth Air Force's escort fighter problem. It was clearly superior against the Luftwaffe's twin-engined Zerstorers. The Fw 190, while highly capable at low- to medium-altitudes, were no match against the Mustangs at the level B-17s are normally flying. The Bf 109s were more less on par with the P-51 at high altitudes but were increasingly hampered by the increase in armament; hence weight (in order to down the bombers). The Mustang, with its lighter armament, designed for anti-fighter combat, allowed them to face the Luftwaffe's fighters with relative ease. Furthermore, with independent fighter sweeps, rather than close escort, the Mustangs were able to intercept the Luftwaffe's Gefechtsverband formations as they assemble, negating the threat to the bombers. Such tactics, together with the numerical superiority of the USAAF, the superlative performance of the Mustang and the better pilot proficency allowed the Allies to cripple the Luftwaffe. Reichmarschall Hermann Goring was quoted  as saying "when I saw Mustangs over Berlin, I know the jig was up."

The Kit
The kit I used in this build was originally released in 1991 as kit SP58. In 1997, Hasegawa re-released that kit as SL3 with a new set of decals. The kit consists of parts distributed among four grey and one clear sprues. The grey parts contain all the airframe and stores parts which include the 75 US gallon metal drop tanks, 108 US gallon pressed paper drop tanks, 500-lb bombs, 5-inch HVARs and 4.5-inch bazooka-type rocket launchers. Both cuffed Hamilton Standard and Aeroproducts prop blades were included in the kit. The clear parts contain all the 'glasses' for the IFF and landing lights, reflector gunsight and the canopies, both standard and Dallas-type. As mentioned before, early 'D' Mustangs were not fitted with the dorsal fin. To make an early D from this kit, Hasegawa has you cut the moulded-on dorsal fin. To help the modeler, Hasegawa moulded the outline of a fillet-less tail on the inside of the fuselage halves.  The original decal sheet was replaced with what Hasegawa described as 'Hi-Tech Decals'. Only one marking was available, that of 'Passion Wagon' of 362nd FS/ 357th FG. It was wrongly described as an aircraft from 336FS/ 4th FG which was actually a carryover from the original instructions (the marking info for Passion Wagon was swapped with the other option). There were no stencil decals save for the aircraft data info and fueling markings on the wings

I bought this kit to replace my Tamiya Mustang which has suffered from irrepairable damage as a result of a collision with the display cabinet's glass doors. The older Mustang is still on my workbench however and the opportunity was taken to compare the two kits. Offhand, the Tamiya kit has better, crisper surface detail than the Hasegawa one. Until construction starts, the Tamiya kit also held the upper hand for fit and they definitely trounced the Hasegawa kit by having the flaps in the lowered position (I found out that the Mustang's flaps are always in the down position whenever the engine is switched off and hydraulic pressure is relieved.). I am however, have no confidence in my own ability to make a good cut, re-filling and re-shaping the tail and make new panel lines. So the fillet remained in place and I decided to use the leftover decals from the Tamiya kit. 

Construction
The cockpit parts were first painted on the sprue. I used Tamiya's recipe for interior green which was two parts XF-3 Flat Yellow and one part XF-5 Flat Green. The moulded-on seat belt was painted XF-62 Olive Drab whilst other details were painted in either flat black, red and silver. As for the cockpit floor, Hasegawa has you paint them in red brown, for which I use Tamiya XF-64. The dashboard has raised detail and I decided to use the kit decals. The cockpit parts, which consists of the cockpit floor/radio rack/fuselage fuel tank, side panels, seat, instrument panel and gunsight were then mated together and set aside. I then painted the inside of the fuselage halves Tamiya XF-4 Yellow Green and the (simplified) radiator and the tailwheel mount silver. The completed cockpit, radiator and the tailwheel mount were then glued to one side of the fuselage. There is a slight fit issue with the tailwheel mount; I simply enlarge the placement bracket using my craft knife. The parts which formed the rear of the radiator (just two of them) were then glued to the rear of the cockpit assembly. Finally the exhaust stacks were glued to the fuselage sides. I chose the shrouded exhaust as the aircraft I'm modeling was so equipped. The fuselage halves were then glued together. There was also fit issues here especially on the rear decking but it was easily overcome with a little bit of putty. I then attached the radiator intake cowling, the oil cooler flap and the radiator flap on the underside of the fuselage. The fit was quite bad here, requiring the sanding of the cowling to fit with the rest of the structure and some filling of the gaps between the flaps and fuselage.

Next, the wings. As stated before, Hasegawa's Mustang has its flaps in the up position whereas it would be more accurate to have them in the down position. I was thinking of using the flaps from my Tamiya kit and initial measurements show that the Tamiya flaps can be grafted onto the Hasegawa kit. However, I decided not to after soberly thinking that my 'surgery' skills were not as good as I thought! So, the kit flaps stay in place. Before gluing the wing halves together, I drilled the holes for the underwing pylons for the fuel tanks. The instructions also show the option to drill holes for the rocket pylons (both ZELL and the bazooka-type) but I chose not to as I want to portray the Mustang in its air-superiority role. Furthermore, the ZELL rocket launchers were not used in the ETO. Hasegawa also had the gun muzzles as separate parts; these were glued to the lower half of the wing. When the halves were mated together, there is a slight, irregular gap in the leading edge - most probably because of my fault rather than the kit design. There were also gaps between the gun barrels and the upper part of the wings. The fit between the wings and the fuselage however, was flawless. The horizontal statibilizers were then attached to the fuselage without any problems. The turbocharger intake however did not fit properly like the radiator intake cowl and had to be sanded. Next, the bits inside the canopy were glued onto the latter. The canopy were then masked off for painting.

Painting and Decaling
Instead of finishing the model with the kit markings, I decided to raid my spares box and came up with the spares decals from the Tamiya kit. I decided to build 'Petie 2nd', the P-51D of Lt. Col. John C. Meyer, Deputy CO of the 352nd Fighter Group, affectionately known as 'The Blue Bastards of Bodney'. He was the fourth highest-scoring American ace in Europe with 24 kills. Lt. Col. Meyer was particularly known for his role in what is known as 'The Battle of Y-29' during Operation Bodenplatte. His foresight in having the 487th Squadron of the 352nd Fighter Group pre-flighted and ready to take-off on New Year's Day 1945 prevented disaster when Jagdgeschwader 11 attacked the airfield (Codenamed Y-29). Meyer led the take-off under fire and even managed to shot down a Fw 190 while his landing gear was still in the down position.

Before painting the entire model with Tamiya AS-12 Bare Metal Silver, I first painted the canopy frame Flat Black and the wheel wells XF-4 Yellow Green. The wheel wells and cockpit transparencies were then masked and two layers of AS-12 were sprayed onto the model. Once dry, it's time to paint the distinctive blue nose of the 352nd FG. I used the painting instructions from Tamiya's 1/32 P-51 kit (which have Petie 2nd as one of the painting options). In the original 1/48 Tamiya kit, the instructions have you mix XF-8 Flat Blue and X-8 (Gloss) Blue in equal measure. I believe this darker blue was only appropriate for the later time period i.e when the 352nd had moved into continental airfields. The 1/32 kit revised the blue as 3 parts X-14 Sky Blue and 1 part XF-8 Flat Blue. To that mix, I added 20% XF-2 Flat White for scale effect. The tyres were painted XF-69 NATO Black and the the rest of the landing gear components were painted silver. Small detail parts such as the wingtip and IFF lights were also painted at this time.

Now it's time for the decals. The plane-specific decals came from my spares box. Despite being at least 10 years old, they were still good albeit with some yellowing. While they looked thinner than the usual Tamiya decals, they remain rather unresponsive to softening solutions. The general-type decals such as for the national insignia and some stencils came from the kit. At first I thought they were dry-transfer decals, but after reading the instructions, they were some sort of a cross-breed of regular water-slide decals and dry transfer ones. You still need to slightly wet the decal in order to separate it from the backing paper. Anyway they are thick and totally impervious to setting solutions - I had to use a burnishing tool to help the decals to conform to panel lines.  The national insignia decals also suffered from some minor cracking. I also somehow placed the fuselage insignia some 1-2mm further forward and I have to modify the 'HO' decals to fit.

Finishing
I started by assembling the main landing gear parts. I goofed up when I put on the landing gear covers backwards! Luckily the glue hasn't properly set and I managed to pry them loose and put them in their actual positions. This was followed by the inner doors and the tailwheel. Next, the prop assembly. The prop blades were painted X-18 Semi-Gloss Black and I used leftover decals from my P-47 for the Hamilton Standard logo and stencils. The method of assembly for Hasegawa's 1/48 Mustangs have you assemble the spinner parts and then place it on its location. The keyed prop blades can then be inserted into their places in the spinner so that the inner ends of the prop blades are sandwiched between the 'stoppers' and the fuselage, preventing the prop assembly from slipping out. However, I broke the cardinal rule of scale modeling here by not following the instructions - I assembled the prop separately from the fuselage. This of course resulted in the inner half getting in the way of the stoppers. Instead of simply partly pulling the prop blades up, insert the whole assembly onto the nose and pushing back the prop blades back, I cut off all the inner prop blade ends and inserted them back into place. This negates the function of the stoppers and I have to glue the prop assembly onto the fuselage...hmphhh!

For underwing stores, I chose to fit my model with the 108 gallon paper tanks. Instead of using the kit tanks, I used the ones provided in the Tamiya P-47 kit. The Tamiya tanks fit the Hasegawa kit with just a little cutting to the parts which connects the tank to the pylon. Also, instead of painting the tanks natural metal, I painted them Neutral Grey using Tamiya XF-53. The radio aerial and air data probe were the last parts attached to the model. Tamiya Semi-Gloss Clear were then sprayed onto the model and was followed by a spray of Flat Clear for the nose area. The masks were then removed to complete the build.

Conclusion
Hasegawa has always been renowned as one of the leaders of the plastic model kit industry. Their Mustang is one of the proof of that. Although somewhat eclipsed by the Tamiya offering, the Hasegawa Mustang can still hold its own. However their decal in this version left something to be desired. 

Monday, 20 January 2014

Dora The Long-Nosed Killer


Historical Background
Focke Wulf's Fw 190A series fighter was seen to have deficient high-altitude performance. This is because the BMW 801 engine which powered the Fw 190A series was originally developed for low altitude-flying cargo and bomber aircraft, which do not need superchargers for high-altitude performance. Their short wings were also overloaded at high altitude, degrading maneuverability. This was in contrast with the Bf 109, with its liquid-cooled, supercharged DB 601 engine which allowed it to perform well at altitudes in excess of 20,000 feet. At first, the Fw 190's deficiency was of no great concern as combat usually took place at medium altitude where the Fw 190 still have ample performance. However with the arrival of American high-altitude bombers, there was a pressing need for high-altitude performance. At first this was achieved by using GM-1 nitrous oxide boost. However, the system can only give extra performance for short endurance only.

To address the altitude problem, which was recognised even before the Fw 190 entered service, Kurt Tank proposed three solutions. The first, Fw 190B, was to be powered by a turbocharged BMW 801; Fw 190C was to be powered by a turbocharged Daimler Benz DB 603 and Fw 190D with a supercharged Junkers Jumo 213. The aircraft would also be equipped with a pressurised cockpit. The B variant was a dead end with only just one airframe completed. The C model require extensive change to the airframe. The longer engine caused the tail to be lengthened to restore the centre of gravity. The turbocharger air intake and intercooler were grouped in a pouch-like fairing underneath fuselage (akin to the P-51 Mustang) causing the C models to be nicknamed Kanguru (Kangaroo). 

The D model, nicknamed Langnasen Dora (Long-nosed Dora) had the radial powerplant of the A series replaced with an inline engine, the Junkers Jumo 213. The new engine generated 1,726hp and could produce 2,071hp with MW50 injection and can reach 426mph at 21,650 feet. Like the C series, the D series was also lengthened to 10.192 meters long. Since the engine is now liquid-cooled, more components had to be taken into consideration. To simplify design and to keep it aerodynamic, Tank chose to use annular radiator, making the engine installation similar to Junkers-engined Ju-88. Early batches of the Dora were equipped with standard canopies but later versions were equipped with blown canopies, with the associated redesign of the pilot armour plate. Armament was reduced, as compared with the A series. The Doras were armed with two MG 131 13mm machine guns in the fuselage and two 20mm MG 151/20 in the wing roots. The Dora made an effective fighter, and when flown by the Experten, was the equal of the Allied fighters such as the Mustang and late-mark Spitfires. 

The Dora Nine entered service in September 1944 with III./JG 54 'Grunherz'. Despite the better performance, the new fighter initially received negative comments and was not helped by Tank himself who pronounced that the Doras were just a stop-gap measure, pending the introduction of the definitive Ta 152. Some Fw 190Ds were used to protect Me 262 airfields from marauding Allied fighters, they were organised into Platzicherungstaffel (air defence squadron). Jagdverband 44's Platzicherungstaffel had their bellies painted in red and white stripes to identify them as friendly to the airfield Flak crews. This in turn gained themselves a new nickname : Papagein staffel (parrot squadron)! Such practice however wasted the Doras' high altitude performance. Despite the higher performance figures, the sheer weight of Allied air power, together with the dwindling number of Expertens and the fuel situation, the Doras cannot influence the air war late in World War 2. A total of 1,805 D-9s were built, together with small numbers of D-11 and D-13. 

The Kit
Tamiya's kit of the Dora-Nine was their third Fw 190 after the F-8 and A-3. The kit was first released in 1995 and features all of Tamiya's hallmarks - good moulding, crisp detail and panel lines and ease of assembly. Despite all the good points, the kit suffer from a number of shortcomings. As the mould for the Dora Nine share many of the universal parts with the A- and F-variant moulds, they suffer from short landing legs and undersized tyres. The Dora Nine added further shortcomings such as fully-enclosed wheel well (the original has the front part open, exposing the rear part of the engine), misshapen fuselage gun covers, prop spinner and prop blades and single underfuselage ammo chute. The last was caused by the fact that Tamiya used the Dora-Nine at the US Air Force Museum, Dayton, Ohio as their starting point. The AFM example has the D-13 wing grafted onto the D-9 airframe (the D-13 was equipped with just a single hub-mounted MG 151/20, hence just one cartridge ejection chute).

Decals were provided for three aircraft : 4./JG 301 (RLM75/83/76), Stab./JG 4 (RLM75/83/76) and 10./JG 54 (82/76/81). The decals are typical Tamiya: well printed but rather thick.

Construction   
Construction, as usual, started with the cockpit. The cockpit parts are virtually the same with the previous Tamiya Wurgers, but since the Dora was one of the earlier releases, there were no decals for the instrument panel and the seat belt. The cockpit, and sidewall colour of RLM 66 Schwarzgrau was painted using Tamiya XF-63 German Grey with details painted X-18 Semi-Gloss Black, XF-16 Flat Aluminium and Khaki (I use Gunze acrylic) where appropriate. The instrument panel were then dry brushed white to pop-up the details. The inside of the fuselage halves were then painted RLM 02 before being mated together. The completed cockpit tub was then inserted into its place

Next up was the wing assembly. The wheel well parts were painted Tamiya XF-22 RLM Grey while still on the sprues. Upon inspection, I found out that Tamiya has tweaked out the wing bottom so that there are now two recesses for the fuselage ammo cartridge chute. The fully enclosed wheel well is still here however. The wing top and bottom were then mated together, after which I realised that I forgot to drill the holes for the ETC 504 rack! The wing was then mated to the fuselage, along with the horizontal stabilizers and the radiator and gun cowls.

Painting and Decaling
As stated before, Tamiya provided three marking options. I was thinking of the first option (4./JG 301 - Blue 15) as the 301's RVD band of red and yellow looked more attractive than JG 4's (<||) black/white/black band or 10./JG 54's (Black 12) blander colour of RLM82 Lichtgrun and RLM76 Lichtblau with no band whatsoever. However, while browsing the internet, I came across the story of 'Black 12'. Focke Wulf Fw 190D-9 Werknummer 120079 was the mount of Leutnant Theo Nibel for the ill-fated Operation Bodenplatte - the mass air attack by the Jagdwaffe against Allied airfields in Belgium, southern Holland and northern France on 1 January 1945. The remnants of III./JG 54, together with I/JG 26 were tasked with attacking the airfield at Grimbergen, Belgium. Arriving at the target, Leutnant Nibel who flew in the second schwarm (flight) realised that the airfield is inactive, which was marked by a large white cross at the end of the runway. The airfield was attacked anyway as there were a few aircraft on the field. The RAF Regiment unit stationed there put up a fight, managing to shoot down six of the attackers. While turning in for a third strafing run, Leutnant Nibel felt a hit that shook his aircraft. The engine temperature shot up and the propeller slowed down. Too low to bail out, he crash-landed Black 12 next to the runway. His canopy was jammed in the crash but the British soldiers simply smashed the glass and took him prisoner. Black 12 became the first intact Dora Nine to fall into Allied hands. Despite the AA fire put up by the defenders, Black 12 was not shot down but rather a victim of a birdstrike when it flew through a flock of partridges!

Before painting, I masked off the canopy and windscreen, re-using the masks from my previous build as Black 12 was one of the early batches of Fw 190D-9s, using the original 'standard' canopy. As for Black 12's colour, there were various interpretations, with the only constant colour being RLM 76 for the lower fuselage. Tamiya's instruction has it in RLM82/76 with RLM 82 mottling on the tail. A side profile I saw in a magazine has the upper colours in dark green (RLM83 Hellgrun?) with RLM 04 rudder and undernose panel. Yet some modelers paint the upper fuselage RLM 75/83. The upper wing colours in Tamiya's instructions were RLM81/82 whilst others show them as 75/83. I eventually elected to paint Black 12 with RLM 75/83 for the upper fuselage, RLM 81/82 for the upper wings and horizontal tails and RLM 04 for the rudder and undernose panel, including the lower part of the radiator cowling. The mottling was done to my 'three-feet trick' standard. Afterwards, it was time for the decals. Again, they are of typical Tamiya quality - rather thick and not really responsive to decal setting solutions.

Finishing  
The still loose parts can now be attached onto the model. As I mentioned in my Fw 190A-8/R-2 build, Tamiya's Dora also suffer from undersized main landing gears. I tried to 'cheat' by gluing the landing gears at a different angle, but it looked rather ridiculous, so I glued them as they were. The drop tank was then glued in place. Once the gear had fully set, I attached the most vulnerable parts such as the pitot tube, loop aerial, and the FuG 16ZY radio aerial. The prop spinner was painted Tamiya X-18 Semi-Gloss Black and the spiral decal applied. The prop blades were painted Tamiya XF-27 Black Green and the prop assembly was then pushed into place. All that remained was some weathering. I started with a sludge wash using watercolours. I also added exhaust stains on the fuselage sides using Tamiya Weathering Master 'Soot'. This time however, I did not add much weathering to the the drop tank, just the basic wash. Finally, a layer of Tamiya TS-79 Flat Clear was sprayed onto the model. The masks were then peeled off, completing the build.

Conclusion
The Fw 190D-9 is everything one can expect from Tamiya. It was well-engineered and easy to build. The issues with the landing gears, fuselage gun cowling and the prop/spinner are fairly major especially to those who are afflicted with Advanced Modelers' Syndrome but can be disregarded by the casual modelers like yours truly. Having said that, it still looks good for an OOB build.

Monday, 13 January 2014

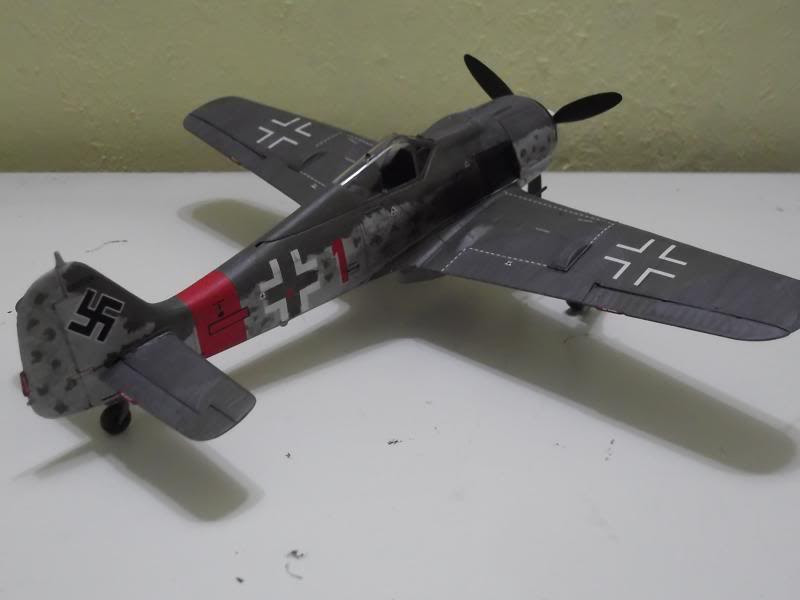
Battering Ram of the RVD


Historical Background
In 1937, the Reichluftfahrtministerium (RLM) issued a request for proposals from the German aviation industry for a new fighter aircraft to serve alongside the Messerschmitt Bf 109. Kurt Tank, Focke-Wulf's chief engineer responded with a number of designs. However, only a design featuring an air-cooled, 14-cylinder BMW 139 radial got the RLM's attention. Use of radial engines for a fighter was rare in Europe at that time as it was believed the wide radial engines would create a higher drag than inline engines, degrading performance (the relative failure of the Italian fighters such as the G.50, MC200 and Re.2000 seemed to support this belief). However, Tank, having seen the successful use of radials in US Navy fighters, decided that it wasn't so and felt that a properly designed installation would minimise the drag.

Eventually, the first prototype, Fw 190 V1 flew on 1 June 1939. It soon exhibited excellent handling qualities and speed. At the same time, BMW was testing a larger engine, the BMW 801, which the RLM persuaded Tank to install it in the Fw 190. Whilst of the same diameter as the BMW 132, the 801 was heavier and longer. This resulted in a redesign of the airframe for Prototype V5 which first flew in Spring 1940. After further redesign, 28 the pre-production Fw 190A-0 was ordered in November 1940. Erprobungsstaffel 190 was formed in March 1941 to test, help iron out remaining bugs and approve the Fw 190 before it is accepted for full service in the Luftwaffe. In June 1941, the first production model, Fw 190A-1 entered service, equipping II./JG26. The aircraft was armed with four 7.92mm MG17 machine guns (2 in fuselage, 2 in wing roots) and two wing-mounted 20mm MG FF/M cannons.

The Fw 190 was developed continuously during the war; for ground attack, the A series was developed into the F and G variants whilst the quest for better high-altitude performance led to the re-engined D series. As for the A series itself, production of the A-8 variant was started in February 1944. This variant was powered by the standard BMW 801 D-2 engine or the BMW 801Q. Armour for the front cowling was increased from 6mm to 10mm. The A-8 also included the Erhöhte Notleistung emergency boost system, allowing power to be raised to 1,953hp for a short duration. The A-8 can also be fitted with a new wooden paddle-bladed propellers and, on some aircraft, with bulged canopy to improve the view to the rear. Standard armament was a pair of 13mm MG 131 machine guns in the fuselage and four 20mm MG 151 cannons ; two in the wing roots and another two in mid-wing mounts. There were also numerous Rüstsätze kits available for the A-8. The A-8 was the most numerous of all A series, with over 6,655 built between March 1944 to May 1945.

When introduced in August 1941, the Fw 190 (nicknamed Würger = shrike aka butcher bird) was superior in all respects except for turn radius to Spitfire Mk. V, the main variant of the British fighter at the time. This enabled the Germans to wrest air superiority from the RAF until the Spitfire Mk. IX entered service in July 1942. The Fw 190 soon form the backbone of the Jagdwaffe along with the Bf 109. They fought almost everywhere, from the Western Front to Russia. With the coming of Allied strategic bombing campaign, the Fw 190 also fought over Germany as part of the Reichsverteidigung (RVD = Defence Of the Reich). The USAAF's heavy bombers, especially the B-17s caused problems for the Luftwaffe. The bombers can absorb heavy punishment at the time when the German aircraft weapons were inadequate for bomber-destroying missions. The heavy defensive firepower of individual aircraft, together with the mutually supporting combat box formation made approach highly risky. Since the Fw 190 had interception missions as part of the design, it was considered ideal for further modifications for anti-bomber operations.

The new method for attacking the bombers was proposed by one  Major von Komatski, an associate of the General der Jagdfliger, Adolf Galland. He suggested that specially armoured fighters are to get as close as possible to the bombers before opening fire and, as a last resort, to ram the bombers. The A-6 version was first modified for this mission, using Rüstsatz (field conversion) kits. The most numerous Sturmböcke (battering ram) conversion was the A-8/R-2 which had the outer MG 151s replaced with the harder hitting 30mm MK 108 cannons, extra armour around the cockpit sides and thicker armoured windshield glass. The additional weapon and armour however reduced the Sturmböcke aircraft's performance so that they had to be escorted by Bf 109s and/or standard Fw 190s. A special unit, Sturmstaffel 1 was formed to test the viability of the tactic. Attached to JG 3 'Udet', the unit achieved success that it was expanded into a full Gruppe - Gruppe IV of JG 3. Soon II./JG 300 was converted into a Sturmgruppe along with II./JG 4. The Sturmgruppen's greatest success came on 7 July 1944 when IV/JG 3, escorted by two Gruppen of Bf 109s from JG 300 downed 28 B-24s attacking aircraft factories in Leipzig and synthetic oil plants. With the increasing effectiveness of USAAF fighter escorts, the heavy and awkward-handling sturmjagers' success began to decline with the lack of fuel becoming the last nail in their (indeed, the whole of the Luftwaffe) coffin.

The Kit
Tamiya's kit of the A-8/R-2 was their fourth Fw 190 in 1/48 scale (after F-8, A-3 and D-9). The kit came in four medium grey and one clear sprues, a small flexible plastic (vinyl?) sheet for the side armour plates, canopy painting mask and a decal sheet. The quality of the parts are typically Tamiya. In real life, the F-8 attack version was derived from the A-8; Tamiya's A-8 shared the same moulding with the earlier F-8. This was evident from the sprues holding ground attack ordnance and mounts. New sprues include bottom wing plates and the barrels for the MK 108 cannons and  wider chord prop used by some Sturmböcke aircraft. Clear parts includes both standard and blown canopies, plus armoured glass panel, also unique to some sturmbocke aircraft. In fact, with aftermarket decals, one can build the F-8 or the standard A-8 from this kit. Decals were provided for five aircraft:

1. Unteroffizier Willi Maximowitz IV./JG3, June 1944
2. Leutnant Klaus Bretschneider II./JG 300 October 1944
3. Hauptmann Wilhelm Moritz IV./JG 3 August 1944
4. Unteroffizier Matthaus Erdhardt II./JG 300 October 1944
5. Unteroffizier Ernst Schroeder II./ JG 300 November 1944

Construction
Before building commences, it should be noted that there are subtle differences between some of the marking options with regards to the side armour panels, armoured glass panels and armament. I settled for Option B, Leutnant Bretschneider's plane. Construction, as usual, started with the cockpit. The cockpit parts are virtually the same with the previous Tamiya Wurgers, the main difference was the inclusion of decals for the instrument panel and the seat belt. The seat belt should really be substituted with a PE aftermarket one (or having the seat replaced with a resin aftermarket with moulded-on seat belt) but I simply used the one provided in the kit. The cockpit, and sidewall colour of RLM 66 Schwarzgrau was painted using Tamiya XF-63 German Grey with details painted X-18 Semi-Gloss Black, XF-16 Flat Aluminium and Khaki ( I use Gunze acrylic) where appropriate.

The fuselage halves were then mated as per instructions. The applique armour plates were then attached to the outside of the cockpit. The armour parts were self-adhesive but not pre-cut so I had to carefully trim out the parts from their sheet. The exhaust stubs were then attached after they have been painted Burnt Iron. This was followed by assembling the engine parts which was then painted X-18 and Steel, followed by a dry-brushing of silver. The engine assembly was then glued to the fuselage and the cockpit slid into its place.

Next up was the wing assembly. The wheel well parts were painted Tamiya XF-22 RLM Grey while still on the sprues. Holes were the drilled in the bottom part of the wing to accommodate the ETC501 rack and at top of the wing halves to accommodate the cannon breech covers. The wing top and bottom were then mated together. Tamiya provided different underwing panels for the cartridge ejection chutes according to the aircraft modelled (Option 5 has a different panel) and these were attached accordingly. The cannon muzzles were however set aside until later. The wing was then mated to the fuselage, along with the horizontal stabilizers and the engine cowl. Finally before painting, I attach the fuselage gun covers, after cutting off the moulded gun barrels and adding fairings for the gun troughs. If doing the other options, one would leave the gun barrels as they were (Option 5) or just cutting off the gun muzzles (option 1). The canopy and windscreen were then masked off using the provided masks. They weren't pre-cut but easily done with sharp, preferably new blade.

Painting and Decaling
Mid-war Luftwaffe fighter planes were usually painted RLM 74 Graugrun and RLM 75 Grauviolett for upper camouflage and RLM 76 Lichtblau for the rest of the airframe. All colours were painted using Gunze Sangyo acrylics. However, when I apply the Graugrun, it didn't look right - it looked more brownish rather than greenish. I quickly consulted the internet and found out that Gunze's RLM 74 is 'wrong', so to speak. Fortunately, the same website (Plastic Surgery) suggested that Tamiya's XF-61 Dark Green when sufficiently lightened, made an adequate RLM 74. Now, the airplane I'm making the model of have mottles of RLM 74 and 75 on the sides and the tail, and there is only one way to paint them convincingly - by airbrush. I do not own one and how can I make the mottling? So, I try to create the illusion of mottling. First I thin down the respective paints until they resemble dirty thinner. It was then dabbed onto the model at the appropriate places. After it has dried I added a thicker paint solution. To my eyes they look like mottling with the thinner paint pretending to be oversprays. It won't pass muster at close-up but quite OK from 6 feet away! I also painted the underside of the nose RLM 04 Gelb using XF-3 Flat Yellow accented with some XF-7 Flat Red. It wasn't on the instructions but I painted it so after seeing some profiles and online builds.

The decals went on next. The reason I chose Lt. Bretschneider's plane was the nose (or rather, fuselage) art : 'Rauhbautz VII'. Rahbautz is German for 'tough guy' and I felt that it was appropriate for the aircraft (and the unit) that was expected to get close to the thirteen .50 cal machine guns of a B-17 in order to shoot it down, and were also also expected to ram their target should the need arise. They were of the usual Tamiya quality - good colour density and register although a bit thick. They went on well with a dash of Mr. Mark Softer.    

Finishing
The still lose parts can now be attached onto the model. I started by gluing the MK 108 muzzles into place and attaching the landing gears. Fit is good but online reviews mention that Tamiya's Wurgers all suffer from inadequate main landing gear length. This, coupled with undersized tyres resulted in a lowered stance as compared to the real aircraft. Afterwards, I attached the drop tank into place. Once the gear had fully set, I attached the most vulnerable parts such as the pitot tube, loop aerial, and the FuG 16ZY radio aerial. The prop spinner was sprayed Tamiya TS-27 Flat White and the spiral decal applied. The prop blades were painted Tamiya XF-27 Black Green and the prop assembly was then pushed into place.

All that remains was some weathering. I started with a sludge wash using watercolours. I also added exhaust stains on the fuselage sides using Tamiya Weathering Master 'Soot'. Although I believe it to be incorrect, (as it was a DROP tank) I added some fuel stains onto the drop tank using Tamiya X-19 Smoke. Finally, a layer of Tamiya TS-79 Flat Clear was sprayed onto the model. The masks were then peeled off, completing the build.

Conclusion
Tamiya has come up with another fine, although not perfect, scale model. Although there is that issue with the landing gear, it was still a good model kit with ease of build being its main hallmark. Those who wish to have a more accurate stance for their Tamiya Wurger can invest in various aftermarket parts available.   

Saturday, 28 December 2013

Lightning Over Remagen


Historical Background
Late in 1940, the Reichluftfahrtministerium opened a tender for a jet-propelled reconaissnce aircraft with a range of 2,156km (1,340m). Only one company replied : Arado Flugzeugwerke. They offered their E.370 design,  a high-winged aircraft with a Junkers Jumo 004 engine under each wing. In order to maximise fuel capacity and to keep weight down, the aircraft did not have conventional landing gear. Instead, the aircraft were to take-off from a jettisonable, three-wheeled trolley and land on three retractable skids. Arado's estimated range for their design however, fell short of RLM's but the latter liked the design and ordered two prototypes as the Ar 234. Problems with the Jumo 004 engine delayed flight tests. Prototype V1 only flew on 15 June 1943 and on 2 August 1944, prototype V7 flew the first reconnaissance mission by a jet aircraft.

Earlier in July, having seen the promise of the design, the RLM ordered two prototypes of a schnellbomber version, known as Ar 234B. Since the aircraft was very slender and the interior was filled with fuel tanks, the bombload had to be carried externally on racks. The external bombload, coupled with the prospect of immobile aircraft littering the airfields post-mission made the landing skids system impractical. The B version was modified to have fully retractable tricycle landing gear, resulting in the deletion of the mid-fuselage fuel tank and a slight enlargement of the same area. Also the proposed rearward firing defensive gun system was abandoned in production aircraft although the periscope sighting system was retained for rearward vision. Normal bombload consisted of two 500kg (1,100lb) bombs suspended below the engines or a single 1,000kg (2,200lb) bomb semi-recessed underneath the fuselage. Maximum bombload was 1,500kg (3,310lb).

Production was slow however but the prototypes were used operationally in the reconnaissance role with Sonderkommando Sperling (earlier known as Sonderkommando Gotz), Sonderkommando Hecht and Sonderkommando Sommer. Cruising at 740km/h at over 9,100m altitude, these flights were mainly undetected by the Allies. The bomber version were however limited to 668km/h while carrying their load - yet they were still faster than any other Luftwaffe's bombers still in service. The bomber version was only operated by Kampfgeschwader 76, which began partial conversion to the type in June 1944. KG76 undertook the first bombing missions by jet aircraft when their aircraft attack rail targets in Namur, Belgium on 24 December 1944 and continue to attack targets in Belgium and Holland until early 1945. The unit was also involved in attacks against the Allied bridgehead at Remagen, specifically the Ludendorff Bridge across the Rhine. The unit continue to fly against both Western Allies and Soviet armies, flying until 15 April 1945. The unit surrendered to the British on 8 May 1945.

A pair of Ar 234B-2s were converted to act as prototypes for night fighters. Dubbed Natchigall (nightingale), the aircraft was fitted with FuG 218 Neptun radar with a pair of MG151/20 20mm cannon and a twin 20mm cannon gun pod in ventral position. The radar operator was located in a cramped compartment in the rear fuselage.Two aircraft were converted and served with Kommando Bonow. A number of other variants were proposed, including the four-engined 'C', which was the only other variant that made physical form before the end of the war. In all, only 210 aircraft were built.

The Kit
For years, the only available Arado Ar 234 in 1/48 scale was from Hobbycraft. The kit was OK but was underscale. In 2002, Hasegawa came up with a new injection-moulded kit of the Blitz. I consider it to be one of the important aircraft in aerial warfare, so the Hasegawa kit became one of my 'I Want YOU In My Collection' aircraft. Having said that, I only managed to buy the kit in August 2013! The kit was moulded to the usual Hasegawa standards. The parts spread over eight sprues, with the entire nose moulded in clear plastic.Clear plastic was also used to mould the panel for recon camera windows; there were also parts for the recon cameras (both of which are irrelevant for this kit). Decals were provided for three aircraft : 'F1+GS' from 8./KG76, 'F1+AS' flown by Oberfelwebel Josef Bruchlos, also from 8./KG76 and 'F1+MT' from 9./KG76 flown by Hauptmann Josef Regler. The decals look OK. However there were no decals for the stencils.

Construction
As there was a gap of 11 years between release and my build, I can rely on build articles on the internet to avoid the pitfalls with this kit. As with any other model aircraft kits, I started with the cockpit. The cockpit parts were painted Tamiya XF-63 German Grey with touches of XF-64 Red Brown to imitate leather parts. The entire cockpit then look quite drab so I added XF-2 Flat White to some dials, especially those on the bombsight. The rest of the instruments came in the shape of decals. Once the basic pilot's office was completed, I attached the rudder pedals underneath the cockpit floor. The instructions have you assemble the front fuselage next; however I deviated by assembling the fuselage first. Despite being the bomber version, Hasegawa included steps to assemble the recon cameras but I skipped them entirely (the instructions even tell you the optional nature of the cameras). I usually did not attach landing gears early in the build, however after studying the instructions and dry-fitting, I decided that it would be better if I followed the instructions. The main landing gears and the wheel wells were first painted Tamiya XF-22 RLM grey. They were then assembled and attached to their locations on the main fuselage. The wheels and gear doors were however left off until later. The fuselage halves were then mated together, along with the underfuselage bomb recess.


Next I assembled the wings. Forewarned by the online build reviews, I cut all the locating pins and aligned the wing halves 'manually, so to speak. Whilst this resulted in perfectly aligned wing halves, it meant a slightly asymmetric hole for the pitot tube. No problem though, just a dab of filler and later re-boring the hole set things back in motion. The tailplanes went up next although I did not attch the elevator horns at this stage. I the returned to the front fuselage. Being of a tricycle landing gear configuration, the model of the Blitz is vulnerable to tail sitting and Hasegawa recommended that 20g of weight to be put in the space behind the cockpit bulkhead. I ran out of fishing weights and I end up using plasticene and since there is no way I can measure 20 grams of weight, I used the tied and tested method of balancing the model on my finger!

Then it is time to attach the bulkhead. As it is, the bulkhead cannot fit into its slot, so some judicious sanding and dry-fitting were needed. The assembled cockpit were then slotted into place. Next, the cockpit enclosure were put into place. Extra care were needed here as the fit was not great plus the need to avoid glue smears on the clear parts. I originally wanted to add some wiring to the back of the instrument panel and control pedals as the design of the Ar 234 makes them highly visible. In the end I didn't do it due to lack of suitable copper wires. The engines were then assembled but I left them off the wings to ease painting. The clear parts were then masked off. The bomb and the RATO gear were assembled but, together with the smaller bits, were left off until after painting.

Painting and Decaling
Ar 234s were painted in late war camouflage of RLM 81 Braunviolett and RLM82 Lichtgrun upper colours and RLM 76 Lichtblau for the bottom. I used Tamiya XF-5 Flat Green for RLM 82 and Gunze Sangyo acrylic for RLM 81 and RLM 76. The camouflage pattern is of the hard-edged, geometric shape: I used Tamiya tape to mask the pattern for painting. It should also be noted that the three marking options have different patterns, so the decision to build which marking had to be made prior to painting. I chose 'F1+AS', the aircraft used by Oberfelwebel Josef Bruchlos to attack the Ludendorff Bridge. The aircraft, together with Obfw. Bruchlos went missing after the attack. The unpainted (on the real aircraft) portion at the rear of the engine nacelles were painted Burnt Iron. The cockpit framing was painted Tamiya X-18 Semi-Gloss Black. Hasegawa suggested that the periscope is to be painted RLM66, however looking at available photos, it looks like the periscope is painted the surrounding external colour.

Once the paint was dry, it was time for the decals. The decals work nicely and went down well with Mr Mark Softer. There were no data stencil decals however. The RATO gear was painted silver with the parachute pack painted XF55 Deck Tan and XF57 Buff;  the relevant decals were then applied. Then it was time to add the remaining parts.

Finishing
I started with the main gear wheels and then followed by the assembly of the nose gear. Once the glue was set, I put the model on its 'feet' for the first time and apparently I put enough weight (perhaps more than enough) to avoid a tail-sitting stance. The gear doors were next and these were followed by the engine pods. The ADF antenna were next, but I decided not to paint it as I do not have a small enough brush to paint the tiny ridges plus it still looks good in its unpainted stage. The large bomb was painted RLM76 but I vary the tone, just to differentiate it from the underside RLM76. The RATO pack went on next - I found that their mountings were quite fiddly to assemble. Finally, tiny parts such as lights, control horns and various aerials were attached. I did not attach the auxiliary fuel tanks however, just the sway braces. Finally the model was subjected to a sludge wash and a coat of flat clear.

Conclusion
As I mentioned before, the Hasegawa offering was one of my 'Most Wanted' kits. Granted it wasn't perfect (the oversized bulkhead and mismatched wing halves being the highlight), but relative ease in building it compensates for that. A pair of smaller bombs should also made nice alternatives to the single large bomb.  

Monday, 23 September 2013

Eagle Owl : Night Defender of The Reich


Historical Background
The He 219 had its genesis in Heinkel's P.1055 high-speed bomber project. It was an advanced design, incorporating pressurised cockpit, ejection seats, tricycle landing gear and remote-controlled defensive armament. The P.1055 was to be accompanied by a night-fighter variant, the P.1056, armed with four 20mm cannons. However, the RLM considered the aircraft as 'too risky' and rejected Heinkel's proposal. At the same time however, Kammhuber was looking for a new night fighter for his command. Heinkel responded by offering a redesigned P.1055 as the P.1060. This was of similar layout, but smaller and powered by the largest mass-produced liquid-cooled engine in Germany, the Daimler-Benz DB603 with annular radiators similar to Jumo 211 engines. DB603 was not noted for altitude performance, but Daimler offered the 'G' version to address the problem. Heinkel, using their own funds, submitted their proposal to RLM in January 1942 but was rejected in favour of Ju 88 and Me 210-based designs. Construction of the prototype began in February 1942 but suffered a serious setback a month later when Daimler was unable to get the engine ready in time. The prototype eventually flew on 6 November 1942 with the 'C' version of the DB603. Kammhuber was so impressed when he saw the prototype and ordered the He 219 into production - to the fury of Milch. The aircraft however had yaw/roll stability problems but were corrected by lengthening the fuselage and enlarging the tails. The rear-facing guns were deleted and forward-firing armament was increased to six 20mm cannons (two in wing roots and four in a ventral gunpack). Radar equipment was UHF-band FuG-212 Lichtenstein C-1.

In March 1943, the P.1060, now known as He 219 Uhu (Eagle Owl) defeated rival designs from Dornier and Junkers. The Heinkel was unique, being the first operational aircraft to be fitted with ejection seats. Pre-production prototypes were ordered as Heinkel He 219A-0 and in June 1943, three prototypes were  sent to front-line units for operational testing. On the night of 11-12 June 1943, Major Werner Streib of Nachtjagdgeschwader 1 flew prototype V9 and claimed five RAF night bombers. He however crashed the prototype upon landing at NJG1's base at Venlo. Despite this success, Milch kept trying to have the programme killed, enraging Kammhuber. This resulted in the (verbal) fighting between the two and led to Kammhuber's transfer to Norway, commanding Luftflotte 5. Work however continued and the first production model, the A-2 was equipped with longer nacelles carrying extra fuel tanks, VHF-band FuG 220 Lichtenstein SN-2 radar set and Rüstsatz R1 kit featuring two 30mm cannon in Schräge Musik installation which allowed German night fighters to attack their targets from below. With the departure of Milch  in mid-1944, the RLM gave greater priority to the He 219 (also because the Ju 388 and Ta 154 were nowhere near series production). The final variant was the A-7, powered with improved DB603E engines and was armed with two MG151/20 20mm cannons in the wing roots, two MG151/20 20mm cannons in the ventral gunpack and two 30mm MK108 in the Schräge Musik installation.

Despite the need, the programme was marred by political rivalries between Generalleutnant Josef Kammhuber, chief of the German night fighter command, Ernst Heinkel, the manufacturer and Generalfeldmarschall Erhard Milch who was responsible for aircraft production at the Reichluftfahrtministerium (RLM - German Aviation Ministry). It was also complicated and expensive, further limiting the number of aircraft produced.  Only 294 were built. The Uhu served mainly with Nachtjagdgeschwader 1. They had some successes against the RAF bomber streams but increasingly suffered from losses at the hands of night-fighting de Havilland Mosquitos.

The Kit
Tamiya released this kit in 1997, answering the calls from modellers who wanted a model of (probably) the Luftwaffe's best night fighter of World War 2. The kit comes in five medium grey sprue trees, a small clear sprue containing the cockpit transparencies, gunsight, ADF 'window' and the extreme tail, a small decal sheet and most impressively, a nose ballast. The nose ballast helps the model to stay on its three points and also forming the nose wheel well and part of the cockpit. There is an option for opened or closed cowl flaps and dropped flaps. Details are finely engraved overall although the exhaust stacks look crude. They should not be a problem since they would be covered by the nicely detailed exhaust shrouds. Two styrene tubes, acting as spars, help in giving the long wing some strength. The most delicate parts would be the FuG 220 radar aerials - they are thin and need careful separation from the runners. Actually one can backdate the kit simply by changing the angle of the dipole aerials. Decals are provided for three planes : 'TH', 1./NJG1 May 1945; 'G9+CH', 1./NJG1, May 1945 and 'D5+CL', 3. NJG3, May 1945.

Construction
As always, construction started at the cockpit. Since Tamiya made the nose ballast as part of the cockpit /  nosewheel well, I primed it using Tamiya Surface Primer. The various parts that made the cockpit were then painted Tamiya XF-63 German Grey. However, Tamiya did not specify the colours for various knobs and switches, save for a few small areas in red, making the cockpit drab and featureless. Using some common sense and what few photos of the interior of the He 219, I painted most of the switches white while the headrest were painted XF-68 NATO Brown. Tamiya provided decals for seat belts, which should really be substituted with PE parts. I used them anyway but refrain from using decal softening agent as they will make the belts look painted on! The cockpit sub-assembly was then glued to the ballast using superglue and the cockpit halves can be mated. Despite earlier dry fitting, I can't clamp the extreme nose properly, leading to fit problems later.

The next step is concerned with fitting the nose landing gear. I however skipped this step as the lanky gear could interfere with subsequent steps. So I jumped to wing assembly. The kit wings consist of upper and lower halves, the engine nacelles and the main wheel wells. Speaking about the last, I believe Tamiya missed the rear bulkhead and one can see all the way to the ends of the nacelles. Any modeler would box-in the wells using plastic sheet but, being me, I just left them as they were. The wheel wells were then painted Tamiya XF-22 RLM Grey. The flaps were separate and while I glued the halves together, they remain unattached until later. Next I assembled the engine halves; while they match perfectly, assembling them to the wings produced a step in the joint which I sanded off. The radiator grills were glued to the front of the engine nacelles - I chose the closed flap option. The landing gears were assembled and painted XF-22 rather than TS-48 (RLM66 Schwarzgrau) as I believe RLM02 Grau was still being used even late in the war. The landing gears were however left off until later.

Following that I assembled the tail. The endplates were butt-jointed to the tail and some eyeballing were needed to ensure proper alignment. Then the MK108 Schräge Musik installation were placed in their compartment. I did not paint the interior as it would be closed and that only the cannon muzzles were visible. The wings were then mated to the fuselage. The spars did help in ensuring proper alignment and also adding strength to the rather long wings. I then return to the front fuselage, attaching the nose and the rather fragile Lichtenstein SN-2 aerial bases. The aircraft I modeled was equipped with Schräge Musik and according the sources I read on the internet, aircraft so equipped were provided with a second Revi 16B/G gunsight on the canopy, between the two headrests with the reflector glass slightly in front of the pilot's head. I used a discarded sight from a previous built; I however did not add the reflector glass. Since I intend to spray paint the model, I attach the canopy parts and masked them off.

Painting and Decaling
In general, the Luftwaffe's night fighters were painted RLM76 Lichtblau with a mottling of RLM75 Grauviolett. Tamiya provided three marking options: two with RLM75/76 and another ('TH') also in 75/76 but with the undersurfaces in RLM22 Schwarz. The last option looks sinister with its black undersurfaces but I prefer something with a little splash of colour so I chose 'D5+CL'. To paint the 75/76 pattern, I first paint the relevant parts of the model RLM75 using Tamiya AS4 Gray Violet. When dry, I placed bits of Blu-Tack to act as masks on the corresponding parts. Admittedly the pattern did not match the pattern in the instruction sheet but it did look good enough for me. The process was also tedious and it took me more than a week to finish and I sometimes did it in front of TV. Once done, I sprayed Tamiya AS5 Light Blue all over the model. The Blu-Tack can then be removed, revealing Grauviolett pattern among the Lichtblau. However, I can't get a soft edge between the colours, mostly.  The exhaust stubs were painted Burnt Iron.

The decals went on next. Again, after looking at other resources, I found out that Tamiya made a rather fundamental mistake. They had the Werknummer for D5+CL as '310188' but actually it was '310189'! There is no alternate number decal for me so 310188 it would be! The decals were however quite all right and respond well to Mr Mark Softer. The still loose parts were also painted at this stage. Tamiya suggested X-18 Semi-Gloss Black for the flame dampers but I painted them XF-69 NATO Black which was followed with an application of Tamiya Weathering Master 'Rust'. Without thinking I almost painted the prop blades black but consulting the instruction sheet, they were painted XF-27 Black Green. The Peil G6 DF aerial were painted silver. With my failing eyesight I should have painted the part entirely in silver and then removing the paint from the raised areas.

Finishing 
The loose parts can now be glued onto the model. I started from the rear by adding the rear aerials for the FuG 220 radar and the aerials for the FuG16ZY radio. As for the FuBI 2F blind landing instrument antenna, I read somewhere that Tamiya got it wrong - it should be of the 'towel rack' configuration rather than the blade supplied in the kit. I have the materials to fabricate the 'towel rack' but decided to use the kit antenna to save time. The Peil G6 slots easily into its recess on the upper fuselage; so is the cover for the searchlights on the left wing. Finally it was the turn for the most vulnerable parts, the forward aerials for the FuG 220 radar. Clean-up of the parts (including the rear aerial of course) was not tedious but care has to be taken so that the frail parts do not break on their sprue or while cleaning up the remains of the runner. Then I run a 2B pencil along the panel lines and finally a spray of Tamiya TS-79 Flat Clear ends the build.

Conclusion
As usual Tamiya has come up with the goods which enhanced their reputation further. There were hardly any hiccup with the fit of the kit and I believe the difficulties I face at the front fuselage was entirely caused by me. The Uhu was one of the Luftwaffe's most advanced aircraft towards the end of World War 2. Despite that, kit manufacturers generally shunned it off and thanks to Tamiya we can have a 1/48 kit of this outstanding aircraft.