Sunday, 14 June 2015

Hunting Panther


Historical Background
In mid-1943, after experiencing combat with Red Army tanks, especially the T-34, the Germans introduced a new medium tank, the Panzerkampfwagen V Panther. The Panther, despite its inauspicious debut during the Battle of Kursk, have an excellent blend of firepower, mobility and protection and became the benchmark for other nations' tank designs and was regarded as one of the best tanks of World War 2. In August 1942, while the Panther tank was still in development, the Waffenamt decided to use its chassis and components to create a new sturmgeschutz armed with a newly developed long 88mm gun with Krupp being assigned to this project. The plans and technical documentation for this new vehicle was scheduled to be completed by January 1943 with full production starting in July 1943. In October 1942, the Reich Minister of Armaments and War Production, Albert Speer, decided that further development would be undertaken by Daimler-Benz with Krupp assisting with the armament and its mount.

In January 1943, Daimler-Benz finished a pre-final design of what is now called a 8.8cm Sturmgeschutz with ordnance inventory designation Sd.Kfz. 172. Preparatory works continue until May 1943 when the final design was finished as the 8.8cm Pak 43/3 Panzerjager Panther with ordnance inventory designation Sd.Kfz. 173. On the 24th of the same month, production was transferred to Muhlenbau-Industrie AG (MIAG) in Braunschweig because of shortage of space at Daimler-Benz's plant in Berlin. The prototype was presented before Adolf Hitler on 20th October 1943 at Arys in East Prussia and in November, Hitler bestowed a shorter name for the vehicle - Jagdpanther.  

The Jagdpanther was based on the standard Panther tank chassis with the glacis and side plates extended up to form a turretless, fixed casemate. The new superstructure housed a roomy fighting compartment with the main hatch located to the rear of the superstructure, which was used for crew entry/exit and also for ammunition loading, two other hatches were located on the roof.  The casemate was protected by 80mm of armour at the front and 60mm sides. The Jagdpanther weighed 46 tons and was powered by a Maybach HL230 P30 V-12 petrol engine with 690hp, allowing it to reach a maximum speed of 46km/h. It was armed a long-barreled Pak 43/3 L71 88mm gun (the same gun fitted to the Tiger II). The gun mount allows the gun to be traversed to 11° on each side and elevation of +14° to -8°. Fitted with a Sfl.Z.F.1a gunsight, the gun was capable of destroying enemy tanks up to 3,000 meters away. A ball-mounted 7.92mm MG34 or MG42 machinegun was fitted to the right of the main armament. Ammunition capacity was 60 88mm rounds and 1,200 7.92mm rounds. Later in the war, a 90mm close-in weapon called Nahverteidigungswaffe, with 16 'grenades' was fitted. In addition, two MP40 submachineguns with 384 rounds were carried for personal crew protection.

Various modification were made during the production run such as different exhaust arrangements, flame suppressor mufflers, deletion of pistol ports and installation of a cooling fan for the interior heater. 'Small square'-pattern Zimmerit anti-magnetic mine paste was applied in factory for early-build Jagdpanthers but the practice was discontinued in September 1944. Generally speaking, there were two main variants of the Jagpanther - the early (G1) variant with a small, internally bolted main gun mantlet with modified Panther A engine deck and the late (G2) with a larger, externally bolted mantlet and a modified Panther G engine deck. However some G1 Jagdpanthers were also fitted with the large mantlet. Only 425 Jagdpanthers were built from January 1944 until the end of the war. It was originally planned to build up to 150 units per month but the highest number produced per month was just 72 in January 1945. The low number produced was the direct result of Allied bombing raids against the main MIAG and MNH (Maschinenfabrik Niedersachsischen-Hannover) factories, which caused much destruction and disruption.

Jagdpanthers were issued to independent heavy anti-tank battalions (schwere Panzerjager Abteilung) and also anti-tank battalions that form part of a Panzer Division. They were first issued to schwere Panzerjager Abteilung 559 and 654 and took part in the Battle of Normandy. On 30 July 1944, three Jagdpanthers from Abteilung 654 ambushed a squadron from the British 6th Guards Tank Brigade near Les Loges in Normandy. They managed to destroy 11 Churchills at the cost of abandoning two of their own number because of damaged tracks. The majority of the Jagdpanthers however served in the Eastern Front although in December 1944, many Eastern Front Jagdpanthers were transferred to the West to take part in Operation Wacht Am Rhein (the Battle of The Bulge). Small numbers of the Jagdpanther were used by the Waffen-SS, specifically with the 2nd SS-Panzer Division Das Reich, 9th SS-Panzer Division Hohenstaufen and the 10th SS-Panzer Division Frundsberg. The three SS-Panzer Divisions received one company each of Jagdpanthers and were used during Operation Frühlingserwachen where out of 42 issued, only 12 were operational at the end of the operation.


The Kit
Tamiya's 1996 Jagdpanther was a new tool kit, replacing the 1960s-vintage original, and used Tamiya's then-new Panther G mould as basis. The parts are spread among six tan-coloured sprues, lower hull half from the Panther G kit, one-piece upper hull, two sprues of separate-link tracks from their Panther track set, a pair of glueable vinyl/rubberised plastic tracks, a length of copper wire plus the de rigeur polycaps, decals and instruction sheet. The parts are well-moulded and have excellent details. There is no PE included although Tamiya did mention their separately available PE set for the engine grilles. The belt-type tracks generally have good detail although the guide teeth are moulded as a solid piece instead of hollow. While nice, it can't beat separate-link type tracks, especially workable ones, to replicate the drape of the real thing. And I am quite at a loss as to why Tamiya use plastic instead of the usual string to replicate the tow cables. The decals provide marking options for three vehicles : '131' and '102' from schwere Panzerjager Abteilung 560 during the Battle of the Bulge and '121' from an unknown unit.  

Construction
As usual. construction began with the lower hull. Tamiya suggests that the rear hull panel be temporarily attached to the lower hull shell with cellophane tapes. I however decided to cement them together. The torsion bars were next in line; although Tamiya reminded the modeller about the alignment of the bars, the fit of them to the hull was very good and aligned well. As the Panther's road wheels also used the Schachtellaufwerk arrangement, the wheels were painted first. While the parts for the middle wheels were mated together, all the wheels were off the hull at this time. Going to the rear of the hull, I added the storage boxes and the towing eyes. As for the exhausts Tamiya provided two types, marked as May-December 1944 or December 1944 onwards production types. As I was thinking of building the 560 Abteilung machine during the Battle of The Bulge, I chose the former as it was more plausible

The upper hull assembly started by cementing all the optical equipment (sadly not moulded in clear plastic) to the roof. Also added were Parts D13 and D14 which act as stiffeners while two holes were drilled into the engine deck. The upper hull was then cemented to the lower hull before i proceed any further. I then added all the stuff on the hull, but instead of following the steps suggested by Tamiya, I end up cementing the engine grilles first, followed by the various hatches and ports, periscope guards and the tool mounts (but not including the tools). The hull MG barrel was also left off at this time. Tamiya also provided the crew compartment heater module, but again, it was not expressly stated whether it was applicable to the markings in the kit. I end up using the normal grille. Like many of their kits of the same vintage, Tamiya have the engine grille covers as a separately available item; good thing the local Tamiya distributor have them in stock. The schurzen mounts was then cemented to the hull. I however intended not to use the schurzen plates. The gun was the last to be assembled prior to painting. It consists of breech assembly (which also formed the vast majority of the interior 'detail'), the barrel assembly (beware of seams if you are not careful) and the mantlet.

Painting and Decaling
By the time the Jagdpanther entered service, German Panzers were mainly painted a tricolour of Dunkelgelb (Dark Yellow),  Olivgrün (Olive Green) and Rotbraun (Red Brown). I used Tamiya's XF-60, XF-58 dan XF-64 respectively. The decals were then applied and afterwards the model then received a filter layer of XF-57 Buff. This was followed by a pinwash of the usual black/brown mix.  The 'metal' parts of the tools were painted XF-56 Metallic Grey, which then received an application of Tamiya Weathering Master Rust/Soot while the wooden parts were painted XF-64. The jack block was painted XF-60 overall and received an XF-64 wash. The tracks were painted XF-1 Flat Black and then washed with AK Interactive's Track Wash. The track cleats were dry-brushed silver.

Finishing
Finishing works started at the bottom where the wheels were put into their places. The tracks would have to wait for a while. The tools were also cemented into place. The supplied copper wire was wound and placed on the right side of the superstructure. Actually I was baffled as to its function, but later I realise that the copper wire was supposed to be the track-change cable. However Tamiya only provided the 'cable' but not the end shackles. As stated before, the tow cable is plastic and would look very artificial if used as they were. Rummaging through my spares box, I found leftover strings from previous projects, I cut the shackles off, drill holes and insert the string. They look better than what came in the box, although I think I cut the strings a bit too long The towing cables were painted silver after which I washed them with AK Interactive's Track Wash. Before adding the tracks, the lower hull and the tracks themselves received an application of Mig Productions European Dust (despite the description that this particular vehicle took part in the Battle of The Bulge, with the implied muddy and snowy conditions)

Conclusion
What else can I say? Another excellent kit from Tamiya. The parts fit well with no problems encountered. The only shortcomings I found in this kit are the lack of PE parts, some simplification of parts, the one-piece tracks and that tow and track-repair cables. Despite the size (the Jagdpanther is a fairly large vehicle), I finished building them at a faster rate than the norm. The ease of build is of course the main factor, plus the fact that the vehicle is turretless also played a part!
   

Friday, 5 June 2015

Renault, Driving The Change


Historical Background
The World War I-vintage FT-17 was the staple of the French armoured force until 1935. But as early as 1926, a plan was drawn to introduce the char d'accompagnement, a cheap, mass-produced light tank to replace the FT-17. However, the Renault tanks developed to fill the requirement were neither light nor cheap. In 1933, Hotchkiss proposed a solution (which eventually became the H35). But for political purpose, Hotchkiss's solution was turned into the so-called Plan 1933 and the whole of the French armaments industry was invited to submit their proposals in August 1933. Fourteen responded, from small armouries to automotive companies. Renault, the prime French military contractor at the time cannot afford to lose the contract and rushed the prototype. In fact, when the specification was changed on 21 June 1934, to increase armour thickness from 30mm to 40mm, it cannot be implemented by Renault. They submitted the ZM design anyway to the Commission de Vincennes in December 1934. The prototype performed well but was sent back to Renault for additional armour and to mount the APX turret in April 1935. The prototype was still undergoing tests when tension mounted following the German re-armament. This prompted a swift modernisation of the French tank fleet and the ZM was to be put into production. On 29 April 1935, the Commission awarded a contract for 300 R35 (as the ZM was now known) even though the model had not yet been perfected. On 4 June 1936, the first production examples left the factory  and were subjected to further extensive tests.

The R35 is of cast construction with the hull consisting of three cast modules bolted together. Maximum hull thickness was 43mm (glacis) and between 30-40mm for the sides, rear and the engine deck. The cast APX-R turret was equipped with a domed rotatable cupola fitted with vertical viewing slits. Of the typical 1930s one-man design, the commander rotated the turret by a hand-crank or using his weight. He was also not always provided with a seat and just stood on the floor of the hull. The turret hatch, when hinged down can also act as the commander's seat.  Early batch of R35s were armed with a short Puteaux L/21 SA18 37mm gun and a 7.5mm Chatellerault fortress machinegun. Later vehicles were still equipped with the same gun but with a better sight and have a MAC31 Reibel machinegun fitted. A total of 72 armour-piercing and 58 high-explosive rounds were carried for the main gun and 2,400 for the machinegun. The running gear was based on the AMR35 cavalry tank with five double roadwheels - four in two sets of bogies and a single at the front. Power was provided by a Renault V-4 engine rated at 85hp allowing a road speed of 20km/h and a range of 130km.

Due to deteriorating situation in Europe, 2300 R35 were ordered by 1939. But due to delays by APX regarding the turret, rate of production fell and at the outbreak of war on 3 September 1939, only 975 have been delivered. They, as mentioned above, were intended to replace the FT-17 but the crews need time to retrain and as a consequence, there were still eight battalions of FT-17s in service in May 1940. The R35 also enjoyed some export success with Poland receiving 50, Turkey (100), Yugoslavia (54) and Romania (41). The Poles actually rejected the R35 when two were bought for tests in 1938. They found it unreliable and preferred the Somua S35 instead. However with war becoming more imminent and their own 7TP tanks insufficient, it was decided to order 100 R35s in April 1939 with the first 50 arriving in June of the same year. Most were assigned to the 12th Armoured Battalion and in September 1939 formed part of the 21st Light Tank Battalion. They formed the general reserve of the Polish High Command and defended the so-called Romanian Bridgehead. Following the Soviet invasion on 17 September 1939, the unit was split with 34 tanks withdrawn to Romania and the rest formed the Dubro Operational Group. Romania absorbed the 34 tanks into its own existing fleet of R35s, allowing the 2nd Armoured Regiment to have two tank battalions.

At the start of Operation Fall Gelb on 10 May 1940, France had 900 R35s in service. The R35s were formed into Groupements de Bataillons  de Chars, which were purely armoured formations without other organic components and were intended for close support of the infantry. Despite its role, the R35 can effectively tackle the German Panzer I and II while its armour was proof against the standard German 37mm anti-tank rounds. The R35s equipped the Ie, IIe, IIIe, IVe, Ve, VIIe, VIIIe and IXe Armees and the Armee des Alps. However, when it was shown that the doctrine did not work, 135 R35s of the 2e, 24e and 44e Bataillons de Chars de Combat formed the 4th Division Cuirassee de Reserve on 15 May 1940 while the 40e and 48e BCC reinforced the 2e DCR. Following the fall of France, the majority of the R35s fell into German hands who promptly used 131 of them as Panzerkampfwagen 35R 731(f) and used in garrison duties or driver training. Several others were turned into tank destroyers with the designation 4.7cm Pak(t) auf Panzerkampfwagen 35R (f) ohne Turm. Others have their turret removed and the latter were then placed in the so-called Tobruk bunker. R35-equipped tank units in Morocco and Syria, the 63e and 68e BCC (Syria) and 62 BCC (Morocco) later fought against the Allies during the invasion of Syria and Operation Torch. They were later taken over by the Free French 1e CCC. Other R35s saw service with the Italians, Hungarians and Swiss. The last combat action of the R35 took place in the Middle East in May 1948 when five Syrian tanks attacked a kibbutz at Degania Alef.

The Kit
I can probably say that Hobby Boss is one of the more adventurous mainstream model manufacturers nowadays, producing kits of vehicles that were overlooked by its more illustrious rivals. The R35 was released last year (2014) after the anti-tank version used by the Germans (that is quite abnormal as, like the real vehicles, models of derivatives are usually released after the base vehicle, but anything sporting the Black Cross sells). For a small vehicle, the box is packed with parts - 304 in beige plastic, 72 in light brown plastic (the tracks), 52 brass PE  parts, one metal barrel and a small decal sheet. Many of the parts are for the interior, including the engine, transmission and the crew compartment. While the engine and transmission are fairly complete, the fighting compartment lacked the ammo storage racks. The tracks are of the link-and-length type and allow the modeller some quite considerable time-saving. All the parts are nicely moulded. Some of the PE parts however lacked the bend lines and may cause some difficulty. Despite the fact that the R35 was the most numerous French tank, not to mention enjoying some export and foreign usage, the decals provide markings for just two vehicles, one of the French Army and another is in the de rigueur German markings. Both are from that most famous military formation in modeling hobby - 'unknown unit'!  

Construction
Like Bronco's Hotchkiss H39, the R35 has a fairly complete interior, including the engine and transmission. However, as I intended to complete this model 'buttoned up', I skipped most of steps 1-4 of the instructions. The rest of the build at this juncture were concerned with the rear panel of the hull, which I also skipped for the time being. The lower hull was then assembled and I only add part B26 to help aligning the walls and strengthening the assembly. I then moved to the rear panel. The two doors on the rear panel did not have good fit and I had to trim the openings for them to have better fit. The mountings for the idler wheels (and also acted as the mount for the towing hooks) and the towing hook were assembled and like the doors, they were also of not perfect fit. The rear panel was then cemented to the lower hull.

Next came one of the tricky (if not the trickiest) part of the build - the suspension. Each of the two-wheel bogies have four brackets made of PE brass (numbered PE-1 and PE-4) while the single-wheel bogies have one PE part (PE-1 in the instructions, although it should be PE-18). The edge of the PE parts need to be bent at right angles; additionally,  the inner part (PE-4) need to be bent into a curve. Without a form to bend the curve and without even bend lines, I came to the conclusion that this was next to impossible. However, browsing the internet, I came upon tips given by Matt Ashley of Perth Military Modeling Site - replace the PE with plastic card. The forms were traced on the plastic card and cut. However, the plastic brackets still followed the unbent PE form and need to be trimmed. Knowing how bad I am with blades, I decided to tack them on the OUTSIDE surface of the bogie. It will look horrible, I know but it would have to do. The numerous parts of the bogies also allow unwanted movements during assembly and I have to ensure that everything aligns,

Once completed the bogies were set aside and I moved on to the upper hull. While dry-fitting the single-piece upper hull, I found that while the rear half fitted fairly nicely, I have to flex the lower hull walls a bit in order for the front half to slid into place. Once done, there are however gaps between the glacis plate the hull sides; there is also a seam on the front of glacis plate - they were dealt with the usual way. The transmission cover and the driver's hatch was then cemented in the closed position. A couple of PE parts were superglued to the transmission cover with part PE-5 (the grab handle) being difficult to bend because of the lack of bending lines. Then it was time to fix those bogies to the hull. Again I faced some difficulties here as the fit between the bogies and the hull were rather loose and that the pegs were too long (or the holes too shallow). I ended up cutting a bit of the pegs off. It helped a bit although in the end I had to use superglue to fix the bogies to the hull. There were alternate idler wheels (opened or closed holes) and it's entirely up to the modeler to choose. However the wheel is a three-piece affair and the outer rims are separate but without any locating pins. So care again have to be exercised as the wheels have perforations that need to be aligned.

Finally, the turret is assembled. The interior detail consists of just the gun breech. While the drawings show the presence of the elevating wheel, it wasn't present on the sprues. The breech assembly were straightforward although I have to carve away excess plastic for a good fit between the breech and the gun cradle. Two small brackets were cemented to act as trunnions for the gun - the left-hand bracket was a bit of a challenge because of its location. The rear hatch is designed to be moveable although the hinge pins were too long and need to be trimmed a bit. The vision ports and the cupola were then cemented and this was followed by the lower turret ring. The very small turret lifting rings, and the even smaller ones on the cupola was then cemented, burrs and all. Once the cement has dried, I cut off the burrs - it was easier this way.

Painting and Decaling
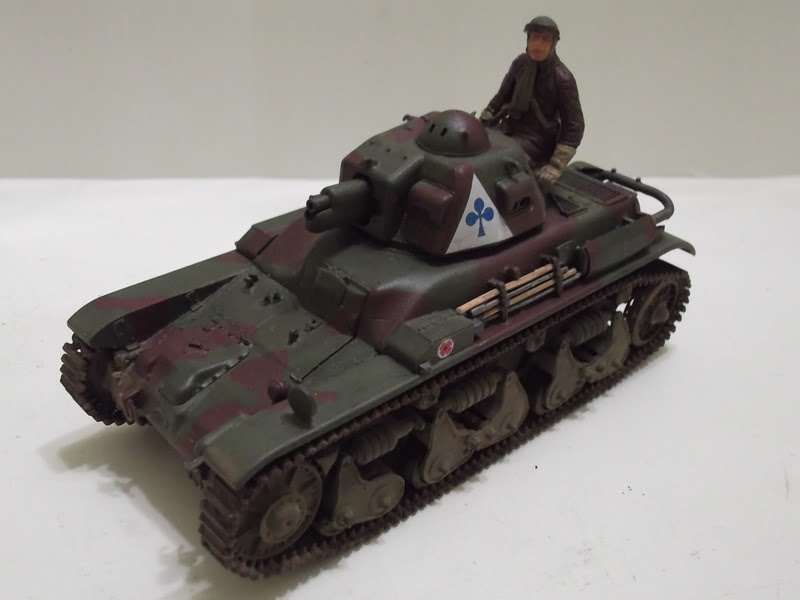
As mentioned before, Hobby Boss only provided two marking schemes - one French, the other German with no indication as to which unit the tanks belong. The box art however shows a marking not included in the kit! Anyway, I chose the French scheme. The instructions have you paint it a camouflage colour of XF-64 Red Brown and XF-61 Dark Green. Rather simple-mindedly, referring to the Tamiya Char B1bis instructions and some photos of built-up models, I decided that the suggested colours were 'wrong' and used XF-9 Hull Red and XF-58 Olive Green. There were just four decals to be applied - one on each side of the hull and another two for the turret sides. And as mentioned before, there is no indication as to which unit the markings belong and the best I can make it out is that this particular tank belongs to the 4th platoon (club symbol) of the 1st Company (blue) of an anonymous regiment.

Finishing
While I'm comfortable with the link-and-length tracks, the rather wobbly assembly of the suspension filled me with a bit of trepidation. And I found that the return rollers sit too close to the hull and therefore will not align with the wheels. The original stubs were removed and I drilled holes into the return rollers. A new stub made from 1mm rod was made for each wheel and they were cut so that they align with the rest of the wheels. My usual method for assembling separate/link-and-length was by starting at the bottom and make my way to the top. This however resulted in a rather misaligned assembly for the right-hand side track. I change the method by starting with the top run first for the left-hand side track and it did have a better appearance. However, the left idler was a bit lower when compared with the right side. Also the forward part of the upper track run somehow warped, resulting in a gravity-defying upward curve. The cement has set however by this time and I just have to live with it. Oh well! The tracks were then washed with the AK Interactive track wash solution.

The rest of the assembly was concerned with the differently-painted parts and also the track guards. While the left-hand track guard fit flawlessly, the right-hand side did not fit well so I trimmed a bit of the locating stub. Afterwards, it also fit nicely. The exhaust system was painted Burnt Iron and enhanced with a bit of Tamiya Weathering Master Rust. The PE heat shield for the muffler caused problem as it is without bending lines engraved (furthermore, I do not have any 'proper' PE bending gizmos). So I'll pretend that the shield was dented when the driver backed the tank into something! The model then received a very thin wash of XF-57 Buff and followed by a pinwash of the usual-black-brown paint mix.

As I have Miniart's French Tank Crew figure set in my stash, I decided to use one of them and since the turret hatch was made operable, I chose the sitting commander's figure. Test fitting however showed that he can't fit into the turret properly so I have to do what's necessary: amputate his legs below the knees! To paint him, instead of using Miniart's instructions, I used the Tamiya one (again from the Char B1bis kit). I also left the googles off.

Conclusion
In a nutshell, it was actually a nice kit and in general I do not face fit problems. The PE is however a bit of a letdown as it was fairly thick and lack folding lines, resulting in its substition with plastic sheet for some components of the model. Another letdown was the minimalist approach to the markings (and colour scheme), a shame really as the R35, being the most numerous French tank, came in many colour schemes, most of them very catchy indeed. Having said that, I still recommend this kit.

Monday, 18 May 2015

King Of Panzers


Historical Background
On 26 May 1941, Adolf Hitler met with officials from the Waffenamt discussing panzer development. By Fall 1942, designers at Porsche and Henschel started work on a new heavy tank that would replace the Tiger Ausf. E, which at that time, had not yet fully entered service. In January 1943, Hitler ordered that the tank would be armed with a long-barreled L/71 88mm gun and protected with 150mm frontal and 80mm side armour. The armour plates would be sloped and interlocked, similar to the then-new Panzerkampfwagen V Panther. Development work was given to Porsche and Henschel as both companies had started work on heavy tank designs since  1939 and 1937 respectively. Porsche provided two projects designated VK4502(P). The first one, Typ 180 (Turm Vorne) A/B had its turret mounted centrally while the second, Typ 181 (Turm Hintern) A/B/C had a rear-mounted turret. Both designs share the same hull and chassis with a gasoline-electric drive system. Henschel's design was more conventional. Designated VK4503(H), it has sloped armour reminiscent of the Panther with a suspension system similar to the Tiger I.

The contract was eventually awarded to Henschel with production beginning in January 1944. Officially, it was known as Panzerkampfwagen Tiger Ausf. B, or Tiger B with ordnance inventory designation Sd.Kfz.182. Informally it was known as Königstiger (German for Bengal Tiger) which was mistranslated by Allied soldiers as 'King' or 'Royal' Tiger. The first 50 vehicles were equipped with the so-called 'Porsche' turret while the rest were equipped with 'Henschel' turret. The designation was due to the erroneous belief that the turrets were designed by both companies for their respective prototypes; in fact, they were both designed by Krupp, with the 'Porsche' turret being the initial design. The earlier turret has steeply sloped sides and a rounded front (creating 'shot traps') and a bulge on the left side to accommodate the commander's cupola. The latter turret has a thicker, flat face (eliminating the shot trap) and less sloped turret sides. The turret was traversed by a hydraulic motor which was driven by the engine through a secondary drive shaft. The Tiger II has the same Maybach HL230 P30 V-12 petrol engine powering the lighter Panther (45 tons) and Tiger I (56 ton) tanks. This made the Tiger II (68 tons) underpowered and have a poor fuel consumption rate.

The Tiger II was armed with a Krupp KwK 43 L/71 8.8-cm gun and two MG34 7.92mm machineguns. Combined with the Tzf 9 monocular sight, it was an accurate and deadly weapon. Penetration of typical armour plate inclined at 30 degrees was 202mm at 100m and 132mm at 2,000m using PzGr.39/43 APCBC-HE rounds and 238mm and 153mm at the same ranges using PzGr.40/43 APCR rounds. HlGr 39 (HEAT) round had a 90mm penetration capability at any ranges and was used as dual-purpose round while SpGr. 43 round was used against soft targets. The combination of heavy armour and powerful long-range gun gave it an advantage against all Allied and Soviet tanks. None of the Western Allies tanks can engage the Tiger II head-on until the introduction of the 90mm-armed M26 Pershing heavy tanks and M36 tank destroyers, and to a lesser extent, the Ordnance QF 17-pounder gun arming Sherman Firefly tanks and the Archer and Achilles tank destroyers.

Apart from research, training and a five-tank detachment (the first five production vehicles actually) with the Panzer Lehr Division, the Tiger II was only issued to Heavy Tank Battalions (schwere Panzer Abteilungen) of the Army and the SS. The Army (s.H.Pz.Abt) battalions were the 501st, 502nd, 503rd, 504th, 505th, 506th, 507th, 508th, 509th, 510th and 511th while SS (s.SS.Pz.Abt) battalions were the 501st, 502nd and 503rd. The Tiger II first saw action in May 1944 near Minsk. Two companies of s.H.Pz.Abt 503 were present at the Battle of Normandy but mechanical problems, coupled with Allied fighter-bomber activity and naval bombardment took their toll and all were lost by August 1944. s.H.PzAbt 506 took part against Operation Market-Garden in September 1944 while s.SS.Pz.Abt 501 took part in the Ardennes Offensive in December 1944. On the Eastern Front, Tiger IIs took part against the Lvov-Sandomierz Offensive in August 1944 where 14 Tiger II of s.H.Pz.Abt 501 were lost in ambushes. On 15 October 1944, s.H.Pz.Abt 503 took part in Operation Panzerfaust, the taking of the Hungarian capital Budapest, ensuring the country remaining in the Axis camp until the end of the war. The 503rd remained in Hungary for 166 days, destroying at least 121 Soviet tanks, 244 anti-tank guns and artillery pieces, a train and five aircraft while losing 25 of their number. Feldwebel Kurt Kniespel, the highest-scoring tank ace (162 kills) served with the 503rd and was killed in action on 26 April 1945 at Czechslovakia. Surviving Tiger IIs continued to be used until the end of  the war.

The Kit
Tamiya came up with a new-tool 1/35 kit of the King Tiger in 1993, releasing both versions of the tank (i.e the 'Porsche' and the 'Production/Henschel' turret). The kits were well-received, being crisply moulded and has a very good fit. In 2002, Tamiya re-released the 'Production Turret' kit as 'German King Tiger Ardennes Front'.  The latter is basically the same kit as the former, moulded in dark yellow plastic which is another hallmark of Tamiya AFV kits. The tracks are still the one-piece glueable vinyl type with a sprue from Tamiya's King Tiger separate link tracks set to be used as spare tracks mounted on the turret. The difference is the inclusion of a smooth, late-style gun mantlet, a DKW NZ350 motorcycle and three figures in addition to the original commander's figure. Markings are provided for four tanks: #008, #204 and #332 from s.SS.Pz.Abt 501 during the Battle of The Bulge and #555 from s.H.Pz.Abt  502.

Construction
Because of the Schachtellaufwerk road wheel arrangement, the wheels were assembled and painted first. The completed wheels were set aside and I turned my attention to the lower hull. The suspension arms have positive location tabs although care needs to be taken when cementing them to avoid unevenness. This was followed by the final drive cover and the idler mounts. Before proceeding any further, I painted the lower hull XF-60 Dark Yellow. The road wheels can then be cemented onto the lower hull, taking note the two types of wheels which need to be placed at their allocated slots. The rear panel was then fixed to the main hull although the fittings on the rear hull would be left off at this time. 

For the upper hull, I started by cementing the periscopes for the driver/co-driver. The upper hull was then test-fitted to the lower half. Tamiya suggested that the hull halves be taped together temporarily during construction. Feeling confident, I cemented them anyway. The minor sub-assemblies for the headlight, machinegun mount and the engine access was done first before attaching them to the hull. For the headlight I added the power cable using solder wire, I however believed that I used too coarse a wire for this purpose. As for the machine gun mount, I assembled it without the barrel in place, to ease handling. They were followed by the driver/co-driver's hatches and several other small parts but certain others like the towing eye and pioneer tools were left off for the moment. Next were the engine and air intake grille covers. While Tamiya provided a piece of mesh material (to be cut into shape) for the air intake grilles, they have this habit of not having the PE screens in many of their kits and modelers have to buy them separately. Thankfully the local Tamiya distributor has what I need although the separately-available parts still annoys me. To enable fitting of the tracks, the fenders were left off at this time too.

Moving on to the turret, I started by assembling the interior of the turret which consists of crew seats, gun breech and the ammo racks (although no ammunition pieces were provided - again they are available separately). The barrel was then assembled and it was here that a decision has to be made as the smooth gun mantlet was only applicable to tanks #008 and #204. I decided to finish my model as #204 and so the smooth mantlet was used. The turret shell was then glued together and the various fittings can be cemented. Tamiya provided two styles of the turret ventilator but did not mention which was needed for a particular tank. The barrel assembly was then cemented to the breech while the commander's hatch and the MG mount was left separate at this time. Because of the fenders and to maintain continuity of the camo pattern, I finally had to put the tracks in place. The tracks were first painted a mixture of XF-1 Flat Black and XF-64 Red Brown and once dry, they were looped and glued, using superglue. The lower hull and the wheels were painted XF-60 Dark Yellow. The tracks were then slipped over the wheels and this is where the weakness of belt-type tracks is apparent. I have to study pics of King Tigers (mainly those missing their fenders) and then apply super glue at the proper road wheels to get the best look for the draping tracks. Finally the fenders were put in place.

Painting and Decalling
The German 'ambush' camo scheme was painted using Tamiya paints, that is XF-60, XF-58 and XF-64, starting with XF-60 as the base colour. The problem however is that Tamiya only provided the left, front and rear views only and none for the top and right side. I have to look around the internet for photos of #204, even including completed models as a guide. The dots of the camo scheme was done using a brush dipped in the respective paints (Dark Yellow on Red Brown and Olive Green areas and Olive Green on Dark Yellow areas). While I think the dots are fairly accurate size-wise, there were probably too much of them, according to my references. Once the painting was done, the decals were put in place. While they adhere well, the number 204 were translucent, allowing the colour demarcation lines and dots to be visible beneath them. The cables, jack and the metal parts of the pioneer tools were painted Metallic Grey and then washed with AK Interactive Track Wash solution. The gun cleaning rod was painted XF-59 Desert Yellow as also the wooden parts of the pioneer tools. 

Finishing
Firstly, the pioneer tools and the cable 'sets' were permanently fixed to the hull. Next, the exhaust assembly was cemented to their places at the rear of the hull. Afterwards it was the turn for the more delicate parts such as the headlight (Parts C31 and C25), the hull MG barrel and the commander's machine gun. The latter was spruced with an anti-aircraft sight from the same PE engine grille set. The model was then subjected to a wash. To make mud, I first mixed Mig Productions Russian Earth and Euro Dust pigments and applied them 'dry' on the tracks. The same company's Pigment Fixer was then applied to fix the 'mud' in place. This was followed by an application of AK Interactive Earth Wash. While many photos of King Tigers showed them without any stowage, I decided to symbolically place some items on the rear deck - a Panzerfaust 60 from Dragon, a StG 44 assault rifle from Tamiya's old German Infantry Weapons Set and three jerricans. The weapons, together with the King Tiger itself are to symbolise the advanced weapons available to the Wehrmacht later in the war and the fuel cans to symbolise the Achilles' heel of them - oil.

The kit provided three figures - the loader, commander and the motorcycle dispatch rider. What was not mentioned is that the kit also included the commander's figure from the original kit 35164. Anyway, the original figure was used in my Panzer III kit. Of the new figures, I decided to use the loader's torso, reposition his right arm and use the commander's head and left arm. The conversion was easy and I only need a little bit of putty to cover the resulting gaps. I painted the uniform in the SS-Erbsenmuster ('pea') pattern using the template provided in the instructions and also Tamiya's own camouflage pattern sheet. But before that I sliced off the moulded on Nazi Eagle and SS Death's Head (just a blob really) on the officer's cap in preparation for the Tamiya German insignia decals. While I had a bit of a problem handling them on the Tank figures (for my Panzer IVF), I have no difficulties whatsoever this time. The figure was then put inside the commander's hatch, finishing the build.

Conclusion
The Tamiya King Tiger continues the marque's tradition of easy-to-build, reasonably detailed kit. While apparently the kit is less accurate than its Dragon rival, I am not really concerned with that as first and foremost, I do not suffer from AMS and the finished model looks like a King Tiger. The inclusion of the motorcycle and extra three figures also added some more value to the kit, although the lack of PE parts (at least for the more obvious areas) is still a bane for modelers (Tamiya did re-release this kit with PE parts and metal barrel, but at a higher price). As for the motorbike, I assembled it but put it in storage.....

Sunday, 10 May 2015

Patton vs. 'Cong


Historical Background
On 27 February 1951, the Ordnance Technical Committee Minutes (OTCM) Directive #33791 initiated the design of a new tank designated 90mm Gun Tank T48. Although basically deriving from the existing M46 and M47 medium tanks, the T48 featured redesigned hull with a longer, lower and more sloped front, a new hemispherical turret and a new suspension. It was to be powered by a petrol engine. The bow machine gun, long the feature of American (and just about any other nations' tanks), was removed. The deletion of the bow machine gun meant that the crew was reduced to four. Following tests, OTCM #34765 on 2 April 1953 standardised the T48 as the third member of the Patton tank family as the M48. Production of the M48 actually started in April 1952. However, the first 100 M48s were found to have poor ballistics protection and therefore had to be relegated to crew and gunnery training duties, designated M48C.

The M48, although basically derived from the M47, was a completely new design. The turret was a departure from the previous lozenge-shaped turret - being a lower, more hemispheric shape with much reduced shot traps. Made of cast steel, the turret was 7 inches thick at the front, 3 inches sides and 2 inches on the rear. The armament comprised of a 90mm T54 tank gun (the M48A3 was armed with the M41 90mm gunk while the M48A5 was armed with the M68 105mm gun), an M73 7.62mm machinegun co-axially mounted with the main gun and a M2 machinegun in the commander's cupola. 60, 5,900 and 500 rounds were provided for each gun respectively. From the M48A1 onwards, the M2 machinegun was mounted on the M1 cupola, allowing the commander to operate the machinegun from inside the turret. The armour of the M48 took into account intelligence reports on the performance of the D-10T 100mm gun arming the T-54/55 series, being generally raised from 4 inch to 4.3 inch.The glacis was well-sloped with a curvy 'beak'. The driver, now being the sole crew inside the hull, was relocated to the middle driving position. The rest of the crew remain at their customary positions.

The M48 was powered by a Continental AVSI-1790-6 air-cooled twin-turbo V12 petrol engine rated at 810hp. Fuel capacity of the tank was 200 US gallons. However the usage of petrol engine meant that the M48, up to the A2 version, was severely limited in range; just 70 miles. Furthermore, like the Sherman of World War 2, a hit to engine will easily ignite the tank. Add to that, the low-flashpoint fluid used in the hydraulic system inside the turret can also be ignited if the hydraulic lines were severed by enemy fire. The problems with the engine resulted in a re-engining program for some of the M48s. The petrol engine was replaced with a Continental AVDS-1790-2 diesel engine rated at 750hp. At the same time the hydraulic fluid was replaced with a more fire-resistant fluid. The resulting version was the M48A3. Although the program was started in 1959, the US military only received the first M48A3 in 1963. 1,019 M48A1 and A2s were converted to A3 standard.

The M48 first saw action in 1965, in Vietnam and during the Indo-Pakistan War of 1965. In Vietnam, the M48 was first deployed by the USMC, landing the 1st and 3rd Tank Battalions in 1965. The US Army deployed three battalions: the 1-77th Armor near the DMZ, the 1-69th at the Central Highlands and the 2-34th near the Mekong Delta. The M48 also served with the Armored Cavalry Squadrons until replaced by the M551 Sheridan. However, the 11th ACR retained their M48s to end of their deployment. Due to the nature of the war, the M48 was used in infantry support role and to back up large-scale search and destroy operations in NVA/VC-held areas. It also proved its worth fighting in built-up areas such as Hue during the Tet Offensive. Despite the jungles of Vietnam, the M48 was also effective there. Apart from using normal HE rounds against enemy bunkers and infantry, the M48 was also provided with 'Beehive' canister rounds, which contains 1,280 pellets or 12,000 darts to shred vegetation, and of course, infantry. Also deployed were M67 'Zippo' flamethrower variant of the M48. 

Tank vs tank combat did occur most notably during the Battle of Ben Het in March 1969 when M48s of the 1-69th Armor engaged PT-76 light tanks of NVA's 202nd Armoured Regiment. When the US forces began their withdrawal, hundreds of M48s (along with M41 Walker Bulldog light tanks) were handed over to the ARVN. During the Easter Offensive 1972, the ARVN M48s performed reasonably well against the NVA's T-54/55, T-34/85 and PT-76 tanks. However, Operation Nguyen Hue (as the Easter Offensive was known to the North Vietnamese) also marked the debut of the 9M14M Malyutka (AT-3 Sagger) ATGW, destroying one M48 and a M113 APC - even larger losses of M48s against ATGWs would take place more than a year later during the Yom Kippur War of 1973. During final 1975 Spring Offensive, the ARVN armour still managed to slow the North Vietnamese down but with fuel and ammunition getting scarcer due to the US Congress' ban on transfer of fuel and ammunition to South Vietnam, many were abandoned and consequently served just for a short time with the Vietnamese Peoples' Army post-1975.

Elsewhere, the M48 took part in the Indo-Pakistani Wars, facing Centurions and Shermans of the Indian Army. The Pakistani Pattons gave good account of themselves although inferior tactics saw the Pakistanis lost 100 tanks, mostly Pattons at the Battle of Assal Uttar in September 1965. Studies also showed that the Patton's armour can be penetrated by the 20-pounder rounds of the Centurion and 75mm rounds of the AMX-13, both used by India. Another major conflict where the M48 took part was the Middle East, where again M48s of the Israeli Defense Force prevailed over the T-54/55. Jordan also operated Pattons but came second best against even the elderly M50/51 Shermans, further showing that tactics can prevail against technology. The M48 underwent its final upgrading in 1975 as the M48A5. It was armed with the M68 105mm gun, the M73 MG replaced with M60D and the M1 cupola replaced with Israeli-style 'Urdan' cupola. The M48 was also exported to anumber of countries. Apart from those mentioned beforehand, other users include Greece, South Korea , Iran, Lebanon, Morocco, Republic of China, Morocco, Portugal, Thailand, Tunisia, Turkey, Spain, Norway and West Germany. A total of 11,703 units of M48 (all variants) were built from 1952 until 1959). Some foreign users modify the basic M48/M48A1/A2/A3/A5 into variants tailored to their needs such as Republic of China's M48H Brave Tiger and the Israeli Magach. The M48 is also the basis of specialised vehicles such as M48 AVLB, M67 'Zippo', M88 ARV and the defunct M247 Sgt York SPAAG.

The Kit
Tamiya came out with their kit of the M48A3 in 1983, the year I started this hobby. The kit is well-moulded and generally OK. However it suffered from overscale smaller parts (not unique among 1980s-era kits) and also the simplified gun mantlet cover. Also, like most 1970s-1980s-vintage Tamiya kits, the M48 has motorisation holes in the lower hull. However, the most talked-about flaw with the kit is its suspension. Apparently, Tamiya based their drawings on a tank which had its engines removed, hence less weight on the suspension making it sat higher than it was supposed to be. Another issue is concerned with the height of the turret - some argued that Tamiya got it right while others said that it looked squashed. Despite its shortcomings, the kit was considered the best M48 until Dragon came out with their version of the M48 in 2013. The decal placement instruction is pretty generic and vague. The most striking marking, a shark (tiger?) face, while illustrated on the box side, was nowhere mentioned in the instructions while the Playboy Bunny logo was simply stated as 'some tanks wore this mark' without mentioning which particular tank. While there are specific marking options mentioned, such as the 11ACR and the 2-77th, it wasn't mentioned anywhere with which registration number they should be used. In short, modelers would have to do their own research for the markings.

Construction
As usual, construction starts with the suspension units. As mentioned before, Tamiya got their suspension wrong by using an empty tank to measure. To lower the suspension, the bumper springs and the piston rods of the shock absorbers need to be cut. While easy, I decided not to do it and left the suspension as they were. The motorisation cutouts were then examined and I decided to fill just the long vertical one near the sprocket wheel mount while the rest were judged to be barely visible to the casual observer and left as they were. The slot in the final drive cover was also left off as it will be hidden by the sprocket wheel. The wheels were the assembled and set aside. The sprocket wheel should have lightening holes, as many Vietnam-era M48s were seen with them. However, lacking powered drill, they were also left as they were. The rest of the parts that needed to be stuck on the lower hull were then cemented onto it.

Not wanting to put the driver half-figure in its place, I immediately cemented the upper hull to the lower half. Apparently there are shape issues with the 'beak'. Again I did nothing, just smoothing out the jutting 'lip' of the upper half (and not doing a good job at it). Once that was done, all the fittings on the upper hull were cemented. Needless to say, some parts need thinning down, such as the light guards and fender supports, although I left them as they were. The air cleaners were assembled but the intake/exhaust pipes were left off to ease painting. The next step is concerned with the gun barrel and the IR searchlight. The barrel is split down the middle and care has to be taken to avoid visible seams. The searchlight assembly includes a piece of clear acetate to act as the glass cover. I however did not include the 'glass' (and even the bulb inside) as I intended to cover the searchlight face.

For the turret, again I left it as it is. However, having seen some photos of M48s in Vietnam engaged in convoy escort duties, I decided to buy Legend Productions' M48 Sandbag Armour Set. The resin set consists of sandbag blocks that assemble on the kit turret a la jigsaw puzzle, a single mould of two sandbags for the fender, a single mould of sandbags for the glacis plate, a resin piece of 'timber' to hold the glacis-mounted bags in place, spare track links and jerricans. Dry-fitting the sandbags on the turret shows that there is no need to use the kit's infantry handrails. I then proceeded to cement the turret shell to the bottom and added most of the fittings. The front lifting lug was totally left out while the machinegun guard rail (I think) was left off until the sandbags were put in place. The main gun assembly was then cemented to the turret shell. Tamiya however still wanted to have 'playability' with their kits when they released the M48 and so the mantlet has only partial cover, allowing movement of the main gun. I therefore fashioned the rest of the cover using 2-part putty to the best of my ability (read: it looks ugly). The searchlight was left off at this time to facilitate painting.

The commander's cupola was next. I was thinking of using the commander figure but after looking at it, I decided to discard it. The commander's hatch was therefore fixed in the closed position. The kit also allows the commander's machine gun to be placed outside the cupola. I decided to place it outside. I however decided to replace the kit gun with an M2 from the Academy US Machine Gun Set.Finally I returned to the turret and fit the stowage basket. I might also add that the pieces are really overscale and should be replaced with more in-scale plastic rods. I also added a piece of aluminium foil to act as a cover for the searchlight.

Painting and Decaling
The Tamiya instructions have the M48 painted Olive Drab overall. I used their XF-62 Olive Drab acrylic paint for this model. I'm not very sure myself but the this particular bottle of OD was greener then the one I used previously - I guess it was one of the alleged 'wrong' batch of Tamiya's XF-62. But for the M48, I can say that this was a blessing in disguise as according to numerous modellers, the M48s (at least during the Vietnam War era) was not painted OD but a something more 'greener' than usual. While it doesn't exactly match, it does look like the shade I have seen on many photos of US M48s in Vietnam. The mantlet and spotlight cover was painted XF-49 Khaki. For markings, I decided to use the sharkmouth markings. This is another usage of creative license as AFAIK, there are no photographic evidence of sandbag-armoured Pattons wearing the sharkmouth, uh, nose art. The creative license was stretched further by applying the kit-provided registration number.

Finishing
I started by placing the commander's cupola in its slot, as dry-fitting of the sandbag armour showed that the latter may block part of the opening for the cupola.I then used the vinyl tubing from Academy's US and German Tank Accessories Set as the power cable for the searchlight.  I then placed the sandbag armour blocks around the turret. The fit for the main blocks at the front of the roof was very good, the one on the turret rear is generally OK but did not fit as closely as the one on the front. The sandbag blocks for the glacis plate and on the track guard was left off. They were then painted XF-57 Buff and a wash was applied to pop up the details. The MG was then placed on the cupola. To add a bit of interest, I did not add the usual ammo box on the MG. Instead, I used a length of 12.7mm ammo belt from Tamiya's old US Weapons Set (it has better definition than the Academy ammo belt). It was bended to conform to the contours, painted and fitted to the MG. The MG guard was then superglued to the slots in the sandbag block after it has been cut to the appropriate height.

For stowage, I placed spare road wheels, luggage, jerricans and spare track links from the kit (Legend provides items for the latter two, but I ended up using those from the kit), food and drinks containers and generic crates from Academy Tank Supplies set, .30 and .50 cal ammo boxes from the Academy MG set, a 105mm ammo crate from Tamiya's Modern US Equipment Set, home-made copies of C-Ration boxes, folded cot from the Academy M60A1 kit and a M1 helmet from the spares box. The lower hull, wheels and tracks were then subjected to an application of Mig Productions pigments. While I understand that they have a pigment powder dubbed 'Vietnam Earth', I do not have that in my inventory. So I improvised by using a mix of African Earth and Rubble Dust. They were mixed with water and brushed onto the relevant areas. Once dry, the excess was removed using a stiff brush. Finally I cut two lengths of copper wire and fashioned them into comm aerials.

Conclusion
The Tamiya M48A3 is a really old kit but until Dragon released theirs a few years back, this was the only available A3 version of the M48 Patton. Generally it was very buildable kit although a number of tweaks have to be done to correct the shortcomings, most notably the extra ride height and the motorisation holes.