Sunday, 5 July 2015

Topless Greyhound


Historical Background
The M8 light armoured car, from which the M20 was derived, began life as Ford Motor Company's entry, designated T22, for the Ordnance Department's initiative in July 1941 to develop a fast tank destroyer to replace the M6 Gun Motor Carriage. The requirement called for a six-wheeled vehicle armed with a turret-mounted 37mm gun, a better anti-personnel armament of a .50-cal and .30-cal machineguns, better off-road capabilities and glacis armour able to withstand hits from .50-cal rounds. Other prototypes were submitted by Studebaker (T21) and Chrysler (T23). Despite its deficiencies, Ford's T22 design was selected in April 1942. The Army however requested changes to the design. These include revision of the front hull hatches, addition of wheel covers and removal of the hull-mounted .30-cal machinegun. The revised vehicle was redesignated T22E2. By this time however, the Army recognised the deficiency of the 37mm gun against the latest German panzers. In order not to disrupt production, the vehicle was repurposed as a reconnaissance vehicle designated M8 Light Armoured Car, which bridged the gap between M3/M5 family of light tanks and the M3 scout car. Contract issues and the fact that no armoured car has been produced for the US Army in large numbers resulted in production delays until March 1943.

The M8 family has an all-welded hull although some external plates were riveted. The most distinctive feature of the vehicle was its lorry-like arrangement of wheels (one axle forward, steerable and two more paired towards the rear). The glacis was sloped with an actual thickness of 19mm. The floor however was only 3mm thick, making the vehicle vulnerable to mines. The vehicle was powered by a Hercules JXD 6-cylinder petrol engine rated at 110hp, allowing an average speed of 30mph off-road and 56nph on roads with a range of 400 miles. The Hercules JXD was quieter than other comparable engines and this feature, together with certain mechanical part tailored for low noise operations, allowed the vehicle to close with the enemy without virtually being detected until the last possible moment. As befits its role, a powerful radio set (SCR 506 at first) was mounted, with some vehicles carrying two. The fully-rotatable turret mounted a M6 37mm gun with a Browning M1919 .30-cal MG mounted co-axially with the main gun. An M2 .50-cal machine gun was sometimes mounted on a ring or a pintle mount - the M2 was not a standard feature of early production vehicles and many were added in the field. The 37mm gun was provided with 80 rounds, although only 16 may be carried if the second radio was fitted (field modifications on the two-radio M8s may raise the 37mm ammunition load to 40) while the M1919 has 1,500 rounds and the M2 500 rounds. Grenades and mines were also provided, along with M1 carbines for personal defence.

Only one M8 variant entered production during the war - the M20 Armoured Utility Car (also known as the M20 Scout Car). The M20 has the turret of the M8 removed and replaced with a low, open-topped armoured superstructure and armed with a ring-mounted M2 heavy machinegun. To compensate for the lack of anti-armour weapon, the crew was provided with a bazooka. Originally intended as command vehicles, the M20 was provided with extra radios. Apart from the command function, the M20 was also used in reconnaissance duties alongside the M8. The extra room available also made it suitable for personnel and cargo-carrying duties. The reduced weight made it faster and nimbler than the original M8. The M20 was originally designated M10 but to avoid confusion with the M10 Gun Motor Carriage, the designation was changed to M20. A total of 8523 M8 were built, solely by Ford. To that number, a further 3680 M20 were also built.

The M8/M20 first saw action in Italy in 1943. While generally more capable than the M3A1 scout car it replaced (being faster and adequately armed and armoured), it exhibited poor off-road capability, restricted on roads, reducing its usefulness in reconnaissance.  The thin floor made it vulnerable to mines and add-on armour kit was designed to give more protection (alternatively the crews place sandbags on the floor). Another problem is that commanders used the M8 in fire-support role, for which it wasn't really suited because of thin armour. Furthermore, while the 37mm gun was adequate against German recon vehicles, the M8/M20 itself is vulnerable to the 20mm gun arming most German recon vehicles. Apart from the European and Mediterranean theatres, the M8 was also used in the Pacific, where they partly revert back to their original role of tank destroyers. .The M8 was nicknamed 'Greyhound' by the British in keeping with other US-made armoured cars ordered by them such as Staghound (T17E1) and the T18 Boarhound.

The Kit
In 1998, Tamiya released a new-tool kit of the M8 Greyhound and it was fairly obvious that the M20 would soon follow. This they did in 1999. The parts were spread among six olive drab-coloured sprues, a length of string plus the usual, Tamiya-standard poly-caps and the decal and instruction sheets. The parts are virtually the same with the M8 kit with the exception of the turret parts, which was substituted for the coaming and other M20-specific parts. Since the two kits share many parts together, a modeller can use the unneeded 37mm rounds and/or mines to spruce up the same company's M8, should one have that kit in their stash (or planning to buy one). As usual there are no external stores but I believe this is probably moot as many modelers prefer to buy aftermarket items or make their own. Apparently, Tamiya provided the 'regular' SCR 506 radio of the M8 instead of a more powerful SCR 508 commonly fitted to these vehicles, but honestly I can't differentiate between the radio sets. Tamiya however do provide a bazooka and a single M1 carbine (yet there are three slots for personal weapons in the vehicle!). Decals provide markings for three vehicles:

-  'Tex', 1 Plt, C Coy, 82nd Armored Reconnaissance Battalion, 2nd Armored Division, France, August 1944
- 1 Plt., B Coy, 807th Tank Destroyer Battalion, Germany 1945
- 'Passy', CO's vehicle, 2nd Dragoon Regiment, 5th Armored Division, Free French Army, France, August 1944

Construction
As with many other military vehicle kits, construction starts at the underside of the vehicle. A separate floor was glued to the hull. This was followed by attaching the suspension and the drive train. Despite being underneath the vehicle and would be mainly invisible, the exhaust was left off, to be painted separately. Before attaching the rear panel, holes were drilled into it to accommodate the lights later on. Next, the interior of the vehicle. The bulkhead and the sidewalls were added, together with the crew seats. The radio and the fire extinguisher were painted separately and then cemented to their respective places. The whole of the interior was painted XG-62 Olive Drab as per the instructions. Other smaller stuff like water canteens were stuck into their places, before attaching the upper superstructure. A jerrican was also included but strangely, with regards to good details elsewhere in the kit, the jerrican has no detailed cover.

Moving on to the upper hull, the steering column / wheel and dashboard were assembled. While waiting for the cement to dry, the upper hull was cleaned up and holes were drilled as instructed.  The M20 superstructure was moulded with separate walls, to ensure proper angles of the side plates. Also cemented on the superstructure are some boxes and the upper bracket for personal weapons. The included M1 Bazooka and its ammo tubes were however left off while the map table was cemented in the opened position.The upper hull was then cemented to the lower half first and this was followed by the superstructure and the engine panels. Other panels and various smaller parts were also cemented. The hatches for the driver and the co-driver was cemented in the closed position. The ring mount for the machinegun was assembled but was left off at this time to allow easier access to the interior. Tamiya provided an option whether to use the mine racks or storage boxes on the sides of the vehicle - I chose the mine rack. Again, it was left empty at this time. The mudguards were left off in order to fit the wheels later on.

Painting and Decaling
As usual with American WW2 vehicles, the M20 was painted overall Olive Drab. I used Tamiya's XF-62 for this purpose. I originally wanted to paint the suspension parts Flat Black as seen on everyday lorries but having browsing photos on the internet, they were also painted Olive Drab. As for the markings, while I love colourful ones, the French option was too bright for me so I opted for the 807th TD Battalion with its 'Crunching Kitty' insignia. The decals, as usual. received the Mr. Mark Softer treatment. This was followed by the usual black/brown wash. And ooppsss I almost forgot, the exhaust pipe and muffler were painted Burnt Iron

Finishing
Starting with the interior, I looked for some items in my spares box. I found two M1 carbines from the old Tamiya US Infantry Weapons Set. Although they look cruder than the only one M1 carbine provided in the kit,they make a good addition (plus, the crudest area, would be out of view).  But when I tried to set them in the remaining two slots in the interior, they can't fit (should've done some test fitting when assembling the interior!). In the end I only used one, and placed it on the bench next to the radio. Also found is a M1 helmet and also a map (sort of) from my Tamiya Churchill kit. I used colour pencil to spruce up the map (and making it look horrendous instead). various bags, rolls, jerricans and ammo boxes were then affixed to the model, courtesy of the spares box and the Academy and  Tamiya vehicle accessories sets.

While handling the stowage, I accidentally knocked one of the tie-downs off. As it was a pretty small part, it was quickly devoured by the Carpet Monster. I have to drill a new hole and inserted a copper wire to replace the lost part.  An application of Flat Clear followed. The model then received an overall 'dust' application using thinned Tamiya Xf-57 Buff; on the vertical sides, I streaked them downwards to create the so-called 'rain' effect. However the brush I used was a 2/0 brush, which was really too large for this application. After the wash has dried, I moved down to the undercarriage. The wheels were daubed with Mig Productions European Dust and Iraqi sand pigments in water. When dry, the excess was removed with a stiff brush. Afterwards, I used cotton buds damped with enamel thinner and wiped them around the sidewalls and contact surface of the tyres to further remove pigments from the said areas. I decided to add radio aerials using copper wires; however I neglect to check whether I still have them in stock. There were none and I have to leave the aerial bases as they were. 

Conclusion
What else can I say? Another kit with good engineering from Tamiya. The parts fit almost perfectly (the 'almost' part was mainly due to my clumsiness). While the details are a bit softer than other companies' kits, the ease of build more than compensates for it. It's nice out of the box, rewarding beginners and average modelers with a good model. Modelers with more skills than me can add a whole lot of additional items to spruce up this kit even further.

Saturday, 20 June 2015

French 'Kiss


Historical Background
In 1926 the French Army decided to provide armoured support to regular infantry divisions by creating autonomous tank battalions equipped with light and cheap infantry tanks. For this role, the Char D1 was developed but it was neither light nor cheap. In 1933, Hotchkiss et Cie presented a proposal for a lighter, and theoretically cheaper design, using new innovations such as entirely cast steel hull sections. On 30 June 1933, the proposal was accepted by the Counseil Consultatif de l'Armement and on 2 August 1933, a specification was issued for a six-ton tank with 30mm armour protection all-around. Prototypes were ordered from Hotchkiss but the specification was issued to the entire armaments industry to provide alternative proposals. As a result, Renault was the first company to submit a proposal for the nouveau char leger, eventually becoming the R35. In January 1935, the Hotchkiss prototype, a turretless, machinegun-armed tankette was presented to the Commission d'Experience du Materiel Automobile at Vincennes with the second prototype being presented in May. Both were rejected because of a new specification that increased the armour thickness to 40mm. On 19 August 1935, Hotchkiss delivered the last prototype with a redesigned cast hull and a APX-R turret armed with a short 37mm gun. This was accepted in November 1935 as the H35 and an order for 200 (later 400) vehicles was made with the first production vehicle was delivered on 12 September 1936.

The first series of vehicles was tested until early December 1936. The H35 was shown to have a poor cross-country handling making it impossible to steer (and fire its armament) safely over bumpy terrain, posing danger to any nearby friendly infantry. As a result the infantry arm rejected the tank, with just two battalions equipped with 100 of the type: the 13 and 38 Bataillon de Chars de Combat (BCC). The remaining 300 were turned over to the Cavalry, which were late in receiving the Somua S35 tank. The cavalry however wanted a faster tank and a new prototype was made in 1937 with a Hotchkiss 6-cylinder, 5.97-liter engine rated at 120hp instead of the 78hp engine in the H35. The larger engine caused the hull to be enlarged with the hood now almost horizontal. The new version was presented to the Commission d'Experimentations de l'Infantrie on 31 January 1939 and was accepted as the Char leger modele 1935 H modifie 1939. It was decided that the H39 would replace the original H35 on the production line from the 401st vehicle onwards.

The Hotchkiss H35/39 is a small vehicle, weighing 9.6 tons (12.1 tons for H39). The hull consisted of six cast armour sections bolted together. Although the armour thickness was just 34mm instead of the specified 40mm, it was still one of the thickest for 1930s light tank design. The crew consisted of two persons: the driver and the commander, who also took the job of loading, aiming and firing the gun. The suspension consists of three bogies per side, with each bogie carrying two rubber-rimmed wheels. The H35 was powered by a Hotchkiss 6-cylinder, 3.4-liter air-cooled petrol engine. The designed road speed was 28km/h; however the type rarely reached this number because of difficulties in engaging the highest (fifth) gear. The H39, with its better power-to-weight ratio can reach 36.5km/h on road. Both H35 and H39 were equipped with an APX-R cast turret, with a thickness of 40mm and armed with a low-velocity, short-barreled SA 18 37mm gun and a co-axial 7.5mm Reibel M31 machinegun. A total of 102 rounds was carried for the main gun with another 2,400 rounds for the machinegun. The SA 18 had weak anti-tank capability so from January 1940, the longer-barreled SA 38 37mm gun was fitted to the tanks of platoon, company and battalion leaders and it was intended to refit all Hotchkisses with the longer gun by the end of 1940. The turret had a rotating cupola with a PPL RX 180 P visor but there was no hatch in the cupola. Access into the turret was through a hatch in the back of the turret. The commander can sit on the opened hatch door for better observation but left him vulnerable to enemy fire.

In the Cavalry, the Hotchkiss replaced the earlier AMR 33 and AMR 35 light tanks. The H35 equipped the 1st, 2nd and 3rd Division Légère Mécaniques (DLM), the 18th Regiment de Dragons Portes and the 4th Cuirassiers. And because of the slow deliveries of the R35, the H35 was also used to equip the 22nd, 24th and 33rd BCC as well as the 342nd and 351st Compagnie Autonome de Chars. The H39 was delivered to the 3rd Division Légère Motorisée, 4th and 5th Division Légere Cavalerie, 25th and 26th DCC and the 2nd and the 3rd Divisions Cuirassées de Reserve. Another unit, the 342e CACC, equipped with SA 38-armed H39s was sent to Norway, arriving at Narvik on 7 May 1940. The 12 survivors were withdrawn in June and disembarked in the UK. The 342 CACC later formed the nucleus of the FFL's armoured force, the 1ere Compagnie de Chars de Combat de la France Libre. In operational formation however, the Hotchkiss were mismatched: the fast H39 operated with the slow Char B1 while the slow H35s were paired with the fast Somua S35. The Hotchkiss's 37 mm gun was superior to the 20 mm gun arming Panzer IIs and were only matched by Pzkpfw 35(t) and 38(t) with similar guns, while their thick armour was quite impervious against German 37mm guns. However, the spread-out formation, lack of radio as well as overburdened tank commanders led to disastrous results. Lack of fuel sometimes caused entire formations to be captured intact. After the fall of France, the Vichy government was allowed to retain some of its tanks in North Africa (with the 1ere Régiment de Chasseurs d'Afrique) and Syria.

Around 550 Hotchkiss were captured by the Germans and distributed to independent panzer companies as Panzerkampfwagen 35H 734(f) and Panzerkampfwagen 38H 735(f). Many have the original cupolas replaced with a two-piece hatch and used for police and occupation duty in France. Others serve in Russia during Operation Barbarossa (with 211th Panzerabteilung) and anti-partisan duties in Yugoslavia, such as with the 7.SS-Freiwilligen-Gebirgs-Division 'Prinz Eugen'. Several were sent to Axis partners Croatia, Bulgaria and Hungary. Those in France later fought against Allied armour in 1944. The Hotchkiss was also used as a chassis for a number of conversions such as ammunition carrier, self-propelled gun and tank destroyers. The Hotchkiss fought their last war in 1948 when 10 H39s were used in the Israeli War of Independence.

The Kit
In 2006, Bronco announced their entry into the scale modelling world by introducing the Hotchkiss H39 as their very first kit. Despite its size, the kit consists of 483 plastic parts (although 264 are the separate-link tracks), a turned aluminium barrel, a short length of chain, six metal springs (five in my box) plus the usual decal and instruction sheets. The kit have detailed interior (for injection moulded plastic), including the engine and the driver's compartment and the transmission/final drive. As Bronco later released the SPG/tank destroyer versions (with open fighting compartment) of the Hotchkiss, this was probably the reason why they were included in this first release. The separate-link tracks were, upon first sight, quite tiny although they do have good detail. Overall it was better than the Trumpeter kit released two years before Bronco's where I had the opportunity to compare them at the now-defunct Miniature Hobbies in KL (and chose this kit over Trumpeter's when recommended by the owner). Decals provide markings for five tanks:
- 25e BCC, 1ere DCR, France 1940
- 211 Panzerabteilung, Finland 1941
- 7.SS-Freiwiligen Division 'Prinz Eugen', Norway 1943 (unlikely, as the 7th SS division fought in the Balkans) or Norwegian Tank Battalion, Norway 1942
- Russian Company, 82nd Armoured Battalion, Israeli Army, 1948
- 7e Cuir, France 1940

Construction
As stated above, for its size, the Bronco H39 sure packed a lot of parts and many of them are for the interior. However, as with the Hobby Boss Renault R35 kit, I did not add the interior parts, save for the bulkhead (Parts C6 and A19), to add a bit of strength to the hull. The transmission cover was then cemented to the hull followed by the detail parts on the rear hull panel and the transmission cover. Next were the suspension. One thing I can say about them is that the front and rear halves of the bogies are moulded as one piece, eliminating the wobbly assembly experienced during the building of my R35.  However my kit missed one of the stainless steel spring. I didn't even attempt to contact Bronco about this matter...instead I tried my own solution. Unfortunately, the best option, using the spring from a pen did not present itself as none were available. I ended up using stretched sprue, wound around a cylinder (pencil) and then gluing the coiled sprue onto the relevant. It look horrible! The suspension units were then cemented to the hull, together with the rest of the wheels. The lower hull was then painted

While waiting for the paint to dry, I painted the track links, cut them off the sprue, cleaned them and placed them inside a container. I then assembled them, 10 at a time using Tamiya Extra Thin Cement. The links are fairly tiny resulting in some dodgy moments during assembly. The real problem was that the links have a less than good fit, especially when I tried to to wrap them around the sprocket and idler wheels. Another problem was the sprocket teeth - there were too many of them than they actually were. So I have to do an emergency surgery, as fast and as clean as possible, in removing the extra teeth, as the cement is fast drying (the operation on the other sprocket teeth was done at a more leisurely pace as the problem has been identified). Only after the tracks have been assembled can work on the upper hull be resumed. I started by putting the track guards in place and adding hatches to the sides of the upper hull. While the instructions have you add the upper hull to the lower half first before adding the details, I diverged a bit by assembling some parts, such as the driver's and the engine hatches first. Only then did I cement the upper hull to the lower hull. Some smaller parts were added but I left the exhaust and the tools at this time.

Finally, the turret. The gun was assembled first and here Bronco provided nicely detailed parts although that's about it regarding the turret's interior. It was then set aside and I assembled the turret proper. There isn't much to assemble, just the turret shell, the bottom, vision slits and the hatch. The latter was cemented in the closed position. The gun assembly was slotted into place, followed by the turret bottom. And the model was off to the paint shed....

Painting and Decaling
Having rejected the German and Israeli options, I was left with just the two French Army options. The 25e BCC option is more interesting as it had that playing card symbol on the turret, in this case, a red heart. The instructions called for this option to be painted in olive drab. I'm not sure about that and end up painting the model in Olive Green, using Tamiya XF-58. As for the decals, while the instructions were clear on the placement of the turret markings, it was less so for the hull ones. For the left-hand side view, the heart symbol was shown to be on the rear of the right-side hull, a very unlikely place for markings. Yet for the rear view, it was shown to be on the rear hull panel. Using common sense (rather than any documented evidence), I placed the symbol on the right side of the rear hull panel with the registration number on the opposite side. There were no decals for the registration number for the front plate however. I should have cut the decal and reposition it on the front plate, making up for the lack of markings on the front

Finishing
There isn't much to do at this stage, I just add the last bits such as the tools. The exhaust was painted Burnt Iron, then dappled with XF-64 Red Brown and was followed by an application of Tamiya Weathering Master Rust. The chain was left unpainted, although I still apply Tamiya's Weathering Master Rust on it. At this moment however I decided to add the trench skid. Yes, it was a pretty dubious decisison as the model has already been painted. Anyway it was assembled, painted and stuck to the rear of the tank.  Good thing I did that before starting the weathering process. The usual pin wash was done using the black-brown mix. The lower half of the model was then liberally coated with Mig Productions European Dust pigments. I do not have any accessories to be placed on the model except for a figure from Miniart's French Tank Crew set. He was painted the same way as the figure in my R35 build.

Conclusion
Bronco took a brave first step (and never look back) into the scale modelling world by having a tank not kitted by everyone else (except Heller and Trumpeter) as their first kit. It is very fine and fairly complicated for such a small kit. Terry Ashley pointed out the shortcomings of this kit, mainly concerning the with the running gear (the issue was rectified in Bronco's subsequent H38/39 release). While I'm not overly concerned with the number of bolts on the idler or of the shape of the heat shield, the mould slip on the wheels and also the wrong number of sprocket teeth were indeed a cause for concern. However, in general, the build process went together well although I must say that that the track assembly process was tedious, especially because of its size and the fit problem. Recommended to all (if you have issues with the problems mentioned, just grab the H38/39 release, it also allows you to build the SA 18-armed H38).

Sunday, 14 June 2015

Hunting Panther


Historical Background
In mid-1943, after experiencing combat with Red Army tanks, especially the T-34, the Germans introduced a new medium tank, the Panzerkampfwagen V Panther. The Panther, despite its inauspicious debut during the Battle of Kursk, have an excellent blend of firepower, mobility and protection and became the benchmark for other nations' tank designs and was regarded as one of the best tanks of World War 2. In August 1942, while the Panther tank was still in development, the Waffenamt decided to use its chassis and components to create a new sturmgeschutz armed with a newly developed long 88mm gun with Krupp being assigned to this project. The plans and technical documentation for this new vehicle was scheduled to be completed by January 1943 with full production starting in July 1943. In October 1942, the Reich Minister of Armaments and War Production, Albert Speer, decided that further development would be undertaken by Daimler-Benz with Krupp assisting with the armament and its mount.

In January 1943, Daimler-Benz finished a pre-final design of what is now called a 8.8cm Sturmgeschutz with ordnance inventory designation Sd.Kfz. 172. Preparatory works continue until May 1943 when the final design was finished as the 8.8cm Pak 43/3 Panzerjager Panther with ordnance inventory designation Sd.Kfz. 173. On the 24th of the same month, production was transferred to Muhlenbau-Industrie AG (MIAG) in Braunschweig because of shortage of space at Daimler-Benz's plant in Berlin. The prototype was presented before Adolf Hitler on 20th October 1943 at Arys in East Prussia and in November, Hitler bestowed a shorter name for the vehicle - Jagdpanther.  

The Jagdpanther was based on the standard Panther tank chassis with the glacis and side plates extended up to form a turretless, fixed casemate. The new superstructure housed a roomy fighting compartment with the main hatch located to the rear of the superstructure, which was used for crew entry/exit and also for ammunition loading, two other hatches were located on the roof.  The casemate was protected by 80mm of armour at the front and 60mm sides. The Jagdpanther weighed 46 tons and was powered by a Maybach HL230 P30 V-12 petrol engine with 690hp, allowing it to reach a maximum speed of 46km/h. It was armed a long-barreled Pak 43/3 L71 88mm gun (the same gun fitted to the Tiger II). The gun mount allows the gun to be traversed to 11° on each side and elevation of +14° to -8°. Fitted with a Sfl.Z.F.1a gunsight, the gun was capable of destroying enemy tanks up to 3,000 meters away. A ball-mounted 7.92mm MG34 or MG42 machinegun was fitted to the right of the main armament. Ammunition capacity was 60 88mm rounds and 1,200 7.92mm rounds. Later in the war, a 90mm close-in weapon called Nahverteidigungswaffe, with 16 'grenades' was fitted. In addition, two MP40 submachineguns with 384 rounds were carried for personal crew protection.

Various modification were made during the production run such as different exhaust arrangements, flame suppressor mufflers, deletion of pistol ports and installation of a cooling fan for the interior heater. 'Small square'-pattern Zimmerit anti-magnetic mine paste was applied in factory for early-build Jagdpanthers but the practice was discontinued in September 1944. Generally speaking, there were two main variants of the Jagpanther - the early (G1) variant with a small, internally bolted main gun mantlet with modified Panther A engine deck and the late (G2) with a larger, externally bolted mantlet and a modified Panther G engine deck. However some G1 Jagdpanthers were also fitted with the large mantlet. Only 425 Jagdpanthers were built from January 1944 until the end of the war. It was originally planned to build up to 150 units per month but the highest number produced per month was just 72 in January 1945. The low number produced was the direct result of Allied bombing raids against the main MIAG and MNH (Maschinenfabrik Niedersachsischen-Hannover) factories, which caused much destruction and disruption.

Jagdpanthers were issued to independent heavy anti-tank battalions (schwere Panzerjager Abteilung) and also anti-tank battalions that form part of a Panzer Division. They were first issued to schwere Panzerjager Abteilung 559 and 654 and took part in the Battle of Normandy. On 30 July 1944, three Jagdpanthers from Abteilung 654 ambushed a squadron from the British 6th Guards Tank Brigade near Les Loges in Normandy. They managed to destroy 11 Churchills at the cost of abandoning two of their own number because of damaged tracks. The majority of the Jagdpanthers however served in the Eastern Front although in December 1944, many Eastern Front Jagdpanthers were transferred to the West to take part in Operation Wacht Am Rhein (the Battle of The Bulge). Small numbers of the Jagdpanther were used by the Waffen-SS, specifically with the 2nd SS-Panzer Division Das Reich, 9th SS-Panzer Division Hohenstaufen and the 10th SS-Panzer Division Frundsberg. The three SS-Panzer Divisions received one company each of Jagdpanthers and were used during Operation Frühlingserwachen where out of 42 issued, only 12 were operational at the end of the operation.


The Kit
Tamiya's 1996 Jagdpanther was a new tool kit, replacing the 1960s-vintage original, and used Tamiya's then-new Panther G mould as basis. The parts are spread among six tan-coloured sprues, lower hull half from the Panther G kit, one-piece upper hull, two sprues of separate-link tracks from their Panther track set, a pair of glueable vinyl/rubberised plastic tracks, a length of copper wire plus the de rigeur polycaps, decals and instruction sheet. The parts are well-moulded and have excellent details. There is no PE included although Tamiya did mention their separately available PE set for the engine grilles. The belt-type tracks generally have good detail although the guide teeth are moulded as a solid piece instead of hollow. While nice, it can't beat separate-link type tracks, especially workable ones, to replicate the drape of the real thing. And I am quite at a loss as to why Tamiya use plastic instead of the usual string to replicate the tow cables. The decals provide marking options for three vehicles : '131' and '102' from schwere Panzerjager Abteilung 560 during the Battle of the Bulge and '121' from an unknown unit.  

Construction
As usual. construction began with the lower hull. Tamiya suggests that the rear hull panel be temporarily attached to the lower hull shell with cellophane tapes. I however decided to cement them together. The torsion bars were next in line; although Tamiya reminded the modeller about the alignment of the bars, the fit of them to the hull was very good and aligned well. As the Panther's road wheels also used the Schachtellaufwerk arrangement, the wheels were painted first. While the parts for the middle wheels were mated together, all the wheels were off the hull at this time. Going to the rear of the hull, I added the storage boxes and the towing eyes. As for the exhausts Tamiya provided two types, marked as May-December 1944 or December 1944 onwards production types. As I was thinking of building the 560 Abteilung machine during the Battle of The Bulge, I chose the former as it was more plausible

The upper hull assembly started by cementing all the optical equipment (sadly not moulded in clear plastic) to the roof. Also added were Parts D13 and D14 which act as stiffeners while two holes were drilled into the engine deck. The upper hull was then cemented to the lower hull before i proceed any further. I then added all the stuff on the hull, but instead of following the steps suggested by Tamiya, I end up cementing the engine grilles first, followed by the various hatches and ports, periscope guards and the tool mounts (but not including the tools). The hull MG barrel was also left off at this time. Tamiya also provided the crew compartment heater module, but again, it was not expressly stated whether it was applicable to the markings in the kit. I end up using the normal grille. Like many of their kits of the same vintage, Tamiya have the engine grille covers as a separately available item; good thing the local Tamiya distributor have them in stock. The schurzen mounts was then cemented to the hull. I however intended not to use the schurzen plates. The gun was the last to be assembled prior to painting. It consists of breech assembly (which also formed the vast majority of the interior 'detail'), the barrel assembly (beware of seams if you are not careful) and the mantlet.

Painting and Decaling
By the time the Jagdpanther entered service, German Panzers were mainly painted a tricolour of Dunkelgelb (Dark Yellow),  Olivgrün (Olive Green) and Rotbraun (Red Brown). I used Tamiya's XF-60, XF-58 dan XF-64 respectively. The decals were then applied and afterwards the model then received a filter layer of XF-57 Buff. This was followed by a pinwash of the usual black/brown mix.  The 'metal' parts of the tools were painted XF-56 Metallic Grey, which then received an application of Tamiya Weathering Master Rust/Soot while the wooden parts were painted XF-64. The jack block was painted XF-60 overall and received an XF-64 wash. The tracks were painted XF-1 Flat Black and then washed with AK Interactive's Track Wash. The track cleats were dry-brushed silver.

Finishing
Finishing works started at the bottom where the wheels were put into their places. The tracks would have to wait for a while. The tools were also cemented into place. The supplied copper wire was wound and placed on the right side of the superstructure. Actually I was baffled as to its function, but later I realise that the copper wire was supposed to be the track-change cable. However Tamiya only provided the 'cable' but not the end shackles. As stated before, the tow cable is plastic and would look very artificial if used as they were. Rummaging through my spares box, I found leftover strings from previous projects, I cut the shackles off, drill holes and insert the string. They look better than what came in the box, although I think I cut the strings a bit too long The towing cables were painted silver after which I washed them with AK Interactive's Track Wash. Before adding the tracks, the lower hull and the tracks themselves received an application of Mig Productions European Dust (despite the description that this particular vehicle took part in the Battle of The Bulge, with the implied muddy and snowy conditions)

Conclusion
What else can I say? Another excellent kit from Tamiya. The parts fit well with no problems encountered. The only shortcomings I found in this kit are the lack of PE parts, some simplification of parts, the one-piece tracks and that tow and track-repair cables. Despite the size (the Jagdpanther is a fairly large vehicle), I finished building them at a faster rate than the norm. The ease of build is of course the main factor, plus the fact that the vehicle is turretless also played a part!
   

Friday, 5 June 2015

Renault, Driving The Change


Historical Background
The World War I-vintage FT-17 was the staple of the French armoured force until 1935. But as early as 1926, a plan was drawn to introduce the char d'accompagnement, a cheap, mass-produced light tank to replace the FT-17. However, the Renault tanks developed to fill the requirement were neither light nor cheap. In 1933, Hotchkiss proposed a solution (which eventually became the H35). But for political purpose, Hotchkiss's solution was turned into the so-called Plan 1933 and the whole of the French armaments industry was invited to submit their proposals in August 1933. Fourteen responded, from small armouries to automotive companies. Renault, the prime French military contractor at the time cannot afford to lose the contract and rushed the prototype. In fact, when the specification was changed on 21 June 1934, to increase armour thickness from 30mm to 40mm, it cannot be implemented by Renault. They submitted the ZM design anyway to the Commission de Vincennes in December 1934. The prototype performed well but was sent back to Renault for additional armour and to mount the APX turret in April 1935. The prototype was still undergoing tests when tension mounted following the German re-armament. This prompted a swift modernisation of the French tank fleet and the ZM was to be put into production. On 29 April 1935, the Commission awarded a contract for 300 R35 (as the ZM was now known) even though the model had not yet been perfected. On 4 June 1936, the first production examples left the factory  and were subjected to further extensive tests.

The R35 is of cast construction with the hull consisting of three cast modules bolted together. Maximum hull thickness was 43mm (glacis) and between 30-40mm for the sides, rear and the engine deck. The cast APX-R turret was equipped with a domed rotatable cupola fitted with vertical viewing slits. Of the typical 1930s one-man design, the commander rotated the turret by a hand-crank or using his weight. He was also not always provided with a seat and just stood on the floor of the hull. The turret hatch, when hinged down can also act as the commander's seat.  Early batch of R35s were armed with a short Puteaux L/21 SA18 37mm gun and a 7.5mm Chatellerault fortress machinegun. Later vehicles were still equipped with the same gun but with a better sight and have a MAC31 Reibel machinegun fitted. A total of 72 armour-piercing and 58 high-explosive rounds were carried for the main gun and 2,400 for the machinegun. The running gear was based on the AMR35 cavalry tank with five double roadwheels - four in two sets of bogies and a single at the front. Power was provided by a Renault V-4 engine rated at 85hp allowing a road speed of 20km/h and a range of 130km.

Due to deteriorating situation in Europe, 2300 R35 were ordered by 1939. But due to delays by APX regarding the turret, rate of production fell and at the outbreak of war on 3 September 1939, only 975 have been delivered. They, as mentioned above, were intended to replace the FT-17 but the crews need time to retrain and as a consequence, there were still eight battalions of FT-17s in service in May 1940. The R35 also enjoyed some export success with Poland receiving 50, Turkey (100), Yugoslavia (54) and Romania (41). The Poles actually rejected the R35 when two were bought for tests in 1938. They found it unreliable and preferred the Somua S35 instead. However with war becoming more imminent and their own 7TP tanks insufficient, it was decided to order 100 R35s in April 1939 with the first 50 arriving in June of the same year. Most were assigned to the 12th Armoured Battalion and in September 1939 formed part of the 21st Light Tank Battalion. They formed the general reserve of the Polish High Command and defended the so-called Romanian Bridgehead. Following the Soviet invasion on 17 September 1939, the unit was split with 34 tanks withdrawn to Romania and the rest formed the Dubro Operational Group. Romania absorbed the 34 tanks into its own existing fleet of R35s, allowing the 2nd Armoured Regiment to have two tank battalions.

At the start of Operation Fall Gelb on 10 May 1940, France had 900 R35s in service. The R35s were formed into Groupements de Bataillons  de Chars, which were purely armoured formations without other organic components and were intended for close support of the infantry. Despite its role, the R35 can effectively tackle the German Panzer I and II while its armour was proof against the standard German 37mm anti-tank rounds. The R35s equipped the Ie, IIe, IIIe, IVe, Ve, VIIe, VIIIe and IXe Armees and the Armee des Alps. However, when it was shown that the doctrine did not work, 135 R35s of the 2e, 24e and 44e Bataillons de Chars de Combat formed the 4th Division Cuirassee de Reserve on 15 May 1940 while the 40e and 48e BCC reinforced the 2e DCR. Following the fall of France, the majority of the R35s fell into German hands who promptly used 131 of them as Panzerkampfwagen 35R 731(f) and used in garrison duties or driver training. Several others were turned into tank destroyers with the designation 4.7cm Pak(t) auf Panzerkampfwagen 35R (f) ohne Turm. Others have their turret removed and the latter were then placed in the so-called Tobruk bunker. R35-equipped tank units in Morocco and Syria, the 63e and 68e BCC (Syria) and 62 BCC (Morocco) later fought against the Allies during the invasion of Syria and Operation Torch. They were later taken over by the Free French 1e CCC. Other R35s saw service with the Italians, Hungarians and Swiss. The last combat action of the R35 took place in the Middle East in May 1948 when five Syrian tanks attacked a kibbutz at Degania Alef.

The Kit
I can probably say that Hobby Boss is one of the more adventurous mainstream model manufacturers nowadays, producing kits of vehicles that were overlooked by its more illustrious rivals. The R35 was released last year (2014) after the anti-tank version used by the Germans (that is quite abnormal as, like the real vehicles, models of derivatives are usually released after the base vehicle, but anything sporting the Black Cross sells). For a small vehicle, the box is packed with parts - 304 in beige plastic, 72 in light brown plastic (the tracks), 52 brass PE  parts, one metal barrel and a small decal sheet. Many of the parts are for the interior, including the engine, transmission and the crew compartment. While the engine and transmission are fairly complete, the fighting compartment lacked the ammo storage racks. The tracks are of the link-and-length type and allow the modeller some quite considerable time-saving. All the parts are nicely moulded. Some of the PE parts however lacked the bend lines and may cause some difficulty. Despite the fact that the R35 was the most numerous French tank, not to mention enjoying some export and foreign usage, the decals provide markings for just two vehicles, one of the French Army and another is in the de rigueur German markings. Both are from that most famous military formation in modeling hobby - 'unknown unit'!  

Construction
Like Bronco's Hotchkiss H39, the R35 has a fairly complete interior, including the engine and transmission. However, as I intended to complete this model 'buttoned up', I skipped most of steps 1-4 of the instructions. The rest of the build at this juncture were concerned with the rear panel of the hull, which I also skipped for the time being. The lower hull was then assembled and I only add part B26 to help aligning the walls and strengthening the assembly. I then moved to the rear panel. The two doors on the rear panel did not have good fit and I had to trim the openings for them to have better fit. The mountings for the idler wheels (and also acted as the mount for the towing hooks) and the towing hook were assembled and like the doors, they were also of not perfect fit. The rear panel was then cemented to the lower hull.

Next came one of the tricky (if not the trickiest) part of the build - the suspension. Each of the two-wheel bogies have four brackets made of PE brass (numbered PE-1 and PE-4) while the single-wheel bogies have one PE part (PE-1 in the instructions, although it should be PE-18). The edge of the PE parts need to be bent at right angles; additionally,  the inner part (PE-4) need to be bent into a curve. Without a form to bend the curve and without even bend lines, I came to the conclusion that this was next to impossible. However, browsing the internet, I came upon tips given by Matt Ashley of Perth Military Modeling Site - replace the PE with plastic card. The forms were traced on the plastic card and cut. However, the plastic brackets still followed the unbent PE form and need to be trimmed. Knowing how bad I am with blades, I decided to tack them on the OUTSIDE surface of the bogie. It will look horrible, I know but it would have to do. The numerous parts of the bogies also allow unwanted movements during assembly and I have to ensure that everything aligns,

Once completed the bogies were set aside and I moved on to the upper hull. While dry-fitting the single-piece upper hull, I found that while the rear half fitted fairly nicely, I have to flex the lower hull walls a bit in order for the front half to slid into place. Once done, there are however gaps between the glacis plate the hull sides; there is also a seam on the front of glacis plate - they were dealt with the usual way. The transmission cover and the driver's hatch was then cemented in the closed position. A couple of PE parts were superglued to the transmission cover with part PE-5 (the grab handle) being difficult to bend because of the lack of bending lines. Then it was time to fix those bogies to the hull. Again I faced some difficulties here as the fit between the bogies and the hull were rather loose and that the pegs were too long (or the holes too shallow). I ended up cutting a bit of the pegs off. It helped a bit although in the end I had to use superglue to fix the bogies to the hull. There were alternate idler wheels (opened or closed holes) and it's entirely up to the modeler to choose. However the wheel is a three-piece affair and the outer rims are separate but without any locating pins. So care again have to be exercised as the wheels have perforations that need to be aligned.
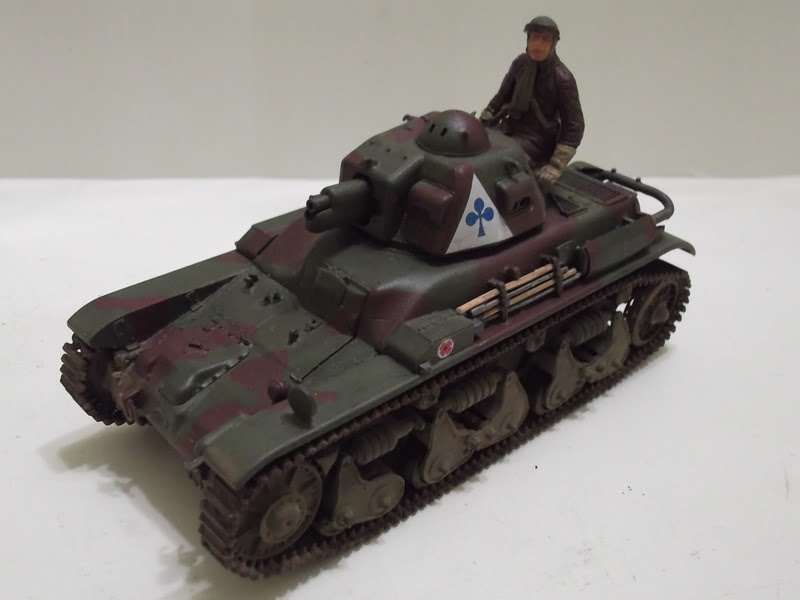
Finally, the turret is assembled. The interior detail consists of just the gun breech. While the drawings show the presence of the elevating wheel, it wasn't present on the sprues. The breech assembly were straightforward although I have to carve away excess plastic for a good fit between the breech and the gun cradle. Two small brackets were cemented to act as trunnions for the gun - the left-hand bracket was a bit of a challenge because of its location. The rear hatch is designed to be moveable although the hinge pins were too long and need to be trimmed a bit. The vision ports and the cupola were then cemented and this was followed by the lower turret ring. The very small turret lifting rings, and the even smaller ones on the cupola was then cemented, burrs and all. Once the cement has dried, I cut off the burrs - it was easier this way.

Painting and Decaling
As mentioned before, Hobby Boss only provided two marking schemes - one French, the other German with no indication as to which unit the tanks belong. The box art however shows a marking not included in the kit! Anyway, I chose the French scheme. The instructions have you paint it a camouflage colour of XF-64 Red Brown and XF-61 Dark Green. Rather simple-mindedly, referring to the Tamiya Char B1bis instructions and some photos of built-up models, I decided that the suggested colours were 'wrong' and used XF-9 Hull Red and XF-58 Olive Green. There were just four decals to be applied - one on each side of the hull and another two for the turret sides. And as mentioned before, there is no indication as to which unit the markings belong and the best I can make it out is that this particular tank belongs to the 4th platoon (club symbol) of the 1st Company (blue) of an anonymous regiment.

Finishing
While I'm comfortable with the link-and-length tracks, the rather wobbly assembly of the suspension filled me with a bit of trepidation. And I found that the return rollers sit too close to the hull and therefore will not align with the wheels. The original stubs were removed and I drilled holes into the return rollers. A new stub made from 1mm rod was made for each wheel and they were cut so that they align with the rest of the wheels. My usual method for assembling separate/link-and-length was by starting at the bottom and make my way to the top. This however resulted in a rather misaligned assembly for the right-hand side track. I change the method by starting with the top run first for the left-hand side track and it did have a better appearance. However, the left idler was a bit lower when compared with the right side. Also the forward part of the upper track run somehow warped, resulting in a gravity-defying upward curve. The cement has set however by this time and I just have to live with it. Oh well! The tracks were then washed with the AK Interactive track wash solution.

The rest of the assembly was concerned with the differently-painted parts and also the track guards. While the left-hand track guard fit flawlessly, the right-hand side did not fit well so I trimmed a bit of the locating stub. Afterwards, it also fit nicely. The exhaust system was painted Burnt Iron and enhanced with a bit of Tamiya Weathering Master Rust. The PE heat shield for the muffler caused problem as it is without bending lines engraved (furthermore, I do not have any 'proper' PE bending gizmos). So I'll pretend that the shield was dented when the driver backed the tank into something! The model then received a very thin wash of XF-57 Buff and followed by a pinwash of the usual-black-brown paint mix.

As I have Miniart's French Tank Crew figure set in my stash, I decided to use one of them and since the turret hatch was made operable, I chose the sitting commander's figure. Test fitting however showed that he can't fit into the turret properly so I have to do what's necessary: amputate his legs below the knees! To paint him, instead of using Miniart's instructions, I used the Tamiya one (again from the Char B1bis kit). I also left the googles off.

Conclusion
In a nutshell, it was actually a nice kit and in general I do not face fit problems. The PE is however a bit of a letdown as it was fairly thick and lack folding lines, resulting in its substition with plastic sheet for some components of the model. Another letdown was the minimalist approach to the markings (and colour scheme), a shame really as the R35, being the most numerous French tank, came in many colour schemes, most of them very catchy indeed. Having said that, I still recommend this kit.