Showing posts with label MiniArt. Show all posts

Friday, 18 September 2015

Support For The Scouts


Historical Background
The Associated Equipment Company (AEC) of Southall, Middlesex was set up in 1912 and became well-known for its trucks and buses, especially the famous London double-deckers. With the outbreak of World War 2 in 1939, the company was geared for war, producing the 10-ton, 4-wheeled Matador artillery tractor (a 6x6 version was also produced, named the Marshall but was always referred to as a Matador). In 1941, a private-venture move was made by AEC to produce a multi-mission armoured car for the British Army using the 4x4 Matador chassis. The prototype was shown to officials at the Horse Guards Parade in London 1941. Winston Churchill was impressed and ordered the vehicle into production.

The AEC Armoured Car was fairly large as the designers intended it to be a 'wheeled tank', being cheaper and thus being able to be produced in larger quantities than the real tank. The vehicle utilised the Matador chassis, including its engine and transmission and thus able to carry heavier armament than its contemporaries. Size-wise, it's impressive, having a long and tall structure and a narrow, lozenge-shaped armoured body. The driver sits at the front with the fighting compartment in the middle. Despite the rather narrow aspect of the body, the fighting compartment was roomier than the one of the Valentine tank. Large stowage boxes were placed between the mudguards, also creating a step for the crew to mount their vehicle. The frontal armour was 65mm thick but sloped angle increased the effective thickness to 90mm, with side armour being 13mm thick. This protection came at the cost however with the vehicle weighing 11 tons. However production vehicles were powered by the AEC 190 diesel engine rated at 105hp and giving a power-to-weight ratio of 9.5hp per ton for the Mark I. This in turn gave the armoured car a speed of 65 km/h and range of 400km, sufficient for most long-range reconnaissance missions.

The first production version, the Mark I was armed with a 2-pounder gun and a co-axial BESA 7.92mm machinegun. The turret the same as those fitted on Valentine Mark I/III infantry tank. The Mark II had a different turret and were armed with a Ordnance QF 6-pounder gun and the BESA machinegun. This version was heavier, at 12.7 tons. To cope with the heavier weight, the engine was changed to AEC 195 (158hp). The final Mark III was armed with a Ordnance QF 75-mm gun. An AA variant armed with a Crusader AA turret was built but was not ordered into production. Tactically, the AEC was used to support other armoured cars in the reconnaissance regiment. It saw first action during the North African campaign in 1942 by the British and the Indian Armies. They later saw service in Italy and North-West Europe, where they were supplemented by the American-built Staghounds. The AEC gave good service, which was reflected in its usage by the British Army well into the 1950s when it was eventually replaced by the Saladin. The AEC was also bought by Lebanon, who used them until 1976.

The Kit
Miniart came up with the kit of the AEC in 2013, releasing all three versions in the same year. The Mark III kit was comprised of 534 light gray parts, 50 brass PE parts and eight clear plastic parts. There is a substantial number of parts related to the interior. They are definitely needed if you want to pose all the hatches in the open position. Of particular note are the 75-mm rounds as they need to be shortened to allow fitment into the ammo racks - a rather tedious job as there are around 40 of them! Again the steps in the instructions can be skipped if you chose to have your model buttoned up. Also included is a pair of Vickers K machineguns, to be mounted on the turret roof (although all the pics I have seen show that the AEC was not equipped with them). Also, be aware of tiny parts - both PE and plastic - there are lots of them! A driver figure in driving pose is also included. The decal sheet provide markings for three vehicles:

1. F 88886, Royal Armoured Corps Gunnery School, Lulworth Camp, Dorset 1944
2. F 88707, Heavy Troop, D Squadron, 2nd Household Regiment, VIII Corps, Normandy June 1944
3. F 89007, 1st King's Dragoon Guards, XII Corps, 2nd British Army, North-West Europe, Spring 1945

Construction
After browsing the instruction sheet, I believe I can skipped about 1/3 of the assembly process as I intended to have my AEC buttoned up (except for the turret).I totally skipped Steps 1-4 and only added the external parts to the side walls in steps 6 and 10. The engine bulkhead was also left bare. Although Miniart included a driver's figure, I decided not to use him for this model and therefore the driver's compartment was also left bare.The side walls, bulkhead and the driver and fighting compartment floors were then cemented together. Steps 16-21 are concerned with the undercarriage. I am of the opinion that the basic chassis is a bit over-engineered as the 'thingies' that hold the leaf spring suspensions should be moulded together with the frame, rather than separately. Also the front leaf springs are not symmetrical but the actual placement was not shown in the diagram...so I made a guess and hope that I was right. Part Ba5 is also not symmetrical and the assembly sheet should be looked at closely.

The rear suspension however have ends corresponding with their mountings so it wasn't a problem here. The gear box was assembled and cemented in its location. However while the position was quite clearly marked in the instructions, it wasn't really so on the plastic. The engine was then assembled but I only use the larger parts only. Anyway when dry-fitting the engine, I found that the connection between the engine and the gear box fell short. I guess it was my mistake rather than Miniart's. However, since the engine and the gear box is mainly out of general view, I left them as they were. Up next were the axles, there were no problems here except that if you put Part Ba5 (mentioned earlier) incorrectly, you will find that the front axle won't fit properly into the suspension. The front brakes however are loose and need to be glued to the axles.

Moving to the upper hull, the driver's hatch was cemented to the upper hull/roof. It has to be done prior to cementing the roof to the hull as it was easier to do it that way. As I intended to have the driver's hatch in the closed position, none of the details were added underneath the hatch door. The mountings for the windshield is downright tiny and I nearly lost them! For the rear part of the upper hull, Step 51 really had to be done first and the assembled parts put in place. This is in order to avoid misplacing Part F12 which, if placed incorrectly, will create a larger gap so that part E41 cannot be cemented between the forward plate and Part F12. Once this was done, the engine hatch covers can be put in place. The storage boxes on the sides were assembled and cemented into place. Afterwards, things stuck on the front mudguards like the headlight, brush guard and the towing eyes were cemented and the mudguard was then cemented to the hull. The rear mudguards were next. I cemented Parts E4 and E5 to the hull first and the cemented the main mudguard structure to them and the storage boxes as there no positive locating pins for the mudguard.

Next up is the turret. I started at the front face by assembling the internal gun mantlet, the Besa machine gun and the breech end of the main gun. As I intended to have the turret hatches closed, I forego doing the interior. The turret walls was then mated together, along with the bottom. The one-piece roof and the rear wall were next but the one in my kit was a bit warped. I soaked it in hot water, gently 'massaging' it back into shape. It was then cemented to the turret shell without problems. The details on the turret was then attached but certain items, like the lifting eyes on the either the turret sides were left off (the third one at the back was cemented at this time - these eyes were delicate, no need to guess what happened!). Sometimes a compromise had to be taken, such as the mounting for the turret stowage box. I do not own a 'proper' PE bending tool so I have to use a piece of plastic to maintain the spacing between the stowage box and the turret's rear face. The main gun has rather short pins (and the recess is shallow on the turret face) for effective surface mating so I have to use superglue for this part. Care also have to be exercised here as the the pin/recess is not keyed and I have to make sure the muzzle brake is properly aligned. I also decided not to use the roof-mounted twin Vickers K machineguns.

Painting And Decalling
I intended to paint the model using Mike Starmer's mix of SCC15 Olive Drab; however I have run out of 'proper' (so to speak) Olive Drab. I decided to improvise by using 7 portion of the 'wrong' batch of Tamiya XF-62 Olive Drab, 3 portions of XF-3 Flat Yellow and a dash each of XF-64 Red Brown and XF-61 Dark Green plus flat white for scale effect. The test mix look close enough and painting commenced. For markings, I chose the second option, that is, an AEC III of the 2nd Household Regiment. The markings however only provide the Arms of Service and unit markings for the front only. Perhaps Miniart did this to maintain 'photo-accuracy' but I believe the set of markings fo the rear should be included (by the way. the third option only have markings for the rear). The decals received the Mr Mark Softer treatment but the silvering persisted for some of them. Pin wash was then applied to selected areas.

Finishing
Finishing work starts by attaching the more vulnerable parts and/or parts painted mainly in a different colour than the main body. The radio aerial at the back of the turret is a two-part affair, with plastic base and a PE part. Due to its fragility (because it's so thin), the PE part was distorted during assembly and attempts to make it as round as it should be resulted in further distortion, so I have to leave it like that. Also, the lifting eyes of the turret suffered from being knocked around during the handling of the turret. The Bren Gun included in the kit (to be hanged outside the turret) was painted and put in place. I glued a piece of kitchen aluminium foil to act as reflecting surface of the rear-view mirror and then sementing the assembly to the mudguards. However, the mounting is to be glued butt-joint to the mudguard; because of the cylindrical shape of the pole and the mount, it can fit properly. I have to cut a small 'channel' on the mount so that the assembly can be more secure whilst drying.

The outside was pretty bare so I decided to add a 75-mm ammo box from Academy, a rolled tarp from Tamiya and a pair of 4-gallon flimsies from Bronco. However I have gotten tired of this kit (despite all the shortcuts) by this time and decided to let the stowage be put in place by 'magic' (i.e not adding tie-downs and straps)...or perhaps the crew has yet to stow them properly...haha. Finally, Mig Productions European Dust pigment was mixed with water and applied under the mudguards, the lower hull and the tyres. Once dry, the excess was removed using a stiff brush, and in the case of the tyres, were partly removed using enamel thinner. As there are no tabs to secure the turret, a slab of plasticene was placed underneath the turret basket to provide friction and also acting as some sort of 'holder' for the turret. Finally, Miniart provided just two tow cable shackles and the builder has to provide his own cable. The leftover twine from previous kits are too big for the shackles, so I just have to leave this rather essential piece of equipment from the model.

Conclusion
Again, the Eastern European (and the newer Far Eastern companies) are more ambitious than the more established companies in introducing kits previously not available (or having only limited availability). And in the case of the AEC armoured car, not only Miniart produces kits for all the major variants, they also throw basically everything a modeler wish for a basic vehicle - including full interior. This resulted in a rather long build but I believe the end justifies all that work. Sure, I skipped many of the construction steps as I do not intend to build up the interior and having them disappear from view. Even so, it took up some of the longest time I took to build a 1/35 AFV kit. Actually it has more to do with holiday breaks and losing some of my modelling mojo rather than actual difficulty with the kit.

Monday, 30 June 2014

Poetic Armour


Historical Background
During the Interwar period, the Red Army fielded the large but cumbersome (not to mention mechanically unreliable) T-35 multi-turreted heavy tank. The T-35 conformed to the 'heavy penetration tank' portion of contemporary Red Army doctrine of 'deep battle' where the heavy tank (also known as 'siege tanks') would be used at key tactical positions to draw and concentrate enemy fire or destroy enemy fortifications while supporting the infantry. Therefore the heavy tank emphasized on very heavy armour and firepower at the cost of mobility. Disappointment with the T-35 caused the Red Army to draw up a requirement for a new heavy tank in 1937. The TsKB-2 design bureau led by its chief engineer Zh. Kotin designed the tandem-turreted SMK (Sergey Mironovich Kirov). At the same time, the team also designed the smaller KV (named after Defence Comissar Kliment Voroshilov) tank, essentially a single turret SMK. Although actually not designed for production, the KV was given approval by Stalin.

The SMK and KV, together with the rival T-100 were presented to the General Staff in September 1939. The tanks were tested at the Kubinka Testing Grounds near Moscow and soon the war against Finland allowed the prototypes to be tested under combat conditions. While all three candidates showed their resilience against enemy anti-tank weaponry, the SMK and the T-100 showed very poor mobility and reliability. The SMK was disabled by an anti-tank mine on 19 December 1939 and had to be abandoned until it was recovered in February 1940, The KV however performed well and subsequently  50 pre-production vehicles were ordered. Also, during the Winter War with Finland, the Red Army found it difficult to deal with the Finnish concrete bunkers and ordered a heavy turreted howitzer mounted onto the KV tank chassis. Initially, the 76.2mm armed KV tank was known as the Little Turret and the 152mm howitzer-armed tank was known as Big Turret; they were later redesignated as KV-1 Heavy Tank and KV-2 Heavy Artillery Tank respectively.

The KV-1 weighed 45 tons in its initial 1939 model, with a fairly long hull at 6.75 meters. The suspension is of the torsion bar system with six twin roadwheel bogies. The caterpillar tracks are wide, lowering the pressure footprint and allows better traction in snow and mud. Because of the weight of the tank, the designers had to use a 20-year old Caterpillar transmission which was sturdy but unreliable and the tank need to stop to shift gears (it was also known that a hammer was used to shift the gears), making the KV tricky to handle. The weight also reduces the top speed and limiting its ability to cross bridges. When combat experience resulted in more armour and other improvements without an increase in engine power, the later models have more trouble keeping up with the medium tanks and with difficult terrain. The armour however was unheard at the time, with up to 90mm thick on the glacis and turret face; only the British Matilda II and the French B1 can rival the KV's armour. Subsequent variants received more armour, in the shape of thickened hide or applique armour, but without an increase in engine power, their mobility suffered further. The KV-1 was initially armed with the L-11 76.2mm gun. It was later armed with a F-32 or F-34 gun of the same caliber and finally the Zis-5 anti-tank gun. Three to four 7.62mm DT machine guns round-up the armament.

On 22 June 1941, the Red Army had 508 KVs on strength. They made first contact with the German panzers a day later at Raseiniai when the KVs of the Soviet 2nd Tank Division attacked and overran the German 6th Panzer Division near Skaudville. The 37mm PAK 36 anti-tank guns and the Panzerkampfwagen 35(t) were ineffective against the KVs. Although out of ammunition, the KVs, using their invincibility, literally ran over the anti-tank guns. On the next day, a single KV-2 blocked the Germans' advance, shrugging all attempts to knock it out. On 18 August 1941, the German 8th Panzer Division was approaching the town of Krasnokvardeysk, near Leningrad when it was ambushed by five well-hidden KV-1s led by Lieutenant Zinobiy Kolobanov. His unit destroyed 43 German panzers and AFVs in a single half-hour action. Lt Kolobanov was awarded the Order Of Lenin for his actions. The appearance of the KVs (and T-34s) came as a surprise because of faulty German intelligence. The Germans, shocked by these tanks, studied any captured examples and came up with their response later in the war, in the shape of the Tiger and Panther tanks. Nevertheless many KV-1s were lost, being destroyed by air attacks, 88mm Flak and field artillery and anti-tank infantry squads. Many were also abandoned through lack of fuel, breakdowns and general confusion of war. The KV was used throughout the great battles of 1942 and 1943 although it found itself unable to keep pace with the faster and more maneuverable T-34s. The armour was also becoming obsolete in the face of better German tank and anti-tank guns. By 1944, only the interim KV-85 sub-type were still in service, although a regiment of KV-1s saw action in Manchuria during August 1945. 5,219 KV tanks (all variants, including prototypes) were built. 

The Kit
Trumpeter Kit No. 00358 was that company's fifth KV tank in their catalogue after KV 'Big Turret', KV-2, KV-1 Model 1941/KV 'Small Turret and KV-1's (sic) Ekhranami. The kit depicted a KV-1 Model 1942 with a 'simplified' welded turret and ribbed steel road wheels. The kit contains 237 parts spread among 9 light gray and 1 clear sprue. Two types of track is provided - continuous 'rubber band' style and link-and-length. The latter incorporates the sag for the upper run while the former is flexible enough for a modeler to use his/her favourite technique in order to replicate the sags. The kit can also be built into a KV-8 flamethrower tank as it include parts for the flame and the 45mm guns - although no clear indication is  made of the KV-8 - just an optional step in the instructions. No PE is included, not even for the engine deck grilles. Online reviews of this kit (and every other Trumpeter KVs) speak of great accuracy and I take their word for it. Of course there are some minor glitches, but they can either be safely ignored or require minor corrections. Only one marking option was provided - 'Besposhadniy' of the 6th Guards Tank Brigade.

Construction
The lower hull consists of the usual tub with separate rear plate. The tub is however made up of a basic structure (with no details) and applique plates which need to be glued to the former. Once the basic structure has been completed, the detail parts (axle bump stop, final drive housings and return roller mounts) were added onto it. This was followed by the two- (four if you count the additional armour plate on the glacis and the turret ring armour) piece upper hull. Then the suspension parts (road wheel axles and track tensioning mounts, for the time being) were cemented onto the hull. The axles have hexagonal locating stubs which correspond to the similarly shaped holes in the hull sides which ensure correct positioning. Part A22 of the track tensioning arm were left unglued. At this time I'm not sure whether this would help in the track assembly, but better safe than sorry.

The detail parts for the upper hull then cemented onto their places. This include the solid, but with petite raised details, engine grilles. These unfortunately hides the reasonably detailed engine vanes moulded onto the rear upper hull and are best replaced with aftermarket ones. The V-shaped bullet splash protector was cemented after dry-fitting it to the hull, looking for the best location and I think there are indentations underneath the upper hull but Trumpeter did not indicate those in their instructions. The roadwheels, idlers and sprocket wheels were then assembled. The first mentioned have a poly cap inserted between the halves to ensure snug fit and also allows some movement, easing the painting process. The wheels were left off and I moved on to the turret.

The square welded turret (hence the title 'simplified turret') came in one-piece main shell and the turret bottom (with a separate turret ring attached to the hull). The weld seam on the turret looks well done - showing all the subtlety of Russian wartime craftsmanship. The various fittings were then cemented onto the turret. These include a reasonably detailed turret hatch inner face, which allows it to be posed in the open position. Nevertheless a modeler might want to add a figure inside the hatch or add their own turret interior as it was totally empty inside the turret, not even a rudimentary gun breech. The business end of the turret was made up six parts, including a single-piece plastic barrel. And as mentioned before, alternative parts were included if one wishes to build a KV-8 flame-throwing tank. The machine gun barrel at the back of the turret was however left off to avoid breakages.

Afterwards, I returned to the hull. The wheels were first attached to the hull. The idler and drive sprocket remain free to allow adjustments when fitting the tracks. I however add a small amount of cement on the locator stubs to allow some friction. For the tracks, I decided to use the link-and-length plastic track as it has the sags pre-formed. There are ejector pin marks on them, but they were easily scraped off using hobby knife. When the glue has dried, the tracks were removed, along with the wheels for painting. One last step to do before commencing the painting stage was attaching the track guards/fender. The fender supports are of the solid and hollow types I have to keep an eye on the instructions. There is some gap but the excess cement covered them up. A storage box is fitted on the left-hand fender but there is no mention of drilling holes to accept the locator tabs - I just cut off the tabs and fit the box between two fender supports as indicated.

Painting and Decaling
Trumpeter provides just one marking option for this kit. Like many of my Soviet AFV kits before this, the KV was also painted in my interpretation of the Russian 4BO Green. The tracks were painted metallic grey and once dry, was washed with AK Interactive's Track Wash liquid. A 2B pencil was used to add a metallic sheen to the contact surface of the wheels, simulating wear. The same effect was applied onto the the tracks by dry-brushing Mr Color Silver. The decal sheet provides markings for 'Besposhadniy', a KV-1 Model 1942 presented to the 6th Guards Tank Brigade by seven Stalin Prize art laureates. The sponsors (four artists and three writers) named the tank Besposhadniy (merciless) with a cartoon of a tank blowing Hitler to pieces and a poem, when translated to English:

Through the blazing fire we go
In our heavy tank
On to the rear of the enemy
Where we smash him in the flanks
Your tank's crew is fearless
Our eyes never close
As we carry out
Stalin's combat orders!

Besposhadniy was presented to the brigade during a ceremony held in Moscow on 25 May 1942. The tank was commanded by one Lt Pavel Khoroshilov and cut a swath of destruction between the end of May 1942 and March 1943. After 700 kilometers and destroying 27 tanks, 7 armoured cars, 4 self-propelled guns, 9 mortar emplacements, 10 artillery pieces, 17 machine gun nests, 10 trucks, a staff vehicle, 5 motorcycles and a supply dump, it was knocked out near the village of Ashkovo, killing the commander and wounding the driver. It was however recovered and presumably preserved at the Museum of Armoured Vehicle Technology at Kubinka, outside of Moscow. The decals are reasonably thin and reacted positively against setting solutions. The decal sheet includes Besposhadniy's kill tally in the shape of stars, triangles and circles towards the rear of the turret. The decal sheet however omitted the poem's title on the driver's front plate. I thought of hand-writing it but decided not to as the actual inscription was more of the 'print' type. The model was then subjected to the usual wash process.

Finishing
The track assembly together with all the wheels are now permanently fixed onto the model. There isn't much else cemented onto the model except for two pairs of spare track links on the track guards and a pair of tow cables. Trumpeter supplies a length of braided wire which was cut into the specified length onto which the plastic end shackles were superglued. The cables were painted XF-56 Metallic Grey and washed with AK Interactive Track Wash (the latter can also be used for this purpose). One end of each cable was slipped into the towing eye and the latter was then attached to its position uncemented. The other end was slipped onto the hook on the hull side. The machine gun barrels were then painted and cemented onto their places, finishing the basic build. To weather the vehicle. I started off by applying heavily diluted XF-57 Buff on all the horizontal surface of the model. The same was applied on the vertical surfaces but in vertical streaks, creating the so-called 'rain marks'. The lower hull, wheels and tracks were then liberally dabbed with Mig Productions' African Earth pigment in enamel thinner. Once dry the excess was removed using stiff brush. For crew figure, another one from the excellent MiniArt Soviet Tank Crew At Rest set was used.

Conclusion
Tamiya has a serious contender in kit engineering with the emergence of Trumpeter, well, at least for the KV tanks. The Trumpeter kit is fairly easy to build without sacrificing the details which the old Tamiya kit lacks. Sure, it needs some help with aftermarket goodies to make it even more outstanding. Despite being much newer, the Trumpeter kit is not much more expensive than the Tamiya kit (or everybody else's for that matter).  I however think that better value for money could be had by us modelers if Trumpeter adds just another couple of markings for variety. 


Tuesday, 10 June 2014

Stalin's Sledgehammer


Historical Background
In November 1942, the State Defence Committee, after noticing the effectiveness of the German Sturmgeschutz assault gun, ordered the construction of assault guns for infantry support. While the SU-76, with a ZiS-3 76.2mm gun and the SU-122 with a M30 122mm howitzer were adequate for the task, Operation Uranus, the Stalingrad counteroffensive showed that the Red Army needed mobile heavy guns to smash German fortifications. During the operation, the Red Army still relied heavily upon towed guns which lack mobility and exarcebated by the snowy and muddy conditions, especially the heavy 152.4mm howitzers. The guns were also vulnerable to counter-battery fire and incapable to cross rivers, unless using bridges. The Red Army did have a self-propelled heavy artillery, the KV-2, armed with an M-10 152.4mm howitzer but it's silhouette was too high (consequently with a too high centre of gravity), sluggish manual turret traverse and a slow reload rate. The Committee specified that the new self-propelled was to be armed with the ML-20 gun-howitzer mounted on a casemate-style superstructure. In December 1942, three designs were submitted to the Committee, all using the KV-1S tank chassis. The design submitted by Iosef Yakovlevich Kotin was chosen for mass production. The project was designated KV-14 and started production in February 1943 at the Chelyabinsk Kirovski Zavod (ChKZ). The designation was later changed to SU-152.

Analysis of the combat performance of the SU-152 showed a need for newer model, based on the IS tank chassis. Development began in July 1943 under the designation IS-152. Trials commenced in September 1943, revealing a number of shortcomings. In October of the same year, a second variant, designated Obyekt 241 was ready. In November 1943, Obyekt 241 was accepted for production under the designation ISU-152 and in December 1943, ChKZ stopped the production of the SU-152 and replaced it with the ISU-152. Production soon went into full gear, causing a surplus of hulls which were armed with the A19S 122mm gun, creating the ISU-122. The ISU-152 followed the same design of other Soviet self-propelled guns - fighting compartment at the front and the engine and transmission to the rear. The crew was made up of five persons - driver, loader, gunner, lockman and the commander. The gun was the same with the SU-152 : the ML-20S 152.4mm gun-howitzer. Close-range self defence armament consist of a pair of PPSh-1941 sub-machine gun and 20 grenades. A 12.7mm DShK heavy machine gun can be placed by the right forward hatch for AA defence and also against enemy tank-killer squads. Because of the size of the ammunition, only 20 rounds can be stowed inside the vehicle, usually consisting of 13 HE and 7 AP/Concrete Piercing rounds.

The ISU-152 can be used for three roles: heavy assault gun, heavy self-propelled artillery and heavy tank destroyer. As a heavy assault gun, it was extremely useful for close-quarter, urban combat operations. The thick armour (sloped and 90mm thick) made it impervious against most German anti-tank guns while the heavy, high explosive rounds were excellent against enemy fortifications. The ISU-152 can also be used in the indirect fire role for preparatory or support bombardments despite the low rate of fire and medium firing range. Finally, while not specifically designed for the role, it can act as a heavy tank destroyer. In this role, it inherited the Zveroboy (animal killer) nickname from the SU-152, for its ability to destroy the heavy 'animal' German armoured vehicles (Tiger and Panther (later joined by the King Tiger) tanks and the Elefant tank destroyer). Although the gun has a low rate of fire and the 152.4mm shell is of low velocity, its heavy charge has sufficient blast effect to blow even a Tiger's turret off. Although generally unable to penetrate armour, the concussive effect causes the interior of the target tank to spall, killing and injuring the crew. While AP rounds were developed, it was not a great improvement over the regular HE rounds. To compensate for the low rate of fire, the ISU-152s used ambush tactics with some 4 to 5 vehicles firing in salvo against a single target. The ISU-152 was used all over the Eastern Front and was especially useful when smashing the fortress cities of Konigsberg, Budapest and Berlin. The vehicle was also used to crush the Hungarian Uprising of 1956 and was probably used as late as 1991 by Iraq during the First Gulf War. A total of 3,242 vehicles were built between 1943 and 1947 and many were exported to Soviet satellite and client states.

The Kit
In the 1990s, Dragon issued a number of IS tank-based model kits, from the IS-1 gun tank to ISU-series assault guns. Kit #6803 Chinese JSU-152 Howitzer was based on its baseline ISU-152 kit and was issued under their 'Korean War Series'. I did not have the opportunity to inspect the original release, but I believe that the contents of both boxings are actually the same. The parts are well-moulded and and generally have good detail. The engine deck screens are however moulded solid and have no PE alternative (save for aftermarket ones of course). The tracks are of single link type and being a 1990s kit, need to be cut off their sprues and cleaned up before assembly and painting. The ISU and IS series have two types of tracks, one being with guide tooth on every link and the other with guide tooth on every other link. For this kit, Dragon provided the former.

Strangely, Dragon did not include parts for the DShKM 12.7mm AA MG. Sure, not all vehicles were fitted with it but I think it should be included as an option. Regarding accuracy, the kit actually included a mish-mash of features from early production to post-World War 2 vehicles. However, internet websites and online forums provided advice and pointers in order for modelers to accurize their kits. And, being of the same mould with the rest of Dragon's IS series, the kit suffers from undersized roadwheels and too low a hull. The kit provides five marking options, and rather strangely, despite its title, only one of the markings is for a PLA ISU-152:
- Chinese PLA Artillery Regiment, 1951
- Guards Heavy Assault Gun Brigade, near Berlin 1945
- Third Baltic Front 1945
- Polish LWP 13th SP Artillery Regiment, Warsaw 1945
- Soviet Heavy Assault Gun Brigade, Berlin 1945

Construction
As the normal practice for AFV kits, construction starts at the lower hull. But first, two sets of idlers, two sets of sprocket wheels and 12 sets of roadwheels have to be assembled. The suspension arms fitted nicely into their slots although I still have to lay the lower hull flat on the table to ensure that all the wheels would touch the ground. Afterwards, all the wheels were cemented, with the exception of the sprocket wheels, which remain free. Holes were cut into the front plate to accommodate the spare track links - a rather tedious work as the plastic was quite thick (holes were also made into the upper hull, which is thicker than the lower hull). The lower hull was then painted and set aside for a while. The track links were painted on the sprue and once dry, were cut off them, the paint retouched and were put into a container. The assembly of the links however took some time as they have too tight a fit and I had to sand / file the mating surface for a better fit. The IS series of vehicles have notable sag of their tracks and to achieve that, after laying the upper run of the tracks, I simply push the tracks down at the appropriate locations once the cement were nearly dry. As stated before, Dragon's hull is too low and should be raised by 1.5mm using plastic strips. Lacking the necessary items at the time, the hull was left as it is.

Moving on to the upper hull, Dragon rather bafflingly instructed the modeler to drill two holes for the gun travel lock....appropriate for the turreted IS tanks, but not for the ISU with its casemate-mounted gun (how the hell the crew is supposed to turn the gun around?), so I skipped off this task. The engine access hatches  were moulded in situ; nothing wrong with that but I think the engraved panel lines were too fine. The grills were also moulded on and are best replaced with PE replacements. I also fit all the external fuel tanks. Each was made of six parts (main body halves, ends and two pylons) - there is a visible seam between the halves and need to be cleaned up. All of the hull fixtures and fittings were also fitted, save for the pioneer tools. The tankovy desant rails were cemented at this time but I discovered, too late, that the foremost pair of handrails were actually a post-World War 2 addition and were only suitable for the Chinese marking option. Yes, I can simply cut them off and sanded the stub but I decided not to. The gun assembly was next. Together with the upper hull, there is no interior detailing, not even a rudimentary breech. The big gun mantlet feature respectable cast pattern, although lacking the casting numbers.The barrel is a two-part assembly, and with careful alignment, can be mated together without a seam line. The upper hull assembly was then mated to the lower half, and the low hull of the Dragon kit became immediately apparent when there is hardly a room between the track guard/sponson and the track itself, especially at the return rollers and the sprocket and idler wheels.

Painting and Decaling
The model was painted in Russian Green, made from a mixture of Tamiya XF61 Dark Green, XF2 Flat White and XF3 Flat Yellow. Chipped paint were then added selectively using XF61 Dark Green. For markings, I was split between two options - the second with number 65 and the slogan 'Liberated Kirovskaya' or the third, with number 25 and slogan 'Death to German Occupiers' (I think). I eventually settled for the latter, as it includes a drawing of an arrow-pierced heart. The decal has somewhat yellowed with age but still good. The model was then subjected to a black-brown wash process.


Finishing
The remaining parts, such as the pioneer tools and the spare track links were cemented onto the model. I also robbed the DShKM heavy machinegun from my old Dragon IS-2 kit, and fit it on the right side of the commander's hatch (my IS-2 actually do not need it as photos of the real tank '414' show that it was not fitted with the weapon). This was followed by the remainder of the weathering process. The tracks were given a wash of red brown-black mix, a bit thicker this time. Once dry, the tracks were subjected to silver drybrushing. Afterwards Mig Productions' pigments were applied in a slurry all over the model - thicker on the lower hull and the running parts and lighter on the rest of the model. I used a mixture of Rubble Dust, European Dust and a bit of Gulf War Sand. When dry, the excess was removed using a stiff brush. Tamiya Weathering Master Rust and Soot were applied onto the exhausts and X19 Smoke was applied onto the external tanks and the rear deck.

A figure from MiniArt's Soviet Tanker At Rest was used to round up the build. While assembling the figure, I noted that there is an extra part not mentioned in the instructions. After scratching my head for a while, I realized that the said part is actually the left sleeve of the tanker's overall! I could not find where it should be cemented to (yes, I know, the left shoulder of the overall, but exactly where as the figure is in the act of putting on the overall). Google came to the rescue after I searched for pics of completed figures. The figure was then painted using acrylics but somehow my paint mix for his uniform went wrong and it dried with a slight sheen....hmphhh!!!

Conclusion
Despite being overtaken by Tamiya's JSU-152 kit, the Dragon version can still hold its own. Sure, it was dimensionally less accurate than the contemporary Zvezda offering but the finer surface details made up for it. After all, it's shortcomings are not really a deal breaker as they can be overcome with minimal work. While the roadwheels were undersized, they were not grossly so and can be safely ignored. I however find some omissions annoying, such as the lack of the AA MG and tow cables. A good substitute for the Tamiya kit with a lower price. Dragon has also tweaked the kit, increasing the height (although the original roadwheels remain) and use their Magic Track track-link concept in their 3-in-1 ISU-152/ISU-122/ISU-122S kit.   

Friday, 23 May 2014

Lightweight Warrior


Historical Background
At the outbreak of the Great Patriotic War in June 1941, the Red Army possessed large numbers of light tanks even though events up to that time pointed to the general weakness of the type. Wartime experience eventually cause the final decline of the light tank, but until 1943, it remained a significant part of the Red Army's inventory. This was caused by a number of reasons: firstly, to make up for the catastrophic losses in 1941 and 1942, as any tank is better than no tank, or as Stalin put it : "Quantity has its own quality". Secondly, it was cheap and easy to produce, and finally, because of its inherent simplicity, it can be built at less specialised factories especially at the time the major tank manufacturing plants were being relocated to the East, disrupting the production of the more capable T-34 and KV series. Once the factories have been re-established, the more powerful and battle-worthy tanks were preferred. This, coupled with the increased protection and firepower of the German panzers caused the role of the light tanks to steadily decline and production of the last type, the T-80, was ended in autumn 1943.

Before 1941, the Red Army was equipped with a number of models of light tanks, from the reasonably armed T-26 to machine gun-only armed T-37 family. In 1941, after facing the disastrous losses at the hands of the Panzertruppen during Operation Barbarossa, Zavod No.37 under the guidance of its head designer, Nikolai Astrov, produced the T-60 light tank. While better in many respects than the earlier T-40, it was still armed with a 20 mm cannon, a weapon totally inadequate against the Germans' Panzers III and IV, especially when used as a combat tank. It was so bad that it was nicknamed 'A Brother's Grave For Two'. In an attempt to remedy some of the shortcomings of the T-60, Nikolai Astrov designed a new light tank with a more powerful armament, a more robust armour and greater mobility than the T-60. The new tank, designated T-70 was put into production in March 1942. The first batch was built with a GAZ-202 engine on each side of the hull , each powering one track. This was seen to be a serious defect and was quickly redesigned as T-70M with the engines in-line on the right side of the tank. The turret was redesigned so that the armour plates can be easily welded together and was moved to the left side of the hull. The T-70 was built at Zavod No.37 and No.38 at Kirov and GAZ at Gorky.  While the ZiS-19BM 45 mm gun and 45 mm of frontal armour were improvements over the T-60, the better armament of German tanks such as L/60 50 mm gun of the Panzer III and L/43 75 mm gun on the Panzer IV negated them. Furthermore, the T-70 was still equipped with a one-man turret, overburdening the tank commander, who also has to act as the loader and the gunner.

The T-70 participated in numerous battles but none bigger than the Battle of Kursk. On 12 July 1943, at a front 32km wide in front of the village of Prokhorovka, 429 panzers of the II SS Panzer Corps and III Panzer Corps clashed with 870 tanks, including 261 T-70s, of the Soviet Fifth Guards Tank Army. A report by the 5th Guards Tank Army on 16 July 1943 listed 89 T-70s as total losses with another 56 still under repair. Following the battle, the T-70 were gradually withdrawn from combat and were relegated to secondary duties. The T-70 was further developed into the T-80 but interest in light tanks had waned and only 120 were built. The T-70 also formed the basis of the SU-76 self-propelled gun and the prototype-only T-90 anti-aircraft tank. In all, 8,226 T-70s were built.  

The Kit
MiniArt, from Ukraine, has come out with a number T-70 kits : T-70 Early production (with figures), T-70M Late production with figures, T-70M with ZiS-3 76.2mm gun (with crew) and PzKpfW T-70 743(r) with ZiS-3 (with crew). The 'Special Edition' is the latest of the T-70M gun tank kit, it came without any crew figures but have a PE fret not available with the other boxings. Also both early and late versions of the T-70 can be build from this kit. The kit consists of 356 parts in light grey and clear plastic and also PE. 176 of those parts are the separate link tracks - they look nice but have ejector pin marks on either side of the inner face. The rest of the parts are well moulded and have no flash.

For those uncomfortable with PE, there are original plastic parts to use but, of course they have less detail and look less realistic. The decal sheet was printed by Begemot and feature markings for nine tanks, mainly from that most famous of military formation in scale modeling : 'Unknown Unit' (Haha!). My previous experience with Begemot decals was very positive and I have no doubt these would work well too. The instruction sheet was printed on gloss paper and the drawings somewhat reminded me of Bronco kits. Apart from the usual construction steps, the instruction sheet is also needed for locating parts numbers as none were moulded on the sprues.

Construction
As with many AFV kits, the MiniArt T-70 is also conventional in its build approach. As usual, the hull received the first attention although MiniArt deviated slightly by having you build the upper portion of the hull first. Me, being a traditionalist, started with the one-piece lower hull. Once all the suspension arms were in place, I have to set the lower hull flat on the modeling table to ensure that all of them were in alignment. Moving on to the upper hull, I first cut a hole in the engine compartment, in order to use the PE parts. The resulting hole was then cleaned up and I installed the PE vent flaps (or whatever it was called). They were then painted steel, along with the compartment on the right-hand side. Then the PE grilles were superglued onto their places. Having already decided beforehand to build a late production vehicle, I used the indicated parts to assemble the driver's hatch. Afterwards, the rest of the hull parts were cemented, save for the spare wheel, exhausts parts, track guards and all the on-vehicle equipments.

The turret assembly were next. MiniArt provided no interior detailing save for the gun breech, co-axial machine gun, gunsight and periscope. Like the driver's hatch, there were different mantlet covers and periscope hatches for early- and late-build vehicles. The co-axial MG barrel was delicate and care was needed in handling it. The turret's interior was painted XF-71 IJN Cockpit Green. Then it was assembled and set aside. As the kit included PE parts, the partially assembled model was sprayed with Tamiya Grey Surface Primer.


I intended to build a vehicle in winter and to ease the weathering process, I decided to weather the hull before attaching the tracks. To create mud, I used modeling paste mixed with water, Mig Productions' African Earth pigment, Tamiya XF-64 Red Brown, along with fibre from a broom (I'm a cheapskate, plus the fibre resemble static grass) and dabbed them all over the lower hull. When dry the 'mud' went lighter so I haphazardly add some more Tamiya XF-64 over it. The wheels were mounted onto their places with some difficulty as the fit was quite tight. Then it was time to assemble the tracks. The tracks are well-moulded with good detail and, as stated before, with ejector pin marks on the inside surface. The tracks were sprayed Tamiya TS-1 Red Brown, cut off their sprues, cleaned and placed inside a plastic container prior to assembly. It should also be noted that the track links are quite fragile and I broke several of them, necessitating repairs as there were only 7 spare tracks (there were 84 links per run with a total of 168, MiniArt supplied only 176 links). Although non-workable, the tracks assemble easily using Tamiya Extra Thin Cement. Looking at photographs, some show that the tracks sag on the upper run while others showed them to be rigid. I decided to go mid-way, by only having a slight sag.

Before adding the track guards, I decided to weather the upper run of the tracks first, as there is only a little room between the track and the guard. Once done, the track guards were cemented into place. The left hand guard was slightly bent so I used superglue at the particular area. The track guards have reinforcing bars, four per side. Like the tracks, the bars are quite fragile and I broke three on the left side before deciding to cut the off the sprue using my hobby knife instead of the cutter. Finally, the storage boxes on the left track guard were glued. MiniArt provided delicate yet well detailed PE hinges and clasps...but I chickened out and left the boxes as they were. 

It should also be noted that the instructions mislabelled some parts and a few other parts were not called for in the instructions. Parts D15 were labelled as D14 while Part D2 was simply illustrated as being on the back of the turret without any instructions to put it there.

Painting and Decaling
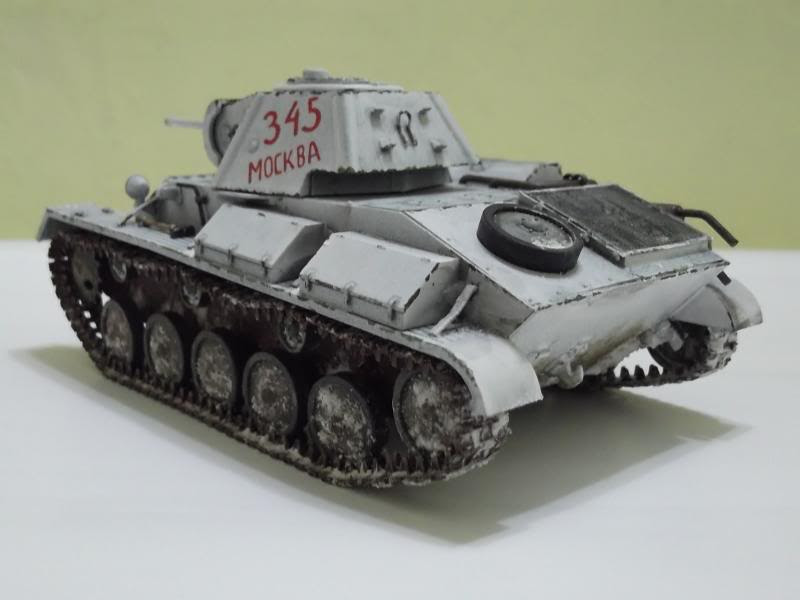
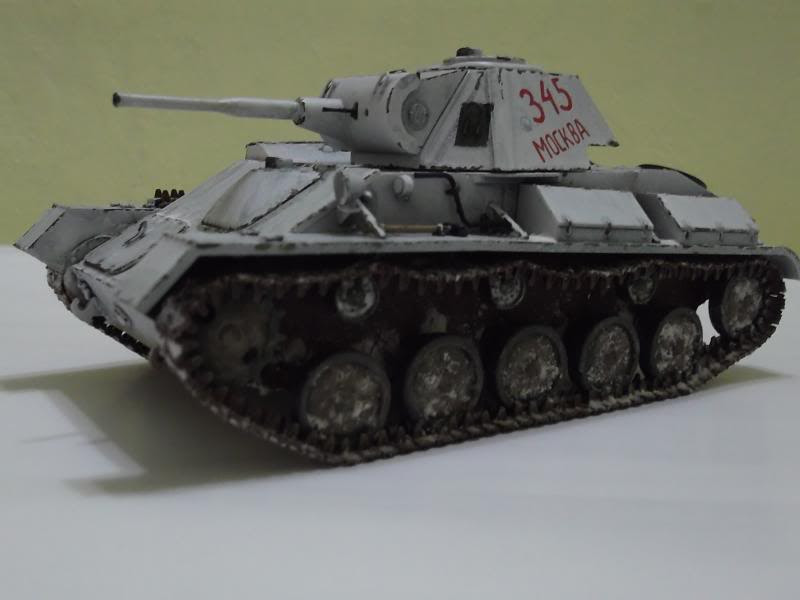
For kit markings, I chose #8, a late production T-70M, Eastern Front, Kharkov, Winter 1943. The tank was painted white overall save for two patches on the turret sides and the lower hull. For the base colour, I used Tamiya XF-67 NATO Green, painted without taking into account scale effect. Although originally thinking of applying the 'hairspray method', I decided to simulate an early winter white camo - not yet washed out but having chipped at the edges. The hairspray method can of course be used for this course of action but I decided to micro-paint the exposed inner layer. After masking, the model was sprayed Tamiya TS-1 Matt White. Once dry, the masking was removed and and using the smallest brush I have, I repainted the NATO Green in irregular dots and dashes on the edges. Once dry, the decal was applied - just two of them, the fastest in my hobby so far!

Finishing
The remaining parts are now cemented onto the model. The pioneer tools were first painted XF-59 Desert Yellow for its wooden parts and Flat Black for the metal parts. The metal parts were then 'metalized' using graphite. The same treatment was done to the co-axial machinegun. The exhausts were painted burnt iron and later were coated with Tamiya Weathering Master Rust. The spare wheel was affixed to its place. Even though the instructions seem to suggest that two wheels were to be placed, it seem that only one was needed, based on the rest of the instruction diagram. Once all the parts were in place, the model was subjected to the washing process. This time however instead of black-brown, I used a blue-black mix.

Once dry, I applied Tamiya Weathering Master Snow randomly and haphazardly, suggesting an uneven wear of the whitewash paint. I then mixed a bit more of the mud mixture and dabbed them on the wheels and the lower front and rear hull and used Tamiya Weathering Master Mud to blend the colours. Next, for snow, I mixed baking powder with water and white glue and dabbed them on the tracks and parts of the hull. The excess was removed from the more obvious places such as track joints. No figure was included in this built as there were none provided in the kit and those in my stash were more appropriate for warmer months of the year. However I may include one in the future, so the turret hatch was cemented just enough for it to stay in place but can be easily pried open when needed, And that concludes the built.

Conclusion
This was my first MiniArt kit and I can say that I'm very pleased with it. Yes, there were some problem such as the fit of the wheels, the fragility of the track links and missing labels and pointers in the instructions but the experience was generally a positive one. The inclusion of the PE parts gave better details for this particular release, although I negated it somewhat by not using a number of them. It should also be noted that some modelers mentioned that the track is wrong for a T-70M (or for that matter, the SU-76 and T-80), so MiniArt has come up with a track-link set to correct this. I am however satisfied with what came inside the box and am thinking of buying their Valentine tank and AEC armoured car kits. On a more sombre note, MiniArt is located at Simferopol, Crimea, smack in the conflict zone between Russia and Ukraine and there is a possibility that production might be interrupted by the crisis.