Showing posts with label Walker. Show all posts

Wednesday, 25 March 2020

"Imperial Walkers On The North Ridge"


Fictional/Real-World Background
The All-Terrain Armoured Transport (AT-AT) was the Galactic Empire's successor to the Clone War-era AT-TE walkers. Standing at 22.5 meters tall, the AT-AT was a behemoth. The quadrupedal machine reminded enemies of ancient beasts of war, and even beasts from the Dark Side lore. Designed and built by Kuat Drive Yards, the AT-AT fulfills the dual function of troop/light vehicle  transport and assault vehicle. The early version of the AT-AT first saw action on Kashyyk to defend an Imperial Refinery against Saw Guerrera and his Partisans. Its intimidating and powerful presence meant that it is usually the first vehicle deployed into combat. The beast-like design of the vehicle means that it can be broken down into 'head', 'neck'and 'body' to describe it.

The moveable 'head' section contains the command section including the cockpit and the weaponry. The vehicle commander, driver and gunner was placed here. Forward view was supplied by a red-tinted viewport. The command section also includes a holoprojector for external communications as well as a 360-degree holographic targetting system. The crew members wore specialised suits in order to protect them should the cockpit integrity breached in a hostile environment. The head could rotate 90 degrees off the centre and 30 degrees up and down for an expansive field of fire. The AT-AT's formidable firepower comprised of a pair of Taim & Bak MS-1 heavy laser cannons on the chin and two Piperii-Cerlurn R-90C medium blaster cannons mounted on each side of the head. The command section is connected to the body by a flexible 'neck' structure. This contained an armoured tunnel, allowing passage between the troop-carrying compartment and the command section. Unlike the rest of the AT-AT, the neck is the most vulnerable part and could be damaged by enemy blaster fire. The rest of the walker however was protected by strong 9095-T8511 grade durasteel armour which was impervious to most weapons.

The 'body' of the AT-AT contains the troop compartment, with the engine underneath it. Troop capacity was 40 including their heavy support weapons (such as the E-Web heavy repeating blaster). A vehicle compartment to the rear of the troop compartment held five 74-Z speeder bikes. The main troop hatches were located in the midle of the walker's side and two smaller, emergency escape hatches were located both to the main hatch's immediate left and right. An auxiliary hatch is located in the walker's underside. The walker embark and disembark its troop complement by kneeling to three meters above ground so that the boarding ramp can be extended. Below the troop compartment were two Kuat Drive Yards FW62 compact fusion drive system. In conjunction with the four heavily reinforced legs, the AT-AT can reach a maximum of 60 km/h on flat terrain. As the walker moves, its heavy, stomping feet caused the ground to shake, demoralising the enemy. 

AT-ATs took part in many battles during the Galactic Civil War with the Battle of Hoth being the most significant engagement. A force that included five AT-ATs led by General Maximilian Veers decimated the Rebel forces defending their Echo Base and destroying the protective shield, allowing a larger force to land. The battle however also proved that the walkers can be toppled by a cable wrapped around their legs.
-----------------------------------------------------------

The script for Episode V : The Empire Strikes Back includes a land battle and originally tanks were envisaged. Joe Johnston came u with the designs of such vehicles (one eventually end up as the Juggernaut in Episode III : Revenge Of The Sith). Intended to be a remote-controlled filming prop, the tank design was abandoned when Dennis Muren and Johnston himself convinced George Lucas to use stop-motion instead. George Lucas explained that he had the idea for the AT-AT from the Martian tripods in H.G. Wells' War Of The Worlds while Phil Tippett recalled that it was on the prehistoric mammal Paraceratherium. The movement of the AT-AT in the movie was based on the elephant.

The Kit
Bandai's second walker kit (after the 1/48 AT-ST) was released in 2017. In the months prior to its release, the modelling community was abuzz with a rumour of a new kit of an AT-AT. A 1/48 motorised model was displayed at a modelling show (I can't remember whether Shizuoka or Nuremberg) making the community even more excited about an impending release of a massive 1/48 (or at least, 1/72) scale AT-AT! Nevertheless the actual release is in a more manageable and standard-ish 1/144 scale, I once had the old AMT AT-AT in the 1990s (which is larger, probably 1/96-ish) and so am excited what bandai has to offer. As usual, the kit is mainly moulded in light gray plastic with Sprue A being in the traditional multi-colored moulding (just two this time). Despite being smaller than the AMT kit, the Bandai AT-AT has better details throughout the six sprues. The neck is moveable (and doesn't need rubber bands!) while the legs are poseable. A white display base is included to recreate the surface on Hoth. A small decal and sticker sheets are included - to represent lines on the viewposrt and the helmet faces of the crew.

Construction
Like the AT-ST, construction started with the head module, specifically the neck. Current kit-making technology allow the neck (and the head) to be moveable without using rubber bands a la the old MPC kit. There is however one lingering problem, that is the seam between the halves. The seam, while just a hair's breadth, is still noticeable. The cockpit was next in line. The are no details here save for something representing the instrument panel at the front. The crew figures were stuck to the seats but I didn't do anything to them or the driving/command interior as they would be totally invisible from the narrow front visor. The chin cannons were assembled and then stuck in place. While the cheek cannon mountings were put in place, the cannons were left off at this time to ease handling.

While the next steps are concerned with the legs, I skipped it and constructed the body instead. The body was basically divided into two - the lower (machinery) half and the upper (troop compartment) half. The lower half of the troop compartment module is the 'structural' one, holding the entire assembly rigid. The main body shell of the troop compartment then slid over this. Small fairings were then put in place. These panels can be depicted open to display the model in a downed and damaged pose. The lower 'machinery' half of the main body came together without trouble, save for the same seam issue although this one was easier to get rid of. When complete the troop and machinery compartment were joined together, just to check fit issues (there were none) and the halves remain separate until after painting.   

Finally, the legs. Bandai has them grouped as 'A' (right fore and left hind) and 'B' (left fore and right hind). Build them accordingly or you may have them misaligned. There were a few small parts here, especially those which allow the poseability of the legs between the 'thigh' and the body. Again, there was that seam issue, this time at the top of each foot. This one is also hard to fix as it is located underneath the 'ankle' and so, I left the seam alone. A panel for the outer, lower thigh of the model is separate and Bandai provided a number of them to chose. As there was no explanation as to why that was the case, it took some time for me to figure it out. Each panel have different length of piston-like structure, so I guess you have to choose according to how you want to pose the legs of the model. And, for the time being, they were also left off.

Painting and Decalling
After looking for a suitable shade of grey (Yes, for modellers, there are really 50, if not more, Shades of Grey), I decided that Tamiya's XF-19 Sky Grey is the best colour to paint the AT-AT. However I forgot that the kit is in a smaller scale then I'm used to and forgot to increase the 'scale factor' (which I realized only after weathering). Darker shades of XF-19 were the dry-brushed and thinly applied haphazardly, especially on the walker's legs. It was also during painting that I appreciate the work done by ILM modelmakers in including parts from model kits when building the studio model. Noticeable model kit parts reproduced include jerrycans, 'A' turret from a HMS King George V model, the funnel cap from a German battleship model, although most of these are quite out of sight at the belly of the machine.Once the paint has dried, it was time for the decals. Oh, wait, what decals?

Finishing
I started by getting the sub-assemblies together. The legs need to be attached to the lower body first as the pelvis joints are blocked by a fairing when the upper body is in place. The head assembly was then fitted to the lower body and the upper body can then be put in place. Finally the cheek guns were put in place - there are two styles of them and I chose the one-piece main assembly rather than the two-piece alternative. Further weathering was done using water-based paint at the joints and enamel-based product (yes, AK Interactive) for the rest of the body. Tamiya Weathering Master 'Soot' was also used. Again, The Star Wars Archive was used as reference.  Next I have to determine the position of the legs. For this step, I referred to clips of the Battle of Hoth on Youtube. The base has 'ridges' moulded in so might want to reduce them where appropriate. The included humanoid-shaped cut-out was painted orange (to represent a downed Snowspeeder crewmember, perhaps) and was cemented in front of the walker to give idea of the latter's 'true' size.    

Conclusion
The 8-year old me watched in awe when the AT-ATs entered the screen in The Empire Strikes Back while the 48-year old version marvelled at the model kit (of a model, haha) of the same vehicle today. Despite it's rather small scale, Bandai did not skip on the details whether engraved or raised. The build process was also pretty straightforward and just needed a good hand in weathering (which I'm not). And, with hindsight, perhaps the walker is best in this scale rather than making it in say, 1/72 as I won't find a place to display it in my cabinet.


Tuesday, 19 April 2016

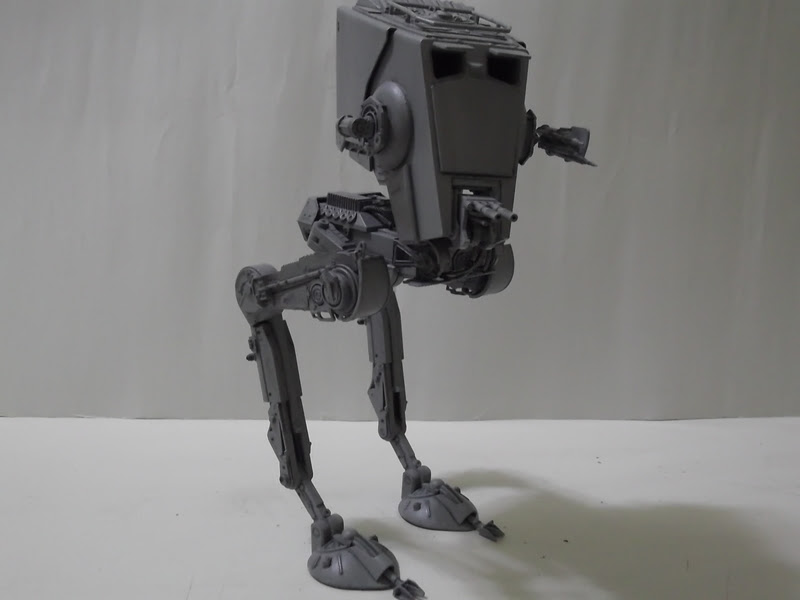
Imperial Chicken Walker


Fictional / Real-World Background
During the Clone Wars, the Rothana Heavy Engineering subsidiary of Kuat Drive Yards developed a new bipedal walker mech, known as the All-Terrain Scout Transport (AT-ST), based on their experimental AT-XT. The AT-ST was used by the Galactic Republic late during the Clone Wars and it saw major usage with the Galactic Empire during the Galactic Civil War. The AT-ST was a light, but heavily armed ground combat vehicle. The stock model was armed with a chin-mounted double blaster cannon, an E-Web twin light blaster cannon on the port side an a concussion grenade launcher on the starboard side of its 'head' structure. The chin-mounted double blasters have a range of 2,000 meters and was used for anti-vehicle purposes while the light twin blasters and concussion grenades were good against short-range infantry attacks and light fortifications. For targetting, the AT-ST used the same holographic targetting system as the larger AT-AT.

The AT-ST was piloted by a crew of two Imperial Army pilots. An advanced gyro system, located underneath the command module (i.e. the 'head' of the walker), provided balance although the system was susceptible to battle damage. The bipedal propulsion system was one of the major weakness of the AT-ST. While allowing speeds of up to 90 kph on flat, even terrain, the bipedal construction meant that the walker can easily topple when confronting uneven or shifting terrain. Furthermore, while the armour was sufficient against infantry blaster shots, it was not effective against heavier weapons, even another AT-ST's blaster cannon shots. The armor was also ineffective against physical, low-tech assaults to the head and the legs. All the weaknesses were proven to great effect during the Battle of Endor when AT-STs were toppled by a rolling log trap and logs rammed to the walkers's sides. Another AT-ST, hijacked by the notable Wookie, Chewbacca and two Ewoks destroyed other surviving AT-STs and forcing Imperial stormtroopers to scatter.

OK, that's the story of the AT-ST in the Star Wars Universe. In the real world, in the 'scrapbook section' of the 27 June 1982 issue of the Star Wars comic strip, a depiction of a walker named 'Two-Man Imperial Scout Walker' was made although it actually resembled half of an AT-AT rather than the more familiar shape of an AT-ST. During the production of The Empire Strikes Back, the modelling department of Industrial Light & Magic created the original model of the AT-ST. George Lucas thought it was neat and decided to add it alongside the AT-ATs. The AT-ST model then received a more extensive makeover for Return Of The Jedi, hence the difference between the AT-STs in the two movies. The AT-ST made further appearances in the Star Wars Universe such as the computer and role-playing games.

The Kit
Unsurprisingly, successful films like the Star Wars saga came up with huge number of merchandise, including model kits. In the 1980s and 1990s, the licence was held by AMT/ERTL which produced a number of kits, some of them were of the snap-fit style while all of them having no standard scale. When the prequel trilogy came up, Fine Molds was granted licence, who then proceeded to produce some of the most stunning sci-fi scale models I have ever seen (but never having even one) and they came in the standard 1/48, 1/72 or 1/144 scales. With the release of Episode VII, the licence was granted to Bandai - a manufacturer best known for its toys and mechas, specifically Gundams. I decided to give it a try, despite my initial and rather irrational, misgivings. After mulling whether to buy any of the fighters or the AT-ST, I decided to buy the latter.

The small-ish box looked a bit bulging and when opened, it was because of the jam-packed sprues (six of them) inside, the highlight of which is the multicoloured sprue A (it was a Bandai specialty, a carry-over from their Gundam kits). The parts are well moulded and having crisp details, The instructions are entirely in Japanese but the diagrams are clear enough (I still need help though through the internet). The downside is that the interior would be entirely invisible unless you open the roof and the front hatches (even then barely, as it turn out). Another downside is the funny-looking crews, who have nice helmet details but totally stiff pose, with funny-looking arms and oversized boots. Strangely, the included Chewbacca figure has better (fur and facial) details! For markings (although no AT-STs were shown to have markings in the movies), a decal sheet and a sticker sheet was provided to cater for 'serious' modellers and the more casual Star Wars collector. Also included in both sheets are 'scorch marks'. They are best discarded as they show rather visible pixellation.

Construction
Before building, I realised that the parts feature rather large locating tabs and corresponding holes rather than the usual shallow holes and small locating pins in the plastic. When dry-fitting, they fit nicely, making the kit a virtual snap-fit style although I did run Tamiya Extra Thin Cement along some of the the joints. Construction started at the erm, pelvis of the walker. Part C1-11 was a tight fit and since I was half-asleep while building this kit, it only got partway through its slots, causing problems when I initially tried to fit parts C1-4 and -5. I pulled out part C1-11 and reinserted it, allowing the other two parts to fit properly. Part C1-36 was actually optional but since I can't understand any Japanese characters, it was inserted into place (apparently, as other modellers remarked, Bandai used two different original studio models as guides). The cable parts were then cemented (they fit nicely but I'm not taking any chances) to their places. This was where I discovered another Bandai speciality - the cables are made from malleable plastic, on that three-colour Sprue A. Impressive! (in Vader's voice)

The next two steps are concerned with the walker's legs. Construction started with the segmented, but not workable lower leg - just the 'ankle' is moveable, The feet were then assembled. The wire-cutting 'claws' have a ball joint, making them moveable. However I found it difficult to insert the main feet section to the ankle/internal feet structure properly, leaving a gap at the 'heel'. I decided to trim off the male joint at parts D1/D2 6 and D1/D2 7  (the internal feet structure) and afterwards the feet fitted properly. The thigh was then assembled; each thigh consisting of two parts with the part containing the slots for the leg-body joint trapped between them. The thigh was then joined with the lower leg. Here Bandai gave an option whether to put Part D1/D2 3 or D1/D2 3 at the joint. Part D4 has extra plastic tab matching the groove inside the joint, locking the joint. Bandai's instruction suggested that Part D4 be used if one is 'going to display the AT-ST for a long time' which I read as 'if you are not going to play with it!'

Next, the head of the walker. Before assembling the cockpit module, I decided to paint it. The cockpit was painted XF-22 RLM Grey overall with certain panels painted XF-1 Flat Black. The crew figures were painted XF-81 RAF Dark Green for their helmets, X-18 Semi-Gloss Black for their visors, XF-54 Dark Sea Grey for uniform and XF-24 Dark Grey for the harness/belt. Maybe I shouldn't have bothered because when the cockpit was boxed in, it looks like the Black Hole of Calcutta!  Good thing I didn't detail-paint all the button and knob representations and weather the cockpit! The weapons were then assembled. No problems here but hole in the left cheek weapon cluster was too tight for  the mounting tab for the shield and I almost snapped the tab. The sub-assemblies remain apart for the painting and weathering process.

Painting and Decalling
One thing I forgot to mention. While painting the interior and the figures, the paint was inconsistent in its adherence to the plastic and I suspect that residual mould release agent was responsible. Therefore the sub-assemblies were washed using dishwashing liquid. At the same time, online reviews stated that the problem persists even after washing and seemed to affect virtually all Bandai kits.  The best bet here would be prime the model first. Unfortunately I have run out of surface primer and had to resort to using spray-can paint (I used Tamiya AS-5 Grey Violet). Even so, the acrylic paint still has lingering problem with adherence. I didn't face the same problem when using the same paint when painting my Hurricane kit, so I guess there is something 'funny' with the plastic. Although decals bearing the Galactic Empire insignia were included, I decided to forego the them to maintain the 'movie-accuracy' of the AT-ST.

Finishing
Before making the model whole, it was given a dark grey wash to pop up the details with emphasis especially given to the pelvis area, in keeping with the spirit of 'used universe' in the movies. However I had to admit that I was a bit gung-ho in the application of the wash, darkening the model unnecessarily. The front viewports, like the entry hatch on the roof are available in open or closed position. I chose the open position, the AT-ST looks better this way. I decided not to use the display base but it was consigned to the spares bin should I fancy dressing it up. Watch this space. As for the 'laser blasts'? I threw them away as they look too cartoonish. The sub-assemblies were then sprayed with Flat Clear. Afterwards, they were assembled, finishing the build. And what did I do next? Play with it Re-enacting the Battle Of Endor (complete with sound effects) of course!

Conclusion
I confess that I am a Star Wars nut and having built several of MPC (AMT/ERTL) kits during my college days, I decided to revisit the old days. I missed out the Fine Molds kits (because of the pile of unbuilt kits at home at the time). Now that the pile has thinned out plus my interest in sci-fi modelling has been 'awakened' by Episode VII, I decided to take a plunge back into the genre. Bandai has come up with a kit that satisfies a broad spectrum of geeks Star Wars fans : from collectors to veteran modellers. The kit is simple yet having very acceptable level of details (not up to those set by Fine Molds though, but in any case, sci-fi models are models of models). The kit was designed so that it has a fair degree of movement to the main parts (head, weapons and legs) to allow playability different display poses. I was looking forward to build others in the range (especially the projected 1/48 AT-AT, shown at the Shizuoka Hobby Show... I wonder how big it would really be like).