Friday, 23 May 2014

Lightweight Warrior


Historical Background
At the outbreak of the Great Patriotic War in June 1941, the Red Army possessed large numbers of light tanks even though events up to that time pointed to the general weakness of the type. Wartime experience eventually cause the final decline of the light tank, but until 1943, it remained a significant part of the Red Army's inventory. This was caused by a number of reasons: firstly, to make up for the catastrophic losses in 1941 and 1942, as any tank is better than no tank, or as Stalin put it : "Quantity has its own quality". Secondly, it was cheap and easy to produce, and finally, because of its inherent simplicity, it can be built at less specialised factories especially at the time the major tank manufacturing plants were being relocated to the East, disrupting the production of the more capable T-34 and KV series. Once the factories have been re-established, the more powerful and battle-worthy tanks were preferred. This, coupled with the increased protection and firepower of the German panzers caused the role of the light tanks to steadily decline and production of the last type, the T-80, was ended in autumn 1943.

Before 1941, the Red Army was equipped with a number of models of light tanks, from the reasonably armed T-26 to machine gun-only armed T-37 family. In 1941, after facing the disastrous losses at the hands of the Panzertruppen during Operation Barbarossa, Zavod No.37 under the guidance of its head designer, Nikolai Astrov, produced the T-60 light tank. While better in many respects than the earlier T-40, it was still armed with a 20 mm cannon, a weapon totally inadequate against the Germans' Panzers III and IV, especially when used as a combat tank. It was so bad that it was nicknamed 'A Brother's Grave For Two'. In an attempt to remedy some of the shortcomings of the T-60, Nikolai Astrov designed a new light tank with a more powerful armament, a more robust armour and greater mobility than the T-60. The new tank, designated T-70 was put into production in March 1942. The first batch was built with a GAZ-202 engine on each side of the hull , each powering one track. This was seen to be a serious defect and was quickly redesigned as T-70M with the engines in-line on the right side of the tank. The turret was redesigned so that the armour plates can be easily welded together and was moved to the left side of the hull. The T-70 was built at Zavod No.37 and No.38 at Kirov and GAZ at Gorky.  While the ZiS-19BM 45 mm gun and 45 mm of frontal armour were improvements over the T-60, the better armament of German tanks such as L/60 50 mm gun of the Panzer III and L/43 75 mm gun on the Panzer IV negated them. Furthermore, the T-70 was still equipped with a one-man turret, overburdening the tank commander, who also has to act as the loader and the gunner.

The T-70 participated in numerous battles but none bigger than the Battle of Kursk. On 12 July 1943, at a front 32km wide in front of the village of Prokhorovka, 429 panzers of the II SS Panzer Corps and III Panzer Corps clashed with 870 tanks, including 261 T-70s, of the Soviet Fifth Guards Tank Army. A report by the 5th Guards Tank Army on 16 July 1943 listed 89 T-70s as total losses with another 56 still under repair. Following the battle, the T-70 were gradually withdrawn from combat and were relegated to secondary duties. The T-70 was further developed into the T-80 but interest in light tanks had waned and only 120 were built. The T-70 also formed the basis of the SU-76 self-propelled gun and the prototype-only T-90 anti-aircraft tank. In all, 8,226 T-70s were built.  

The Kit
MiniArt, from Ukraine, has come out with a number T-70 kits : T-70 Early production (with figures), T-70M Late production with figures, T-70M with ZiS-3 76.2mm gun (with crew) and PzKpfW T-70 743(r) with ZiS-3 (with crew). The 'Special Edition' is the latest of the T-70M gun tank kit, it came without any crew figures but have a PE fret not available with the other boxings. Also both early and late versions of the T-70 can be build from this kit. The kit consists of 356 parts in light grey and clear plastic and also PE. 176 of those parts are the separate link tracks - they look nice but have ejector pin marks on either side of the inner face. The rest of the parts are well moulded and have no flash.

For those uncomfortable with PE, there are original plastic parts to use but, of course they have less detail and look less realistic. The decal sheet was printed by Begemot and feature markings for nine tanks, mainly from that most famous of military formation in scale modeling : 'Unknown Unit' (Haha!). My previous experience with Begemot decals was very positive and I have no doubt these would work well too. The instruction sheet was printed on gloss paper and the drawings somewhat reminded me of Bronco kits. Apart from the usual construction steps, the instruction sheet is also needed for locating parts numbers as none were moulded on the sprues.

Construction
As with many AFV kits, the MiniArt T-70 is also conventional in its build approach. As usual, the hull received the first attention although MiniArt deviated slightly by having you build the upper portion of the hull first. Me, being a traditionalist, started with the one-piece lower hull. Once all the suspension arms were in place, I have to set the lower hull flat on the modeling table to ensure that all of them were in alignment. Moving on to the upper hull, I first cut a hole in the engine compartment, in order to use the PE parts. The resulting hole was then cleaned up and I installed the PE vent flaps (or whatever it was called). They were then painted steel, along with the compartment on the right-hand side. Then the PE grilles were superglued onto their places. Having already decided beforehand to build a late production vehicle, I used the indicated parts to assemble the driver's hatch. Afterwards, the rest of the hull parts were cemented, save for the spare wheel, exhausts parts, track guards and all the on-vehicle equipments.

The turret assembly were next. MiniArt provided no interior detailing save for the gun breech, co-axial machine gun, gunsight and periscope. Like the driver's hatch, there were different mantlet covers and periscope hatches for early- and late-build vehicles. The co-axial MG barrel was delicate and care was needed in handling it. The turret's interior was painted XF-71 IJN Cockpit Green. Then it was assembled and set aside. As the kit included PE parts, the partially assembled model was sprayed with Tamiya Grey Surface Primer.


I intended to build a vehicle in winter and to ease the weathering process, I decided to weather the hull before attaching the tracks. To create mud, I used modeling paste mixed with water, Mig Productions' African Earth pigment, Tamiya XF-64 Red Brown, along with fibre from a broom (I'm a cheapskate, plus the fibre resemble static grass) and dabbed them all over the lower hull. When dry the 'mud' went lighter so I haphazardly add some more Tamiya XF-64 over it. The wheels were mounted onto their places with some difficulty as the fit was quite tight. Then it was time to assemble the tracks. The tracks are well-moulded with good detail and, as stated before, with ejector pin marks on the inside surface. The tracks were sprayed Tamiya TS-1 Red Brown, cut off their sprues, cleaned and placed inside a plastic container prior to assembly. It should also be noted that the track links are quite fragile and I broke several of them, necessitating repairs as there were only 7 spare tracks (there were 84 links per run with a total of 168, MiniArt supplied only 176 links). Although non-workable, the tracks assemble easily using Tamiya Extra Thin Cement. Looking at photographs, some show that the tracks sag on the upper run while others showed them to be rigid. I decided to go mid-way, by only having a slight sag.

Before adding the track guards, I decided to weather the upper run of the tracks first, as there is only a little room between the track and the guard. Once done, the track guards were cemented into place. The left hand guard was slightly bent so I used superglue at the particular area. The track guards have reinforcing bars, four per side. Like the tracks, the bars are quite fragile and I broke three on the left side before deciding to cut the off the sprue using my hobby knife instead of the cutter. Finally, the storage boxes on the left track guard were glued. MiniArt provided delicate yet well detailed PE hinges and clasps...but I chickened out and left the boxes as they were. 

It should also be noted that the instructions mislabelled some parts and a few other parts were not called for in the instructions. Parts D15 were labelled as D14 while Part D2 was simply illustrated as being on the back of the turret without any instructions to put it there.

Painting and Decaling
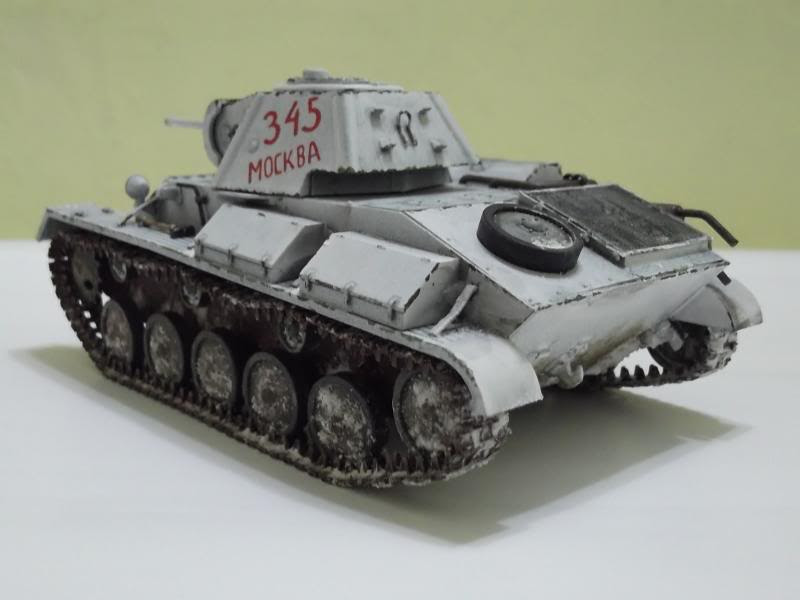
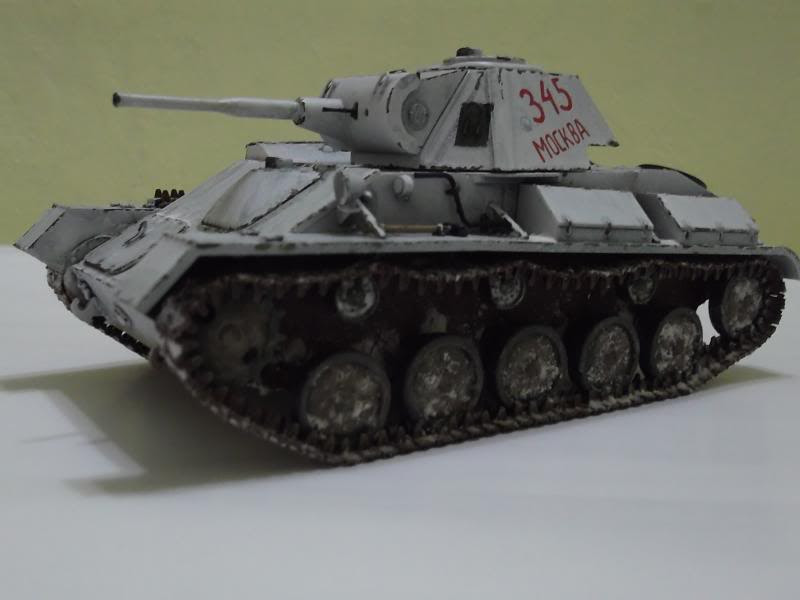
For kit markings, I chose #8, a late production T-70M, Eastern Front, Kharkov, Winter 1943. The tank was painted white overall save for two patches on the turret sides and the lower hull. For the base colour, I used Tamiya XF-67 NATO Green, painted without taking into account scale effect. Although originally thinking of applying the 'hairspray method', I decided to simulate an early winter white camo - not yet washed out but having chipped at the edges. The hairspray method can of course be used for this course of action but I decided to micro-paint the exposed inner layer. After masking, the model was sprayed Tamiya TS-1 Matt White. Once dry, the masking was removed and and using the smallest brush I have, I repainted the NATO Green in irregular dots and dashes on the edges. Once dry, the decal was applied - just two of them, the fastest in my hobby so far!

Finishing
The remaining parts are now cemented onto the model. The pioneer tools were first painted XF-59 Desert Yellow for its wooden parts and Flat Black for the metal parts. The metal parts were then 'metalized' using graphite. The same treatment was done to the co-axial machinegun. The exhausts were painted burnt iron and later were coated with Tamiya Weathering Master Rust. The spare wheel was affixed to its place. Even though the instructions seem to suggest that two wheels were to be placed, it seem that only one was needed, based on the rest of the instruction diagram. Once all the parts were in place, the model was subjected to the washing process. This time however instead of black-brown, I used a blue-black mix.

Once dry, I applied Tamiya Weathering Master Snow randomly and haphazardly, suggesting an uneven wear of the whitewash paint. I then mixed a bit more of the mud mixture and dabbed them on the wheels and the lower front and rear hull and used Tamiya Weathering Master Mud to blend the colours. Next, for snow, I mixed baking powder with water and white glue and dabbed them on the tracks and parts of the hull. The excess was removed from the more obvious places such as track joints. No figure was included in this built as there were none provided in the kit and those in my stash were more appropriate for warmer months of the year. However I may include one in the future, so the turret hatch was cemented just enough for it to stay in place but can be easily pried open when needed, And that concludes the built.

Conclusion
This was my first MiniArt kit and I can say that I'm very pleased with it. Yes, there were some problem such as the fit of the wheels, the fragility of the track links and missing labels and pointers in the instructions but the experience was generally a positive one. The inclusion of the PE parts gave better details for this particular release, although I negated it somewhat by not using a number of them. It should also be noted that some modelers mentioned that the track is wrong for a T-70M (or for that matter, the SU-76 and T-80), so MiniArt has come up with a track-link set to correct this. I am however satisfied with what came inside the box and am thinking of buying their Valentine tank and AEC armoured car kits. On a more sombre note, MiniArt is located at Simferopol, Crimea, smack in the conflict zone between Russia and Ukraine and there is a possibility that production might be interrupted by the crisis.

Friday, 2 May 2014

Matilda, Queen Of The Desert


Historical Background
In 1935, the British General Staff issued a requirement for an infantry tank. Designated A11 and built by Vickers-Armstrong, it was specified to be a low-cost tank, using commercially available parts such as Ford V8 engine, Fordson gearbox, a steering mechanism from the Vickers Light Tank and a suspension system adapted from the Mark IV Dragon artillery tractor. Armament was the Vickers machine gun. either in 0.303in or 0.5in caliber. While the turret and hull were well-protected against contemporary anti-tank weapons, the tracks and running gears were totally exposed. Furthermore the weapon was completely useless against tanks, severely limiting its utility. The commander also had to duck into the hull in order to use the radio, as it was located there. Designated Tank, Infantry, Mark I, it was allegedly nicknamed 'Matilda' by General Hugh Elles, the Master-General of Ordnance due to 'the vehicles diminutive size and duck-like shape and gait'. A total of 140 A11s were built.

In 1936, a decision was made to build a larger infantry tank and specification A12 was drawn up. Designated Tank, Infantry, Mark II, it was designed by the Royal Arsenal at Woolwich.The Infantry Tank Mark II weighed 27 tons and was armed with an Ordnance QF 2-pounder gun. The tank was heavily armoured, with 78mm for the hull front and 75mm for the turret. The contemporary Panzers III and IV had only 30 to 50mm of armour in its hull front. This made the tank impervious against the German 37mm and 50mm and the Italian 47mm anti-tank guns - only the 75mm Pak 40 and the 88mm gun can penetrate its armour. The heavy armour came at a price however. The Matilda II (as it was named following the withdrawal of the Matilda I) had an average off-road speed of just 9.7km/h. This was not thought as a major problem as the tank was designed to accompany infantry attacks with high priority over armour and trench-crossing ability. Another problem, not realised until the tanks went into combat, was the lack of HE rounds. This was a real handicap against anti-tank gun emplacements and the crew only had the co-axial machine-gun to use against unarmoured targets.

The Matilda II entered production in 1937, but only two were in service in September 1939. Both versions of the Matildas were used in combat by the 7th Royal Tank Regiment in France where the Germans were forced to use their 88mm Flak gun against the them. During the Allied counter-attack at Arras, the Matildas played a central role in briefly halting the German advance. All surviving tanks however were abandoned following the evacuation of the British Expeditionary Force from Dunkirk. In the North African theatre, the Matilda were highly effective against the Italian and German tanks. During Operation Compass, the Matildas wreaked havoc among the Italian L33 tankettes and M11/39 medium tanks while the anti-tank gunners found their shots bounced against the Matildas' armour. However the rapid maneuvering warfare practiced in the North African desert proved to be the Matilda's undoing. The 88 was also used in the theatre as an antitank gun, causing the loss of 64 Matildas, among others, during Operation Battleaxe. The Matildas were however instrumental in the Allied breakout from Tobruk and the capture of the Axis fortress of Bardia during Operation Crusader.

With the introduction of more powerful guns on German tanks such as the 50mm L/42 and L/60 and the towed 75mm Pak 40 anti-tank gun, the Matilda became less effective at normal combat ranges. The small turret ring meant that it cannot be equipped with a larger gun. The Matilda was finally replaced by the Infantry Tank Mk III Valentine in the autumn of 1941. The Matilda II was also used by the Soviets, who compared it with their own KV-1 tanks. The Matilda was roughly similar in speed and protection the KV-1 but were nowhere near in terms of firepower.The Matilda was also used by the Australians, where it reigned supreme as the Japanese lack heavy anti-tank weapons. The Australian Matildas were used in the Wewak, Bougainville and Borneo campaigns, remaining in action until the end of the hostilities, making it the only British tank to remain in service throughout the war.

The Kit
It was 2009 and Tamiya's Military Miniatures series was nearing kit #300. Speculations were quite rife then concerning the milestone kit. It eventually turned out to be the Matilda II, a kit Tamiya released back in the 1970s. Some wondered why did Tamiya basically released a kit that is already in their catalogue? For one, kit #024 is already a 30-something kit, moulded using 1970s technology. It also suffered from having many inaccuracies, chiefly being oversized (many of Tamiya's early kits suffer from this problem, which stemmed from the desire to include motorisation, powered by a C-sized battery). Secondly, while the Panzers and Shermans were done to the death by plastic manufacturers, Tamiya's was the only Matilda in 1/35 scale. So the new release with more accurate dimensions and better details is most welcome. As for the title of the kit, it denotes Matildas armed with 7.92mm Besa co-axial MG and the asterisk denotes Leyland, instead of AEC engine.

The kit was moulded in sand coloured plastic and the parts are spread among six sprues, a single piece upper hull, two flexible tracks, a length of string, some polycaps, a decal sheet and 16-page instruction sheet. A small photographic reference sheet was also included. As befits a modern kit, all the parts have very good detail (as far as the injection moulding technique allows) and generally correcting the omissions and mistakes of the earlier release. Apart from the flexible track, Tamiya also included link-and-length tracks. Both type of tracks however have solid guide horns (the ends were indented however) although the spare tracks have hollow guide horns! While kit #024 had two gun mantlets (one with shroud over the co-axial MG), this kit has only one. There are however three types of gun barrels - a smooth and a stepped 2-pounder barrels and a 3" howitzer for CS version while the co-axial Besa machine gun has hollowed barrel. There are also three crew figures (the driver figure is more of a bust). Decals are provided for three tanks:
 1. 'Phantom', 42nd RTR, 1st Army Tank Brigade, North Africa 1941 (Caunter scheme)
2. 'Defiance', 4th RTR, 32nd Army Tank Brigade, Libya 1941 (Caunter scheme)
3. 'Filibuster', 49th RTR, 35th Army Tank Brigade, UK 1942 (two-tone brown)   

Construction
As usual, construction started at the lower hull. Instead of the usual tub, Tamiya had the lower hull in four pieces - bottom (incorporating the rear), sides and the front. Some sub-assembly is required at the front before mating it to the rest of the hull. and then came the most tedious part of the built-assembling the road wheels, all 20 of them. Good thing they have no tyres, as it would mean painting 40 small strips of plastic to represent them! This was followed by assembling the suspension and some attention was needed to avoid mixing up the parts.The completed suspension was then cemented onto the hull and was followed by attaching the suspension cover cum mud chutes. At this point, I decided to paint the lower hull sides, before installing the tracks. As mentioned before, Tamiya provided both one-piece vinyl and link-and-length tracks. I originally wanted to use the latter option, due to better details. I however opted to use the vinyl track as it was an easier option and the the detail is pretty good plus most of it will be hidden. I sprayed the track TS-1 Red Brown, let it dry and joined it using regular Tamiya cement. Moving on to the next step, various holes for a number of fittings and  tools need to be drilled before work commences on the upper hull. I however added certain parts only at this stage, such as the headlights, light housings and engine deck parts; the rest would be added after painting. The upper hull was then mated to its lower half - the front part was cemented while the rear was secured using a polycap. Afterwards the exhaust pipings were added and Tamiya has nicely captured the surface detail of asbestos-wrapped exhaust pipes. Gluing the lower exhaust parts (D77 and D78) to the muffler were a bit awkward however because of the location. The work on the hull was finished (for the time being) by fitting the side skirts, which also incorporated the outer half of the return rollers. At this time I also decided not to fit the external fuel tank, so the recesses were puttied over.

Next, the turret. The cast pattern was nicely moulded, replacing the smooth moulding of the original release. As with the upper hull, there were a number holes that needed to be drilled plus three other holes if one is building the C option of the markings. The gun mantlet was then assembled and as mentioned before, Tamiya provided three types of barrels although the instructions only have you use part D13. A pair of polycaps secured the mantlet and allow movement of the gun. The main turret parts were then cemented together. As I intended to place the crew figures, the turret hatches were cemented in the open position. All the other turret parts which would not interfere with masking and painting were also cemented onto the turret at this time. Of a particular note is the turret smoke dischargers. On the real thing, it was made of cut-down Lee-Enfield No.1 Mk.III rifles mated to smoke grenade launchers. On the original Tamiya kit, the rifle part were just lumps but on this kit, there is good detail so that you may recognize the cut-down Lee-Enfields.

Painting and Decaling
I actually had the older Tamiya Matilda and still have the spare decals. I originally thought of building a plain desert yellow tank but I thought the better of it and decided to finish the model in the markings of 'Defiance'. Both it and 'Phantom' were finished in the Caunter (named after it's supposed inventor, a Colonel Caunter) scheme. Tamiya's instructions have you painted the scheme in XF-59 Desert Yellow, XF-23 Light Blue and a mix of XF-1 Flat Black and XF-26 Deep Green. Apparently Tamiya based their paint mixes on museum vehicles. However, modern research led by Mark Starmer showed different colour. The base colour is either Portland Stone or Middle Stone, The light blue is actually a colour called silver grey and the darker colour is Slate Grey. He also gave suggestions for the appropriate mix of Tamiya colours. I chose Portland Stone for the base colour and mixed XF-2 Flat White, XF-3 Flat Yellow and XF-57 Buff in a 6:1:1 ratio as per his instructions. The Silver Grey was a mix of XF-21 Sky, XF-19 Sky Grey and XF-4 Yellow Green in a 7:1:1 ratio while Slate Grey is XF-65 Field Grey. all were added with 20% flat white for scale effect. The decals were then applied with no problems. One note though, decals 9 and 10 (the number '4') were basically not interchangeable as the starboard 4 was in two pieces, to take into account the gun cleaning rod over its position. The figures are also painted at this time with the uniform painted XF-49 Khaki. The skin was painted XF-15 Flat Flesh with a bit more washes of red brown than usual to simulate tan (sort of). Afterwards, it was time to finish the model.

Finishing
All the remaining parts were cemented onto the model. As mentioned before, I did not intend to use the external fuel tank. Instead I crafted a stowage rack using Evergreen rods and strips as many Matildas did not carry the external tank up until the timeline of Operation Crusader. The rack was painted the same Portland Stone colour as the tank. To fill the rack, I put four 2-gallon 'flimsies' cans from the Academy Tank Supplies Set. The flimsies were painted silver, though I originally wanted to paint them white. Afterwards it was time for some weathering. First I applied a red brown/flat black wash all over the model. Next I applied some chipped paint on certain parts on the model using Tamiya XF-62 Olive Drab and also flicks from a 2B pencil. The mud chutes were weathered using Mig Productions' African Earth pigment while the whole of the lower hull were dabbed with Gulf War Sand pigments, applied 'wet' with enamel thinner. Once dry the excess was removed using a stiff brush. Diluted Tamiya X-19 Smoke was then applied at a few places on the lower hull to simulate leaked lubricants. Once they were dry, another slurry mix of Gulf War sand pigment and enamel thinner was applied and once again the excess was removed. Mig Productions' Pigment Fixer was then applied. I then reapplied X-19 to simulate newer leaks. The weathering was then touched up a bit with Tamiya's Weathering Master Sand. Finally, a length of brass wire was cut to represent the radio aerial and painted black. The crew figures were then cemented into their places, finishing the build.

Conclusion
When Tamiya came up with the Fieseler Fi 156 Storch for their 100th 1/48 aircraft series, the modeling community was quite abuzz with complaints that they have came up with a plane that nobody really wanted to be kitted (apparently, many modelers expected a British heavy bomber or something similar) and that the release was more of a tie-in with their 1/48 Military Miniature series. There were less complaints however with the 300th 1/35 Military Miniatures kit, perhaps because the original suffer from so many inaccuracies, especially being oversized. The newer kit offers all the modern mould-making can offer, coupled with Tamiya's unsurpassed kit engineering. Yes, there were a number of drawbacks, such as solid guide horns, detail-less turret interior and suspect painting instructions but it did not detract from the fact that it was a fine kit. A highly recommended kit to all.


Sunday, 20 April 2014

The Small Panzer In A Big Panzer World


Historical Background
In 1934, the Waffenamnt issued a specification for an armoured vehicle weighing 10 tons and armed with a 20mm cannon. In early 1935, MAN, Krupp, Henschel and Daimler-Benz submitted their proposals under the cover name Landwirtschaftlicher Schlepper 100 'agricultural tractor' for evaluation. The new vehicle was to supplement the then-new Panzerkampfwagen I light tank / tankette and capable of firing 20mm high explosive and armour-piercing rounds. Krupp was the first to submit their design but it was not adopted. Eventually it was decided to use the MAN chassis, allied to the hull of the Daimler-Benz design. For testing purposes, pre-production models Ausf. a,b and c of the Panzerkampfwagen II (as the new vehicle was now named) were produced from 1935 to 1937. The Ausf c. introduced the five independent roadwheel suspension, which became standard on full production models.

In July 1937, the first true production Panzer II, Ausf. A was produced. It featured improved transmission and increased armour thickness (from 13mm to 14.5mm). This was followed by the Ausf. B, which featured minor changes. From March 1937 to April 1940, the Ausf. C was produced. All of the Ausf A, B and C have rounded hull front, but many of these were up-armoured before the invasion of France, by having an extra armour plate bolted on the turret front and at the front of the hull. Ausf. D and E featured torsion-bar suspension with four roadwheels and also a new superstructure. The D and E were designed as a fast cavalry tank, geared towards pursuit and reconnaissance. The final major version was Ausf. F, with even thicker armour (35mm front, 30mm on front superstructure and face of the turret and 15mm elsewhere. The commander was provided with a cupola (also retrofitted to many Ausf Cs) and a dummy visor.

All Panzer IIs were powered by Maybach HL62 petrol engine of 138hp. Models A to C had a top speed of 40km/h while the the D and E, using torsion bar suspension had a top road speed of 55km/h. All versions had a range of 200 km. The gun tank versions of the Panzer II were armed with a 20mm cannon, either the KwK 30 L/55 or the KwK 38 L/55. A total of 180 shells were carried. The tank was also armed with a co-axial MG34 machine gun with 2,250 rounds. The 20mm cannon had weak penetrating power and efforts were made to rearm the Panzer II with captured French 37mm gun following the fall of France in 1940, but the project came to nothing. Crew consists of three men - the driver, the loader/radio operator and the commander, who also acted as the gunner.

The Panzer II first saw action in 1938, albeit not 'in anger', during the Anschluss with Austria and the occupation of Czechoslovakia. Despite its supposed role as a training and reconnaissance tank, the Panzer II saw service as a combat tank early in World War 2. Of the 2,750 tanks available for the invasion of Poland on 1 September 1939, 1,223 were Panzer IIs. For operation against France and the Low Countries, 920 Panzer IIs were mustered. Although possessing a smaller gun, the Panzer II was comparable to the Polish 7TP, Soviet T-26 and the French R-35 and H-35/39. Following the reorganization of the Panzertruppen in late 1940/early 1941, the Panzer II was finally relegated to the reconnaissance role. They were however had to be used on occassions during Operation Barbarossa as combat tanks due to the sheer number of Soviet tanks. The Panzer II was finally withdrawn from frontline service in 1943; it however remain in service until the end of the war.

A total of 1,924 Panzer IIs including prototypes were built. The Panzer II chassis was also used for other armoured fighting vehicles, notably the Wespe 105mm self-propelled gun, Marder II tank destroyer, Flammpanzer II Flamingo and Sturmpanzer II Bison assault gun.

The Kit
To commemorate the 40th anniversary of their Military Miniatures range in 2008, Tamiya released a new-tool Panzerkampfwagen II (the first tank in the Military Miniatures range was another Panzer II, the Ausf. F/G). This time Tamiya chose to depict the early war Ausf A/B/C, specifically for the timeframe of Operation Case Yellow (i.e. the invasion of France). The kit parts were spread among five dark grey-coloured sprue trees, hull bottom, a small stainless steel PE fret, poly caps and a decal sheet plus, of course, the instruction sheet. The tracks are of the link-and-length type with sag built-in into the upper runs. Being a modern kit, it has better details than the original Panzer II kit released in 1971. The decal sheet contains markings for four tanks : two from the 6th Panzer Division and the other two from the 4th Panzer Division. As usual, while the decals appear to be well-printed, it looks rather thick.

Construction
The instruction slightly deviates from the usual assembly sequence for an armoured vehicle in that it starts by assembling the running gears first. I however stick to the 'normal' assembly sequence by handling the lower hull first by attaching the suspension to it. The suspension units have good detail, and also a seam line running on top of them. I however had an attack of laziness that day and not cleaning them up! Besides they were not really noticeable (yeah, excuses, excuses). This was followed by the idler wheel mounting and the final drive housing; a poly-cap was inserted into each of the latter to allow movement of the sprocket wheel. Only then I returned to the wheels. Instead of the open backs of the road wheels in their earlier releases (most noticeably on their Shermans), Tamiya includes the inside faces of the wheels. And as usual, all the road wheels and and the idler feature the ubiquitous poly caps. Once completed, they were set aside and I continue with the upper hull.

Before assembling the upper hull, various holes were drilled into it in order to accommodate parts like the armour plates, bullet splash guards and pioneer tools. With the exception of the last mentioned, they were duly cemented onto the upper hull shell. This was followed by attaching the engine deck hatches. As for the hull visor port covers, a decision has to be made at this point - Part B19 for marking options A and B and B20 for options C and D. I decided to do Option D and used the recommended part. To ease assembly, I returned to the lower hull again. I first painted the hull sides and wheels Panzer Grey using  a mixture of Tamiya XF-63 German grey and XF-18 Medium Blue and the tyres straight Gunze H77 Tyre Black while the tracks were painted XF-64 Red Brown. Once the paints were dry, I placed all the wheels onto the chassis, cementing them all but the sprocket wheels. The tracks were then mounted onto the model; the uncemented sprocket were adjusted accordingly while positioning the tracks. when the tracks had dried properly, the upper hull was joined to the lower half. Some parts, such as the headlights, Notek headlight, tool box, hooks, fire extinguisher and the rear mudflaps were cemented onto the upper hull, while the rest were left off until after painting.

Attention was then turned towards turret assembly. The turret upper and lower halves were mated first and all hatches, ports and sundry small parts were cemented onto it, bar the commander's hatch. The instructions then have you complete the gun mantlet and then inserting the whole assembly into the turret shell. I believe this might cause some problem during painting stage, so while I did cement the mantlet, the guns were left off at this time. The mantlet also include poly caps, so that the guns would remain poseable. Now it was time for painting.

Painting and decaling
Early war German panzers were painted dark (or 'panzer' grey). I used a mixture of 80% Tamiya XF-63 German grey and 20% XF-18 Medium Blue, plus roughly 20% white for scale effect. The entire tank was covered in this paint mixture and coupled with its rather diminutive size, painting was over fairly quickly. And, yes, I don't really subscribe to the paint modulation technique or to the simulate-the-light-falling-on-object school of thought. The decals were then applied - I chose the markings for tank number 216 of the 36th Panzer Regiment, 4th Panzer Division, May 1940. The decals, as usual, were fairly thick, but settled well. Afterwards, I applied the sludge wash on certain parts of the model - not really appropriate for a tank model but sufficient for me to pop up some of the recessed details. The guns were painted flat black and when the paint dried, I applied powdered graphite onto them. But before that I covered two sections of the KwK 30 gun barrel with strips of Tamiya tape, to simulate the knurled grips.

Finishing
To start the final leg, I attached all the remaining loose parts such as the pioneer tools and the aerial holder. The guns were glued beforehand and were inserted into their slots through the bottom of the turret. The wooden block was painted XF-59 Desert Yellow and dry-brushed XF-64 Red Brown to simulate wood grain. I had another attack of laziness and simply paint the pioneer tools a straight XF-59 and XF-56 Metallic Grey. The exhaust and muffler were also painted XF-64. The PE exhaust guard was bended using a pencil as guide and fixed to the model using superglue. It was then painted steel with patches of red brown. Finally the colours were blended (sort of) using Tamiya weathering Master Rust.

For weathering, I started by applying thinned XF-57 Buff all over the lower hull, tracks and wheel. I then applied Mig Productions European Dust 'wet' and once dried, removed the excess using a stiff brush. The process was repeated, in patches, using MiG Productions Rubble Dust pigment. The same weathering powders were also applied 'dry' at selected areas of the model. Tamiya did not include the aerial in this kit, and I fashioned one using 0.5mm Evergreen rod. Finally the crew figure was painted and assembled. The uniform was painted NATO Black while the 'metal' parts (belt buckle and decorations) were painted X-11 Silver. I decided not to add any stowed items as early war panzers were rarely seen with them.

Conclusion
Tamiya has come up with another simple yet finely executed model. Assembly is hassle-free as usual, and the moulded-on details, while rather simple for some modelers, are good enough for the casual (or those not suffering from AMS) modelers. Like I mentioned elsewhere, a simple, yet detailed kit is a good antidote for stress after building a 1,000 part 'premium edition' kit!

Saturday, 12 April 2014

An American Hound In Polish Service

Historical Background
In July 1941, The US Army Ordnance Corps issued specifications for a heavy armoured car (which resulted in the T18E1 Boarhound) and a medium armoured car. For the latter, the Ford Motor Company built a 6x6 prototype designated T17 while Chevrolet built a 4x4 prototype designated T17E1. Both prototypes were armed with a 37mm gun in a rotating turret plus a co-axial .30 cal machine gun and another .30 cal MG in the hull. At the same time the British Purchasing Commission were looking for heavy and medium armoured cars for use in the North African theatre. They took interest in the T17 and T17E1, naming them Deerhound and Staghound respectively. However the US Army chose the lighter T22 design for its medium armoured car (later named M8 Greyhound). The T17 Deerhound was only used by US MP units Stateside and was never adopted by the British. T17E1 however was accepted for production, despite not being used by its parent nation.

Over 4,000 Staghounds were built. Variants include the basic Staghound Mk 1, armed with a 37mm gun, two .30 cal M1919A4 machine guns (co-axial and in hull position) plus another M1919A4 on the turret roof for AA defence. Staghound Mk II was armed with a 3-in howitzer for close support while Staghound Mk III had its turret replaced with one from the Crusader tank and was armed with a 6-pounder gun and a co-axial 7.92mm Besa machine gun. Some Mk IIIs were later armed with Ordnance QF 75mm gun. All Mks II and III had their bow machine guns removed. T17E2 Staghounds were T17E1s fitted with Frazer-Nash turret armed with two Browning M2 12.7mm machine guns. It primarily provided low-level air defence capability for the armoured car regiments. There was also the turretless Staghound Command version while the T17E3 was a variant fitted with the turret and armament from the M8 Howitzer Motor Carriage; it was however not adopted for production.

Despite being ordered by the British for service in North Africa, it entered service too late for use in that theatre, where its combination of armour, armament and range had advantage over the German reconnaissance force. It eventually saw operational service during the Italian campaign where its bulk was now a liability in the narrow streets and roads of southern Europe. The Staghound was also used by units in the North West Europe on their drive towards Germany.

The Kit
In 2008, hot on the heels of Bronco's Staghound Mk I Late version, Italeri came up with their 1/35 kit of the Staghound Mk.I Late Version. And as per their agreement (I guess), the kit was re-boxed and released by Tamiya in the same year. The kit came in 222 parts, laid over five olive coloured sprues, 2 clear parts and small PE fret. Also included was a length of wire, decal sheet and of course, the instruction sheet. The instructions however were of the usual Tamiya style, instead of simply using the original Italeri instructions (which used the rather disliked photo-style instructions, like what Dragon did a number of years ago). The turned aluminium barrel from the original kit was omitted but a sprue containing the figures from Tamiya's Universal Carrier Mk II European Campaign was included. The Photographic Reference Manual from the original release was also included for the Tamiya release. The surface detail is very good, although not as sharp as the Bronco Staghound.

Decals were provided for five options covering both wartime and post-WW2 period. They are for:
1. 7th Armoured Division, British Army, France 1944
2. 'Ardent', Belgian Brigade Group, France September 1944
3. Esercito Italiano, unknown cavalry regiment, late 1950s
4. 1st Australian Armoured Car Regiment, BCOF, Japan 1946-1948
5. 'Nadwislanin', Polish 2nd Corps, Italy 1944

The decals were of typical Italeri quality - nicely printed with no register issues.

Construction
The Staghound kit started off slightly different from the usual AFV kits construction sequence - it started at the front plate of the hull. The instructions have you drill a number of holes into the front panel and to cut clear plastic pieces to act as windscreens. While I did drill the holes, I left the clear plastic parts, plus the PE frame and wipers, off as I intended to have the covers for the crew windscreens in the closed position. Steps 2-4 were concerned with the basic assembly of the hull. Fit is good and the one-piece lower hull makes it easier to assemble than the Bronco kit, which have separate side walls and floor. Moving on to Step 5, this was the assembly of the leaf-style suspension. Afterwards, it was time to assemble the external fuel tanks and their mounts. The fuel drums was divided into four parts and the seams between the body halves need to be sanded off. While the instructions have you fully assemble the tanks and the mounts before attaching them to the hull, I diverged by attaching the mounts (part B42) to the hull first. This was followed by the drums. The mounting end of the PE straps were then inserted into place and was followed with Part B36 (the hooks for the straps) to the hull. The female end of the bended straps were then hooked  into place, parts B18 and B28 were cemented to the hull and the fuel tank assembly was attached to the hull.

The engine covers were then cemented into place and the detail parts were attached. These include PE brackets and wingnuts. This was followed by the engine grille covers and fenders. The tyre halves were mated but I left them off until after painting. all the hull hatches, including the driver's and co-driver's armoured windscreen covers were attached in the closed position. All the smaller parts, except on-vehicle tools, rear-view mirrors and the exhausts were glued at this time. These also include the PE box at the rear of the vehicle and the PE light guards (bended using the bending tool provided). Moving on from the hull, I started the turret assembly, beginning with the main gun. While the original release used turned aluminium barrel, the Tamiya release has a plastic replacement. There was no problem here, although the Italeri .30 cal barrel (for the co-axial and hull) MG has less definition than other manufacturers' offering. Steps 20 to 21 were concerned with the turret basket assembly. The turret basket was assembled as they were but the lightening holes can be drilled to have better definition. The turret shell halves were then mated together. However, the resulting seam line was not sanded off and was merely cleaned up as there is weld seam at the location on the real vehicle. Italeri also provided a reasonably detailed No.19 radio set, to be placed at the rear of the turret. I simply put it in place, without painting, as it would be invisible, with the crew figures in place. The completed turret basket and the front face of the turret were then cemented to the turret shell. As usual, the smaller parts were left off until after painting.

Painting and Decaling
Because of the presence of PE parts, I first sprayed the model with Tamiya Surface Primer (Grey). At the beginning of the build, I had decided to finish the kit in the Polish 2nd Corps marking. The kit instructions have you paint the kit in an overall dark yellow paint job with disruptive pattern in dark green. I however remembered an article written by Mark Starmer, who was regarded by the modeling community as an expert in British camouflage colours during World War 2. He stated that, starting from March 1943 in the North African theatre and continuing to the Sicilian and Italian campaigns, a lot of British and Commonwealth vehicles were painted in a colour called 'Light Mud'. Although Light Mud was usually used in conjunction with 'Blue Black' (Tamiya XF69 NATO Black can be used for this colour), I decided to paint the disruptive pattern in Olive Drab. The Light Mud was painted using a 4:2:1 ratio of Tamiya XF55 Deck Tan, XF49 Khaki and XF66 Light Grey, as per Mr. Starmer's recommendation. While originally planning to paint the olive drab pattern using Mr Starmer's mix for the British SCC15 Olive Drab, I eventually decided to simply use Tamiya XF-62. The still unattached parts were also painted at this time. The tools were painted XF-59 Desert Yellow and Steel for their wooden and metal parts respectively. The machine guns were painted flat black and were 'metalized' by rubbing graphite whilst the tyres were painted Gunze H77 Tyre Black.

The decals were then applied onto the model.  They went on well, even though I didn't prep the surface beforehand. There is however a slight silvering for one of the decals and I'm positive that it was caused by the untreated surface. The decals were then subjected to the usual decal setting solution treatment.

Finishing
Now is the time to attach the remaining parts. I started by fixing the pioneer tools at their places. This was followed by placing the tow cable at the glacis plate. The provided steel wire was quite stiff and I have to anneal it first before attaching the ends and wounding it around the anchor points. While still using the kit mount and cradle for the AA MG, the M1919 MG and the ammo box was replaced with the one from the Academy US Machine Guns Set. By this time I have also bought Bronco's 25-pounder Ammo box set, which can be mounted onto the Staghound's fenders. I used two of them, mounted on the front fenders - after fashioning a simple rack for them using styrene strips. With the boxes in place, the rear-view mirrors were left off. The provided tarps were placed on the rear fenders, after painting them XF-49 Khaki. I also decided to place some stowage on the engine deck and the rear box and I used a wooden ammo box from Academy's Tank Supplies Set, a couple of .30 cal ammo boxes from Academy's US Machine Guns Set and a bedroll plus four fuel cans from Tamiya's Allied Vehicles Accessory Set. I used a thread from my wife's sewing kit, painted XF-59 Desert Yellow to tie the stowage onto the model (I cemented them on anyway, the string was mainly to create some degree of realism). The commander's hatch was put in the open position so that I can use the commander's figure to illustrate the size of the vehicle. His uniform was painted with a mixture of Tamiya XF-57 Buff and XF-52 Dark Earth with the suspenders in XF-49 Khaki. 

Finally, the weathering process. I started by washing the model by using a mixture of Flat Black and Red Brown. I then added some small paint scratches using 2B pencil but I decided not to add larger scratches. Tamiya Weathering Master was applied to the exhausts to simulate rust. Finally I add 'dust' to the running gears and the underside of the model using Mig Productions Gulf War Sand. This was however my first attempt of adding dust to a wheeled vehicle, so the results were quite terrible, as can be seen from the photos. A length of copper wire, painted black, was used as the radio aerial. I am however, not quite sure whether the length of the aerial is correct or not.

Conclusion
Italeri has come up with an excellent kit of the Staghound armoured car. Yes, there is a little bit of a problem with the fit, but nothing that any modeler could overcome (unless a total newcomer to the hobby). The machine guns however could be better and best replaced. The Tamiya version was virtually similar to the original release and I lament the deletion of the turned aluminium barrel. Whether the inclusion of three figures plus a PIAT projector and a Sten Gun were worth the extra cost for the Tamiya boxing is a question I left to the readers to decide.


Sunday, 30 March 2014

Stalin's Steamroller


Historical Background
In 1937, the Red Army assigned engineer Mikhail Koshkin to design a replacement for the BT-series tanks at the Kharkov Komintern Locomotive Plant (KhPZ, later Zavod No.183). The specification include 20mm of armour, a 45mm gun and powered by a diesel-fuelled V-12 engine while using the same Christie-type suspension while incorporating sloped armour plates. Following the Red Army experience in the border clashes with the Japanese Army at the Battles of Lake Khasan and Khalkin Gol, in which the Soviet T-26, BT-5 and BT-7 tanks were easily destroyed by Japanese anti-tank teams armed with Molotov Cocktails and also by the Type 95 Ha-Go's 37 mm gun, Mikhail Koshkin sought the permission from Stalin to develop a  second prototype, named A-32. It was armed with a 76.2 mm L-10 gun, protected by 32 mm of armour whilst using the same engine.

A heavier version of the A-32, with 45 mm of armour and armed with an L-11 76.2 mm gun was approved for production as the T-34. The T-34 however faced initial resistance from the military with regards to its higher cost. However concerns about the performance of the Red Army tanks in the Finnish-Soviet Winter War coupled with the performance of the German tanks in Western Europe ended such resistance. The first T-34s entered service in September 1940. T-34s were built at State-owned factories: Kharkov Locomotive Factory No. 183 (KhPZ) at Kharkov (later evacuated to Nizhniy Tagil and combined with Dzerzhinsky Ural Railroad Car Works), Stalingrad Tractor Factory (STZ) at Stalingrad and Krasnoye Sormovo No.112 Factory at Gorky plus factories at Leningrad which were later transferred to Chelyabinsk (Tankograd) and at Ural Heavy Machinery Plant (UZTM) at Sverdlovsk. The L-11 gun were however inferior and was later replaced with the more powerful F-34.

The sloped armour of T-34 was effective in deflecting AP rounds, especially the 37mm rounds used by the Germans early in the war. The F-34 gun, firing APCR shells can pierce 92 mm of armour at 500 meters (to put it in perspective, the German Panzers III and IV have frontal armour of 50 to 60 mm). The wide tracks and Christie suspension gave good mobility, especially in the muddy and snowy battlefields of the Eastern Front. The T-34 however had some design deficiencies. The sloped armour, while causing headaches to the Germans, have overall build quality problem especially at the plate joints and welding.The F-34 gun lost its effectiveness when the Germans introduced their Panther and Tiger tanks. The main deficiency however was concerned with the two-man turret, a trait it shared with many tanks of the same time frame. This arrangement forced the tank commander to act as gunner, aiming and firing the gun, while at the same time having to command his own tank and coordinating with other tanks. The workload get heavier if he was a platoon commander or higher. The forward-opening turret hatch and lack of turret cupola also hinder the commander's job who only had a single viewing slit and a traversable periscope to view the battlefield. The gun's reduced performance against heavy German tanks was rectified by upgunning the T-34 with a 85mm gun in the T-34/85 variant. The visibility problem was rectified in August 1942 by replacing the single-piece hatch with separate hatches for the commander and loader and later still, a cupola. The commander workload problem was only rectified with the T-34/85 when the T-34 was fitted with a three-man turret.

The T-34 were a complete shock to the invading Germans when the latter launched Operation Barbarossa on 22 June 1941. The Soviets had 967 T-34s at the start of the hostilities and in one instance a single tank managed to cut a 14-kilometer trail of destruction before it was stopped by a 105mm howitzer at close range. The PaK 36 37 mm anti-tank gun was completely useless against it, forcing the usage of 105 mm howitzers or 88 mm Flak 36/37 in the direct fire role to counter it. Despite that, the Soviets lost large numbers of them, at least half were caused by mechanical failures or reasons other than enemy actions. With the Germans receiving more 75mm Pak 40 anti-tank guns and more 88s were used in the anti-tank role, the T-34s were also upgraded incrementally, receiving thicker armour and better transmission. T-34s are the second most manufactured tank in the world (the first place goes to the T-54/55 family): 34,780 76mm gun-armed and 22,559 85mm gun-armed models were built during the war.

The Kit
Dragon Kit #6479 follows a line of new-mold T-34/76 series from Dragon starting with the T-34/76 Model 1940 in 2003. The new 34s from Dragon are among the best of their product. In true Dragon tradition the box was packed with parts - 19 sprues, a set of Magic Track links, a rather sizeable (for Dragon's 'Smart Kit' concept) PE sheet and a turned aluminium barrel. Included are Factory 112 specific parts such as the turret. The are three versions of the gun, turned aluminium, plastic single piece and a two-part one. The breech and partial interior of the turret were also included.

Markings were provided for five tanks (technically four as one of the options is totally devoid of any markings!) :
- Unidentified Unit, Eastern Front 1943
- Unidentified Unit, Eastern Front 1943 (white 41/05)
- Unidentified Unit, Eastern Front 1943 (white 64)
- Polish 1st Tank Regiment, Oka River, Russia July 1943 (white Polish Eagle)
- 8th Estonian Infantry Corps, Eastern Front 1943 ('For Soviet Estonia!' in Russian and Estonian) 

Construction
As usual, construction starts with the lower hull. I follow the construction steps to the letter (almost). As per online reference material, I shaved off the row of bolts moulded on the forward lower hull as they were not present in this variant. The suspension were first glued in place. Then the running gears (idler and drive wheels) were added, but not yet glued to the chassis. This was followed by the road wheels but I left off the outside wheels at this time, to facilitate assembling the tracks. Since the T-34 used the Christie suspension with large road wheels and with no return rollers, assembly was quick, unlike assembling the 32 road wheels of a Panzer IV...maybe I should thank Mikhail Koshkin for choosing the Christie suspension! Also to facilitate painting, the completed lower hull was painted at this time. The next construction step deals with the upper hull. The plastic rear fender was cut off and were replaced with the PE substitute. For the engine deck, one can actually choose a solid plastic mesh or a better detailed one with PE components. In this case, the locating pin underneath the engine hatch had to be removed, as it interfered with the engine louvre locating tabs.

The rows of bolts on the engine deck also needed to be removed to ensure good fit. I however neglected to paint the engine louvres, thinking that the grille mesh can hide them...how wrong I were! And speaking of the grill mesh, it was located on the curve of the rear deck. To help the metal part conform to the slope, I annealeate the relevant PE parts before gluing them. Easy! As for the intake grills, two styles were provided but internet sources suggest using Parts G20/21 as it was more appropriate. Afterwards came the almost surgical-like precision when building this model - attaching the scores of PE track grouser tie downs and grab handles. To make it harder for modelers, there is no positive locators for them and I had to resort to visual estimation based on the drawings. Going to the front, the hull machine gun was assembled, less the machine gun barrel. The driver's hatch was assembled in fully closed position and I left the vision blocks off as it can only be fitted in the open position. The headlight has an alternative PE post, which I used. This however mean that I have to putty over the hole for the plastic one.

On to the turret. Before assembling it, I decided to paint the interior parts first. There is no colour call-out for the turret interior so I had to guess, based on photos on the internet. I decided to use Tamiya XF-71 Japanese Interior Green. The gun shield and housing feature nice details while there were three options for the gun barrel - turned aluminium, single-piece plastic and two-part plastic. I chose the former because of its better shape plus there is no need to clean out the seams. There is also option (sort of) for the turret roof as Dragon included the turret roof from the earlier T-34/76 Model 1941 Cast Turret. The instructions however show that the proper part would be the new Part U14. The single Part R sprue held the turret hatch and one can retain the moulded-on details or remove them and add the PE parts. I decided to have the hatch open, so I added the PE parts. While test-fitting the hatch, I found that the bracket holding the hatch in the open position interfered with the fit so some trimming had to be done.

Going back to the lower hull, it's time to assemble the tracks. Dragon provided their tried and trusted Magic Track links. The track links were not 'handed' like the Magic Track track links for the German AFVs, just plain and toothed links, to be linked alternately. I did not count how many were needed to make one track run but suffice to say that there were enough of them (plus some spare). They were cemented using Tamiya Extra Thin Cement and once near-dry, they were wrapped around the wheels. Once properly cured they were removed and set aside. Before painting, I decided to add the tankoviy desant handrails - 4 on the turret and 10 on the upper hull. The instructions however swapped the positions for the turret handrails, causing awkward-looking rails, which was fortunately realized early. I pulled them off and reposition them at their actual locations.

Painting and decaling
Basic painting of Soviet tanks of World War 2 is relatively easy - green overall. There were various formulas and mixtures for the Russian green (also known as 4BO Green) but I clung to a mixture I found years ago on the Internet - six parts XF-61 Dark Green (I used XF-13 for this build however), 3 parts XF-2 Flat White and one part XF-3 Flat Yellow plus 20% white for scale effect. But before painting, the model was subjected to a coat of Tamiya Surface Primer. Once the primer had dried, I checked for any (major only) imperfections. Finding none (or minor enough to be unnoticed) I proceeded with the green. Once the paint has cured, I added chips and scratches to the paint using XF-62 Olive Drab and HB pencil. The exhaust pipe was painted XF-64 Red Brown and was later enhanced using Tamiya Weathering Master Rust.

I decided to use the decals for the 8th Estonian Infantry Corps with its 'For Soviet Estonia!' slogan. There were actually extra decals on the sheet - a pair of Guards badge and a slogan (something about Kazakhstan) but there were no colour scheme which uses them, I guess they were a carryover from an earlier release. The decals were printed by Cartograf and were agreeably thin and opaque. They went on without a problem and there is no need to use decal solutions on them. I then painted the tracks using XF-64 and dry-brushed the guide teeth silver.  The track face received some 'polished metal' effect, using HB pencil.

Finishing
The  tracks can now be permanently fixed to the hull. The outer road wheel and the drive and idler wheel neatly trapped the track in place ( I glued the tracks to the upper surface of the road wheels anyway).To place the track grousers on the sponson, the PE straps were threaded through the tie-down brackets first. The track grousers were then put into place and the loose ends of the straps were mated - it should work like putting on a belt although I only managed to do that for a couple of straps only. The rest were simply superimposed or left untied. The tow cable, consisting of plastic eyes and braided steel wire was assembled, painted and placed on the right sponson. I also added a wooden box, taken from my earlier (waay earlier) Tamiya T-34/76 Model 1943. For further weathering, I decided to apply MiG Productions Rubble Dust. Mixed with tap water, the pigment was applied liberally to the lower hull, tracks and wheels. Once dry, excess pigment were removed using an old, stiff brush. I then add a bit more of the pigments, this time 'dry' randomly on the wheels and on the lower hull. It was then fixed in place (more or less) using Tamiya Enamel Thinner. Finally, using Tamiya X-19 Smoke, I added some oily residue on the exhausts and the area directly underneath them.

To illustrate the size of the vehicle, I added a crew figure from Miniart's Soviet Tank Crew At Rest set.

Conclusion
There is no doubt that Dragon is one of the leading (if not actually the leader of) manufacturers of fine armour kits. They constantly come out with amazing kits of various combat vehicles of World War 2 and the T-34/76 'Krasnoye Sormovo' Late kit was merely one of them. The kit builds up fairly easy and the 'Smart Kit' concept helped in reducing the number of PE parts as compared to the 'Premium Edition' kits. Whilst it may not be every one's cup of tea, the Magic track links also helped considerably in easing the build. This kit is highly recommended.