Showing posts with label Helicopter. Show all posts

Wednesday, 2 September 2020

"Kucing Laut"


Historical Background
In the 1960s, the British Army issued a requirement for improved helicopters. As the French Army also had the same requirements, Westland Helicopters and Aerospatiale signed an agreement in early 1967 to jointly develop the helicopter for their countries' armed forces. While Aerospatiale became the design leader for the large helicopter (eventually emerged as the Puma) and the 'small' helicopter (which became the Gazelle), Westland took up the development of the medium helicopter, initially known as WG.13 (and later as the Lynx). The first prototype of the Lynx flew on 21 March 1971. In 1972 a Lynx broke the world speed record over 15 km and 25 km by flying at 321.74 km/h and then set a new record for 100 km closed circuit by flying at 318.504 km/h. The British Army put an order for more than 100 Lynx AH.1 to perform various roles including transport, armed escort, anti-tank, reconnaissance and evacuation. Deliveries began in 1977

Meanwhile, the Royal Navy found that the Westland Wasp inadequate and had a strong interest in the Lynx. Therefore a navalised variant was developed as Lynx HAS.2. While the naval HAS.2 retained the twin Rolls-Royce Gem turboshaft engine of the Army Lynx, it differed by having fixed tricycle landing gear, foldable main rotor and tailboom, deck capture and and restraint system, emergency floating system and a bigger nose containng a Ferranti Seaspray radar. The colloquially-named Sea Lynx first flew on 10 February 1976 and officially entered service in 1981. The HAS.2 was then upgraded to HAS.3 with the addition of a towed magnetic anomaly detector, uprated transmission, Gem Mk 204 engines and Orange Crop ESM. In 1984, an enhanced version called Lynx-3 was proposed but was not pursued with due to insufficient orders. However in the early 1990s, Westland incorporated some of the Lynx-3 technology into a less radical design called the Super Lynx. This variant featured BERP rotor blades, new tail rotoer (derived from WG.30 design), a new under-nose 360-degree coverage radar, Gem 42 engines and optional EO turret in the nose. Royal Navy Lynx HAS.3s upgraded to Super Lynx standard were known as HMA.8. The Super Lynx was also offered to prospective clients as upgrades to their existing fleet or as new-build craft.

In order to fulfil maritime patrol, anti-submarine, anti-surface and SAR duties, the Royal Malaysian Navy placed an order for six Super Lynx Series 300 in September 1999. These would also complement the then newly-delivered Lekiu-class frigates. The RMN Mk.100 Super Lynx is powered by a pair of LHTEC CTS800-4N turboshaft engines rated at 1,563 shaft horsepower. It also incorporated an all-new glass cockpit with active LCD displays and new avionics. Half of the fleet is equipped with EO sensor on the nose. The pilots are also provided with NVGs for night-time operations. Anti-submarine weaponry consists of two A-244/S lightweight torpedo while anti shipping vessel weapons consists of up to four (but usually just one or two) BAe Sea Skua missiles. Pintle-mounted FN MAG 7.62 mm or FN M3M 12.7 mm machine gun may also be be fitted. The Lynxes are grouped into No.501 Squadron and was land-based at KD Rajawali.

The Kit
Hobby Boss came up with a bunch of Sea Lynxes in 2009. The HAS.2 version was the first release, followed by HAS.3, Super Lynx, Sea Lynx Mk.88 and Sea Lynx Mk.90. For this build, I chose kit No. 87239 (Lynx Mk 88). All the kits generally have nicely engraved and raised details although most details for the cabin interior is missing save for some equipment boxes and jump seats (which I think were usually not installed in the naval Lynx). The model is also missing the pedestal-mounted winch for SAR work. The nose is separate so that modelers can chose either to have the radar nose of the one with the EO sensor dome. There are also two styles of main gear fairing so chose according to your reference. For external ordnance, two styles of torpedoes (a pair each) and a pair of Sea Skua missiles are included. Decals provide markings for two Bundesmarine birds.

I however intended to build a RMN bird and so have purchased a conversion set from Naza Model Works. This set includes a new engine fairing, exhausts, the aforementioned winch, a new instrument panel, central console and also a small decal sheet.

Construction
As usual, the construction steps started with the interior of the aircraft. However, this time I started by sawing off all the resin replacement parts off their pour stubs and hacking away portions off the main fuselage halves. The NMA conversion kit did not actually show the areas to be removed but their FB page shows a post of the conversion part being dry-fitted to the basic kit and that indirectly shows which area of the original kit to be removed. Only then did I continue with the interior. There wasn't much to do here as the kit's interior is quite sparse (there wasn't even the collective stick!). The troop seats can be left off as the Super Lynx (at least in those in Malaysian service) were rarely used as troop transports. I just add the seat behind the pilot for the cabin interior. The holes on the cockpit floor were then puttied in. However, the base for the rotor shaft cannot be used as the replacement engine housing is too thick at the opening for the rotor shaft and cannot be drilled through easily. 

Next, the replacement engine fairing is put in place. But before that, holes for the exhaust were cut out (the resin is thin over the openings). The resin wafer covering the air intakes can be left on (and painted black later on) or removed although the latter option means they open into nothingness (not really a problem actually). Since I cut badly, extra putty were needed to cover the gaps between the fuselage and the engine housing. There are two types of sponsons provided and the one similar to RMN Lynxes' were used. However the chosen sponsons lacked some detail such as tie down eyelets. As RMN Lynxes have both radar and EO noses, decision has to be made here and it was, more or less, dictated by the provided decal sheet. The latter only provide markings for M501-1, -3 and -5 which have EO sensor on the nose

Although the conversion kit includes the winch assembly, I didn't use it as I have the cabin doors closed. The ESM antennas on the rear of the fuselage was not fitted on RMN Lynxes and the holes were puttied in. The blobs on the mount were removed and transplanted to rear of the sponsons. Obliterated cabin door railings were restored using styrene strips (one looks rather OK, the other, quite bad!). To ease handling while painting and decalling, the landing gears, weapons pylon and the rotors were left off at this time. Oh yeah, one more thing, part of the landing gear sponson is actually covered in canvas, so I have to mask, apply putty and sand before painting.

Painting and Decalling
I have to confess: despite my year of dabbling in scale modelling, I still can't correctly identify which colour to be used without being told which is which. In this case, I'm not sure whether the helicopter is painted in medium Sea Grey or Dark Sea Grey (despite being in front of it). Fortunately, there is a photo of the pre-delivery M501-1 in front of a Royal Navy Merlin. I know for sure that RN's Merlins were painted MSG (the instructions for an aftermarket decal sheet said so(!)) and as the Lynx looks darker than the Merlin....then it must be painted in DSG then. The area around the engine intakes, the anti-glare panel and the ESM antennas were painted Flat Black. For markings, both inbox and the conversion kit were used with the inbox decals providing most of the stencils. However, there are some 'misses' with the in-box decals. First, the port 'rescue' arrow has a different orientation than the one on the real aircraft. Secondly, a number of decals are missing from the decal sheet - there are only two decals for the kick-in steps and there is only one stripe decal for the Sea Skua missile.

Decal application went without a hitch, except for a warning sign on the starboard engine casing; the carrier film was quite stiff and somehow unable to stick to the surface. I replaced it with paint but being unable to replicate the stencil, I just painted dots to replace the alphabets...haha. Having looked into my spares box for suitable replacements, the port 'rescue' arrow had to be placed into wrong position. Another inaccurate decals are the 'Step' markers on the main wheel sponsons. And finally I decided to paint the warning stripes on the tail rotor rather than using the decals. 

Finishing
I started by adding the EO dome and the missile rack. Speaking of the latter, Hobby Boss instructed you to use Parts D5 and D6 which somehow look dubious and not used on RMN Lynxes and I believe is for the carriage of two missiles each. I decided to replace it with Parts F3 and F4 as the missile pylon can fit onto it. Test fitting however showed that the missile would be lower than the landing gear. This required further modification by removing the upper part of the pylon. On the real aircraft, there is a cable running through the antenna blades at the bottom of the tail but I decided not to add them. The main landing gears were canted outboard a bit as the real aircraft is usually seen as such (unless the wheels are chocked). The panel lines were then applied with AK Interactive Paneliner. The missiles were cemented to the pylons and the rotors were put in place.  After that the whole model was sprayed with Mr Color Semi-Gloss Top Coat, the masks removed, finishing the build.

Conclusion
Hobby Boss's Lynx is a fairly nice representation of the real thing in 1/72 scale. The outside surfaces are fairly detailed although the interior, especially the main cabin is very sparse although with all doors closed, it wasn't a problem. The decal is also quite disappointing as Hobby Boss missed quite a number of the more prominent ones especially for the kick-in steps. As for the conversion set, NMA has come up with another excellent conversion set for Malaysian armed forces'birds. My complaint against the set was just the lack of cabin machine gun mount. Although the Lynx kits from Hobby Boss are modular, and basically the same among the HMA.8, Super Lynx and Lynx Marks 88 and 90, I finally realise why NMA recommended the Mk 90 as the basic kit for the conversion - the Mk 90 kit 'essential information' decals are more appropriate for a RMN Super Lynx!  


Sunday, 29 September 2019

Cobraaaa!!!!


Historical Background
The emergence of the helicopter, specifically of  Bell's UH-1 Iroquois or Huey, made the theory of air cavalry practical. In Vietnam, the Huey fleet carried troops across the country, to fight at the ground and the time of their own choosing, rather than the enemy's. However, these unarmed Hueys were vulnerable to ground fire especially when they are nearing the landing zones. Without support from nearby artillery or other ground troops, the only way to pacify the landing zones was from the air, using an aircraft, preferably another, armed, helicopter that can closely escort the transport choppers and loiter over the battlefield. Originally the Army used UH-1s fitted with machine guns and rocket launchers, but was needed was a dedicated helicopter gunship Bell has been investigating such concept since the 1950s and in 1962 had revealed a mockup of what they called D-255 Iroquois Warrior concept. The D-255 was a purpose-built attack helicopter based on the UH-1B but with a slender fuselage and the two crew sitting in tandem. It was to be armed with a turret-mounted 40mm grenade launcher in the nose, a 20 mm belly-mounted gun pod and stub wings to mount rockets or anti-tank missiles.

The Army was interested and awarded a proof-of-concept contract to Bell in December 1962. Bell modified a regular Bell Model 47 (UH-13 Sioux) into Model 207 Sioux Scout which had the hallmarks of a modern attack helicopter with sleek fuselage, tandem cockpit, chin-mounted turret and stub wings for weapons. Although impressed, the Army decided that the Model 207 was too small, underpowered and generally not suitable for practical use. Instead the Army launched the Advanced Aerial Fire Support System (AAFSS) which resulted in the large and fast Lockheed AH-56 Cheyenne. It proved to be too sophisticated and was eventually cancelled in 1972. Although Model 207 was rejected by the Army, Bell persisted with their idea of a smaller and lighter helicopter gunship. Bell mated the T53 turboshaft engine, the transmission and the rotor system of the UH-1C, adding to the latter a Stability Control Augmentation System with the design philosophy of the Sioux Scout and produced the Model 209.

With the war escalating in Vietnam and the AAFSS programme stuck in technical difficulties and political bickering, the US Army asked Boeing-Vertol, Sikorsky, Kaman, Piasecki and Bell for an interim gunship design. In April 1966, Bell's Model 209 won the evaluation and a first production contract for 110 airframes were signed. Bell added 'Cobra' to the UH-1's nickname of 'Huey' becoming Model 209 HueyCobra - the name adopted by the Army for its production AH-1G. For production some modifications was made, including the adoption of simple landing skids instead of retractable undercarriage, a new wide-blade rotor and plexiglass, instead of armoured glass canopy. The first HueyCobras were delivered in June 1967 and saw extensive service during the Vietnam War, taking over the role of assault helicopter from the 'snake' Huey gunships.

The Cobra has a slim fuselage, designed to present as small a profile as possible against enemy ground fire. Due to the slimmer shape and lighter weight, the Cobra is twice as fast as the Hueys it escorted. The original variants were powered by a single Lycoming T53-L-11 turboshaft engine rated at 1,100 hp allowing it a speed of 277 km/h. The crew seating arrangement, which has since become the virtual standard for attack helicopters, placed the pilot at the rear seat, which is slightly elevated behind the co-pilot/gunner. The gunner also a full set of flight controls. The weapons turret under the nose were originally used to mount two 7.62 mm miniguns or two 40 mm grenade launchers or one of each weapon. Later versions of the Cobra mounts the M197 20 mm three-barrel cannon in the turret. The stub wings can carry up to 1,360 kg of various weapons but usually consist of folding fin aerial rocket tubes, gun pods or, later, anti-tank guided weapons.

Originally not equipped to fire anti-tank guided weapons, the Cobra was fitted with the M65 TOW/Cobra system complete with M65 Telescopic Sight Unit and M73 reflex Sight, creating the AH-1Q variant in 1973. The AH-1S is an upgraded -1Q variant with 1,800 hp Lycoming T53-l-703 turboshaft. The -1S was followed by the -1P with glass cockpit, improved low-altitude performance and composite rotor assembly. The AH-1E introduced the three-barrel M197 cannon while the AH-1F introduced laser rangefinder, infra-red countermeasure equipment, digital flight systems and heads-up display. Prior to 1988, all the S,P,E,Q and F Cobras were simply known as various variants of the AH-1S. Apart from the Vietnam War, US Army Cobras took part during Operation Just Cause in Panama in 1989, Operation Desert Shield / Desert Storm in 1990/1991 and Operation Restore Hope in Somalia in 1993 and Operation Uphold Democracy in Haiti in 1994. 300 Cobras were lost due to enemy action and accidents during the Vietnam War with a further three during Desert Storm. The Cobra was phased out and replaced by the AH-64 Apache in US Army service beginning in 1990 and fully retired from service in 2001. Retired machines were passed to allied nations and also the USDA Forest Service. The Cobra was exported and used by the armed forces of Israel, Japan, Jordan, Turkey and Pakistan.       

The Kit
Hasegawa came out with a 1/72 kit of the single-engine Cobra in 1997 when they released the JGSDF version of the AH-1S. The US version was released in 2000 while the one I use in this build is a 2015 reboxing of the 2000 kit. And, according to online reviews, this is the most accurate version of the -1S (at least for the 1/72 version). The parts are spread among five dark olive drab sprues, one clear sprue and a small decal sheet. The parts are well moulded and have engraved panel lines. Some are marked as 'Not for use' as probably they are only relevant to the JGSDF version. Details are acceptable for 1/72 scale and from casual viewing, it looks like it's going to be a simple, straightforward build. It also includes two crew figures. The decals provide markings for just one helicopter : a snake from the 7th Cavalry, US Army.

Construction
Almost inevitably with flying machine models, even the rotary winged ones, construction started with the cockpit. And as per my usual practice, the relevant parts were painted while on the sprue. There were just two paints needed for the cockpit - flat and gloss black. The parts were then removed from the sprue and the resulting scars were then touched up. The parts were then assembled, the crew fifures however were not used. The provided decals were then used to represent the instrument panels on the cockpit sides. Before the fuselage halves were cemented together, holes were drilled or puttied over where needed and the cockpit sides were painted Black. Afterwards, the completed cockpit plus the bottom of the fuselage (Part A4) were inserted into one of the cockpit halves and the whole fuselage was cemented together. The tail skid was however left off at this time.

Next up were some of the external features. The tail fins were first and some care were needed here to avoid gaps. The stub wings were next. The halves were mated together, sanded and then cemented to the fuselage. The pylons for the FFAR pods were also added at this time although the TOW missile assembly was left off. The last sub-assembly I added to the model at this time was the sight at the nose. In order to ease handling during painting and decalling, the landing skids were left off. Although the tail rotor, the M197 cannon and the exhaust were assembled, they were set aside at his time.


Painting and Decalling
Hasegawa has you paint the model entirely in Olive Drab. However, based on my readings during my AH-64 Apache build, US Army helicopters are painted Helo Drab instead of Olive Drab. For modellers, only Model Master has this particular paint in their range. I'm not going to wait for several more weeks in order for newly-ordered paint to arrive. So decided to use the next best alternative : Tamiya's XF-51 Khaki Drab. While it does not exactly match Helo Drab, looking at photos on the internet shows that Helo Drab can assume shades from OD to Dark Grey but I think XF-51 is just about the shade of the 'original' Helo Drab. The FFAR pods and the TOW tubes however were painted US Olive Drab. The M197 cannon was painted black and then I decided to use my newly acquired AK Interactive weathering pencil 'Gun Metal'. The pencil works as the usual pencil-watercolour combo. The graphite(?) is moistened and then applied over the parts....and voila, metallic-looking parts! The narrow sealing tape however was not painted as I doubt my ability to cleanly mask and paint such a narrow line.

The decals were then applied in the usual manner and was then given the Mr. Mark Softer treatment.

Finishing
Finishing at this stage means permanently attaching the remaining sub-assemblies. I started with the weapons first. By the way, the kit FFAR pods were replaced with the ones from the Italeri weapons kit as the latter has the 'rocket heads' (for what its worth) poking from the tubes, whilst the kit ones are more or less 'empty'. Once the skids were attached, I found that the model was not very stable and usually went tail-heavy. However once the main rotor was put in place, it no longer has that nose-up attitude. The cannon assembly and the canopy howere were quite a tight fit and the cannon nearly broke apart when I try to insert it into its slot. The canopy needed a bit of sanding to get it into place; however the finished still has quite a noticeable gap. The model received a coat of Gunze Flat Coat and the masks were then removed, finishing the build.

Conclusion
Hasegawa's 1/72 Cobra is an easy kit to build and without any real shortcomings. The details are convincing enough especially in 1/72 although those who wants more detail can easily add them.

Sunday, 27 November 2016

Cobras Of The Sea


Historical Background
The emergence of the helicopter, specifically of  Bell's UH-1 Iroquois or Huey, made the theory of air cavalry practical. In Vietnam, the Huey fleet carried troops across the country, to fight at the ground and the time of their own choosing, rather than the enemy's. However, these unarmed Hueys were vulnerable to ground fire especially when they are nearing the landing zones. Without support from nearby artillery or other ground troops, the only way to pacify the landing zones was from the air, using an aircraft, preferably another, armed, helicopter that can closely escort the transport choppers and loiter over the battlefield. Originally the Army used UH-1s fitted with machine guns and rocket launchers, but was needed was a dedicated helicopter gunship Bell has been investigating such concept since the 1950s and in 1962 had revealed a mockup of what they called D-255 Iroquois Warrior concept. The D-255 was a purpose-built attack helicopter based on the UH-1B but with a slender fuselage and the two crew sitting in tandem. It was to be armed with a turret-mounted 40mm grenade launcher in the nose, a 20mm belly-mounted gun pod and stub wings to mount rockets or anti-tank missiles.

The Army was interested and awarded a proof-of-concept contract to Bell in December 1962. Bell modified a regular Bell Model 47 (UH-13 Sioux) into Model 207 Sioux Scout which had the hallmarks of a modern attack helicopter with sleek fuselage, tandem cockpit, chin-mounted turret and stub wings for weapons. Although impressed, the Army decided that the Model 207 was too small, underpowered and generally not suitable for practical use. Instead the Army launched the Advanced Aerial Fire Support System (AAFSS) which resulted in the large and fast Lockheed AH-56 Cheyenne. It proved to be too sophisticated and was eventually cancelled in 1972. Although Model 207 was rejected by the Army, Bell persisted with their idea of a smaller and lighter helicopter gunship. Bell mated the T53 turboshaft engine, the transmission and the rotor system of the UH-1C, adding to the latter a Stability Control Augmentation System with the design philosophy of the Sioux Scout and produced the Model 209.

With the war escalating in Vietnam and the AAFSS programme stuck in technical difficulties and political bickering, the US Army asked Boeing-Vertol, Sikorsky, Kaman, Piasecki and Bell for an interim gunship design. In April 1966, Bell's Model 209 won the evaluation and a first production contract for 110 airframes were signed. Bell added 'Cobra' to the UH-1's nickname of 'Huey' becoming Model 209 HueyCobra - the name adopted by the Army for its production AH-1G. For production some modifications was made, including the adoption of simple landing skids instead of retractable undercarriage, a new wide-blade rotor and plexiglass, instead of armoured glass canopy. The first HueyCobras were delivered in June 1967. The USMC was very interested in this new aircraft but preferred a twin-engined version for better safety margin in over-water operations and also a more potent weapons in the turret. Although the Department of Defense balked at providing the USMC with a 'different' aircraft (as it viewed commonality outweighed the advantages of a twin-engined design), the Marirines had their say and awarded Bell a contract for 49 AH-1J SeaCobras in May 1968. The GAU-2 7.62mm minigun and/or M129 40mm grenade launcher of the M28 turret was replaced with a 20mm XM197 three-barrel cannon which was basically a 'halved' M61 Vulcan cannon.

In the 1970s, the USMC requested a greater load-carrying ability in 'hot and high' situations. Using Model 309 KingCobra as a basis, Bell developed the AH-1T. This model also have full TOW missile-firing capability. In the 1980s, the Marines sought to replace their SeaCobras with a navalised version of the AH-64 Apache but was denied funding by the Congress in 1981. In turn, they proposed a more powerful version of the AH-1T, designated AH-1W, called the SuperCobra which also incorporated the ability to fire AIM-9 Sidewinder AAMs, AGM-122 Sidearm anti-radiation missiles and AGM-114 Hellfire ASMs. Dubbed the SuperCobra or Whiskey Cobra, it started to enter service in 1986. A total of 179 new-built helicopters and 43 rebuilt AH-1Ts were delivered to the USMC with the last delivery taking place in 1998.

Marine SeaCobras first saw action in June 1972, interdicting the Ho Chi Minh Trail near Hon La Island. Their next action was during Operation Urgent Fury where two AH-1Ts were shot down, killing three crewmembers. The AH-1W first saw action during the Gulf War when 78 were deployed. They flew 1,273 sorties with no combat losses (although three were lost to accidents) and were credited with the destruction of 97 tanks, 104 APCs and other vehicles and two anti-aircraft sites. The SuperCobras continue to give support to the USMC to this day. In 1996, the USMC launched an H-1 helicopter upgrade programme which include upgrading 180 AH-1Ws into AH-1Z Viper standard, which was eventually declared combat ready in 2010. The SuperCobra was also exported to taiwan and Turkey.

The Kit
The 1/72 scale Italeri kit of the Whiskey Cobra came out in 1987, roughly a year after it entered service. The kit consists of 70 parts moulded in featured raised, but nice panel lines. The interior however is fairly basic and some external features specifically the various probes and aerials) were pretty oversized or crude. I'm not sure myself about the accuracy but I am pretty sure the Hellfires doesn't look the part with a more pronounced tapering and a rather suspect shape of the tail fins. The transparent parts were however very clear. The small decal sheet provide markings for just one machine. Without any unit identifying markings and codes, I believe this was one of the development, rather than an operational machines.

Construction  
As usual with aircraft model kits, construction started at the cockpit. As per my usual style, the parts and the sidewalls were painted while still on the sprue. They were painted overall XF-1 Flat Black while the seat cushions were painted XF-62 Olive Drab. And, no, I didn't bother cutting up masking tapes to make the seat belts. Before joining the fuselage halves together, I crammed 10 grams of ballast underneath the cockpit floor, as suggested by the instructions. The stabilators is a one-piece affair also need to be inserted between the fuselage halves. The next step was concerned with the engine fairing. The mounting for the rotor shaft was glued in place but I left the rotor shaft itself at this time to avoid breakage. The halves were joined together, and was followed by the air intake bits. I was quite impressed when I found that they fitted nicely, requiring no filling or sanding. The exhausts, although assembled, was left off to facilitate painting.

The engine fairing assembly, together with the stub wings were then cemented to the fuselage. To ease handling, the landing skids were also left off at this stage. The gunner's console was cemented into place. Taking caution from previous builds, especially of Tamiya's P-47 Thunderbolt, the gunner's sight was also set aside for the time being. The turret was assembled sans the cannon barrels, which can be added later. The Night Targeting System turret was assembled, also without problems and as with any other vulnerable parts, the thingie in front of the NTS was also left off. The electronics bay cheek fairings and the outboard pylon mountings were cemented before the model went for the painting stage.

Painting and Decalling
The SuperCobra model is presented in the fairly typical 1980s camouflage for the type. The model was painted overall FS 36375 Light Ghost Grey using Mr. Hobby H308. The USMC Green was painted using Tamiya XF-13 JA Green while XF-69 NATO Black was used for the black. The rocket pods were painted XF-62 Olive Drab with a band of silver at the ends of the tube. With hindsight, I probably should have painted the pods XF-13. The Hellfire missiles were also painted XF-62. The instructions just mentioned one single colour for them although photos show them having yellow  bands and/or squares on them. They were duly painted using XF-3 Flat Yellow but by this time, I got lazy and painted them freehand without masks, with predictable results! The rotor hubs were painted Steel while the rotor blades were painted XF-1 Flat Black. Cannon barrels were painted XF-69 NATO Black, after which graphite powder was applied. The decals were then applied with no problems. I just wished Italeri included a line bird rather than the development one for the markings as was done with their 1/48 kit of the SuperCobra. 

Finishing
I started the final leg by supergluing the landing skids into place, allowing the model to stand. The weapons were. The Hellfires were mounted first on their racks, which were then superglued to the wing pylons. But before that, being the innermost weapons, the rocket pods were cemented into place. The inner wing pylons do not have any alignment tabs, they were aligned using faint raised lines on the stub wings - pretty hard to see with the layer of paint over it. The cannon barrels were then stuck into place through the opening in the turret. The various aerials, cable cutters and the countermeasures dispensers were painted on the sprues before being placed on their respective places on the model. The canopy was then cemented to the model and in contrast to the rest of the kit, it had a bad fit on the left side. And, in my effort to place the canopy, stray cement managed to crept underneath my fingers, reulting in blemishes on the clear parts. Arghhh! Ak Interactive Paneliner for Grey Camo and Brown/Green Camo was then apllied. The model was then sprayed with a couple of layers of Tamiya Semi-Gloss Clear.


Conclusion

Italeri's 1/72 scale is a simple kit and can be the starter kit for those attempting to build their first helicopter model. As I mentioned elsewhere, I'm not sure about the accuracy but it does look like a SuperCobra to me. On the positive side, the parts fitted nicely and on the debit side, the most glaring ones are the shape of the Hellfire missiles and the lack of details in the cockpit. The raised panel lines is not really a problem (unless it causes you nightmares) although I think it is a bit thicker than the previous Italeri helicopters I built. In any case, this the only kit of the SuperCobra in 1/72 scale, being reboxed by Tamiya, Modelist and Testors.

Wednesday, 16 November 2016

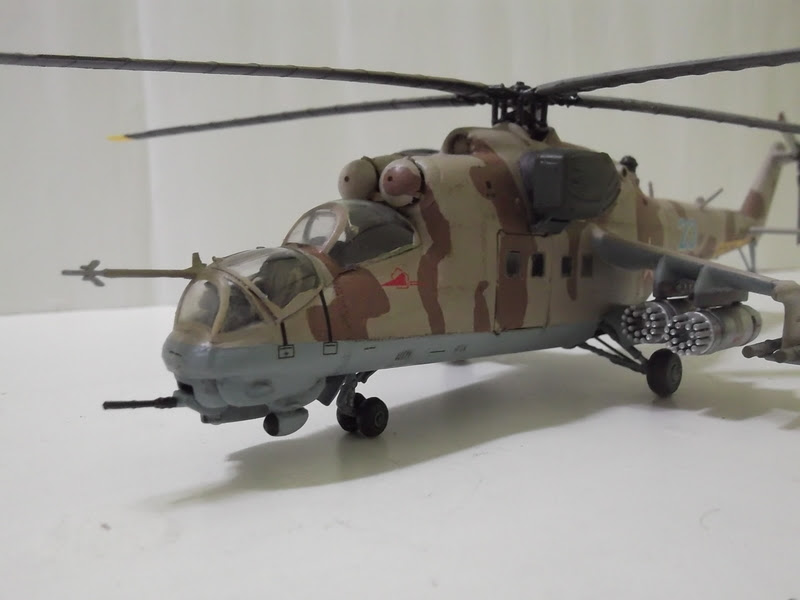
The Devil Rides A Crocodile


Historical Background
With the trend towards battlefield air mobility in the 1960s, Soviet helicopter designer Mikhail Mil realised the potential for aerial infantry fighting vehicles which could be used to perform both infantry transport and fire support missions. A mock-up, designated V-24 was revealed at factory No.329 in 1966. The V-24 had an infantry compartment that could hold eight soldiers sitting back-to-back, a set of small wings at the top rear of the troop-carrying cabin which was capable of carrying up to six missiles or rocket pods and a GSh-23L cannon fixed to the landing skid. When the design was proposed to the Soviet High Command, it was met with some opposition, who prefer to have a more conventional design. Mil however managed to persuade Marshal Andrey Grechko, the Defence Minister's First Deputy, to convene an expert panel to look into the proposal. The panel's reaction was mixed, but convinced with the development and deployment of attack helicopters and gunships by the Americans in Vietnam, the supporters of the project held sway.

The Mil Design Bureau prepared two designs: a single-engined, 7-ton design and a twin-engined, 10.5-ton design, both using the 1,700 hp Isotov TV3-117 turboshaft used in the same design bureau's Mi-8 utility helicopter. During the design stage a number of changes were made including the replacement of the 23-mm cannon with a rapid-fire, multi barrel heavy machine gun in a chin turret and the ability to use the 9K114 Shturm (AT-6 Spiral) anti-tank missile. In May 1968, the twin-engined design (now called the Mi-24) was chosen. The full-scale mockup was reviewed and approved in February 1969. A tethered hover flight test was made on 15 September 1969 with the first free-flight conducted four days later. The prototype was followed by a batch of ten development aircraft which conducted an 18-month test programme beginning in June 1970. These produced more changes sucha s a 12-degree anhedral to the wings, moving the missile pylons from the fuselage to the wingtips, moving the tail rotor from the right to the left side of the tail and reversing the rotation direction. The first production version, Izdeliye 245 or Mi-24A achieved initial operational capability in 1971 and was officially accepted in 1972.

The Mi-24 was essentially a derivative of the Mi-8 'Hip' with the two top-mounted turboshaft engines driving an almost-similar main rotor. The original version (Mi-24A) has an angular greenhouse-style cockpit which was replaced by a tandem, stepped cockpits with separate armoured bubble canopy for the crew (who are also protected by a titanium tub, proof against 12.7 mm rounds) from Mi-24D onwards. Weapons, depending on the mission undertaken, ranging from free-fall bombs to laser-guided anti-tank missiles, were carried under the two mid-mounted stub wings, each with three weapons stations. On-board weaponry is turret-mounted 12.7 mm Yakushev-Borsov Yak-B gatling-style machine gun (on most variants) or fixed twin-barrel GSh-30K on Mi-24P or turret-mounted 23 mm twin barrel GSh-23L cannon (Mi-24VP and VM). A PKB 7.62 mm can be mounted on the passenger cabin window to protect the aircraft's blind side. Over time, the troop-carrying function became less important and the cabin was used to carry ammunition reloads.

The Mi-24, given the NATO nickname 'Hind', saw first action with Ethiopian forces against Somalia during the 1977-1978 Ogaden War. In 1978 it saw action with the Vietnamese Peoples' Air Force during the Cambodian-Vietnamese War of 1978. In the same year it also faced against Chad when it was used by the Libyans during their incursions into the former. The Hind's first extensive operation was during the Soviet occupation of Afghanistan from 1979 to 1989. Despite strong resistance from the Afghan Mujahideen fighters, the Hind was very effective against them. It was nicknamed Syaitan Arba (Satan's Chariot) and apparently a Mujahideen leader was quoted saying 'We are not afraid of the Russians, but we are afraid of their helicopters'.  Combat experience in Afghanistan demonstrated the disadvantages of carrying troops, incurring weight penalty while operating in hot and high areas. The troops were carried in Mi-8s while the Hinds concentrated on giving support. The troop compartment armour was also removed while a machine gun (or two) were mounted on the cabin windows, operated by a technician. The Mi-24s were usually operated in concert with Su-25 ground attack aircraft, protecting and escorting heliborne assaults and ground operations, convoy protection and hunter-killer-style operations. They were also used to protect transport aircraft coming in and out of Kabul, deploying flares to decoy man-portable surface-to-air missiles, of which the FIM-92 Stinger was the most effective.

Another conflict in which the Hind was used extensively was the Iran-Iraq War (1980-1988). Although causing severe damage to Iranian infantry and soft-skinned vehicles, it was less effective against tanks as the Iraqi Hinds were armed with the older 9M17 Skorpion (AT-2 Swatter) missile. A tactic was developed where the Hinds were used to suppress Itranian air defences while the armour was dealt with the HOT missile-armed Aerospatiale Gazelles. The Iran-Iraq War also saw air-to-air combat between helicopters, chiefly between the Hind and the AH-1J SeaCobras. It was claimed that these aerial engagements resulted in the loss of 6 Hinds and 10 SeaCobras. Weapons used in these engagements include the mounted cannon / machine gun, rockets and anti-tank missiles. The Hind continue to be developed and used in conflicts around the globe until today. In its native country, the Mi-24 was nicknamed 'Krokodil' (crocodile).

The Kit
The kit built here is the 1993 Tamiya re-boxing of the Italeri kit originally released the year before. The parts are spread among two sand-coloured and one clear sprues. The kit has raised details but petite and sharp (the fit will have to wait until construction starts) although some details were skipped or simplified. More serious shortcomings was that it was well, short in the diameter of the rotor blades and the tail boom, the rotor blades were too narrow, the stub wings were too long and the airfoil is reversed. While disappointing, I'd go on with the build as at the time I bought the kit, it was the only game in town (the Revell kit was another Italeri reboxing). The nice decal sheet provide markings for three aircraft:

1. Yellow 07 - Soviet Air Force
2. 0294 - Czechoslavakian Air Force
3. 96+22 - Luftwaffe

Construction
As usual, the cockpit received the first attention. I started by painting the parts while still on the sprue. Tamiya suggested that the interior is to be painted XF-19 Sky Grey, although I believe it to be Russian Interior Blue. I used a 50-50 mix of X-14 Sky Blue and XF-5 Flat Green. As for the seats, I weren't confident of my ability to properly trim it down and so I left them as they were (as moulded, the seats would be the most comfortable of all helicopter crew seat, they are quite wide, perhaps two persons can sit side-by-side at 1/1 scale!) . There weren't any decals for the instrument panel I had to paint them myself. Italeri also included a very rudimentary interior for the troop cabin and it is best closed unless an aftermarket set is available or if one wants to scratchbuild it. If one is building an aircraft without the heat dissipaters, the exhausts have to be assembled and then cemented to the roof of the troop compartment. The interior parts were then cemented to the right side of the fuselage, prior to closing up the latter.

Although the instructions have you place the tail rotor at this time, I skipped it as it would interfere with painting (it can still be removed, by the way). The troop compartment doors were then cemented in the closed position (it can be posed open by cutting the door in two and adding other parts required). Fit is not good and need to be carefully placed in the opening; nevertheless there is quite a gap between the door and the fuselage. Also, the clear parts did not fit snugly in the openings and with me being clumsy, resulted in cement smudges on the clear parts..darn it! The upper engine cowling, engine air intakes, the heat dissipaters and the IRCM 'ball' were assembled and fitted to the fuselage. All have fit issues, whether as to the components themselves and/or their fit to the fuselage which require filling and sanding. It was quite tedious as the gaps and steps occur at hard-to-sand areas.

Moving to the bottom of the fuselage, the turret-mounted machine gun was assembled but I set it aside for the time being. The radar pod went on without problem, just a seam line along the centre. The LLLTV/FLIR pod however has a step when assembled and to cure this problem, I cut off the locating tabs and align them by sight. While this avoided the step, it resulted in a gap between one side of the fairing and the fuselage, which require more puttying, and sanding. The wings were assembled and attached to the fuselage. again there is the issue of fit as the there is a bit of a gap at the wing roots and also between the left wing tip and the laser designator pod. There is also a sizeable gap between the wing and the weapons pylons. Talking about the weapons pylons, they were moulded together with the B-8 rocket pods. Not only this complicate painting, I also believe that the rocket pods were undersized. They would have to go and were cut away before the pylons were cemented to the wings.

Painting and Decalling
During the course of the build, I came to know a Linden Hill Decals sheet for Mi-24 stencils and decided that I must have one (despite, or perhaps because of, my love-hate relationship with modern aircraft stencilling). So I took an opportunity during a visit to KL to drop by at Hobby HQ. Mr. Low stocks the said decal, but unfortunately the price is quite steep. Nevertheless I managed to buy Begemot's Mi-24 decal sheet which have the stencils plus a bunch of interesting markings for Mi-24 users around the world. I have to disregard some marking suggestions as they are for the Mi-24P variant. A second round of elimination took out those without the heat dissipaters. That left me with just three choices - a Sandinista AF Mi-24D in 1987, a Soviet AF Mi-24V in Afghanistan, 1984 and an airshow Mi-24VM/ Mi-35M. I ended up choosing the Soviet AF Hind as the helicopter was best known for its role in the conflict.

For the underside blue, I used a mixture of roughly 60% XF-23 Light Blue, 30% XF-2 Flat White and 10% XF-8 Flat Blue. While Tamiya suggested XF-59 for the base colour, I feel that, after consulting photos, it should have a grey tint to it. After browsing the internet, I settled for a mix of 40% Gunze H315 (as substitute for Tamiya XF-20), 20% XF-52 Flat Earth and 10% XF-59 Desert Yellow. The brown camouflage pattern was painted using Tamiya XF-64 Red Brown. Afterwards it was time for the decals. I have used Begemot decals before (for my MiG-31) and found them to be thin and in register although a little flat in finish. It was the same for the Mi-24 decals, although I have to leave them in the sunlight for several hours as the decals has yellowed. One gripe though - the 'Danger' markings at the tail was quite transparent, showing the camouflage beneath it. I substituted them with leftovers given by a friend. Mr. Mark Softer was then applied.

Finishing
As usual I started with the landing gears. However, the way the kit main landing gears is engineered, the model would sit level with the surface whereas the actual Hind has a nose-up attitude. The main landing gears were repositioned and some trimming were done so that the struts and wheels were perpendicular to the ground. This however results in Part A75 becoming too short and they were replaced with a length of plastic rod cut to appropriate length. Originally I thought of having different weapons fit, such as having bombs or gun pods on the pylons but having none (there are no gun pods in my stash and I have run out of bombs form the Dragon Weapons Set), I settled for the prototypical load of four rocket pods using the ones from the Dragon set. The 9K114 Shturm missile tubes were also replaced with Dragon items as the kit ones were merely lengths of tube devoid of details. The cockpit transparencies , painted separately, was then attached. They did not sit properly, requiring a bit more sanding and retouching of paints (I however forgot the gunner's hatch!). 

While most wrong and missing details were left as they were, I did a few reworkings of the main rotor. The main rotor rotates clockwise (when viewed from above) but it was moulded the other way round. I shaved off the 'pimple' (it was the hydraulic reservoir on the real aircraft) on top of the hub and placed it on the bottom while the control rods swap places with it. The rotor blades were then cemented to the hub. There were sizeable gaps at each joint but I left them as they were for a while. As the real blades droop while idle, each blade was soaked in hot water and was then gently bent down. I didn't increase the chord of the blades as I felt it was too ambitious for me. The gap on each blade joint was then filled and painted. The Hind modelled was fitted with blade-type IFF aerials, so the moulded-on 'Odd Rods' IFF aerials were removed and replaced with ones made from scrap plastic. The model was then given a wash and was later sprayed with Mr. Hobby Matte Topcoat, finishing the build.

Conclusion
The 1/72 Italeri / Tamiya kit is not a good kit. There, I have said it. Not only it has a number (which is quite a lot, really) of glaring mistakes, the fit was also not good. It was a good kit for a modeller to get out of his comfort zone (I can say that I only rose part way...haha!), making a number of tweaks so that the kit represented a more accurate Hind. The competitors' Hinds represent a better value for money. 

Monday, 9 May 2016

Sky Shark


Historical Background
By the 1970s, the Soviet Defence Ministry decided that the Mil Mi-24 was not going to meet future Red Army requirements. On the Ministry's advice, a new resolution was passed by the Central Committee of the Communist Party and the Council of Soviet Ministers to develop a new combat helicopter which could be fielded by the Soviet Army in the 1980s and beyond. The main task of this helicopter is to destroy enemy armoured forces close to the edge of the forward battle area (FEBA). Two design bureaus with extensive experience between them, Kamov and Mil was chosen to compete. Kamov's designers, led by Sergei Mikheyev, believed that the task of flying, navigating, target detection and tracking can be automated to a degree that a single crew member can perform all the functions. The designers also have survivability in mind, incorporating armour around the cockpit and other vital areas and also redundant systems. Crew survivability is enhanced by installing an ejector seat, the Zvezda K-37-800. The prototype, designated V-80 was rolled out in June 1982 and first flew on 23 July of the same year.

The V-80 was further developed into V-80Sh-1. The latter model was chosen for production by the Council Of Ministers on 14 December 1987, after competitive trials against the rival Mi-28 design. The actual order for production was however only given in 1990. In March 1992, during a symposium in the United Kingdom, the V-80Sh-1 was publicly described as 'Ka-50'. The Ka-50 was revealed to the public at Mosaeroshow '92 held at Zhukovskiy / Ramenskoye Airport in August 1992. The second prototype was displayed at the Farnborough Airshow in September of the same year, painted with an image of a werewolf on its rudder, earning it the 'Werewolf' nickname. The fifth prototype was used in a movie titled 'Chernaya Akula' (Black Shark), after which the Ka-50 earned its lasting nickname (NATO codenamed the helicopter as 'Hokum'). Although proposed to be the replacement for the Mi-24, the collapse of the Soviet Union curtailed defence spending and only 65 were operational by 2011. At the same time the Mi-28 was also ordered into production and the Hakum was selected to be the special forces' support aircraft while the Havoc (Mi-28) was chosen to be the main helicopter gunship of the Russian army.

The Ka-50 featured Kamov helicopters' distinctive feature: the contra-rotating, co-axial main rotors with no tail rotor. This allow aerobatics usually not possible with conventional helicopters and also allowing a higher speed. The lack of tail rotor also allows 100% engine power be used for the main rotors and reduce vulnerability to ground fire. The ejection seat is novel in a helicopter. Before the seat is deployed, explosive charges in the rotor hub jettisoned the blades first. The Hokum is also fitted with electronic radio and sighting-piloting-navigating systems that allow day and night operations in all weather conditions. For self protection, the helicopter is fitted with radar warning receiver, electronic warfare system and chaff and flare dispenser. The cockpit is protected by armour plates against armour-piercing 12.7 mm bullets and 23 mm fragmentation cannon rounds. The Ka-50 is armed with a 2A42 30 mm cannon mounted semi-rigidly on the right side of the fuselage and provided with 460 armour-piercing, fragmentation and/or explosive incendiary rounds. Six external hardpoints on the stub wings can carry up to 2,000 kg of ordnance including up to 12 9K121 Vikhr (AT-16 Scallion) anti-tank missiles.

In December 2000, a pair of Ka-50s were sent to the Chechnya to join the Russian Army operations against the Chechen separatists. Along with the pair was a Ka-29 to provide reconnaissance and target designation. On 6 January 2001, the Ka-50 fired its first shots 'in anger'. On 9 January, one of the Ka-50s, escorted by a Mi-24, used unguided 80 mm S-8 rockets to destroy an ammunition dump near the settlement of Komsomolskoye. On 6 February, the two Ka-50s, escorted by the Ka-29 destroyed a fortified insurgent camp in a mountainous, forested area near the village of Tsentoroj using two Vikhr missiles. Finally on 14 February, eight targets were destroyed in the Oak-Yurt and Hatun areas.  For the time being, the Ka-50 was only operated by the Russian Air Force. The Ka-50 was developed into the Ka-50N and Ka-50Sh night-capable helicopter, but no orders were forthcoming. A twin-seat version was also developed - the Ka-52 'Alligator' which so far enjoyed a better export success, with 50 being ordered by Egypt.

The Kit
Italeri released their kit of the Hokum in 1993 with Tamiya re-releasing it under their label in the next year. Unlike their Mi-28 kit (named simply 'Soviet Attack Helicopter', which was based on speculative DoD drawings), the Ka-50 kit was more accurate, at least in general shape and outline (I'm not a rivet counter anyway). The Tamiya version was moulded in their usual tan/light sand-coloured styrene (the original was moulded in a dark, brownish-black plastic). The parts are spread among two solid and one clear sprue and featured finely raised panel lines (even though the trend was moving towards engraved panel lines at that time). Exterior stores include a pair of S-8 rocket tubes and 12 Vikhr missiles plus the 2A42 cannon. Holes for the weapons pylons have been pre-drilled into the stub wings. Decals provide markings for two aircraft, and since the kit came in the early 1990s, they did not represent operational machines. One was '018', a test machine at Akthoubinsk in 1991 (camouflaged) and the other is the Farnborough '92 participant in overall black.

Construction
As always, construction of an aircraft model started at the cockpit. For this build however, I substituted the kit cockpit with the excellent resin replacement from Neomega. It was painted according to the kit instructions and set aside for a while. next, the instructions have you partially assemble the rotor assembly (the drive shaft and rotor heads). I think that this might lead to breakage so I just glued the together the base (Parts B7, B8, B9 and B11) and inserted them in the starboard fuselage half. The cockpit was then superglued and the fuselage was closed up, with the cockpit nicely fitting in. The same however cannot be said with the fuselage halves which have a bad fit, resulting in a seam along the fuselage (although I think, with proper attention and due dilligence, it can be overcome, or at least minimised). While admiring the details of the Neomega set, I can't help but worry whether they would be visible when the canopy is in place.

And yes, when the canopy was in place, it nearly obscures most of the interior. I coud have the entry door in the open position but I decided to have it closed. Hmmmmphh. The canopy itself is problematic with rather major alignment problem - glue it to fuselage and there will be a step between the canopy top and the upper fuselage; aligning it with the top will create a gap at the bottom.The engine fairings and the air intakes were assembled and cemented to the fuselage with no fit problems. The exhausts were left off at this time. The stub wings were assembled and attached to the fuselage but like the exhausts, the weapons pylons were also left off. The tails, while falling at existing panel lines, the gap looked a bit deeper than usual because of the less than perfect fit. As they would also interfere with painting, the landing gears, air data probe and the cannon were also left off.

Painting and Decalling
As mentioned before, the painting options are for two non line birds (one airshow demonstrator, the other for evaluation purposes). I wasn't keen on any of them so I looked for other options. While browsing the internet, I came across Begemot Decals website showcasing their products. They also kindly allow users to download their instruction sheets. The decal sheets for the Ka-50 still consist of test birds but I spotted one, just one, colour scheme of an operational combat test Black Shark in Chechnya. It has the same camo pattern as '018' in the kit's decal sheet but that's where the similarity ends. The kit has the camouflage in sand/dark green (using XF-59 Desert Yellow and XF-26 Deep Green) while Begemot has it in light green (FS 34227) and Khaki Drab (Tamiya XF-51(?)). I went for Begemot's suggestion and painted the model Gunze H312 and Tamiya XF-51. The black portion was painted Tamiya XF-69 NATO Black. The lower fuselage was painted Tamiya XF-23 Light Blue.

The decals were not used as the Ka-50s sent to Chechnya have all markings, except technical stencils, removed.

Finishing
To start the finishing process I worked from the bottom. I started at the landing gears, allowing the model to stand on its wheels. The weapons then received my attention. The S-8 rocket pods were painted silver; the Vikhr missile tubes were painted XF-64 Red Brown and XF-1 Flat Black. The missile racks were glued to the pylons first before cementing the weapons themselves to ensure proper alignment. Once that was done, the exhausts were assembled. Unfortunately they are moulded 'short', leaving a gap in the plates inside the exhausts. It can be rectified but lacking the proper tools, I decided to leave it as it is. I concentrated on the rotors. Italeri had the rotor blades molded 'straight', with no droop, which is almost always seen on idle choppers. To have the droop, I immerse the rotor blades in hot water, and then gently bending them. Weathering was done just to highlight some of the panel lines and rivets. As the paint on the real aircraft was flat, the model received a layer of Gunze Super Clear Flat spray.

Conclusion
Italeri's (and Tamiya by association) 1/72 Kamov Ka-50 helicopter can be described as a curate's egg. Although I don't bother measuring the kit and compared it to official drawings, it does look like a Ka-50. The details, although mainly of the raised variety is quite acceptable. The major letdown is the fit with almost everything having gaps and steps, plus that 'short-shot' exhausts. I also have to add that the cannon is also a bit disappointing as it lacked detail, being externally mounted and all.