Historical Background
With the introduction of the Tiger and Panther tanks, the Germans now have tanks able to destroy Soviet tanks at long range while being relatively immune to the Soviets' 76.2mm projectiles at normal combat ranges. In May 1943, the design bureaus of General Vasiliy Grabin and General Fyodor Petrov were instructed to develop a new anti-tank gun based on the 85mm 52-K/D-5T anti-aircraft gun. Petrov's bureau developed the D-5S 85mm anti-tank gun. The performance of the D-5S was on par with the 8.8-cm KwK 36 gun arming the Tiger and was capable of penetrating the Tiger itself at 1,000 meters. However, the T-43 tank project was cancelled and it took time to re-tool the production line to make way for the T-34/85. It was decided, as a temporary measure, to mount the gun on turretless T-34 chassis as a
Samokhodnaya Ustanovka (self-propelled carriage) designated SU-85. The gun was redesigned for self-propelled carriage as D-5S. Tests were conducted on an earlier self-propelled gun chassis, the SU-122, but the Uralmash factory rejected the initial designs as they took too long a time to convert for mass production. The factory directors were however persuaded to continue and the final design, with periscopic sights and ball-type gun mantlet was accepted for production.
The same gun was finally fitted to the T-34/85 and coupled with the Germans' introduction of the Tiger II, the SU-85 was made obsolete and efforts were made to up-gun the SU-85. Lev I. Gorlitsky was tasked to supervise the development of this project. Work started in February 1944 and the first prototype called Obyekt 138 was built in March. The prototype was used to test different models of 100mm gun, derived from the Soviet S-34 naval weapon. Finally the D-10 gun was selected as the D-10S (while the D-10T ('tank') version eventually arm the T-54/55 family). The new vehicle was designated SU-100 and two pilot vehicles were made ready in March 1944. After tests, the SU-100 was approved for mass production in September 1944.

Overall, the SU-100 inherited the design of the SU-85, which was based on the T-34 chassis. The D-10S gun was housed in a fixed superstructure and as with all casemate-style tank destroyer/assault gun require the entire vehicle to be traversed in the direction it needed to fire. The casemate had a more pronounced slope, reducing the habitability of the vehicle. A new, raised commander's cupola was fitted on the right side of the vehicle and was equipped with vision slots. Despite the cramped interior, the SU-100 was cooler than the SU-85 with two ventilators providing fresh air from outside. The D-10S gun is 53.5 calibres long and was installed on a special mount. With a muzzle velocity of 895 meters per second, it could penetrate 149mm of steel armour at 1,000 meters, better than the KwK 42 of the Panther and KwK 36 of the Tiger I. 33 rounds were usually carried and the normal mix was 18 BR-412 APHE and 15 F-412 HE/Frag rounds. Curiously, like the SU-85, no personal weapons were provided and the vehicle was not equipped with secondary machine guns. Power was provided by a V-2-34M 12-cylinder diesel engine rated at 500 hp. This allowed the SU-100 to move at 30 mph on road with a range of up to 200 miles.
SU-100 entered operational service in October 1944 and 65 were issued to each self-propelled artillery brigades and it became popular with its crews. It was able to defeat all German tanks with the exception of the King Tiger. It was used en masse in blunting, and ultimately defeating the final German offensive during the war, Operation Fr
ühlingserwachen around the Lake Balaton area in March 1945. It was then used in the final offensives into Germany, even being used as an assault gun supporting the infantry. With the end of the war in Europe, large numbers of SU-100s were transferred to the Far East to take part in the Manchurian Strategic Offensive Operation. There was no proper record-keeping regarding the production of the SU-100 but 2,335 were built by July 1945 and production by the Soviet Union ended in 1947. In the 1950s a new production line was opened in Czechoslovakia. The SU-100 remain in Red Army service until 1957 and the type was also exported to Warsaw Pact and friendly nations such as North Korea, Vietnam, Cuba, Angola and Egypt. SU-100s exported to Yugoslavia were known as M-44 while those exported to Egypt were designated SU-100M ('modernised'). The SU-100M is slightly modified to adapt to the sandy conditions of the Middle East. The Yugoslav M-44s were used during the Balkan Wars while the Egyptian SU-100Ms were used during the 1956 Suez Crisis, Six-Day War 1967 and Yom Kippur War 1973.
The Kit

Dragon/DML released a kit of the SU-85M in 1998. In 2010 they re-released the kit as part of the 'Premium Edition' releases with a rather extensive PE parts. It wasn't stated outside the box that the re-released it kit is also a 2-in-1 kit; it was only stated so on the first page of the assembly instructions, allowing an early-production SU-100 to be built from this kit. The parts are spread among 24 light grey-coloured sprues, 1 lower hull pan, 1 clear sprue, 2 packs (1 toothed, 1 flat) of Magic Track track links, 1 twisted steel wire, an aluminium barrel, a fret of PE parts and a decal sheet . The parts are of the mix-and-match type, with parts coming from the T-34 1940/1941 kits and Premium Editions of the T-34/85, SU-100 and SU-85 kits. This in turn can cause a bit of confusion during construction as some of the sprues share the same alphabetical reference. The general impression is that the parts are well-moulded although I took exception with the moulded-on tie downs on the casemate sides and on the fenders, which definitely have to go and replaced with the PE parts. Separate casemates are provided for the -85M and -100. The -85M use the turned aluminium gun barrel while the SU-100 has a choice between a two-piece gun barrel or a slide-moulded one-piece barrel. Other options include 'new' or 'used' external fuel tanks while the PE parts provide alternatives to the plastic parts. The instructions have also been revised, restoring steps previously missing as noted by Cookie Sewell in his review of the kit.
Decals are printed by Cartograf, they are thin and have good register. They provide markings for six vehicles, the majority of which are from that famous unit, 'Unidentified' (haha) :
- Unidentified Unit, Eastern Front 1945 (SU-85M) White 119-'bullseye cockade-7A' (4BO Green)
- Unidentified Unit Poland 1945 (SU-85M), Black 281 (Whitewash)
- Unidentified Unit Bohemia 1945 (SU-85M) cyrillic F2 (4BO Green)
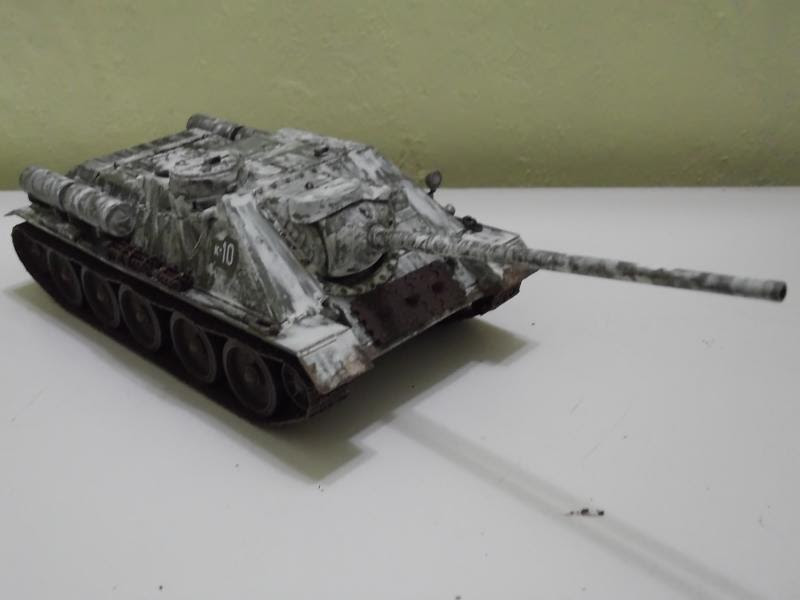
- 7th Mechanised Corps, Hungary 1945 (SU-100 early) K-10 (faded whitewash)
- Unidentified Unit Bohemia 1945 (SU-100 early) White 432 (4BO Green)
- Captured SU-100, 4. Panzer-Division, Danzig Area April 1945 large black/white balkankreuz (Dark Green / Dark Yellow camo)
Construction

When I realised that a SU-100 can be built from this kit, I intended to finish it as such. As the usual practice, construction started with the lower hull. The suspension spring housings were first glued onto the hull pan. The axles were also cemented but I left the idler axle off at this time. The towing eye clasps can be substituted with PE but I decided to use the original plastic ones. The are also couple of PE parts to be placed underneath the hull but to my dismay, my superglue had has hardened inside the tube and they will have to wait until I buy a new one. The next step is concerned with the wheels but I skipped them at this time and moved on to the upper hull. I started by fitting the rear wall of the fighting compartment and adding the first of the extensive PE parts, that is the interior behind the grilles. Afterwards I cut the casemate walls off their sprues and began a session of removing and sanding the moulded-on tie-downs. I did not add the PE replacements at this time and proceeded to cement the walls onto the superstructure. Fit is rather bad and I have to use putty to cover up the gaps.
I then moved back to the rear of the model and added the rear panel. The radiator cover was next and unlike the SU-100 kit, Dragon provided one with opening for the grille (the one with solid grille, which you have to remove before the PE substitute can be used, was still provided anyway). To help the mesh and frame conform over the sloping end of the upper hull, I annealed them first. Dragon also include the louvres but unlike their previous efforts (like on my
T-34/76), there weren't any tabs that interfere with the fit of the cover. The grilles on the side of the vehicle also have PE options, which I use. Returning to front of the vehicle, I tackled the hatches first. The driver's hatch was put in the closed position and I did not use the PE parts for the latches as they would not be seen. Before placing the commander's and the loader's hatches, I went through my collection of unbuild figure sets, looking for a suitable figure to be placed in the hatch(es). Seeing none suitable, the hatch covers were cemented in the closed position. I decided to join the upper and lower hull at this time. But before doing that, I temporarily affix the running gear parts on to the hull. The track links were joined, adding a bit of sag. Once the tracks have been completed, they and the wheels were removed and set aside.
After the hull halves have been joined together, I shaved off the tie down rings on the fenders, marking their positions with a pencil. Reference lines were then drawn from the fender to the casemate as the original plastic tie-down 'shapes' did not align with the rings on the fender. Before doing any of the smaller parts, I handled the larger assemblies first. The gun mantlet was assembled, taking care that the base for the gun barrel can still move up and down. The barrel however was left off at this time to ease handling. I then affixed the rest of the PE parts, (the ones that I use) to the model. The external fuel tanks were assembled but not yet cemented onto the hull. The boxes on the fender, while assembled, were also left off at this time.
Painting and Decaling
For painting, I mixed equal parts of XF-58 Olive Green and XF-4 Yellow Green as base colour. Once the paint has cured, it was time to decide which marking to use. I ended with the 'K-10' of the 7th Mechanised Corps. After the decals have been applied, I sprayed two layers of hair spray. A coat of XF-2 Flat White was then applied rather haphazardly. Of course it would be better if I use an airbrush, for a thin, easily scrubbed off layer. Anyway, the white paint did flake off, creating the distressed pattern. They flake off more than I wanted however, but it's OK as the actual temporary paint flake off badly (and eventually gone) by the end of winter. The upper part of the model then received some pin wash using my regular concoction of Red Brown and Black.
Finishing
The remaining parts can now be fixed onto the model. The barrel, painted and weathered separately was permanently fitted to the model. The grousers were placed onto the right-side fender but I can't get the belt to get inside the buckle, so they were secured using superglue. The tow cable was annealed, painted steel and washed with the Track Wash before being secured to the hull. A rather thick X-19 Smoke was then applied on the exhaust nozzles and the area underneath it as per photos seen in an old copy of Model Military International. Storage boxes and towing eyes were then put in place and were followed by the two-man saw and all the grab handles. I also added two wood pieces, acting as unditching beam (sort of), on the left-hand fender.
To complement the late winter camouflage, I put Mig Productions European Dust liberally on the tracks and secure them using the same company's pigment fixer. A more restrained application was done on the wheels and the lower hull. Once dry I applied AK Interactive Earth Effects wash all over the lower hull and tracks.
Conclusion
Dragon has been updating their older kits since several years ago as Premium Edition kits, allowing a modeller to build the kit as it was originally released or replace the cruder parts with PE. The downside is a higher price but without too many improvements. Anyway, for this kit, I believe it was worthwhile plus the added surprise (to me at least) that it was actually a 2-in-1 kit, allowing me to build a SU-100. There were some fit problems especially concerning the casemate armour plates but nothing an average modeller cannot overcome. In all a nice kit.