Historical Background
During the interwar years, the French Army, like the British, was a firm believer of the division of labour between tanks, categorising them into cavalry, infantry and heavy tanks. By French law, tanks (
chars) were operated only by the infantry, forcing the cavalry to name its tanks as
automitrailleuses. The French preferred to fight a defensive battle but was realistic enough to understand that it might have to be on the offensive. Each of the two offensive phases - breakthrough by the infantry and exploitation by the cavalry, called for specialised vehicles with the cavalry ones designed to fight enemy armour. Plans for the cavalry tank (or
Automitrailleuse de Combat, AMC) were made as early as 1931, but on 26 June 1934, the requirements were revised. The new specification called for a heavier design, able to resist contemporary anti-tank gun fire. The Army has already contacted Soci
ét
é d'Outillage M
écanique et d'Usinage d'Artillerie (SOMUA), a subsidiary of Schneider et Cie, on 17 May to build a prototype. Construction began on 12 October 1934 and the first prototype, designated AC3 was completed on 12 April 1935. Four more prototypes of an improved type designated AC4 followed the AC3. All these vehicles were fitted with an APX1 turret, armed with a short 47 mm SA 34 gun (production models used the longer SA 35). On 25 March 1936, the AC4 was selected to be the standard medium tank of the cavalry with the official name of Automitraielleuse de Combat modele 1935 S, or more commonly known as SOMUA S35.

The S35 became the first tank in the world to be constructed from cast steel. The hull consisted of four sections (two bottom longitudinal plates, front and rear upper plates) bolted together. The maximum thickness of the hull was 47 mm. The turret, with a maximum thickness of 40mm, was derived from the APX1 turret fitted to Char B1 heavy tanks. Known as APX1 CE, this turret has a larger turret ring, allowing the radio operator to act as gun loader. Even so, the commander, like in the Char B1, was expected to direct the tank while loading, aiming and firing the gun. The gun was provided with 118 rounds and unlike British tanks, include both HE and AP rounds. A Riebel 7.5 mm MG was mounted co-axially with the main gun and was provided with 2,250 rounds. Like German panzers, radio was expected to be part of the standard equipment. In practice however, only the platoon leader's tank was equipped with an ER 29 set for communications with higher command level. The programme to fit short range ER 28 set was postponed to the summer of 1940 and was of course overtaken by events. The suspension was based on the Skoda LT35 tank. It was however too weak, too complicated and too maintenance-intensive. This was further complicated by the fact that the cast armour modules preclude easy access for maintenance.
The four pre-production AC4 series of the S35 entered service in January 1936 with the 4
ᵉ Cuirassiers. The first production S35 tanks left the factory in April 1937. By July 1938, 128 hulls have been delivered but only 96 received their turrets. At the outbreak of war, 246 had been delivered and following the outbreak, another 374 was ordered, bringing the total ordered to 824. Later it was decided that from the 451st vehicle onwards, the S35 would be replaced by the more advanced S40. By June 1940 however, only 440 tanks had been completed. At the beginning of the Battle of France, 288 were in front-line service with the 1
ᵉ, 2
ᵉ and 3
ᵉ Divisions Legeres Mecaniques. The 2
ᵉ and 3
ᵉ DLMs were concentrated in the Gembloux Gap between Louvain and Namur. From 13 to 15 May 1940, the French divisions clashed with the 3rd and 4th Panzer Divisions at the Battle of Hannut, still one of the largest tank battles of all time.
On one-to-one basis, the S35 proved themselves to be superior to the German panzers. However they were hesitatingly deployed by the French High Command as they thought the German attack at the Gembloux Gap was the
schwerpunkt of the offensive and reserved their armour should the Panzerwaffe erupted from elsewhere. The attack was indeed a feint, causing the 1st DLM, earlier heading northwards to help the Dutch, to be hurried south again. The resulting disorder and breakdowns weakened the division which was defeated by the 5th Panzerdivision on 17 May. The remaining DLMs then only fought delaying battles as the initiative was firmly in the Germans' hands. Apart from the three DLMs, the S35 was issued to ad hoc units such as the 4
ᵉ DCR, 4
ᵉ DLM, Corps-fr
ᵉancs Motorises, the reconstituted 1
ᵉ, 2
ᵉ and 3
ᵉ DLMs, 7
ᵉ Cuirassiers and a platoon in the 3
ᵉ RAM of the 3 DLC.
After the fall of France, 23 S35s were sent to West Africa to bolster Vichy French units stationed there. After the French units in Africa sided with the Allies following Operation Torch, the 12ᵉ Regiment de Chasseurs de Afrique who operated the Somuas, used their tanks against German and Italian forces during the Tunisian campaign. They were replaced by M4 Shermans following the defeat of Panzerarmee Afrika.
Some 297 S35s were captured by the Germans. These were taken into German service as Panzerkampfwagen 35-S 739(f) and were used to equip Panzer-Abteilung 211. The unit was sent to Finland to take part in Operation Barbarossa. The S35 was also used by 22 and 25.Panzerdivisionen when they were reformed in 1943. Some of these units fought against the Allies at Normandy in 1944 such as 100. Panzer Ersatz und Ausbildungs-Abtelung and 206. Panzer-Abteilung. Others fought against Yugoslav partisans with the 7th SS-Freiwilingen Gebirgs-Division 'Prinz Eugen', 12. Panzer-Kompanie z.b.V and I/Panzer-Regiment 202. Germany's allies also received captured S35s with Italy receiving 32, Hungary 2 and Bulgaria 6. After the liberation of France, 17 S35s recaptured from the Germans, formed part a the newly-raised regiment, the 13e Regiment de Dragons and fought against the remaining German pockets of resistance in France.
The Kit
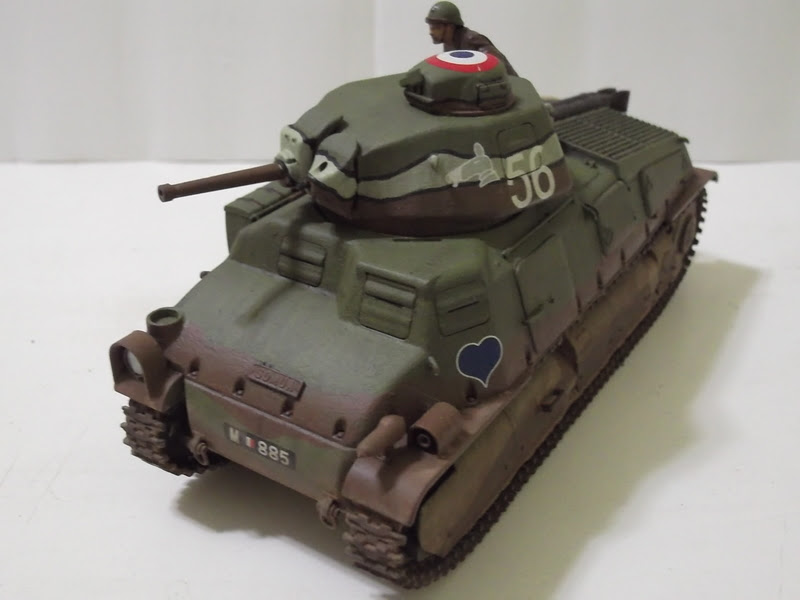
After releasing the Char B1, Renault UE and Citroen 11CV, Tamiya's next French vehicle was the Somua S35, released early in 2015. The release of this tank (and the previous French subjects) are most welcome as the market isn't exactly thick with them, and what's already in the market were long in the teeth. The kit consists of some 190 parts spread among five light sand-coloured and one clear sprues , a mass of separate-link tracks, a number of polycaps, a length of chain and the usual decal and instruction sheets. The parts feature fine detail especially the cast texture while the track assembly follows the same method as those for the Char B1 kit. The running gear on the real tank was quite complicated although Tamiya managed to simplify them without sacrificing too much detail. Decals provide markings for three vehicles :
1. '56', 18th Dragoon Regiment
2. '42', 13th Dragoon Regiment
3. '20', 4th Cuirassier Regiment
Construction

As usual with vehicle models, construction started from the bottom. It consists of a single-piece lower hull with separate front and side panels. Holes for the chain hangers were drilled into the rear panel face. Tamiya have the holes in 1 mm and 1.5 mm. I however have lost the larger drill bits and simply drill all holes in 1 mm, enlarging the required holes using another method. The side panels, the road and idler wheels and the drive sprocket (at this time still on their sprues) were then painted Olive Green (Tamiya XF-58 in this case) which seemed to be the basic colour for the Somua. The suspension and wheels were then assembled and cemented to the lower hull and followed by the armoured panels. The track skids and return rollers were then cemented; I almost lost one of the track skids when it flew off the tweezers (the track skids were located in rather tight spots and needed a tool to get them in place). The return rollers were also quite tight you need to insert them until you heard (or rather, feel) a click to show that they're properly in place. The next step would be assembling and fitting the tracks but I skipped this step and went for the upper hull.

The upper hull is a one-piece affair, somewhat replicating the real thing. The engine deck hatches were cemented in place and this was followed by the crew compartment hatches. The crew hatch on the left side of the hull can be posed open but with a totally empty interior, it was not a good idea. One of the shutters for the driver's vision hatch is moulded in the open position. Although not as obvious as the entry hatch, this one was also closed by cutting off the moulded-on hinge. The upper hull was then mated to the lower hull. The halves were secured by poly caps on the rear half while a tab secures the front. Tamiya Extra Thin Cement was used to plug the minor gaps. The rest of the hull fittings were then cemented on the hull although I left the exhaust and the pioneer tools until later. The storage boxes on the right side of the hull were of two parts and this necessitated some puttying to be done to make the moulded-on holding straps 'one', otherwise you'd end up with 'cut' straps (the best thing is to shave them off and replaced with PE replacement). The decision to use which markings also have to made here as the third marking option features a different style of towing hook.

Turret assembly was started by gluing the hatches on the turret sides. They fit OK, just remember to centre the part in the opening. The turret shell and the bottom match perfectly although a joint line was fairly visible when dry-fitted. To avoid that, I applied a bit more of Tamiya Extra Thin Cement, ooze off the melted plastic, cut them off and sand the joint. The mantlet and the cupola had the same issue and was dealt the same. I wanted to use the crew figure but since he sits on the hatch door and the door needs to be painted continuously with the rest, I temporarily stick the door in the closed position. Some lost cast texture caused by the sanding was restored, sort of, by stippling cement onto the affected areas. They may not be the same as the original pattern, but at least it restored the rough looks. Finally the tracks were assembled although they would be also be left off at this time.
Painting And Decalling

The decision to use which marking option was narrowed down to two when I selected the particular towing hook during assembly. It was now down to two - either tank number '56' or '42'. I selected '56' as the pattern was easier to paint. The model was painted accordingly using Tamiya paints (I almost exclusively use them). There is a bit of a problem while painting the black demarcation line as I couldn't keep a steady hand for a consistent width. The line was repaired in places using the base colours where needed. The tracks were painted a 50/50 mix of Flat Black and Red Brown. The decals were then applied. As nearly all the relevant surfaces have that rough texture, a layer of gloss clear was needed to prevent the decals from silvering. All of them bar one settled nicely. The recalcitrant one was the French roundel on top of the commander's cupola which needed a rather copious amount of Mr Mark Softer, and some cutting in order for it to settle on the surface. The model then received a filter layer of Buff.
Finishing
The tracks, which had already been assembled and painted was then mounted on the model by running them through the sprocket wheel. Although there wasn't much room between the hull sponson and the upper run of the track, it was quite easy as the track has become quite stiff (although still pliable) from the paint. The storage box straps on the right side of the hull was painted XF-10 Flat brown as it gave more contrast than XF-64 Red Brown as suggested. The pioneer tools, after being painted, were cemented onto their places on the hull. The model was then given the usual wash to highlight the details. The lower hull was given an 'extra' application of Ak Interactive Earth Effects wash. Afterwards I picked up Mig Productions' Europe Dust pigment, mixed it with water and applied it all over the lower hull and the tracks. The crew figure was assembled, painted and then placed in the open turret hatch.
Conclusion
Early World War 2 tanks, especially the French ones aren't exactly thick on the ground (at the time of writing). Again Tamiya had to be congratulated for bringing armour modellers this rather significant French medium tank which became the perfect partner for their Char B1 bis and Renault UE kits. It featured Tamiya's well-known hallmark of being easy to build (construction actually took me three days compared to at least one whole week for a similarly-sized model). The parts fit perfectly while having good surface details. And like the Char B1 bis, the snap-click tracks is the highlight of this kit, although due to its size, it's not as easy as the Char's tracks (why couldn't all model tank tracks like these?). I think the only drawback is the rather parsimonious selection of markings. And with the release of the Tamiya version of the S35, the old Heller kit can now be retired to become a collector's item.