Friday 26 September 2014

The Scourge Of The South Atlantic


Historical Background
The Super Étendard can trace its origins in two early 1950s requirement for light fighters; one for the Armee de l'Air and the other for NATO air forces. Avions Marcel Dassault used the same basic design for the two requirements, designated Étendard II and Étendard VI (originally Mystere XXVI) respectively. The latter fared well in test flights but was outperformed by Aeritalia's G.91 which was eventually declared the winner. The Marine Nationale however expressed interest which led to Dassault constructing a navalised prototype. Sufficiently satisfied with the performance, it was ordered into production, totalling 69 Étendard IVM fighter-bombers and 21 Étendard IVP reconnaissance versions. In the 1970s, the Étendard IVM was to be replaced by a navalised version of the Anglo-French SEPECAT Jaguar, the Jaguar M. The project was however stalled by political problems and issues raised during carrier trials. In 1973 the project was cancelled and alternatives were sought, including the A-7 Corsair II and A-4 Skyhawk. Marcel Dassault also offered his company's proposal - the Super Étendard. (It was alleged that Dassault played a significant part in the cancellation of the Jaguar M).

The Super Étendard was essentially an improved Étendard IVM with a more powerful engine, a new wing and improved avionics. The engine chosen was non-afterburning version of the SNECMA Atar 9K-50 turbojet (designated 8K-50) of 11,025 lb thrust. It was fitted with a multi-function Thomson-CSF Agave radar used in conjunction with the AM.39 Exocet anti-ship missile and a UAT-40 central computer. Dassault's proposal was accepted in 1973 with the first prototype, an Étendard IVM fitted with the new wings, engine and avionics first flew on 28 October 1974. First deliveries of the type was made in June 1978. In the 1990s, upgrades were made to the type by installing a UAT-90 computer and replacing the Agave radar with the same company's Anemone radar. The cockpit was redesigned with HOTAS controls and airframe lifetime extension work was undertaken. In the 2000s, further improvements were made, including better self-defence ECM, cockpit compatibility with night-vision devices, new inertial navigation system incorporating GPS and compatibility with the Damocles laser designator pod. The Super Étendard can also carry nuclear weapons; originally free-fall bombs such as the AN52. The 1990s upgrades also included the ability to launch the ramjet-powered ASMP (Air-Sol Moyenne Portee) supersonic cruise missile.

The Super Étendard began to be delivered to the Aeronavale in 1978, with the first squadron, Flotille 11F becoming operational in February 1979. The French aircraft began to be replaced by Dassault Rafale M in 2006 and are expected to be fully retired in 2016. Argentina became the first export customer when it decided to purchase 14 aircraft in 1979 when the United States embargoed weapons sales to them and withheld replacement parts for Argentina's A-4 Skyhawk fleet. Five aircraft together with five AM.39 Exocets were delivered to Argentina between August and November 1981. Delivery of further aircraft was put on hold by France during the Falklands War and thus just five of the new aircraft can be deployed, together with five Exocets. Full delivery was completed in 1984. The Argentinian Super Étendards were supposed to be operated from the carrier ARA 25 de Mayo but problems with the catapult and engines meant that the aircraft were mainly operated from land bases. Iraq was the last export customer, receiving five loaned aircraft in 1983 while waiting the delivery of Agave radar-equipped Mirage F.1EQs. They were returned to France in 1985.

The Super Étendard was first blooded in combat by the Argentine Navy's Comando de Aviacion Naval Argentina during the Falklands War. They are based at Rio Grande airbase in Tierra del Fuego and represented the greatest threat to the British that a number of infiltration missions were planned in order to destroy them. On 2 May 1982, the first attempt to attack the British Task Force was made but was abandoned due to inflight-refuelling system problems. On 4 May 1982, two aircraft, guided by a Lockheed P-2 Neptune maritime patrol aircraft launched one Exocet each at the Type 42 guided-missile destroyer HMS Sheffield. One of the missiles hit her causing massive fires. HMS Sheffield sank on 10 May 1982 after foundering in high seas. On 25 May, another attack by a pair of Super Étendards sank the container ship SS Atlantic Conveyor. Ironically, the Atlantic Conveyor was hit by the missiles as a result of countermeasures taken by other ships in the area. The loss of the Atlantic Conveyor was more significant, especially from a logistical point of view, than HMS Sheffield, as she was carrying supplies and also six Westland Wessex and five Boeing Chinook helicopters, which were to be used in the advance from Goose Green to Port Stanley. All the helicopters were lost in the fires except for a single Chinook. 

On 22 September 1983, French Super Étendards from the carrier Foch bombed Syrian positions in Lebanon when French peacekeepers were fired upon by artillery. On 17 November 1983, the French attacked a militia camp in Baalbeck in retaliation to attacks against French paras in Beirut. The next conflict where the Super Étendards took part was Operation Allied Force over Serbia in 1999 when they flew 400 sorties with 73% success rate - the best among the air forces taking part in the operation. The Super Étendards onboard the Charles de Gaulle were also active over Afghanistan during Operation Heracles in 2001 and Operation Anaconda. Apart from carrying out attacks, they were also used to designate targets for Rafale M fighters. In March 2011, they were again deployed as part of Operation Harmattan during the Libyan conflict. Iraqi Super Étendards were used against Iranian merchant shipping in the Persian Gulf and also against tankers carrying Iranian crude oil. Iran claimed shooting down three of the Super Étendards but France claimed four of them were returned by Iraq when the loan ended in 1985.


The Kit 
The Academy kit of the Super Etendard was released in 1988. Although I thought this was another of Academy's reboxing of a Hobbycraft kit, a search on the Scalemates website showed that this kit is a reboxing of a 1983 kit from Sunny - admittedly a very obscure company, which I have never heard of. The kit came in 54 medium grey parts, spread among three sprues and four clear parts plus the usual decal sheet. despite the age of the moulding, the quality of the parts are good - just a few flash that can be easily scraped off with a sharp hobby knife. The panel lines are of the recessed type and look fine. The cockpit however is more than spartan, with no detail for the instrument and side panels, not even in the shape of decals. The kit also did not have the troughs for the 30mm cannons. The clear parts include two canopies, for those who want to have theirs in the open position. The ordnance option reflected the aircraft's most known role as Exocet carrier - an Exocet, a 1100-liter fuel tank, two 600-liter fuel tanks and a pair of Matra R.550 Magic missiles. A typical Academy decal sheet was provided, featuring markings for :

- '7', Flotille 11F, Aeronavale, carrier Clemenceau;
- '3-A-201', 2 Escuadrilla Aeronaval de Caza y Ataque, 3 Escuadra Aeronaval, Comando Aviacion Naval Argentina, Falklands War

Extra numbers were provided to build any of the five Argentinian aircraft during the Falklands War but in reality, apart from 3-A-201, only 3-A-202 can be made from the kit as only tail number 0752 was included. By the way, the boxtop illustration was somewhat misleading as it showed 3-A-202 with ship silhouettes, although none were provided on the decal sheet.

Construction
Before starting, I must say that the construction steps were fairly short - just five and it occupies one side of an A4-sized sheet. Anyway, as usual, construction started at the cockpit. The cockpit is very spartan consisting of just a plain tub, a plain instrument panel, a control stick and a simplified bang seat. At first I thought of replacing the kit seat with a Neomega resin Martin Baker Mk4. While the seat fit nicely into the tub, when I test-fit the cockpit tub to the fuselage, the seat sat too high. I ended up using the kit seat. Academy also did not indicate the colour of the cockpit - I have to browse the internet looking for pictures of the cockpit and decided to paint it flat black. Flat White dots and circles were painted on the instrument panel to represent dials as there aren't any decals provided or relief details engraved. The fuselage halves were then closed with the cockpit in-between them. The exhaust can was painted Burnt Iron before being cemented to the fuselage and this was followed by the lower half of the fuselage.

The wing halves were mated to each other and cemented onto the fuselage. This was followed by the horizontal stabilisers. The intake splitter plates and the forward part of the intake fairing were the last parts fitted before painting. By the way, Academy provided the IFR probe in the deployed position. However if one chose to pose it so, a groove should be cut in the fairing in front of the nose as the centre section of the fairing formed part of the probe assembly.


Painting and Decaling 
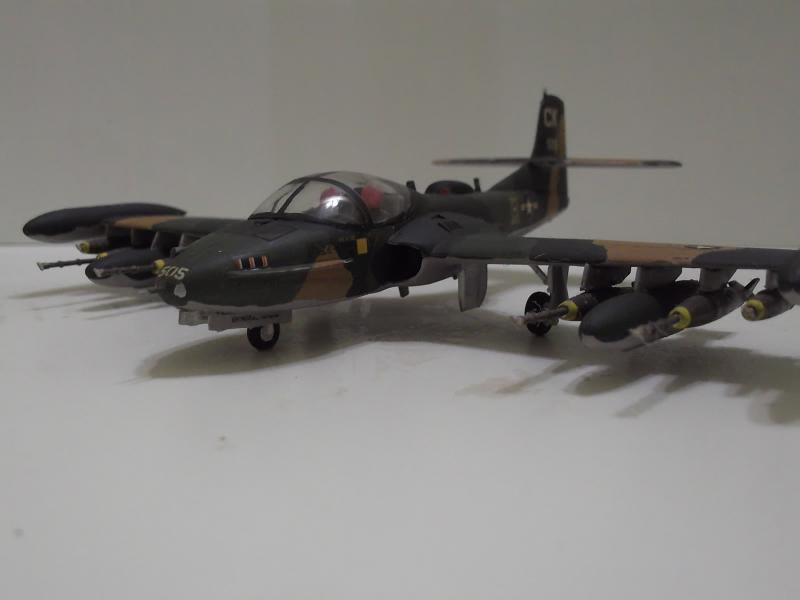
I decided to finish my Super Etendard in Argentinian colours, being probably the most famous user of the Super Etendard/Exocet combo. Anyway, there wasn't actually any difference between the French and Argentinian options as they were both painted blue-grey and white. The lower colour was painted using Tamiya XF-2 Flat White and the upper colour XF-24 Dark Grey. For the markings, I chose the markings for 3-A-201 simply because I don't have to cut numerals 1 from the decals and replace them with 2. Perhaps I should, as 3-A-201 did not take part in the attacks of 4 and 25 May (the attacks were carried out by 3-A-202 together with 3-A-203 and 3-A-204 respectively).

As expected, the decals behave as any other typical Academy decals. Mr Mark Softer, generally regarded by modellers as the most potent decal softening solution, failed to make any impression. In addition, some of the decals were off-register, especially for the 2 Escuadrilla badge. To add further insult, Academy had the colours of the badge and the Argentinian flag on the rudder wrong. For the latter, the colour is of course right, but the blue is of the wrong tone. I fixed that by painting the rudder a roughly 60:40 mixture of X-14 Sky Blue and XF-2 Flat White. The white part of the decal was cut from the rest and applied in the usual manner. For the squadron badge, I had to leave the registry problem as it was. I then used the tiniest brush I have to repaint the cartoon eagle's body with Gunze Aqueous FS34227 light green. It may or may not match the actual colour, but it was way better than the original blue!


Finishing 
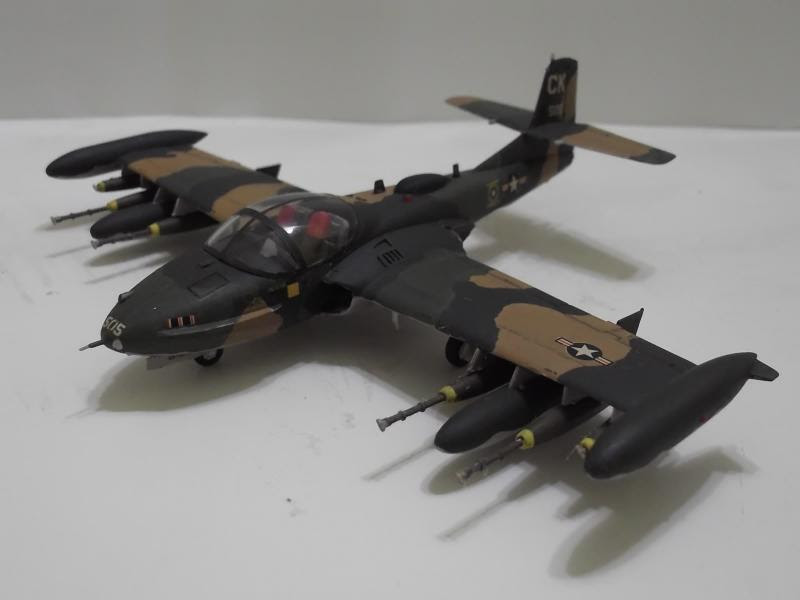
Once the painting and decaling were done, the fiddly stuff and external stores can be added. The landing gear was painted silver and so were the wheel wells and the inside of the gear doors. For the external fuel tank, I chose the larger 1,100-liter tank. For the ordnance, I used the Exocet from Heller's weapons set. The kit Exocet is actually OK but I used Heller's as it came with stencil decals. Finally the pitot tubes on the nose are cemented onto the model. I then subjected the model to a sludge wash and sprayed Semi-Gloss Clear paint to finish the build.


Conclusion 
Academy kits, especially those of Hobbycraft origins have nice details generally but many areas were overly simplified (such as the cockpit) or totally missing (the cannons). For the Super Etendard kit, you definitely need replacement PE and/or resin parts to replace the missing details. Otherwise you have to find the Heller kit or scratchbuild the details. The decals were also terrible, being off register and having the wrong colours in addition to the usual Academy decal problems. Nevertheless it is buildable and with TLC can be made into a great-looking model. Academy re-released the kit in 2012 as 'Super Etendard Libya 2011'. Apart from the decals, the plastic were the same with the original release. Worse, the weapons also remain the same and made one wonder if the Libyan government used warships on land against the NATO-supported rebels as the main offensive weapon on the sprue was that single Exocet!

Wednesday 24 September 2014

Lavochkin's Wooden Wonder


Historical Background
Lavochkin's La-7 was the last in the line of the aircraft family starting with the LaGG-1 in 1938. The LaGG-1 (and its successors) were made of laminated wood to save strategic materials and was powered by a Klimov M-105 inline engine. Although promising, the LaGG suffered from being underpowered and lacked agility and range. It was then replaced by the LaGG-3, a modified LaGG-1 design with lighter airframe and more powerful engine. But the improvements were insufficient and the LaGG-3 remain woefully underpowered. In early 1942, Lavochkin design bureau engineers, Semyon Lavochkin himself and Vladimir Gorbunov (Mikhail Gudkov has pulled out of the project) attempted to rectify the problem by installing a more powerful Shvetsov ASh-82 radial engine on the LaGG-3. The attempt was sucessful with tests pilots claiming the LaG-5 superior to Yakovlev's Yak-7. In July 1942, Stalin ordered maximum production of the La-5 (the 'G' had been dropped by this time). By 1943, the La-5 had become the mainstay of the V-VS, yet its designer and the engineers at the Tsentralniy Aerogidrodinamicheskiy Institut (TsAGI) felt that it could be improved upon. The changes included complete sealing of the engine cowling, re-arrangement of the wing centre section to accommodate the oil cooler and the relocation of the engine air intake from the top of the cowling to the bottom to improve the pilot's view. The aircraft was evaluated between December 1943 and January 1944. Using the standard La-5FN engine, the test aircraft had a top speed of 684 km/h at a height of 6,150 meters, 40 km/h faster than standard La-5FN.

Lavochkin had been monitoring the TsAGI's improvements and in January 1944, built an improved version of the LA-5, incorporating all of them. Lavochkin also incorporated lighter, but stronger metal wing spars. With Soviet strategists now confident that strategic materials supplies were no longer an issue at this stage of the war, Lavochkin was able to replace some wooden parts with alloys. Lavochkin also added some other changes such as the oil cooler was moved to the wing roots, the wing/fuselage fillets were streamlined, each engine cylinder had its own exhaust pipes, reduced number of engine cowling covers, rollbar added to the cockpit, longer short struts fitted to the landing gears while having the tailwheel was shortened, improved gunsight and a new propeller blade were also installed. Armament was three Berezin B-20 20mm cannons. The aircraft was called etalon (standard-setter) and made nine flights between February and March 1944. It however proved to be near-equal to the TsAGI's test plane. It was 180kg lighter and climb faster than the TsAGI's aircraft. Speed was only marginally slower at altitude. The tests validated Lavochkin's changes and the aircraft was ordered into production as the La-7. However the B-20 cannon was not ready for production and production La-7s retained the two ShVAK cannons of the La-5. The first five La-7s were built at Zavod No.381 in March 1944 and three were accepted by the V-VS in the same month. The quality of the early production aircraft were however less than the etalons due to issues with the engine, defective propellers and incomplete sealing of the cowling and fuselage.

After the problems had been rectified, the La-7 underwent combat trials with the 63rd Guards Fighter Aviation Corps in September 1944 and the results were mainly positive. The new aircraft surpassed its immediate predecessor in terms in speed, maneuverability and landing characteristics. Pilots however recommended that changes should be made to the armament and an urgent fixing of its engine.  In the one-month trial, the 63rd GvIAP shot down 52 Fw 190s and 3 Bf 109Gs, while losing 7 (out of 30) of their number. The 156th Fighter Aviation Corps of the 4th Air Army was the next unit to receive the La-7 in October 1944. The engine still gave trouble however and at one point, the 156th had only 14 aircraft serviceable. The engine, the 14-cylinder Shvetsov ASh-82FN, provided satisfactory service in the La-5FN. However, the lower position of the engine air intakes in the wing roots made it easier for the La-7 to ingest sand and dust. The engine problems (among other causes) remained until the end of the war when on 9 May 1945, only 169 out of 967 La-7s were serviceable. The Soviet, and indeed the top Allied ace of World War 2, Major Ivan Nikitovich Kozhedub flew the La-7 and scored the last 17 of his 62 air-to-air victories in it. His last 'kill' was a Messerschmitt Me 262 piloted by Unteroffizier Kurt Lange of 1./KG(J)54 over Frankurt on der Oder on 15 February 1945. Outside the Soviet Union, The La-7 were only used by Czechoslovakia. Before the war's end more than 2,000 airframes were delivered, but only 74 of the originally-intended 3-cannon version managed to be delivered by May 1945. Production continued until 1946 with a total production of 5753 aircraft built at Zavod No.381, Zavod No.21 (Gorky) and Zavod No.99 in Ulan-Ude. By 1947, La-7 has completely disappeared from service.

The Kit
The Academy La-7 is another of their reboxings of Hobbycraft's kits. The original was released in 1990 while Academy released theirs in 2002. In a nutshell, we have a kit released in the 21st century but with early 1990s characteristics. The kit consists of 55 parts spread among three light grey and one clear sprues and a decal sheet. From casual inspection of the parts, it looked like it's going to be a rather simple build. The cockpit looks spartan with not much details and there is no details whatsoever in the wheel wells. While the cockpit were simplified, the fabric effect was exaggerated; in fact they look unrealistic. But with extra work and some aftermarket help, it could be made into a beauty. The decal sheet provides two rather colourful marking options. The first was White 93, Lt. Col. Sergey F. Dolushin, 165 IAP, April 1945, Germany and the second was Major Ivan N. Kozhedub, 176 IAP, Spring 1945, Germany. And as usual, I was suspicious of the quality of Academy decals.

Construction
Where else but the cockpit to start? The cockpit consists of 11 parts - enough for rudimentary details. The cockpit parts were painted while still on the sprue and were touched up later. The main colour used was Gunze Aqueous H317 (FS36231). The instrument panel, control stick and 'boxes' inside the cockpit were painted XF-1 Flat Black and the instrument faces dry-brushed silver. Once the assembly was complete, the cockpit was trapped between the two fuselage halves and cemented. The exhaust shrouds were then cemented to the fuselage. Because of the way the propeller was attached, the cowling would be left off until later. Then I fit the horizontal tailplanes and the rudder. As the rudder is a separate piece, it may be cemented at an angle, although I didn't do it. So far, there wasn't any problem with parts fit. Moving on to the wings, Academy gave the option to drill holes on the lower wing for bombs. However I skipped this as the La-7 was almost exclusively used as an air combat fighter plus, the decal options feature top-scoring pilots, who were unlikely involved in attack missions late in the war. The fit was OK for the wing halves but there is a gap between the fuselage and the rear of the wing assembly. Before painting, I added the engine oil cooler fairing. Consisting of two parts, there wasn't even a plain bulkhead inside the tunnel, allowing one to see through it.

Painting and Decaling
Painting started with the lower fuselage. With my previous Soviet WW2 aircraft, I used Tamiya XF-23 Light Blue for the AMT-7 Blue colour. However I have run out of XF-23 and the next best colour match I have in my arsenal was Tamiya X-14 Sky Blue. Straight out of bottle, and even allowing for scale, it looked too garish. I added more Flat White both to tone it down and cut a bit of the gloss. For the upper colour, I painted it Tamiya XF-53 Neutral Grey The darker splinter colour would have to await my final decision regarding the markings. Then came decision-making time. Lt. Col. Dolgushin plane looked more colourful with its striped tail, while Capt. Kozhedub's plane is, well, being Capt. Kozhedub's plane. With a heavy heart, I eventually decided to finish my model as Colonel Dolgushin's White 93. With that, I painted the nose a mixture of XF-7 Flat Red and X-7 Gloss Red and the tail XF-2 Flat White.

Some info about Lt. Colonel Sergei F. Dolgushin: Dolgushin was a veteran pilot by the time he joined the 156th IAP in August 1943, having been in combat since 22 June 1941, shooting down a German aircraft while flying Polikarpov I-16 on that first day of Operation Barbarossa. Over the next two years, he flew most Soviet frontline combat aircraft including the MiG-3, LaGG-3 and Hawker Hurricane. He was awarded the Hero Of The Soviet Union medal on 5 May 1942 for seven individual and four shared victories. Promoted to Lieutenant Colonel, he was made the commander of the 156th IAP, flying Lavochkin La-5FNs. The regiment then converted to the La-7 and was held in reserve until sent back in combat in June 1944 as part of Operation Bagration. Dolgushin and the 156th IAP were in almost continuous action until VE Day. He was hit by flak over Warsaw in February 1945 but managed to bring his plane back to safety. Dolgushin flew his last combat sortie on 7 May 1945 by which time his official tally was 17 personal and 11 shared victories.

With some trepidation I started the decaling process. And as expected, they showed the typical Academy decal characteristics. The silvering problem was minimised (but not entirely eliminated) because of the glossy surface. Mr Mark Softer was not used as the decals were totally impervious against it. The stiffness of Academy's decals and its immunity against decal softeners makes it hard to conform to surface features; in this case, the tail stripe decals. The fuselage star decal was somehow stuck to where I first placed it, it only moved a bit when poked around. Any further prodding resulted in tearings so the fuselage stars were not in their actual places. Arghhhh!!! Another problem was concerned with Dolgushin's kill markings. The instructions have you place them underneath a panel line and I dilligently did so. However when I look around the internet, virtually all the drawings and build-up examples have the first row of stars above that panel line..more misery!!! When I was younger (and having more spare money), such terrible setbacks meant a sudden impact between the model and the wall but nowadays, it will be finished as it is and served as yet another cautionary tale!

Finishing
There weren't actually much to do at this stage. The landing gear and tailwheels were painted, assembled and cemented onto the model. I am not too sure myself but it seemed like Academy (or rather, Hobbycraft) had the landing gear too tall. Sure, the La-7 had a longer landing gear strut and a shorter tailwheel but it somehow looked wrong. Anyway, right or wrong, I left them as they were. The engine cowling was assembled, together with the propeller. Academy did not provide a vinyl grommet to make the prop rotate but a plastic one. It fitted snugly however that I felt that the assembly need not to be cemented. The pitot tube, canopy and aerial were then fitted. The canopy parts did not fit well however, leaving gaps here and there. The model was then subjected to a sludge wash, which was made lighter than usual because of the predominantly light colour. This was followed by a spray of Flat Clear. Afterwards, I masked the area behind the exhausts and the two bands on the cowling. The former was painted aluminium while the latter in silver. I should add that for the two nose bands, it should be painted in chrome silver as photos showed them to be very shiny. Anyway, plain silver was the only silver available to me and I have to live with that. 

Conclusion
OK the bad points first. The kit has minimal interior details, The bad fit between the wing-fuselage joint and between the canopy and the fuselage, the cardboard-like decals and that (probably) wrong decal placement instructions. On the credit side, the kit is quite easy to build. The scribed details are also good. The marking selections are also interesting, shame about the decals themselves. Although not as detailed as the Gavia/Eduard offering, the base kit is sound enough and costs a lot less than the their rivals' kit....of course in this case, you got what you pay.

p.s. While Googling for the subject, I came across a photo of a 1/72 built model of the La-7 which I believe was from KP. Apart from the wrong profile, what caught my attention was the kit's depiction of Dolgushin's kill markings. While Academy got the location wrong (probably), the model I saw had two additional rows of red stars, an excess of 16 kills against Dolgushin's actual official tally! Talk about inaccuracy!

Tuesday 16 September 2014

Winged Samurai


Historical Background
In May 1937, the Imperial Japanese Navy issued specification 12-Shi for a new carrier-based fighter to Mitsubishi and Nakajima, even though Mitsubishi's A5M had just entered service earlier in the year. Based on the experiences of the A5M in China, the Imperial Navy came up with a more detailed specification in October: the new aircraft should have a speed of 600km/h, climb to 3,000m in 3.5 minutes, endurance of two hours at normal power or six to eight hours at economical cruising speed. Armament should consist of two 7.7mm machine guns and two 20mm cannons and a full radio set including radio direction finder for long-distance navigation. Maneuverability was at least equal to the A5M, with wings less than 12m wide for use onboard carriers. The powerplant was to use existing engines, causing a significant design limitation.

Nakajima's team considered the requirements unachievable and pulled out of the competition in January 1938. Mitsubishi's chief designer, Jiro Hirokoshi however felt that they were achievable, but only if the aircraft was made as light as possible. To make the aircraft light, every possible weight-saving measures were incorporated. Most of the aircraft was made of a new aluminium alloy called Extra Super Duralumin which was lighter and stronger than other alloys at that time. No armour was provided for the cockpit, engine and other critical points of the aircraft and self-sealing fuel tanks were not used. This made the new aircraft, designated Mitsubishi A6M, lighter, more maneuverable and the longest ranged single engine fighter of World War 2. The trade in weight and construction were however offset by making the aircraft prone to catch fire and exploding when struck by enemy fire. The A6M was of low-wing cantilever monoplane design with retractable, wide-set landing gear and enclosed cockpit. The aircraft had low wing loading and coupled with light weight, made for phenomenal maneuverability, enabling it to out-turn any Allied aircraft at that time.

The A6M was given the Navy type classification Navy Type 0 Carrier Fighter, taken from the last digit of the Imperial calendar year 2600 (1940), the year it entered service. The designation gave rise to its nickname, the Zero. Unofficially, it was known as Rei-sen or Zero-sen and the Allies gave it the code name 'Zeke'. The first A6M1 prototype was completed in March 1939, powered by 780hp Mitsubishi Zuisei 13 engine. While the Navy was still testing the A6M1, they suggested that the third A6M1 be fitted with a Nakajima Sakae 12 engine of 940hp. Designated A6M2 Model 11, the extra power of the Sakae pushed the Zero beyond its original specifications. The Model 11 proved promising that the Navy had 15 of them built and sent to China for combat evaluation even though tests were not yet compeleted. They arrived in Manchuria in July 1940 and saw first combat over Chungking in August. On 13 September 1940, 13 of the Zeros met 27 Polikarpov I-15s and I-16s of the Chinese Nationalist Air Force, shooting all enemy aircraft at no loss to themselves. After the delivery of 65 Model 11s by November 1940, a further change was made by introducing folding wingtips to allow the Zeros to fit onboard aircraft carriers. Range was increased by the use of 520 liter wing tanks and 320 liter drop tanks. The A6M2 Type 21 was the most numerous version at the start of the war with 1,540 units built by Mitsubishi and Nakajima.

The Zero went further upgrading throughout the war with the A6M5 Model 52 being considered the most effective variant. The Model 52 was developed to counter the superior (in terms of engine power and armament) American F6F Hellcat and F4U Corsair. The variant has shorter wings with non-folding tips and a thicker skin to permit faster diving speeds and an improved exhaust system. It also had the improved roll rate of the clipped-wing A6M3 Model 32. The major subvariants of the Type 52 are A6M5a (or 'Ko') with belt-fed Type 99-II 20mm cannons, permitting a bigger ammunition supply (125 rounds instead of 100 rounds for drum magazine Type 99 cannon); A6M5b (or 'Otsu') with armour glass windshield, fuel tank fire extinguisher and the left 7.7mm machine gun in the fuselage cowling replaced with a 13.2mm Type 3 heavy machine gun; and A6M5c (or 'Hei') with thicker armour glass and armour plate behind the pilot's seat. The version also had a revised armament fit with three 13.2mm machine guns (forward fuselage and each wing) and two 20mm Type 99 cannons. The A6M5 had a maximum speed of 540km/h and can reach 8,000m in 9 minutes, 57 seconds.

Despite being used in China since 1940, reports of the Zero's performance filtered slowly back to the United States. Once there the reports were often dismissed by most military officials who thought that the Japanese were unable to build such high performance aircraft. By 7 December 1941, there were 420 Zeros active in the Pacific Theatre and they quickly gained a fearsome reputation. They easily disposed of the motley collection of Allied fighters in 1941, thanks to their exceptional agility and armament. Its tremendous range allowed it to operate far from their carriers or land bases, giving the impression that there are more of them than they actually were. Their superb maneuverability eventually persuaded the Allies to adopt the boom-and-zoom tactics and were used successfully over the China-Burma-India Theatre by the Flying Tigers. In the Pacific, Lieutenant Commander John S. 'Jimmy' Thach's 'Thach Weave' technique were used. Used effectively during the Battle Of Midway and over the Solomon Islands, the Japanese lost many experienced pilots, resulting in a gradual decline in the quality of Japanese aviators, which became a significant factor in the Allies' eventual victory.

The Allies eventually discovered the Zero's unique attributes when it recovered a relatively intact A6M2, tailcode DI-108 from the carrier Ryujo at Akutan Island in the Aleutians. Dubbed the Akutan Zero, the aircraft, piloted by Petty Officer 1st Class Tadayoshi Koga, was damaged during the raid on Dutch Harbour. The nearby Akutan Island was designated for emergency landings, with a submarine assigned to pick up downed aviators. Mistaking a boggy ground for a solid one, he landed with landing gear extended, causing the aircraft to flip over, killing him in the process. His wingmen, unable to know whether Koga was still alive, did not strafe the almost-intact aircraft. A month later a PBY Catalina discovered the crash site. A team was dispatched there, recovered the aircraft and shipped it to Naval Air Station North Island, California. There, the repaired Zero revealed both its strengths and weaknesses in design and performance. The A6M was obsolete by 1944, but due to the lack of suitable replacements, it soldiered on until the end of the war. During the final years, many Zeros were used in kamikaze attacks, with the first organised attack taking place on 25 October 1944, sinking the escort carrier USS St. Lo.

The Kit
The Zero family, like the Bf 109 was virtually 'owned' by Hasegawa. For the Zero, Hasegawa has came up with all the variants, from A6M2 Model 11 to to A6M8 Model 64 with various reboxings in-between. This particular kit, catalogue number JT72 is another from the mid/late 1990s. The parts are spread among seven light grey and two clear sprues. As expected, the parts were finely moulded with nicely engraved panel lines. The interior has good detail and I believe there is no need for aftermarket products except for the seatbelts. The engine parts are also very good and should only need some scratchbuilt ignition harness for extra detail. The flaps can be posed open and for that, the inside detail were moulded and not left plain. The decals provide markings for two aircraft: 203rd Naval Air Group, 303rd Fighter Squadron, flown by Takeo Tanimizu, Kagoshima AB June 1945 and 302nd Naval Air Group Atsugi AB August 1945.

Construction
I first pre-painted the cockpit parts on their sprue before assembly. Hasegawa instructed that they be painted Nakajima Interior Green while some online builds pointed out that Type 52 Heis were built exclusively by Mitsubishi, hence the cockpit colour should be Mitsubishi Interior Green. It was moot point however as I painted the interior parts Tamiya XF-71 IJN Interior Green, which I'm not sure whether they represent Nakajima or Mitsubishi Interior Green. There isn't much colour used for the interior, with Wood Brown (I used Tamiya XF-64 Red Brown), Flat Black and Steel being the other colours. The details are adequate for an OOB build but typically one need to add aftermarket/scratchbuilt seat belts to complete the picture, so to speak, as none were supplied (I didn't). Decals were then applied for the instrument panel and were treated with Mr Mark Softer so that they lay snugly over the raised details. After the parts were cut from their sprues, I retouched the paint and assembled the cockpit. The cockpit assembly was then trapped between the fuselage halves and the latter were glued using Tamiya Extra Thin Cement. But before that holes were drilled in the right fuselage half and on the pilot's headrest. the upper fuselage cowl was fixed to the main fuselage, finishing the basic fuselage.

Skipping the engine assembly, I jumped straight to the wings. The single lower half and the separate upper halves were glued together with no fuss but there was a slight gap when the wing assembly was mated to the fuselage. The flaps were not cemented at this stage as they were moulded in the open position and may interfere with the painting process. The aileron mass balances were cemented at this time as I judged that they were OK at their positions. Returning to the fuselage, I cut of the tailhook bump on the rear fuselage underside, as the Hei version was meant to be operated from land bases. The recess for the tailhook was then plugged with the kit-supplied part. Before painting the model, I assembled the engine cowling.  The engine parts were painted Mr. Color 28 Steel and drybrushed Mr. Color 8 Silver. The interior of the cowling was painted XF-71 IJN Interior Green. The parts were then cemented together but left separate from the fuselage prior to painting.

Painting and Decaling
While using the internet to help me build the model, I came across a fact which did not cross my mind before. Tom Cleaver, a noted aircraft modeler mentioned that apart from the shade / tonal difference of Nakajima and Mitsubishi (exterior) Green, another difference between Mitsubishi- and Nakajima-built aircraft was that that on the former, the fuselage colour demarcation line from the wing trailing edge to the leading edge of the horizontal stabiliser  rises in a curve while the latter have the demarcation line beneath the horizontal stabiliser. Anyway, being an A6M5c kit,  both finishing options are of the Mitsubishi style. To start off, I painted the wheel wells and the interior of the flaps Aotake, using a base of flat aluminium with a thin layer of clear blue and clear green. Then I painted XF-71 over the parts that will be underneath the canopy and also the inside frames of the canopy.The lower grey was painted Tamiya XF-12 JN Grey while the XF-11 JN Green was used for the green upper colour. The engine cowling was painted XF-69 NATO Black.

For markings, I chose the markings for Warrant Officer Takeo Tanimizu's aircraft. He graduated as a pilot in March 1942, being among the last of Japanese fighter pilots who received prewar-quality training. He was assigned to the carrier Shokaku but faced his first combat on 2 November 1943 from Rabaul when Shokaku's air group was transferred to that base to face increasing Allied attacks. In February 1944 he was transferred to the 251st Kokutai in Formosa (Taiwan) until he was wounded in combat over Amoy on 3 November 1944. After recovering from his wounds, he served with the 203rd Kokutai where he chose to fly the A6M5c due to its heavier armament. It was at this time he painted 'kill' markings on his plane to inspire the more inexperienced men in his squadron. The head-on silhouttes of a four-engined aircraft represent two B-29 Superfortresses while the six stars denote his other kills. Arrows indicate confirmed kills (the two arrows on one B-29 silhouette indicate a shared kill with Tetsuzo Iwamoto, another ace) while unpierced markings indicate probables or damaged aircraft. He survived the war and was officially credited with 18 kills. The Hasegawa decals were relatively thick but they settled well with the aid of Mr Mark Softer. The problem with the whites of Hasegawa decals was not really an issue here as the affected decals were just the fairly small kill markings. The panel lines were then enhanced with watercolour sludge wash.

Finishing
I started from the front of the model. The exhaust stacks were painted Mr Color 61 Burnt Iron and cemented onto their places. This was followed by the completed engine cowling. The landing gear and the tailwheel were next, allowing the model to sit on its legs. The rest of the parts were then permanently cemented to the model. The external fuel tank fitted nicely to its pylon and in turn the pylon fit well onto the fuselage but the protusions on the top of the tank (which I assume were the plumbings for the tank) did not even touch the fuselage. The canopy and the radio aerial was the fixed with the propeller assembly being the last. A final spray of Flat Clear finishes the build.  

Conclusion
There you have it - another easy, relaxing build from Hasegawa. While I would prefer a more 'common' Zero variant (A6M2, A6M3 or A6M5a or b), the 'limited edition' (less than 100 built) A6M5c had its own attraction, such as the extra 13mm machine guns, making it look slightly different from the rest of the family. That, coupled with the rare personal 'kill' markings was enough to persuade me to buy and build this little gem of a kit.

Saturday 13 September 2014

Jet-Propelled Dragonfly


Historical Background
In Spring 1952, the USAF issued a Request For Proposal for the Trainer, Experimental (T-X) program, specifying a lightweight, two-seat basic trainer to introduce USAF cadets to jet aircraft. Cessna Aircraft Company responded by designing a twin-turbojet design with side-by-side seating with company designation Model 318. The USAF liked the design, especially the side-by-side seating since it let the student and instructor interact more closely than tandem seating. In the Spring of 1954, Cessna was awarded a contract for three prototypes with USAF designation XT-37. Production T-37A was first flown late in 1955 and delivery began in June 1956 with the improved T-37B delivered in 1959. The T-37 had a low, straight wing with the engines buried in the wing roots. The canopy is of the clamshell type, hinged to open vertically to the rear. The landing gear is widely spaced, allowing easy maneuvering on the ground. The gears were also short, avoiding the need for access ladders and maintenance stands. Since the gears are short, the engines sit closer to the ground, and to prevent FOD, mesh screens pivoted over the intakes whenever the landing gears are down. The aircraft was also designed to be easily maintained, with more than 100 access panels and doors. Power ws provided by two French Turbomeca Marboré engines, licence-built by Continental-Teledyne as the J69-T-9. The intake for the engines produced a high-pitched shriek, which gave the T-37 its nickname:  'Tweety Bird' or simply 'Tweet'.


In 1961, Cessna began developing the T-37 as a weapons trainer. With eyes to foreign sales, the new variant, T-37C, can also be used for light attack duties.The primary changes include stronger wings, provision of hardpoints and stores pylons on the wings and wingtip tanks. Also included are computing gunsight and gun camera. In late 1962, with the United States' growing commitment in South-East Asia, the USAF's Special Air Warfare Centre based at Eglin AFB's Hurlburt Field in Florida began evaluating the T-37C as a Counter-Insurgency (COIN) aircraft. The USAF found the T-37C promising but required an improved version which have a longer endurance, carrying a greater payload and better short-field performance. In 1963, Cessna was awarded a contract for two prototype YAT-37D. The new variant of the T-37 include stronger wings, three stores pylons underneath each wing, 360-litre capacity wingtip tanks, GAU-2B/A 7.62mm Gatling-type machine gun in the nose, better avionics and tougher landing gear. The changes meant drastic weight increase coupled with the need to carry stores. The engines were thus replaced with a pair of more powerful General Electric J85-J2/5 turbojets. The first YAT-37D flew in October 1964 with the second prototype flying a year later. The second prototype was fitted with a fourth pylon under each wing and the first prototype was also retrofitted. However the USAF interest in the COIN aircraft soon faded and the second prototype was sent to the USAF's Museum at Wright-Patterson AFB in Ohio. 

The war in South-East Asia however continued to escalate and losses of the USAF and VNAF A-1 Skyraider CAS aircraft were greater than projected and the USAF interest in the COIN aircraft was revived. The YAT-37D seemed suitable but the USAF wanted it to be tested in combat first. The USAF issued a contract for 39 YAT-37D to be built from existing T-37 airframes. Originally designated AT-37, it was quickly changed to A-37A. In August 1967, 25 A-37As were sent to Vietnam under the 'Combat Dragon' evaluation programme. They flew from Bien Hoa airbase on air commando missions, including close air support, helicopter escort, forward air control (FAC) and night interdiction. Combat loads include free-fall bombs, cluster bombs, unguided rockets and SUU-11/A minigun pods. The A-37A was officially nicknamed 'Dragonfly' but many pilots called them Super Tweets. They flew thousands of sorties, losing none to enemy fire although two were wrecked in landing accidents. 

The Combat Dragon programme revealed some shortcomings with the A-37A, notably the lack of range and endurance, heavy control response and vulnerability of the non-redundant flight control systems. As a result, the USAF signed a contract in 1967 for an improved version, the A-37B. The initial order for 57 airframes were increased to 127 and were primarily intended for the VNAF. The A-37B prototype was rolled out in September 1967 and deliveries to the VNAF began in 1968. Unlike the 'A' version, the A-37B were all new-build airframes. These were stronger than the A-37A, being able to pull 6 instead of 5 g, and have a longer airframe life at 4,000 hours. The A-37B weighed twice as much as the A-37A, with 5,800 lb of the loaded weight being the external stores. The A-37B was powered by two General Electric J85-GE-17 turbojets and to improve endurance, pilots usually flew with with just one engine in the cruising mode. The B model was also fitted with a refueling probe for the probe-and-drogue method, unusual for the USAF as they preferred the flying boom method. 

Eventually, a total of 577 A-37Bs were built, with 254 delivered to the VNAF. During the Vietnam War, they flew 160,000 combat sorties, suffering 22 USAF losses. At the end of the War in 1975, 187 were still in service with VNAF. The A-37s were also used by the VPAF in their only airstrike against South Vietnam and their US allies when on 28 April 1975, three A-37s flown by VPAF and turncoat VNAF pilots, bombed the Tan Son Nhut airbase with six Mk 81 250-lb bombs. Of the 187 aircraft, ninety-two were recovered by the United States while the rest were used by the VPAF over Cambodia and against China in 1979. They were phased out in the 1980s due to lack of spares. The A-37 was also used by the Salvadoran Air Force during the Salvadoran Civil War. Other users of the A-37 were concentrated in the Americas, with the air forces of Colombia, Ecuador, Guatemala, Honduras, Peru and Uruguay. It was well-suited to their needs because of its low cost, simplicity and effectiveness in COIN missions. The USAF passed its A-37s to Air National Guard and Reserve units following the end of the Vietnam War. In the 1980s, they were assigned FAC duties and designated OA-37B. They were then phased out and replaced with the OA-10A Thunderbolt II. USAF OA-37Bs last saw action during Operation Just Cause in 1989.

The Kit
This kit is another of Hasegawa's reboxings (I believe sometime in the 1990s) of the original kit released in 1970. To put it into perspective, I was not born until two years after the kit was first produced! Unlike Academy's A-37, this kit still has raised panel lines. The interior is very simple; the seats for example consists of just the seat backs. There is no sidewall detail and the dashboard is just plain plastic with just decals for detail. There wasn't even a piece of plastic rod pretending to be the control stick. There are two pilot figures, and if used, they would be cemented directly to the cockpit floor! (The floor has raised 'platform' so when the seat backs are cemented, it completes an illusion of proper seats) The wheel wells and landing gear were simplified as well, but reasonable enough for a 1970s-vintage kit (plus they are low enough and can hardly be seen unless you pick the model up). There is also grid patterns underneath the intakes to represent the FOD screen (those, and for many parts of the kit were best replaced with PE and/or resin). The clear parts is not as clear as many modern offerings but still OK. Holes were already pre-drilled for the underwing load which consist of four fuel tanks and four rocket pods. All the underwing stores were moulded together with their pylons. Despite the age of the moulds, there are no flash on my example. There are a lot of ejector pin marks however but they can be easily dealt with. Markings were provided for two aircraft: a OA-37B in overall Gunship Grey from 19th TASS/51st TFW, probably from the 1980s and a 505th SOS/3rd TFW A-37A in SEA camo during the Vietnam War. The decals are of the usual Hasegawa vintage - off-white white and rather thick. As a footnote, the same kit which I bought in 1984 also have two marking options - a A-37A and a A-37B, both during the Vietnam War.

Construction
Maybe I have lost my sanity when I chose the prehistoric Hasegawa Dragonfly over the more 'modern' Academy offering. But since it was the only one available at the local hobby shop, plus the moulding still looks good and I had a nostalgia attack while browsing the contents, I took it home (another reason was that it was on 50% discount!). As usual, the cockpit received the first attention but I guess this was one of the fastest, if not THE fastest job I had ever done on a 1/72 scale fuselage. After painting the interior H317 (FS 36231), H61 Khaki and XF-1 Flat Black, I cemented the two seat backs (rather than 'seats'). I then put the instrument panel decal on the dashboard. The two parts were then cemented to the right fuselage half. A ball bearing was superglued in the nose and the fuselage halves were mated. Yep, it's that simple (and of course bad at the same time!). The one-piece lower wing half and the upper wing halves were mated and together with the horizontal stabilizers, were mated to the fuselage. As I have chosen the A-37A, the refueling probe was not fitted. I assembled and cemented the wingtip fuel tanks. Apparently the tanks are undersized but having no substitute, I left it as it is. I decided to rearm my Dragonfly and I cut the rocket pods off their pylons with the latter and many other parts were left off until after painting. 

Painting and Decaling
Having already selected the A-37A from the Vietnam war, I proceeded to paint my model in SEA camouflage. The bottom colour (FS36622) was painted using Tamiya XF-19 Sky Grey. The upper camouflage colours were FS30219, for which I used a mixture of Tamiya XF-59 Desert Yellow and XF-64 Red Brown; FS34102 was Tamiya XF-67 NATO Green and XF-13 JA Green was used for FS34079 while the domed aerial covers were painted XF-1 Flat Black. Then it was time for decals. Having used a number of 1990s-era Hasegawa kit decals, I am pretty confident that this kit's decals would behave the same, and indeed they were, although the decals for the national insignia were  off-register. They slide off the backing paper easily, but being a 90s' creature, they are thick and require a number of baths of Mr Mark Softer.  Since the kit has raised panel lines, I used a pencil to highlight the panel lines.

Finishing
So it's time to finish the build. I started by cementing the tiny and featureless GAU-2B/A minigun 'pimple' on the nose. While cementing the heat shield near the exhaust outlets, I realized that the model has no actual exhausts, just openings in the wing roots (What? You only realize that at this stage?!). I fashioned a rudimentary exhausts using plastic sheet and painted them Burnt Iron. The landing gears were next. Like many 1970s kits, details were also skipped here. While in general they are quite OK, the oleo scissors were moulded as a triangle, rather than its actual shape. The gear doors were also simple without structural shapes on the inside. For the underwing load, I decided that the kit external fuel tanks would be used for stations 3 and 6. For stations 2,4,5 and 7, I dug my Hasegawa Weapons Set I and fixed Mk.82 500-lb bombs with fuse extenders - probably unlikely in CAS missions the caircraft might not be able to clear the target area in time, unless the mission is flown at a safer altitude. Finally for stations 1 and 8, I placed Mk.81 250-lb bombs, also from the Hasegawa set. All the bombs were painted Tamiya XF-62 Olive Drab with XF-3 Flat Yellow stripes. The chunky gunsight was cemented onto its place and the canopy was placed on the model, finishing the build.

Conclusion
Make no mistake, despite the various reboxings, the kit inside is still the same one from the 1970s. The cockpit has no detail, while some details were simplified or missing on the outside. In fact, very few modelers built the Hasegawa kit (at least in the well-known internet modeling sites). It goes without saying that most modelers prefer the Academy kit with more details, weapons choice and recessed panel lines and avoided the Hasegawa offering like a plague. I was however motivated by nostalgia and merely wanted a A-37 in my collection.


Wednesday 10 September 2014

The Monster Beneath The Modelling Table

Modellers don’t enjoy trouble-free construction every time. One of the most common problems is lost parts. You cut a part off its sprue and it somehow slipped through your fingers or instrument and dropped on the floor. You swear you saw where that part landed but nevertheless you can’t find it. Baffled? Doug Chaltry from On The Way website offers an explanation!

THE BEAST BENEATH THE MODELING TABLE

There has been much speculation lately about the "creature" who lives beneath the model table eating dropped model parts. Being a professional wildlife biologist, I took it upon myself to study this elusive animal in order to better understand it and its habits. After several months of intensive life history research, I will now share with everybody what I learned about this fascinating and most maligned beastie.

First of all, its name: it is known among scientific circles as Styrenus consumptiverus, which literally translates to "eater of plastic." It is commonly known by several local names, including "that %*&$!@ thing," and "#!%&*@!" In Asia it is called "#*&@$=!" and in Europe: "%$#*!&" In this study, I will simply refer to it as Styrenus.

Physically unimposing, some people would consider Styrenus to be downright tiny. They average approximately 5 cm long (almost half of which is mouth), and weigh between 30 and 35 grams (females are slightly smaller). They are hairless, with short, stubby tails, small ears, and large snouts. Their active lifestyle and the high-petroleum content of their food supply (qv) keep their metabolisms high enough to maintain homeothermy even in the coldest climates.
Contrary to common assumption, Styrenus is not a solitary animal, and it is likely that if you have one beneath your table, you have several. They have short lifespans (on the order of one to two years) and are prolific breeders. Those unusual bumps that you hear in the middle of the night are probably the romantic encounters between a couple of them.

Styrenus has a very small home range, with usually two or three territories per modeling room. Competition between them, males in particular, can be fierce. The males compete not only for food, but also for the female, who is impressed with the male that can swallow the largest piece of plastic (an entire aircraft canopy is usually guaranteed breeding rights). You can probably find a den buried in the debris behind your airbrush compressor, or in the closet behind your stack of unbuilt kits.

Gestation is about one week, after which the female gives birth to two to four young. After reaching full size in 18 to 20 days, the young disperse. Preferred dispersal routes include hiding within old, collecters kits with the hope of being traded to someone at the local model club. Regional model shows in particular, are necessary for the required genetic mixing to maintain a viable species. Without national model conventions, the range of this creature would probably be much more restricted. Nobody knows from where exactly Styrenus is native, but the best guess is the little known Styrolomon Islands in the South Pacific. How they spread from there is open to conjecture.

Styrenus in neither a carnivore, nor an herbivore, but rather a styrenivore, due to their most common food source. Fecal analysis has revealed that styrene plastic is the most abundant food in their diet. Chi-square analyses have shown, however, that their preferred food is actually brass. Brass is higher in nutrient value, which is why any dropped photoetch brass piece is almost immediately consumed. They tend to avoid cast resin, and cast metal, unless the pieces are small, in which case they are sometimes eaten by mistake. They usually hide behind boxes, spray cans, and other visual barriers, only to dart out to snatch up fallen pieces, sometimes before they even hit the floor. Nightime allows them to prowl at their leisure, picking up missed pieces. If you can't find a dropped piece within a couple of hours of losing it, then you should probably forget about ever seeing it again. Some pieces are not eaten immediately, but rather carried off for use in the little-understood mating ritual. This explains why you can find pieces you lost weeks ago, sometimes even in a different room.

Management recommendations are few. I have heard a great suggestion of feeding them some pieces from a cheap model on a regular basis. Keep in mind though, that the higher nutrient value in expensive plastics and brass will always lure Styrenus away from the cheap feeding stations. Try not to be over-zealous in the cleaning of your modeling area. It is beneficial to keep debris piled in all corners of the room, and especially along the base of the walls, so as to provide hidden movement pathways of which Styrenus can take advantage. Leaving open model boxes stacked in large piles throughout the room maximizes intrinsic habitat value, and allows for more than one breeding pair per houshold. Water is unnecessary, and in fact, open water containers can prove a danger to Styrenus, who is not capable of sustained swimming.

In conclusion, I hope that the results of my study have helped to enlighten everyone about this remarkable, and in my opinion, quite charming, little member of the animal kingdom. Though not an endangered species, it is still a wonderfully adaptive and intriguing animal, and deserves our respect and care, and yes, even a little affection as well.

Saturday 6 September 2014

Flying Artillery of the Blitzkrieg


Historical Background
The design of the Ju 87 had its origins in the 1933 Sturzbomber-Programm. The Ju 87's principal designer, Hermann Pohlmann held the opinion that any dive bomber design should be simple and robust. This led to one of the Ju 87's most distinctive features - its fixed and spatted landing gear. When the Nazis came into power, they took interest in the design, specifically by Ernst Udet, the former World War 1 ace who liked the concept of the dive bomber after testing a Curtiss Hawk II biplane. Junkers built a prototype fighter/ dive bomber named Junkers Ju K47 through its subsidiary, AB Flygindustri SV in Sweden. Apart from fixed undercarriage, the K47 also featured inverted gull wings and double vertical stabilisers to give the rear gunner a better field of fire. From the K 47, Junkers build the prototypes of the Ju 87, using British Rolls-Royce Kestrel engine. The prototype was built by AB Flygindustri SV and was secretly transported to Germany in late 1934. It was to be completed in April 1935 but due to the inadequate strength of the airframe, construction was not completed until October 1935. However, the mostly complete Ju 87 V1 made its first flight on 17 September 1935. The RLM was still not interested with the aircraft however, and was unimpressed with the choice of a British engine. In late 1935, Junkers suggested fitting a Daimler Benz DB600 engine, with the final variant powered by a Jumo 210. This however, was only accepted as a temporary solution by the RLM. The reworking of the design began on 1 January 1936 but test flights could not be carried out for two months, due to inadequate airframes.

The situation was worsened when the V1 prototype  crashed on 24 January 1936, killing Junkers' chief test pilot, Willy Neuenhofen and his chief engineer, Heinrich Kreft. The twin tails proved to too weak; they collapsed during the testing of terminal dynamic pressure in a dive. The crash prompted a change to a single vertical tail design. A heavy plating, along with brackets riveted to the frame and longeron, was fitted to the fuselage. The V2 prototype was fitted with a BMW 'Hornet' engine due to shortage of DB600 and the single tail fitted in place of the twins. The changes resulted in delays, setting back testing until 25 February 1936. In March the Jumo 210 was finally fitted. Although the tests went well, Oberstleutnant Wolfram von Richtofen of Technisches Amt told Junkers representative that the Ju 87 have little chance of being the Luftwaffe's main dive-bomber, as he felt that the aircraft was underpowered. On 9 June 1936, the RLM ordered the cessation of development, in favour of the rival Heinkel He 118. Yet, on the next day, Ernst Udet countermanded the order, and development continues. On 27 July 1936, Udet crashed the He 118 prototype and soon after announced the Ju 87 as the winner of the dive-bomber development contest.

The Ju 87 was an all metal, cantilevered monoplane with fixed, spatted landing gear. In the early models, fixed armament was two wing-mounted 7.92mm MG17 machine guns and a single MG15 7.92mm machine gun for the radio operator. The Ju 87 was also fitted with an automatic dive recovery system that engaged when the bombs were released. Production of the Ju 87 commenced in 1937 with the Ju 87A series. While capable of carrying a 1,100lb bomb, it was at the expense of the radio operator/rear gunner as the Jumo 210 engine was still underpowered, even in its later D version, reducing operational bombload to just 500lb. The A version was replaced by the more powerful B series, the first variant to enter mass production. The B series has a completely redesigned fuselage and landing gear and was powered by a Jumo 211D engine producing 1,184 hp. The B series was also fitted with propeller-driven sirens, mounted either on the leading edge of the wing or on the front edge of the landing gear fairing. Known as Jericho trumpets, the siren was used to weaken enemy morale and to enhance the terror effect of dive-bombing. The device however caused a loss of 20-25 mph of speed through drag. Furthermore, as the war goes on, the enemy were used to it and were no longer intimidated by it. Although officially unnamed, the Ju 87 gained the name 'Stuka' from the German word for dive-bomber : Sturzkampffleugzeug.

The Ju 87 was first blooded in the Spanish Civil War as part of the Germans' Legion Condor. A single Ju 87A-0 was sent to Spain in August 1938. This was followed by three Ju 87A-1s in January 1938. These aircraft supported the Nationalist forces until they returned to Germany in October 1938. The A-1s were replaced by five B-1s, which were used to support bombings by Heinkel He 111 medium bombers. The experience in Spain helped the crews in perfecting their skills while testing the aircraft under combat conditions. However, the Republicans and their allies did not provide a large and well-coordinated aerial opposition, thereby not exposing the Ju 87s weaknesses until later. During the early phase of World War 2, the Ju 87, acting as the flying artillery of the blitzkrieg concept, reigned supreme against Poland and Norway.  During Operation Weserubung, the Stukas  had success against Allied shipping, including the sinking of HMS Bittern, HMS Afridi and the French Bison. The lessons learned during these early campaigns ensured an even more attention to pin-point attacks, to be applied in the next campaign against France and the Low Countries. Co-ordination between forward liaison officers and attacking aircraft were also excellent, allowing attacks to come within 20 minutes from the call. During the Dunkirk evacuation, more Allied ships were sunk by them. However, at this time, the Stukas' weakness began to unravel. For example, on 12 May 1940, six Hawk 75s from GC 1/5 attacked a squadron of Stukas flying without fighter escort. Only one managed to escape whilst the attackers suffered no losses.

The Battle of Britain finally proved the vulnerability of the Stukas in a hostile sky against well-organised and determined fighter opposition. Although originally still proving very potent against shipping, including the battering of HMS Illustrious (later in 1941 during the campaign in the Mediterranean), it could not be effectively protected by fighters because of its low speed. The Stuka depended upon air superiority, which the Luftwaffe were unable to attain. It was withdrawn from battle in August, depriving the Luftwaffe of precision-attack platform. Despite the exposed vulnerability, the Stuka continued to be used in the Mediterranean and North Africa, where once again they showed their prowess as ship-killers. Following the Battle of El Alamein and Operation Torch, with increased Allied air power, the Stukas once again suffered. On the Eastern Front, with complete air superiority from Operation Barbarossa until the Battle of Stalingrad, the Stukas again wreaked havoc on the Soviets, but the Battle Of Stalingrad proved to be the high point of the Stukas' fortunes. During the Battle of Kursk, the Stukas took a high toll against the Red Army, especially the 37mm cannon-equipped Ju 87G tank-busters but the stronger Soviet aerial opposition caused higher losses among the Stuka arm. From then onwards, the Ju 87 was replaced by ground-attack Focke-Wulf Fw 190F and G in the ground support role with the Stukageschwaders being redesignated Schlachtgeschwaders to reflect their general close air support rather than dive-bombing role.

The Kit
This kit is another uh, relic, from the 1990s, specifically 1994. Anyway, being a Hasegawa kit from the 1990s onwards, it feature crisp and petite panel lines and good raised details, especially in the crew's office. There were 100 parts, spread among nine dark gray and one clear sprues. The nose assembly was separate from the fuselage, so that Hasegawa would only mould the new nose for the follow-on D and G versions (the wing is another matter). There is also no sprue 'G', as this, as it later turned out, is for Ju 87R's external fuel tanks). And unlike most other kits (including Hasegawa themselves) the kit provide paper masking templates for painting. The decals provide markings for three aircraft:

1. 4./StG 77 Russia, Summer 1941 (RLM 70/71/65) (Note: I believe the markings were actually dated prior to Operation Barbarossa, as there was no yellow theatre band)
2. 2./StG 2 (Eastern Front, judging by the RLM 04 nose and fuselage band) (RLM 70/71/65)
3. 3./StG 5 Leningrad, 1942 (white distemper camouflage)

Construction
The cockpit gets the first attention, as usual. The detail for it is adequate for OOB builders like me, although there are no seat belts, even as a decal. On the real aircraft, the gunner/radio operator's seat is made of metal frames which Hasegawa managed to capture its shape well (for injection-moulded plastic that is). The parts are painted while still on their sprues; Tamiya XF-22 RLM Grey for the basic cockpit colour and XF-64 Red Brown and XF-1 Flat Black for detail paintings. The parts were then cut off the sprue and cemented together. The sprue gate scars were then touched up. The sidewalls were cemented to their respective fuselage halves and the latter were then cemented together with the cockpit trapped in-between. Fit is good although I still need to clamp the fuselage halves together as the cement dries. The instrument panel installation is slightly different; the parts are cemented onto a small section of the upper nose fairing. The assembly was then cemented onto the main fuselage. The engine cowling was separate and consists of three main parts. There was no problem here although I was bit concerned about the bomb crutches which is to be installed at this stage. Another thing is that the propellers are also installed at the same stage. I tried dry-fitting the engine cowling and found a perfect fit with the fuselage so decided just to temporarily tack the engine to the fuselage, broke it off after painting and install the propellers later on. The bomb crutches were cemented as I judged that it won't get much in a way like an aerial or pitot probe would.

Before assembling the wings, holes were drilled into the one-piece lower wing for the dive brakes and the wing bomb pylons. The upper wing halves fitted snugly to the bottom and left to dry. The wing assembly felt solid in my hands and I then proceeded to glue it to the fuselage. But before that I cemented the bomb release observation window. The wing gun fairings were then fitted, although not the gun barrels themselves. The landing light in the port wing is just a hollow cut-out in the wing and should at least be blanked off with plastic card. As usual I forgot to do that, and only remembered after the cement on the clear fairing had dried.....It should also be noted that Hasegawa molded the flap actuator linkages as a solid triangle. To enhance the look, they should be cut and replaced with plastic rods or something similar - I left them as they were. The tailplanes were then cemented although the support struts were left off to ease painting. I did dry-fit them and discovered that the pre-drilled holes in the fuselage were too low. The holes were filled and instead of drilling new holes, I just cut the locating tabs off and fit the struts using Mk1 Eyeball later on.

The spatted undercarriage presented a problem as it would be very hard to paint the tyres inside them. To counter that, I shaved just a bit of the locating pins on the wheels so that I can pop them through after painting. The inside of the wheel spats were painted RLM 65 and the wheel spat halves were cemented together. The wheels spats were fitted with the Jericho trumpet housing, although no propellers were included, just fairings for them. Hasegawa indicated that the siren housing was only applicable to the second marking option (which I had chosen beforehand) and should be removed for the rest of the marking options. The wheel spats were however left off to facilitate painting, although their wing fairings were cemented to the lower wings. The wing bomb pylons were the last parts I glued before moving to the painting stage.

Painting and Decaling
Selection of the painting scheme was easy. I ruled out Scheme 3 as I have run out of rattle-can white paints and I don't trust my ability to brush-paint whites for the entire model. That left the other two and I chose #2 as it added some more colour to the model. I first painted the lower half of the aircraft RLM 65 Hellblau using Gunze Sangyo Aqueous H67. For the upper fuselage colours, I first painted RLM 71 Dunkelgrun overall using Gunze Sangyo Aqueous H64. As mentioned before, Hasegawa provided paper masks for this kit. I however only used them to mark the demarcation lines and instead used Tamiya tapes for the actual masking. For RLM 70 Schwarzgrun, I used Tamiya XF-27 Black Green. The canopies were also painted at this time but separately. Once the camouflage paints were cured, I marked the demarcation line, also using Tamiya tapes and painted Tamiya XF-3 Flat Yellow on the nose.

Then it was time for the decals. The Gunze Sangyo paints dried with semi-gloss sheen so that no extra layer of gloss clear was needed. The Tamiya paint however dried flat, so the areas covered by it were varnished with a bit of Tamiya X-22 Clear. So that I won't forget if done later, the interior frame decals were placed first at the canopy. The decals are of typical Hasegawa vintage from the 1990s - rather thick and having off-white white. While OK for flat areas and needing just a swab of Mr Mark Softer, the same cannot be said for the theatre band and unit markings, as they were situated at curvy areas and were subjected to repeated Mr Mark Softer bath.

Finishing
The still loose parts can now be permanently fixed onto the model. I started with the landing gear spats, so that the model can stand on its own while I glued the rest of the parts. This was followed by the tail wheel and the tailplane stabiliser struts. The nose was taken off in order to install the propeller. Hasegawa engineered the propeller to be moveable but I found that the assembly was quite wobbly and I had to permanently glue it. The Stuka's usual payload of a single SC500 500kg and four SC50 50kg bombs were assembled, painted Flat Black and fixed to the bomb crutch and underwing pylons. Other small, fragile fittings such as the wing machine gun barrels/muzzles and pitot tube can finally be added, followed by the cockpit transparencies and not forgetting the radio aerial and the rear MG 15 machine gun. The model was then subjected to a medium grey sludge wash for the undersides and the usual black-brown wash for the upper fuselage.

Conclusion
First, I must say that for anyone building up a collection of World War 2 aircraft, the Stuka is a must in their collection. and for those building 1/48 scale warbirds, the Hasegawa offering is the kit to go, not least because it includes the evil swastika decals, something usually missing from most European brands. While there is no perfect kit, the Hasegawa Stuka is close enough with that solid flap actuators and the blank landing light recess being its major shortcomings. The parts fit well however and I really enjoyed the build.