Thursday 11 September 2008

Thud!


Historical Background
The F-105 Thunderchief was designed as a successor to the F-100 Super Sabre. It however started life as a private venture by Republic to replace the F-84F Thunderstreak. Known as design AP-63FBX, the new aircraft was designed to be a supersonic, low-level nuclear bomber carrying its warload internally. As such, it possessed limited maneuverability but excellent low-altitude speed.  An enthusiastic USAF  awarded Republic a contract for 199 aircraft in September 1952. However by March 1953, the order was reduced to 37 fighter-bomber and 9 tactical reconnaissance variants, citing the approaching end of the Korean War. Near the end of that year, the contract was cancelled due to delays and uncertainties with the aircraft (including weight and size growth, change of engine and delays in the development of the Pratt & Whitney J75 turbojet). However on 28 June 1954, under Weapon System desgnation WS-306A, the USAF ordered two YF-105A, four YF-105B, six F-105B and three RF-105B. The first YF-105A prototype first flew on 22 October 1955, powered by the less powerful J57 although it still managed to reach Mach 1.2. Design revisions include incorporating 'area rule' effect, replacing the conventional air intakes with forward-swept, variable geometry intakes and finally installing the J75. With these changes, the F105B managaed to attain Mach 2.15.

In March 1956, the USAF ordered a further 65 F-105B and 17 RF-105B. To allow it to conduct nuclear strike missions, an MA-8 fire-control system, an AN/APG-31 ranging radar and K-19 gunsight were fitted. Five F-105C trainers were ordered but then cancelled together with the reconnaissance version. The first production F-105B was received by the USAF on 27 May 1956. In June, Republic requested that the F-105 be named Thunderchief, continuing the sequence started by the P-47 in the 1940s. The USAF made this name official in July 1956. In 1957, Republic proposed the F-105D in order to fulfil the USAF's need for an all-weather attack aircraft. This version featured an enlarged nose and radome housing the AN/ASG-19 Thunderstick bombing and navigation system. Inside the cockpit, the D version featured a vertical strip instrument diplay. Plans to build 1,000 F-105D was curtailed when Defense Secretary Robert S. McNamara declared that no more than seven combat Wings were to be equipped and chose the F-4 Phantom to be the main combat aircraft of the USAF.

The F-105 is a mid-wing aircraft with a 45 degree wing and tail sweep. The single Pratt & Whitney J75-PW-19 turbojet developed 14,300 lb dry thrust (24,500 with afterburner). The large fuselage provided room for 4,480 liters of fuel and an internal bomb bay. Designed for carriage of nuclear weapons, the bay was commonly used to hold an additional 1,300 liter-capacity fuel tank. It featured four underwing and one centreline hardpoints that can carry up to 6,400 kg of disposable stores. One M61 Vuclan 20 mmcannon, together with 1,028 rounds of ammunition was installed on the left side of the nose. The Thunderchief was a large aircraft (19.63 meters long and 5.99 meters high). Because of this and its troubled early life, it received a lukewarm reception from its pilots. various derogatory nicknames were given, including 'Lead Sled', 'Squat Bomber' and 'Ultra Hog/Hyper Hog'. Arguably its most famous nickname was 'Thud', named after the character 'Chief Thunderthud' from the Howdy Doody television series. The Thunderchief's offensive capability was sarcastically referred to as 'Triple Threat' - it could bomb the enemy, strafe him or fall onto him. The positive aspects of the aircraft such as responsive controls, good performance at low level and at high speed plus its electronics won its pilots over, who now used the 'Thud' monicker affectionately.

The F-105, specifically the initial 'B' model entered service in August 1958 with the 335th tactical Fighter Squadron of the 4th Tactical Fighter Wing. Difficulties with the avionics meant that the plane spent more time for maintenance than actual flying. The B model were gradually relegated to Air National Guard units and were replaced by the 'D' model beginning in September 1960 - the first recipient being the 335th TFS again. The first overseas unit were the 36th TFW at Bitburg and the 49th TFW at Spangdahlem, West Germany. Both Wings were tasked with nuclear weapons delivery. In the meantime, the USAF anticipated a change in the F-105's mission from nuclear weapons delivery to conventional bombing. As part of Project Look Alike, the Thud's capacity was upgraded, enabling it to carry up to 16 750-lb bombs on the centreline and wing pylons (the original conventional capacity was just four). relevant equipment was also added to allow it to launch AGM-12 Bullpup air-to-ground missiles.

The F-105 received some special modifications during its service with the USAF. The most notable was the defence-suppression 'Wild Weasel' aircraft. The two-seat F-105F training variant was chosen as the basis. As with the earlier F-100 Wild Weasel I and F-4C Wild Weasel II, the second crewmember was trained as an Electronic Warfare Officer, deciphering hostile radar emissions and guiding the pilot to attack them. The elctronic capability was supplemented with the usage of conventional bombs and specialist anti-radar missiles like the AGM-45 Shrike and AGM-78 Standard. In 1967, the F-105F were upgraded to the definitive 'G' version. 30 of the D versions received 'Thunderstick II' upgrade with the additional avionics housed in a long, raised dorsal spine. None were used at Vietnam despite entering service in 1969. Several F-105Fs received R-14A radar and a higher resolution radar scope. Known as project Commando Nail, they were used for all-weather and night low-level strikes against highly-defended targets by a unit from the 13th Tactical Fighter Squadron, known as Ryan's Raiders.

The Thud was however best remembered for its role during the Vietnam War. Following the passing of the Gulf of Tonkin Resolution, the first Thud mission was an attack on anti-aircraft positions at the Plain Of Jars, Laos, on 14 August 1964. By February 1965, the Johnson Administration had approved Operation Rolling Thunder, a bombing campaign aimed to crack the fighting spirit of North Vietnam. North Vietnam was divided into 'Route Packages' numbered I to VI (RP VI was divided into VI-A and VI-B). The USAF was reponsible for RPs I, V and VI-A; the last include the environs of Hanoi, nicknamed 'downtown' by pilots, ringed with flak and SAM batteries and defended by MiGs. The Thuds were based and Takhli and Korat Royal Thai Air Force bases in Thailand. The classic mission for Route VI usually involved 30-50 aircraft including F-4 fighter escorts, EB-66 ECM aircraft and 'Wild Weasel' SEAD aircraft (F-4C, F-100 and later, F-105F or G).

On a typical mission into North Vietnam, the Thuds flew with a load of 1,028 rounds of 20mm shells for its internal M61A1 cannon, six 500lb or 750lb bombs on the centre rack, 2 more 500lb or 750lb bombs on the outer wing pylon, 2 450 US gallon fuel tanks on the inner pylon and a 390 US gallon tank in the bomb bay. Depending on the potential threats, the outer wing pylons can be used to mount an ALQ-87 ECM pod or AIM-9B Sidewinder AAM. Alternative loads include AGM-12 Bullpup ASM and 1,000 lb and 3,000 lb bombs. To allow the Thuds to reach their targets (and return safely to base), inflight refuelling was required. Approach into 'downtown' can take two paths: one over the Gulf of Tonkin and the other by flying along the Day Truong Son mountains which ran parallel with the Red River into Hanoi. The jagged karst mountains were soon nicknamed Thud Ridge.  

The heavy AA defences of North Vietnam exacted a heavy toll on the Thud. Of the 610 F-105Ds built, 283 were lost in combat and another 52 lost to other causes. In return, the Thuds, despite being designed as a bomber, managed to shoot down 27.5 enemy MiGs - the highest scoring type after the F-4 Phantom. 24.5 MiGs were shot down using the internal cannon and the rest with the Sidewinder. In return, 17 Thuds were downed by MiGs. After Vietnam the surviving aircraft were transferred to USAF Reserve and ANG units and were finally retired in 1984.

The Kit
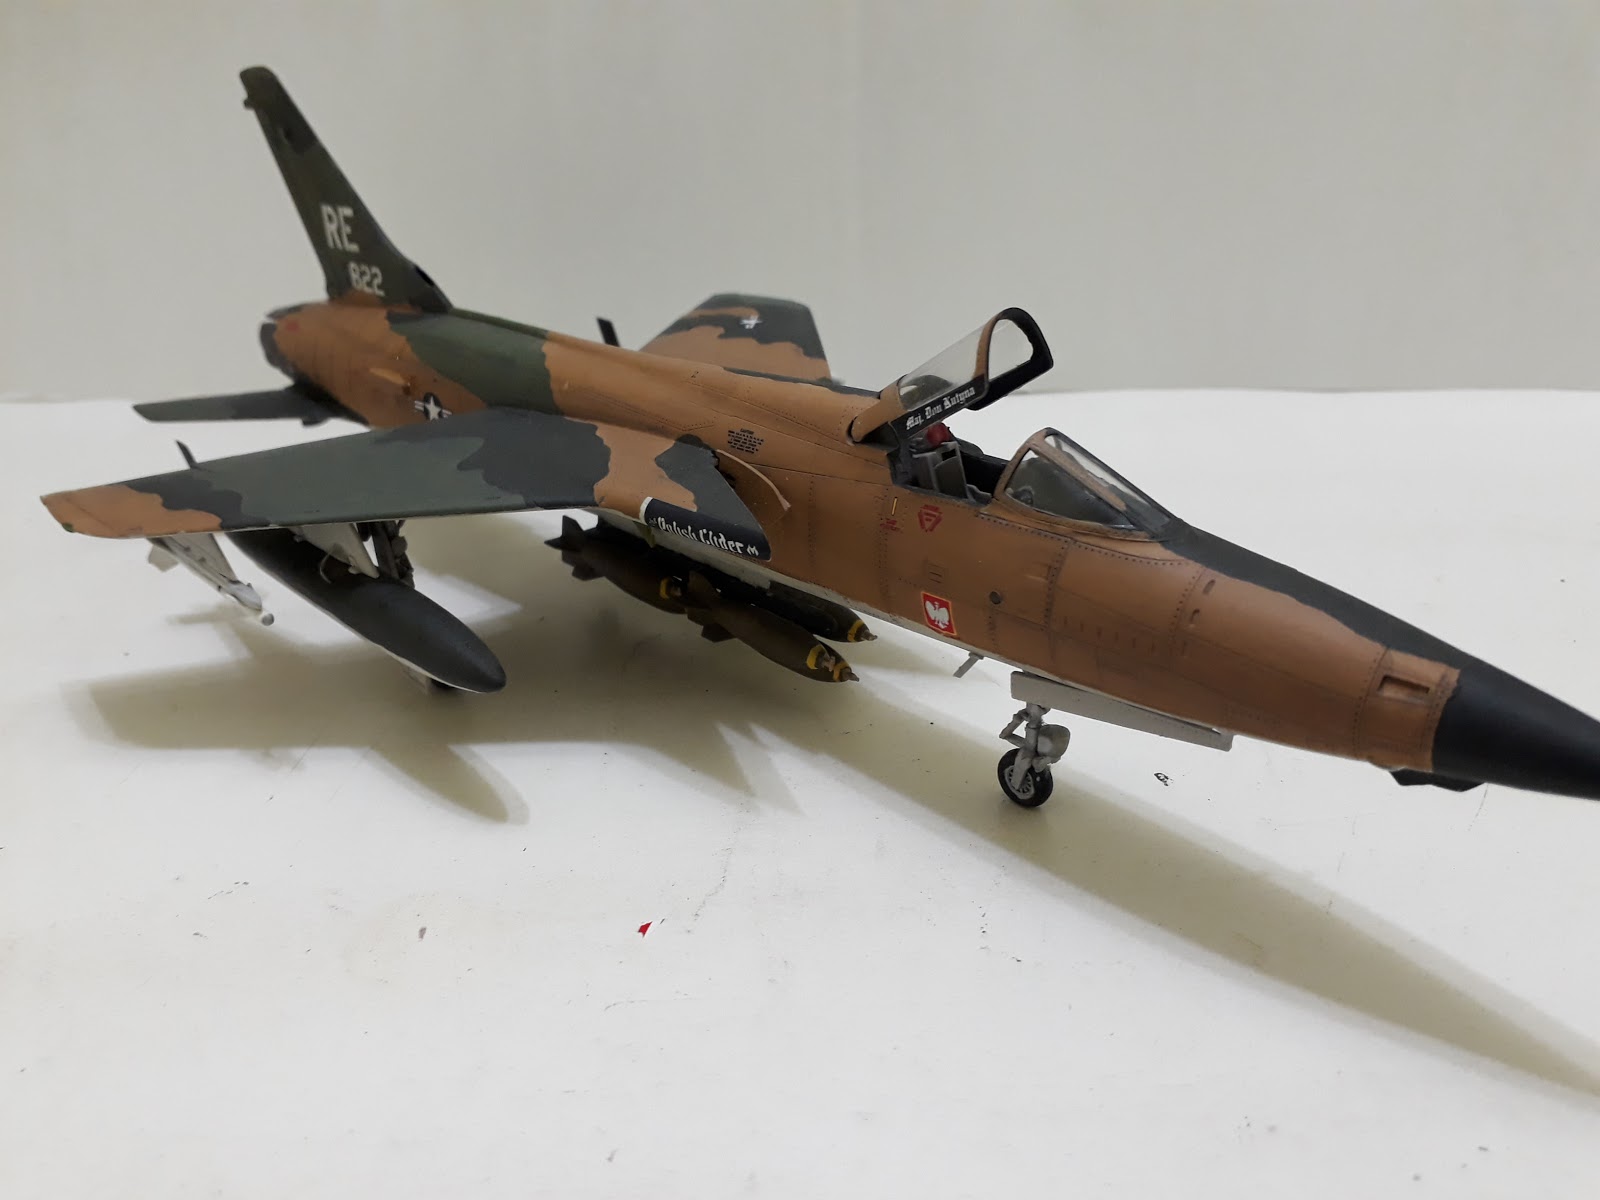
I have a soft spot for the Thud and that's why I eagerly awaited Trumpeter's release of the Thud in 1/72 scale. Once released, the modeling press did not wholeheartedly embrace the new 1/72 Thud. The main criticism is concerned with overdone rivet details and the lack of any details on the inner face of the landing gear doors. Otherwise the detail is fine and that the flaps, IFR probe, stabilators, canopy, speed brake/exhaust petals and gun bay door are poseable. Another 'bad' point with the kit is the supplied ordnance configuration. Trumpeter suggested that the options were either two MERs with four Mk82 500lb bombs each (with normal or extended fuze) on outer wing pylons plus three external tanks on centerline and the inner wing hardpoints or two AGM-12 Bullpup on the outboard pylons, the MER with bombs on the inboard pylons and the centerline tank. No fuselage pylon was included, which prevented modelers from configuring the model with the 'normal' RP VI-A combat load. Three marking options were included - one in silver and the other two in SEA camo.

Construction
As usual, the cockpit received the first attention. After painting the parts while still on the sprue, the kit decal  representing instrument panel and switches were applied. There weren't much detail in the cockpit. Although not as 'detailed' as other manufacturers' (not to mention resin replacement cockpit), they are sufficient in 1/72 scale. The IFR probe and the gun bay were closed as I don't intend to display them in the open position. The landing lights on the port fuselage and at the base of the tail were secured using Tamiya X20 Clear. I also added some fishing weights in the nose cavity, just to be on the cautious side, to avoid a tail sitting stance. The directions have the nose landing gear assembled and glued to the wheel well before closing up the fuselage but after dry-fitting, it can be glued later on and I left it aside. 


The wings, after assembling the upper and lower portion and fixing the flaps in place, were then mated to the fuselage. The landing gear wells and the interior side of the gear doors were painted US interior green even though the instruction said Flat White as photos show that they were painted in the former color. The same goes with landing gear themselves which I painted silver instead of the recommended Flat White. I decided to leave the exhaust petals at this time and would only attach them after painting. I also shaved off the collision light fairing on the spine as wartime aircraft do not have this feature.

Now, I didn't intend to use the suggested arming options as reviewers on the internet said that such configuration was rare or used earlier in the conflict (the first option), or non-existent (the second option). I was thinking of using the larger AGM-12C from the Hasegawa Weapons Set as there were photos of Thuds carrying these and the centreline fuel tank (plus the larger C model make them more visible) but as will be explained below, I had to dismiss this idea. Unlike their 1/32 offering, Trumpeter did not include the centerline pylon. Basically I had two options; one is to scratch a new pylon; the other is to rob/borrow from other kits. Rummaging through my spares box, I found an extra pylon from a previous Fujimi F-4G Phantom build. It has the right shape although I'm not sure about the exact dimensions. I don't really give much thought at this stage and decided to cement it onto the bottom of the fuselage. There should be a pair of reinforcing strips on the belly (not included of course and had to be scratchbuild) but I decided not to add them.

Painting and Decalling
Originally, I intended to paint the model silver, just to have another colour scheme other than grey and camouflaged planes in my collection (plus the gaudy sharkmouth and the colourful lightning bolt and TAC insignia made interesting markings). However, Trumpeter goofed up the US Star & Bar insignia, being of the wrong shade of blue and having wrongly-sized bar portion. Lacking a better looking replacement in my spares box, I decided to do the third option - 'The Polish Glider' in SEA camo. Although the Star and Bar shared the same problem with the first option, at least I can use the extra insignias from TwoBobs' Combat Lancer sheet in my collection. I painted the underside FS36622 using Tamiya AS16 and the upper colours were painted using Tamiya XF13 IJA Green, XF67 NATO Green and a mixture of XF59 Desert Yellow and XF64 Red Brown for FS34079, FS34102 and FS 30219 respectively. However, Trumpeter did not show the upper scheme and I have to resort to the Internet and my books in order to get the top view.

The second marking option is rather bland so I chose the third marking option: Major Dan Kutyna's 'The Polish Glider' / 'Yankee Air Polack' which was assigned to 44th TFS/335th TFW (in which Trumpeter erroneously stated as 466TFS/419th TFW). The decals are quite thick but an application of Mr Mark Softer sorted them out. Finally sludge wash is applied (which exaggerates the already oversized rivets!). As briefly mentioned above, the choice of the markings affected my decision as to the configuration of the weapons carried. The Bullpup missile was more commonly used during the early days of Rolling Thunder, when the Thuds were mainly still painted silver. Since the decals for the silver-coloured machine were basically unusable, I had to use the other marking options. In turn, Bullpup was no longer used by the time the planes were camouflaged and receiving tail codes; hence I had to configure the weapons option in the more familiar loadout. 

Finishing
The small parts can now be attached to the model. The landing gears and doors were attached first and as for the exhaust petals, I decided to attach the bottom portion in the open position as photos usually show it as such. As for the external stores, The MER and the M117 750 lb bombs came from Hasegawa Weapon Set I. The Sidewinder was robbed from my Italeri RMAF F-5E model as I have run out of the 'B' variant from Hasegawa's Weapons Set III. The Sidewinder rail also came from the same set. As the original rail is the twin version, I cut one of the arms off and used it to represent the single launch rail. The ALQ-87 ECM pod came from Hasegawa Weapons Set IV. I then attached the ordnance and external tanks followed with the antennas and the pitot probe (which is overscale!). The model then received a coat of Flat Clear and finally the canopy was placed in the open position.


Conclusion
A very welcome addition to the 1/72 aircraft models since the earlier Monogram and Hasegawa offering is more than 20 years old, not to mention extremely rare. Even though there is still some issues with Trumpeter's Thud, they are not something an average modeller cannot overcome (unless one is too lazy to do it, like me!)

Tuesday 2 September 2008

Power To The Volk!


Historical Background
The Heinkel He 162 jet fighter was a lightweight fighter designed for easy mass production. Late in World War 2, when Germany was being pounded day and night by the Allies, the Luftwaffe needed new approach using the newly developed jet propulsion in order to counter the mass bombing and also the threat of the superlative P-51 Mustang escorts. Basically two school of thoughts developed: the one led by General der Flieger Adolf Galland preferred hi-tech approach and demanded more Me 262 jet fighters to the detriment of other aircraft production. Another group, supported by Hermann Goering and Albert Speer noticed the shortcomings of the Schwalbe and proposed a new design which is to be cheap, and simple to built to the point that it can be discarded if damaged. Galland and most of the Luftwaffe's senior officers were against the light fighter programme, but since it received the support of two of the Reich's big brass, it was green-lighted with the name Volksjager (Peoples' Fighter).

Official requirements specified that the plane is to be powered by a single BMW 003 jet engine, which has a slightly lower thrust than the Jumo 004 (and thus not in demand for the Me 262 and Ar 234). The main structure are be built using wood and other non-critical materials plus the design should be simple enough that even non-skilled labor (or, in case of the Third Reich, slave labour) could assemble the airframe. Specifications include a weight not exceeding 2,000 kg, maximum speed of 750 km/h at sea level, operational endurance of at least 30 minutes and a take-off run of no more than 500 meters. Armament would either be two 20 mm MG151/20 cannons with 100 rounds each or two 30 mm MK108 with 50 rounds each. The aircraft should also need to be easy to fly that even glider or student pilots could fly it effectively in combat. It has also been suggested that Hitler Youth members be taken as pilots of this new fighter after receiving rudimentary training in gliders.

The requirements were issued on 10 September 1944. As this was going to be a huge contract, nearly every German aircraft manufacturers submitted their proposal. Heinkel was seen to be the leading contender for this project as they had already been working on lightweight single-engined fighter designated P.1073. Although some design, such as Blohm und Voss P.211 were technically superior, Heinkel's design was accepted as the winner in October 1944. The RLM chose airframe designation 8-162 (originally for a proposed Messerschmitt bomber aircraft) to confuse Allied intelligence, while the construction programme was given the codename 'Salamander'. The He 162, called 'Spatz' (sparrow) by Heinkel, was fairly small, aircraft with a slim and sleek fuselage. In fact it looked quite modern for its time. The BMW 003 jet engine was mounted in a nacelle atop the fuselage, directly centered over the wings' centre section. The highly dihedralled tailplanes mounted the rectangular tailfins at the ends. The wing was mounted high with a marked degree of dihedral and forward-swept trailing edge. The pilot was provided with an early ejection seat. The prototype flew on 6  December of that year. The flight was fairly successful although the acidic replacement glue (the originally specified glue was unavailable as the factory was bombed) attaching the nose gear strut floor failed during a high-speed run, forcing the test pilot, Flugkapitan Gotthold Peter to land. Other problems were also noticed, notably pitch instability and sideslip due to the rudder design. They were however considered to be minor, so as not to disturb the test programme.

On 10 December, during the second test flight the glue failed again, this time causing a structural failure. The aileron separated from the wing, causing the aircraft to crash, killing Peter. The investigation into the cause of the accident resulted in a strengthened wing structure and from the third ('M3') and fourth ('M4') prototypes onwards, small, anhedral, drooped wingtips were added in an attempt to cure the stability problems. Both M3 and M4 were armed with the MK 108 30-mm cannons of the A-1 anti-bomber variant. However tests showed that the recoil of these powerful weaposn were too much for the light airframe and plans for production turned to the MG 151/20-armed A-2 variant (the A-1 was reworked into the strenghtened A-3). Various other changes resulted in an escalation of weight, raisng from 2,000 kg to 2,800 kg. Nevertheless the He 162 was the fastest fighter aircraft during World War 2, with speed up to 905 km/h at 6,000 meters. It however has a short duration of just 30 minutes. This was mainly due to the limited amount of fuel it could carry. And despite the hope that the aircraft can be flown by Hitler Youth members, the He 162 was a complicated enough aircraft that only the most experienced pilots can handle them.

In January 1945, test unit Erprobungskommando (EKdo) 162 was formed at Rechlin with 46 aircraft. In February, the He 162 was delivered to its first operational unit, I./JG 1 'Oesau' (the mad idea of using young, inexperienced pilots was finally shelved). The Gruppe was transferred to Parchim where the pilots can pick up their new jets and start training immediately. On 7 April, Parchim was heavily damaged in a raid by the USAAF, forcing them to relocate to Ludwigslust and then to Leck.  II. Gruppe of JG 1 moved to Marienehe on 8 April to begin conversion to the type whilst the proposal to re-equip III. Gruppe was abandoned. Officially the He 162 was never operational but apparently they saw combat in April 1945. On 19 April, Feldwebel Kirchner was credited with shooting down an RAF aircraft but he himself was lost in a crash before he can return to base. I./JG 1 claimed a number of unverified kills in April, with just one confirmed kill: a Tempest shot down by Leutnant Rudolf Schmidt some time in early May 1945. The Gruppe on the other hand lost 13 of their number, mainly due to accidents and structural failures.  All JG 1's aircraft were grounded on 5 May 1945 and turned over to the Allies the following day. EKdo 162's aircraft were turned over to JV 44 and were destroyed along with the unit's Me 262 before they surrendered. By 8 May 1945, 120 He 162s were delivered, 200 were completed and awaiting delivery with another 600 in various stages of production.

The Kit
Tamiya came out with a 1/48 scale kit of the He 162, using the project code name Salamander, a few years back (2006 actually). Portraying the A-2 version, the kit comes with the usual Tamiya quality. Details are sharp and generally excellent, although the panel lines may be a bit heavy. The engine can be displayed in an open nacelle or posed separately from the aircraft (superdetailers can go crazy on the engine alone!) The engine nacelle is mounted on polycaps so that one can swap the pose of the engine cowlings. In fact one can display both style of engine cowls at the same time with one mounted on the supplied trolley. To help modelers align the wings, a T-shaped plastic spar was included (it also act as the mounting for the engine nacelle). Also included is a ball bearing to act as nose weight. Decals provided markings for four aircraft:
1.'Yellow 11/20' Oberleutnant Emil Demuth, 3./JG 1, Leck, Germany, May 1945
2. 'White 1' Leutnant Rudolf Schmidt, 1./ JG 1, Leck, Germany, May 1945
3. 'Nervenklau' / Red 1', Leutnant Gerhard Hanf, 2./JG 1, Leck, Germany, May 1945
4. 'White 23', Oberst Herbert Ihlefeld, JG 1, Leck, Germany, May 1945

Construction
The instructions have you build the...engine display trolley first. I of course skipped that and went straight to the cockpit. There is no cockpit tub per se here - there are basically sub-assemblies of the instrument panel, the nose gear bay and the seat/rear bulkhead. The whole of the cockpit parts plus the side walls were painted Tamiya XF-63 to represent RLM 66. Part A13 (nose wheel strut mount) is shown to be a slip-in affair. While friction may held it in place, I doubt whether friction can withstand the force of inserting the nose wheel strut, so I glued it in place. The next step in the instructions is concerned with the landing gear. The struts and wheels were assembled but I left it off first while I assembled the main landing gear bay. I then dry-fitted the fuselage and the landing gear bay together to see whether I can leave the landing gears off until later (the instructions have the bay inserted into the fuselage, landing gears and all). I judged that it can be done and I continue with the build.

The panels on the cockpit sidewall and part of the cannon barrel were then cemented to their places on the cockpit walls. The cockpit bulkhead/seat assembly and the nose gear bay were then cemented to the right fuselage half. The ball bearing / nose weight was then inserted behind the bulkhead where the latter plus protrusions on the fuselage and part of the plane's belly trapped the weight in place. The main gear bay and the wing spar was then cemented into their places and the fuselage was then closed up. The tail plane was then cemented to the fuselage and afterwards the tail fins were attached to the ends of the tail plane.

Next to be assembled are the wings and the engine nacelle. The wing halves were mated together and inserted onto the protruding spar. Fit is very good and the spar set the wings at the proper angle. This is followed by the engine nacelle. As mentioned before, there is an option of having the engine nacelle displayed open. If so chosen, there is fairly detailed engine to be shown and one can add more details as they see fit. Since I want to have it closed, the steps involved were lesser as there only some minor assembly of the intake and exhaust to do. The only thing I left from the engine assembly at this moment was the loop aerial. The poly caps inserted during the build secured the engine nacelle to the fuselage. This however resulted in a less than perfect fit and I have to add some putty to close the gap.

Painting and Decalling
I decided to do the second option - 'Yellow 11/20' of Oberleutnant Emil Demuth of 3./JG1 with his previous kill markings on the tail and 3. Staffel's insignia. I painted the model overall RLM76 using Gunze Aqueous H417. Once dry, the top part is painted RLM83 using Gunze Aqueous H413. Now the instructions stated that the top right wing and elevator is to be painted RLM82. However, a color profile of Yellow 11/20 in an issue of Scale Aircraft Modelling International showed that the top is RLM83 overall. Lacking RLM82 in my arsenal (which I found out later that XF5 can be used to represent RLM82), I decided to follow the sample in the SAMI magazine. The intake lip was also painted according to the same colour profile instead of Tamiya's instructions. The decals went on next without much problem. For Yellow 11/20, Tamiya supplied two sets of the 3. Staffel's 'Devil' insignia decals - one depicting the devil in red and another in tan. I use the tan one as my resources show the latter option. Mr Mark Softer was later applied to conform the decals on the surface. 

Finishing
As the real plane was meant to be a simple affair, the same goes with its 1/48 counterpart. The assembled landing gear can now be inserted into their places, allowing the model to stand on its own. The completed instrument panel was cemented into place (I totally forgot about it, good thing I have not cemented the cockpit transparencies yet). The landing gear doors, in a rather retro step by Tamiya, was moulded as one (or in the closed position) and need to be cut into its constituent parts before being cemented to the fuselage. Finally the loop aerial and the nose probe were attached. The model then received a sludge wash before everything was sealed with Flat Clear.


Conclusion
Being a modern Tamiya kit, there is really no big problem with the build. The parts fit well generally speaking and the details are nicely done (although the panel lines are a bit deep for a Tamiya kit plus a few missing details). The inclusion of the nose weight and wing spar/alignment are very welcomed in assisting the modeller. Although the Spatz is the lesser known jet than the Me 262 or the Ar 234 (plus having a very short operational life), Tamiya is to be commended for producing this little jet - I believe a must if one builds or collects World War 2 planes, especially the early jets.

Monday 25 August 2008

Sweetheart Angel Of The Marines


Historical Background
In February 1938, the US Navy Bureau of Aeronautics (BuAer) released two requests for proposals for a single-engined and a twin-engined fighter. For the former, the Navy requested a speed of 400 mph and a range of 1,000 miles. It had to carry four guns and provision for anti-aircraft bombs to be carried in the wings. Chance-Vought answered the proposals with prototype V-166 (Navy designation XF4U-1) and a contract was signed in June 1938. In February 1939, the XF4U-1 prototype was built and was powered by a prototype Pratt & Whitney XR-2800-4 Double Wasp radial engine rated at 1,805 hp. The first flight was made on 29 May 1940 and on 1 October 1940, the XF4U-1 became the first single-engined US fighter to fly faster than 400 mph. The proposed armament of two .30 cal synchronised engine cowling-mounted machine guns and two 12.7mm machine guns was however found insufficient nad in November 1940, the Navy requested a heavier armament of six 12.7mm machine guns, three in each wing. Acceptance trials began in February 1941 and on 2 April,  Vought ws awarded a contract for 584 F4U-1s. The name 'Corsair' was bestowed upon the aircraft and the first production fighter made its initial flight on 24 June 1942.

As the Corsair incorporated the largest engine at the time, a relatively large (4.06m diameter) Hamilton Standard three-blade propeller was used to extract as much power as possible from th engine. The wide propeller necessitated a long landing gear which was originally considered to retract backwards. However, the chosen chord of the wings made it difficult to make it long enough. The solution was the use of inverted gull wing design which shortened the landing gear. However, partly owing to advanced technology and greater speeds, numerous technical problems had to be solved before the Corsair can enter service. The early Corsairs suffers from low-speed stalls, poor forward visibility because of the position of the cockpit, size of the engine and the short tailwheel. The Corsair have a tendency to 'bounce'. All these were revealed during carrier trials aboard USS Sangamon on 25 September 1942. The Corsair earned disparaging nicknames such as 'Hog', 'Hognose' and 'Bent-Wing Widow-Maker'. As a result, the US Navy released the fighter to the Marine Corps who operated their aircraft from land bases.

The Corsair was sent to the frontline, specifically in the Solomon Islands in February 1943. The first combat involving Corsairs took place on 14 February 1943 but it was an inauspicious one 10 American planes lost (including two Corsairs) for the loss of four Zeroes.The Marines however quickly learned to make better use of the aircraft and they started demonstrating its superiority over Japanese air units. Also, despite the decision to issue the Corsair to the Marines, two Navy squadrons, VF-12 and VF-17 were equipped with Corsairs in 1943. VF-12 soon transferred its aircraft to the Marines while VF-17 was removed from its parent carrier, USS Bunker Hill and operated from land bases. The US Navy only cleared the Corsair to operate from carriers in April 1944 after the fitting of longer oleo struts to reduce bouncing and the adaptation of a curved approach used by Royal Navy Corsairs, which operated their Corsairs from carriers since November 1943. The first effectively carrier-based units were, interestingly, Marine Corps VMF-124 and VMF-213. The increasing needs to defend carriers against kamikaze attacks resulted in more carrier-based Corsair units.

The Corsair also show great abilities as ground attack aircraft, performing strikes using bombs, napalm and unguided rockets. This ability was demonstrated with the -1A version, and was carried over to the -1C and -1D versions. The F4U-1C was only introduced in April 1945 the -1D was introduced a year earlier. It had the new -8W water-injection engine which gave the aircraft up to 250 hp more power, which, in turn, increased performance. Speed, for example, was boosted from 417 mph to 425 mph. It also had a payload of rockets double the -1A's, as well as twin-rack plumbing for an additional belly drop tank. Such modifications necessitated the need for rocket tabs (attached to fully metal-plated underwing surfaces) and bomb pylons to be bolted on the fighter, however, causing extra drag. proved too vulnerable and were removed. The extra fuel carried by the two drop tanks would still allow the aircraft to fly relatively long missions despite the heavy, un-aerodynamic load. The canopies of most -1Ds had their struts removed along with their metal caps.

Apart from the derogatory nicknames described above, the Corsair was affectionately nicknamed 'The Angel Of Okinawa' and 'The Sweetheart of The Marianas' by the ground troops due to their CAS role during the two campaigns. It was also nicknamed 'Ensign Eliminator' because of tricky handling and it was allegedly nicknamed 'The Whispering Death' by the Japanese (no Japanese sources supported this allegation; it was however known, rather bafflingly, to the Japanese as the 'Sikorsky'). The Corsair was also built by Goodyear with designation FG-1. Corsairs of USN and USMC flew 64,051 operational sorties during the war, of which just 9,581 were flown from carrier decks. Corsair pilots claimed 2,140 aerial victories against 189 losses for a ratio of 11:1. The Corsair was also a durable design, being built between 1942 to 1953 in 16 variants. The 12,571st (and the last Corsair built), was delivered to the French in 1953. As a type, the Corsair flew its last combat missions for the both sides during the so-called 'Football War' between Honduras and El Salvador in 1969.


The Kit
Tamiya has a number of Corsairs in their catalog with the F4U-1D kit making its debut in 1998, after the F4U-1 in 1996. Tamiya's Corsairs are among the best in the market despite some 'misses' such as the step on the inner flap on the starboard wing (which was a post-war addition). The wings are also moulded in a way that modelers can choose between folded or deployed positions. Rocket launcher stubs are also provided even though no rockets were included, unlike the 1/72 scale version. Panel lines were also crisp and clear. Speaking of clear, the clear parts include two types of canopies - with or without framing. Two pilot figures were also included: one sitting in the cockpit and another standing on the wing. The kit was re-released in 2002 featuring a deck tractor, new markings and the 'missing' rockets. The decal sheet provide markings for three aircraft, all in Gloss Sea Blue:

1. VF-84, Wing 167, USS Bunker Hill February 1945;
2. VMF-112, Wing 1, USS Bennington,, January 1945; and
3. VMF-193, Wing 107, MCAS Cherry Point, January 1945.

The last aircraft has disk-less US star-and-bar.


Construction
As usual construction starts in the cockpit. The entire cockpit (plus the landing gear bays) were painted Tamiya's version of US interior green using a mixture of 1 part XF5 Flat Green and 2 parts XF3 Flat Yellow. Tamiya has accurately reproduced the Corsair's 'bottomless' cockpit and also the lengthened control stick and rudder that go with the raised pilot's seat. The instrument panel faces is supplied as a decal, which nicely conforms to the raised details on the instrument panel part especially after the application of Mr Mark Softer.. Alternatively, one can simply use drybrushing to 'pop-up' the details on the instrument panel. The seat belt is provided in the form of decal and look flat. I didn't use decal solution as it will make the seat belt even flatter! The fuselage is then closed around the cockpit - very nice fit I should say.

The engine was then assembled. Again, the parts have very nice details and only needed careful painting and wash plus additional wiring to turn it into an excellent piece of plastic art (but not me, mind). Tamiya provided two engine cowl flaps and I chose the closed one. The inner wings were then assembled; again no problems were found. The fuselage halves were then joined together, trapping the cockpit assembly. Inserts were then cemented behind the cockpit. Usually separate inserts like these (to allow multiple versions to be manufactured while using just a single mould for the main fuselage) can be the cause of fit problems but again, thankfully, it was not a problem here.The lower fuselage / inner wing and the cowling assembly were then cemented together to the fuselage. I also added the horizontal tailplanes, finishing the basic fuselage.

The wings came on next. As mentioned before, the kit allows one to build the wings as folded or deployed. In order to allow that the wings are moulded in four parts - upper/lower and outboard/inboard. I chose the deployed position. However, the joint is not very strong and that there is a slight gap between the inner and outer wings. Tamiya has designed the kit's flaps to be in the down position, which makes it visually interesting. The hole/step in the inner flap of the starboard wing was filled with two-part putty and the excess was then sanded off. The rest of the assembly is uneventful and I left the smaller and more fragile parts such as antennas, landing gears and external fuel tank for assembly after painting had been done. And while rummaging through my spares box, I found 5" HVARs from my previous build, a 1/48 Hasegawa P-38 Lightning. Great! There were eight of them and would appropriately arm my Corsair.

Painting and Decalling
I love late-war US Navy planes as they are easier to paint! Yes, I know it's kinda boring with just one colour and without much personal markings to speak of. For the Gloss Sea Blue, I used Tamiya AS-8 Navy Blue sprayed straight from the can. As mentioned before, I chose the markings of '167' off USS Bunker Hill. As that particular marking was chosen, the nose cowling ring was painted XF-3 Flat Yellow. The decals were then applied the usual way with no problems encountered, except for the decals representing tapes in front of the windscreen, which broke into several pieces which required a tedious and careful rearrangement. While looking around for pictures of the aircraft, I found that '167' was the mount of 12-victory ace LCDR Roger Hedrick, the CO of VF-84 at the time and the former XO of the original VF-17, the first 'Jolly Rogers' squadron. Many of the core of VF-84 consisted of former VF-17 veterans; however their request to have it named 'Jolly Rogers' was denied by the Navy (VF-84 eventually took over the name in the 1960s and proudly flashing the skull-and-bones insignia on the fin of their Phantoms, and later, perhaps most famously, by the F-14). Hedrick survived the kamikaze attack which decapitated the Bunker Hill and killed most of the pilots in the ready room on 11 May 1945 and retired from the Navy with the rank of Rear Admiral.

Finishing
To complete the model, I attached all the remaining parts such as the landing gears, wheel well doors, flaps, external fuel tanks and the rockets. I must mention that I goofed up painting the rockets as I misread the Hasegawa instructions. Instead of white, I painted the rockets black! And instead of OD, the warhead section was painted red. I only realised this mistake after the model has been completed! Arghhhhh!!!! As for the rockets, after searching the Internet, I decided to paint them aluminium. It's a bit tough to repaint the rockets as I had attached them using superglue and cannot be removed without damaging the railings or the rockets themselves. The warhead area was painted olive drab. I also managed to knock off the pitot tube which were quickly gobbled up by the Carpet Monster. To replace it, I used a length of styrene tubing while the 'hook' on the tube was replaced by a piece of palstic sheet cut to shape and size (more-or-less). The model than received a sludge wash and was followed by two layers of semi-gloss clear to seal everything in. 

Conclusion
Tamiya kits have the reputation of being shake and bake kits (or 'put glue and paints inside the packing box, shake it and out comes a complete model'!) and the Corsair is no exception. All parts fits nicely with no putty needed. On the down side however, the kit decals are quite thick and barely responds to setting solutions, even the strong Mr Mark Softer. Also, despite the -1D's reputation as a fighter-bomber, no ordnance were included, which is a shame for an industry leader like Tamiya.

Tuesday 5 August 2008

A Large Hunting Dog


Historical Background
Despite the initial Western panic about its perceived performance, the MiG-25 had substantial compromises in order to achieve high speed, altitude and the rate of climb. The Foxbat lacked maneuverability at interception speeds, short operational radius and excessive weight caused by its mostly nickel steel construction. The Smerch-A radar, while powerful, had a short range and lacked look-down, shoot-down capability. The MiG-31 began as an upgrade program for the MiG-25RBK 'Foxbat-D' reconnaissance variant. The first prototype was designated Ye-155MP which first flew on 16 September 1975. It was intended to be a long-range interceptor with look-down, shoot-down capability, able to engage penetrating bombers and low-flying cruise missiles. For that, it was to carry another crew member - the radar systems officer in tandem position. Although it resembled a stretched MiG-25, in many respects it was a new design and warranted a new name, which was designated MiG-31.

Externally, the main difference between the MiG-25 and MiG-31 was the stretched forward fuselage to accommodate the new radar and its operator, LERX, extended tailpipes and reshaped vertical fins. The interior changes were more substantial. Most of the structures now comprised of aluminium alloys, with titanium and steel limited to critical areas only. The wings and airframe were made stronger than the MiG-25 with the addition of a third spar. The MiG-31 was however limited to 5 g at supersonic speeds; this wasn't really a handicap as it was not designed for close combat and rapid maneuvering. The main undercariage was changed to tandem staggered arrangement to allow operations from snow-covered or semi-prepared airfields. The Tumansky R-15 turbojets powering the MiG-25 were replaced with a pair of Soloviev D-30F6 low-bypass turbofan engines capable of generating 34,200 lb of thrust with afterburner. Most importantly, it allowed the MiG-31 to fly at supersonic speed at low-level, unlike the the MiG-25. While the thrust-to-drag ratio allowed it to go past Mach 3, the engine was redlined at Mach 2.83 to avoid unacceptable hazards to engine and airframe life.

But the most significant change was to the detection and weapons system, centred on the RP-31 N007 Zaslon phased-array radar (NATO codename 'Flash Dance'). The Zaslon was able to track up to 24 targets and engage 8 of them simultaneously. It was also equipped with ECCM capability to counter the jamming systems carried by aircraft such as the B-1 Lancer and the B-52 Stratofortress. The Zaslon was also coupled with the RK-RLDN and APD-518 digital secure datalinks with the latter enabling a flight of four MiG-31s to exchange data within 200km from each other. It may also be used  with other aircraft with less sophisticated avionics (such as the Su-27, MiG-29 and MiG-23. The radar was backed by a IRST system in a retractable turret under the nose. The main armament was a quartet of long-range (160km) Vympel R-33 (NATO : AA-9 'Amos'), which was considered to be the Soviet/Russian equivalent of the Hughes AIM-54 Phoenix missile. The earlier R-40 (AA-6 Acrid) and the shorter-ranged R-60 (AA-8 Aphid) and R-73 (AA-11 Archer) IR-guided missiles can also be carried. The MiG-31 also carried an internal cannon, the six-barrel GSh-6-23 23mm with 800 rounds of ammunition.

The MiG-31 (NATO : 'Foxhound') entered service with the Voyska PVO in 1982 where it became the only interceptor able to (and did) intercept the Mach 3 Lockheed SR-71 Blackbird reconnaissance plane. In 1990, a new variant, MiG-31B was introduced. This was as result of the discovery that Adolf Tolkachev, an engineer at the Phazotron radar division had sold secrets of Russian radars to the West. A new version of the Zaslon was hurriedly developed and many MiG-31s were re-equipped with the new radar, and designated MiG-31BM. A more advance variant, called the MiG-31M was begun 1983 and first flew in 1986. However the break-up of the Soviet Union curtailed further development.  The MiG-31M added further features such as GPS and GLONASS receivers and three colour MFDs for the radar officer. Around 280 Foxhounds served with the Russian Air Force with another 29 serving with Kazakhstan.  Syria ordered eight MiG-31E (export) in 2007 but in 2009 the order was suspended due to either Israeli pressure or lack of Syrian funds.


The Kit
Zvezda came up with a 1/72 kit of the baseline MiG-31 in 2004 and a year later came up with the MiG-31B. The kit is molded in a light grey styrene with a rather thick sprue gate. While the parts were nicely moulded, apparently the Matchbox trench digger has found new employment in Russia as the panel lines would resemble Western Front trench lines if enlarged to 1:1 scale! The large intakes have no details inside them and you can actually see all the way to the exhaust piece. Interior detail is rather sparse and the ejection seats are best replaced with resin products. I also found that the clear parts are rather thick. Weapons and stores include two large fuel tanks, a quartet of R-33 missiles and a pair of R-40 (probably R-40RD version) missiles. Marking is provided for one aircraft, Blue 74 of 786th GIAP, Pravdinsk in 1995. There were however no stencilling decals included. The decals are also typically Zvezda - thin and in register but matt in appearance.


Construction
As always construction starts with the cockpit. MiG cockpits are painted in a shade of blue-green which is rather hard to capture (especially when I didn't have the correct paints at the time). I tried to mix XF-23 Light Blue with XF-5 Flat Green but it ended up greener than it should be. The Zvezda K-36 ejection seats have basic details but they look better than the one in the Italeri MiG-29. Also to note that this is my first modern aircraft kit, building only WW2 ones previously. Lacking proper information from the instruction sheet (and common sense, ha!), I painted the whole cockpit, including seats and internal cockpit frame XF-5 Flat Green! Once dry, I applied the decals, which are provided for the dashboards only.

The nose was then closed up. But before that, a weight of 7 grams were put inside ( I used plasticine). The fit between the halves was not very good and some filling and sanding works were needed Construction then moved to the main fuselage. The main wheel wells were cemented to the bottom half of the fuselage and this was followed by the outer walls of the intakes. There  were no air intake tunnels or compressor faces (or at least plain bulkheads). One can see all the way through the fuselage as a result. On the other end however, Zvezda provided a bulkhead with patterns for the rear turbine faces molded on. The upper and lower halves of the fuselage were then cemented togther with the wing structure sandwiched between them. The dorsal fairing extension at the end of the fuselage was then cemented but I temporarily leave off the ventral strakes and the tail surfaces off in order to facilitate another round of filling and sanding the main fuselage joint.

Turning back to the forward fuselage, the nose section was cemented to the main fuselage. As for the intake ramp, Zvezda provided two positions for the intake ramp: an open one at roughly 45 degrees and a 'closed' one (almost all the way): I chose the 45 degree position. The bleed air doors were the last parts installed at this time. Available in open or closed position,  I have them in the latter. 

Painting and Decalling
According to the instructions, the fuselage is painted FS 36375 (which makes me wonder whether the Russians refer to US Federal Standard in the first place!). Anyway it was painted so using a mixture of Tamiya paints. Nose cone and dielectric panels were painted FS36118, also using Tamiya paint mixes. Landing gear wells were painted FS36320 and the wheels were painted Tamiya XF58 Olive Green. Decals are then applied. My example has yellowed and were very noticeable on the pale grey fuselage. Apart from the Red Stars, bort numbers and the Russian coat of arms, there is only a small number of stencils. The model is then completed when I attach all the small parts, the landing gears and the canopies.


A few months back, while looking for model kits at Hobby HQ Kuala Lumpur, I came across Begemot Decals Sheet 72-006. Not only does this sheet has more marking options, it also has a more comprehensive stencils compared to the kit sheet and also decals for the cockpit side console. Not only that, it is also quite cheap! Without much hesitation, I bought it. Also in the meantime, I found out that the actual color of the Foxhound is not straight FS36375 and someone suggested an 80:20 mixture of FS36375 and FS36320. So after soaking the original kit decals in Mr Mark Softer, I pulled the now fragile decals off using strips of Tamiya tape. The paint was then stripped off using Easy-Off Bang kitchen cleaner.

Having realised that modern warplanes is painted differently from their WW2 ancestors, I repainted the K-36 bang seats according to the guide I found on the internet. The inner frame of the canopy is now painted flat black using Tamiya XF-1. The whole airframe was then painted according to the mixture above. Once the paint is dry it's time for re-decaling. I decided on the rather colourful markings of Foxhound 'Red 08' assigned to the 174 GIAP at Monchegorsk, Kola Peninsula in 1995. The 174th was named 'Boris Safonov' after the Soviet World War 2 fighter ace, who fought in the same region during the German invasion (see here for my build of Major Safonov's Polikarpov I-16). 'Red 08' was a MiG-31 rather than -31B. However, no major surgery was made to the kit as the difference is mainly internal.

Finishing
The landing gears were tackled first as they would allow the model to stand on its own, so to speak. The tyres were painted Flat Black while the wheels were painted XF-58 Olive Green. After the landing gears have been cemented, I add the wheel bay doors, although the one on the bottom of the fuselage would be cemented later. The R-33 missiles were painted and decalled and were then superglued to the fuselage bottom  The pylons for the fuel tanks and missiles were then cemented to the bottom of the wings followed by the external tanks and the missiles themselves. The pitot and other probes were then cemented, followed by the canopies; the latter were set in the open position. Finally the airbrakes were cemented. To prolong the build a bit, I knocked the dorsal antenna and had to build a replacement using scrap plastic. The panel lines were enhanced using pencil. A final spray of Semi-Gloss Clear completed the build.

Conclusion
Ok, Zvezda's kits are not of the same level with Tamigawa's. However, their generally lower price makes great enticement to buy their kits. Whilst OOB the kit is fine enough, detail freaks might want to replace kit parts with aftermarket resin, PE, white metal or vacform parts plus filling and rescribing the panel lines. I'm not suffering from AMS, and to my eyes the kit looks like a MiG-31 and that was good enough for me.