Wednesday 26 June 2013

Lightning George


Historical Background
In 1940, the Japanese Navy decided that it needed a fighter aircraft capable of supporting amphibious operations in isolated areas deemed not important enough to warrant the attention of land- or carrier-based aviation. Two projects were initiated: Nakajima were to produce a floatplane version of Mitsubishi's A6M (as an interim measure, and known as A6M2-N) and Kawanishi to produce a new design, the N1K Kyofu (Allied codename 'Rex'). Powered by a 1,460hp Mitsubishi MK4C Kasei radial engine, it was a success (although the bulky floats degraded the performance). However, due to over-reliance on the Zero and a slow procurement schemer, by the time the first production aircraft appeared in the Spring of 1943, the Japanese were on the defensive and there was no longer need for such an aircraft and only 100 were built. 

At the same time however, Kawanishi had been working on the land-based version of the Kyofu and was pursued as a private venture. First flown on 27 December 1942 (just 8 months after the original floatplane), it retains the mid-mounted wing of the Kyofu. Coupled with the large diameter propeller, it resulted in a long, stalky landing gear. The powerplant was replaced with a Nakajima NK9A Homare radial engine. It was found that the new aircraft was faster than the A6M and also has a longer range than the J2M Raiden. On the debit side it was noted that the aircraft had a somehow weak undercarriage and the engine proved troublesome. The Navy was impressed nonetheless and ordered the aircraft as N1K1-J Shiden (Violet Lightning). The aircraft was armed with two 7.7mm machine guns in the nose (later deleted) and four 20mm cannons (two in underwing gondolas). 1,007 N1K1-Js were produced (including prototypes).

Just four days after the first flight of the N1K1-J, a complete redesign program was begun. The main focus of the program were centred on the weak undercarriage and the mid-mounted wing position. The wing was moved to a low position allowing a shorter, more conventional landing gear to be used. The fuselage was lengthened and the tail redesigned. The whole aircraft was made more simple, using less than two-thirds of the N1K1's parts. The end result was 250 kg lighter and more faster and more maneuverable than the N1K1. Lack of alternatives however forced the retention of the temperamental Homare engine. The prototype first flew on 1 January 1944 and was rushed into production as the N1K2-J Shiden Model 21. It was also known Shiden-KAI (Improved Shiden). Only 423 were built due to production difficulties, compounded by damage to the factory due to B-29 raids. The original Shiden was introduced into combat during the invasion of the Marianas in June 1944.

The Shiden and Shiden-KAI (codenamed 'George' by the Allies) proved highly effective against American Hellcats and Corsairs, giving an even chance to IJN pilots. In the hands of aces, it could even outfly its American adversaries. While formidable, the Shidens were demanding of its' pilots and limited in quantity. They were therefore mainly issued to elite fighter units such as the 343rd Kokutai commanded by Minoru Genda, the architect of the attack on Pearl Harbor. The 343rd was a 'squadron of experts' (as it was mainly staffed by surviving IJN aces) and fought against overwhelming odds until final surrender on 15 August 1945. On one occasion in February 1945, ten N1K2s led by Lt. Kaneyoshi Muto clashed with seven F6F Hellcats of VF-82. The Shidens managed to down four Hellcats and no cost to themselves.

The Kit
In 1993, Hasegawa released a new-tool 1/48 N1K1, replacing the earlier (but still nice, even though it has raised panel lines) ex-Mania kit dating from the 1980s. . Featuring fine recessed and raised details, including countersunk rivets,  it was met with rave reviews for being virtually flawless and basically having no need for aftermarket products. In 2000, the molds were retooled to produce the N1K2, initially in its 'Early Version' form. The 'Late Production' version, also released in 2000, is virtually the same with the original release save for parts that make up the late version. As with the original N1K1, the panel lines are very crisp, the cockpit is well-detailed and there is option for lowered flaps. Decals were provided for two options, both from the 343rd Kokutai (and as with many other Japanese aircraft, they are rather bland).

Construction
As usual, I started with the cockpit. Hasegawa specified that the cockpit is to be painted a mixture of Gunze Nakajima Green and Mitsubishi Green. I did not have those colours and painted them Tamiya XF-71 IJN Interior Green, even though technically it wasn't accurate. Detail parts were painted XF-3 Flat Yellow, Gunze 8 Silver, XF-1 Flat Black and XF-7 Flat Red. The instrument panel part was painted Flat Black before the laying the decal for instrument panel face. The cockpit assembly was then trapped between the fuselage halves. The reviews don't lie as the fit was perfect! The engine assembly was next and I painted the parts first before assembly. The sprue scar was then touched up and the engine was then weathered (maybe shouldn't bother with the cylinders as they were partially hidden from view by the reduction gear).

The horizontal tailplanes were then glued to the fuselage. This was followed by the wing assembly, which consisted of a one-piece lower wing, upper wing surfaces and the wheel wells. I then cut off a notch from the bottom part of the tail and at the wingtips and replaced it with clear parts. Hasegawa also gave an option for retracted or deployed combat flaps. While I think the flaps, as the name implies, are only deployed during combat maneuverings, I can't help but deploy them in the extended position as it was more visually appealing. The gun barrels were left off as they look very fragile (they are) and might broke during the painting process.

Painting & Decaling
Shiden-Kais were only painted in two colours : Green uppers and silver/natural metal bottoms. The bottom colour was painted using Tamiya TS-30 Silver Leaf. For the upper camo colour, Hasegawa's instructions have you mix two shades of Gunze Sangyo paints to create what is called Kawanishi Green. I did not have the required paints so I just paint the green portion using Tamiya XF-11 J.N Green.  The wing leading edge ID strip was painted using a mix of Tamiya XF-3 Flat Yellow and XF-7 Flat Red. The landing gears were painted silver using Gunze 8 whilst Gunze H77 Tyre Black was used to paint the tyres. The prop blades were painted XF-64 Red Brown.

For markings, Hasegawa provided just two options, both from the 343rd Kokutai. The first was from the 701st Hikotai, flown by Squadron Leader Takashi Oshibuchi, April 1945 and the second, a Shiden-Kai of the 407 Kokutai, flown by a Squadron Leader Hayashi, also in April 1945. Apart from individual aircraft numbers, the two options were distinguished by different fuselage marking bands: the first option in red and the second in white. I chose the second option as the white fuselage bands were more visible on a dark green background (and this rather violated my policy of 'have markings of a more famous pilot'). The decals were typically Hasegawa but like the Hayate, the white portions are really white unlike their earlier releases. They also responded well to decal setting solutions.

Finishing
I started by enhancing the panel lines using a thin mixture of enamel red brown and black and the excess was removed using a piece of cloth dampened with enamel thinner and wiped in the direction of the air flow. Paint chips were adding by dabbing silver paint, using torn sponge pieces onto the leading edge of the flying surfaces and on the boarding side (left) of the wing. More chipping was also done by painting silver paint onto areas adjacent to panel lines. The more fragile parts can now be attached to the fuselage. The gun barrels, as mentioned before, were however quite fragile: I got nervous during the clean-up and as a result, some stubs still remain on the gun barrels; one of the barrels broke. I decided to replace all barrels with plastic rods. The muzzles were removed from the kit barrels and re-attached to the plastic rods. They still look unsatisfactory but was sight better than bent barrels with traces of sprue runner still visible.

Conclusion
It was a joy to build this kit. Everything fits perfectly and the details are very good. The price might be a bit high but it was well worth it.

Monday 17 June 2013

Gale Force


Historical Background
Nakajima commenced the design of the Ki-84 in early 1942 to meet the Imperial Japanese Air Force's requirement for a replacement to Nakajima's own Ki-43 Hayabusa, then just entering service. The specification required the maneuverability of the Ki-43 with performance to match the latest Western fighters and heavy armament. The prototype first flew in March 1943 and the new aircraft addressed three shortcomings of the Hayabusa : poor protection, insufficient firepower and lack of climbing power. The Ki-84 used armoured glass of 65mm thick as canopy, 13mm of head and back armour and multiple bulkhead to protect water-methanol injection tank and the fuel tank. Armament comprised of two 12.7mm machine guns in the fuselage and two 20mm cannons in the wings. The Ki-84 was powered with Nakajima Ha-45 radial engine which was rated at 2,000hp on take-off. This theoretically gave it a performance roughly competitive with Allied fighters. In initial tests, the Ki-84 reached maximum level speed of 624km/h in the second prototype. The new aircraft was nicknamed Hayate (Gale). The Hayate went into full production in April 1944 and entered combat in August 1944 with the 22nd Sentai in China.

However, the Allied advance which resulted in shortage of raw materials together with poor quality control and lack of skilled pilots meant the Ki-84 never reached its full potential. If everything worked correctly, the Ki-84 was more than a match for the P-47 Thunderbolt and even the P-51 Mustang, especially at medium and low levels. Aircraft quality differed even within the same unit. It was said that the pilots drew lots to see who would pilot the fully functioning aircraft and who would get in the cockpit of the lemons. As the fighting gets closer to the Home Islands, even the Hayate was not spared in conducting one-way Kamikaze missions, despite (or perhaps because of) its performance against the American fighters.  The Ki-84, together with Ki-100 and N1K2-J were considered the best Japanese fighters of the war. The Ki-84 was given the Allied reporting name 'Frank' and designated 'Army Type 4 Fighter' by the Japanese Army. 3,514 aircraft were built.

The Kit
This particular kit was one of Hasegawa's reboxings of their 1990s / early Noughties release of the Ki-84. The kit features very nice moulding and have crisp panel lines.There were also grommets to allow parts to be fitted without glue. The cockpit parts looked well-detailed and the clear parts were thin. Decals were provided for two aircraft, both from the 22nd Sentai: Major Iwasaki Jyazo, Initial Production aircraft #85, China, September 1944 and a green and silver/bare metal painted aircraft, Korea 1945.


Construction
The cockpit was painted Tamiya XF-71 Interior Green overall. The details were picked in silver, red and black. The seat cushion was painted Tamiya XF-57 Buff and the machine gun breeches were painted XF-1 Flat Black. The breeches were later polished with graphite from a 2B pencil. I used the provided decals for the instrument panel, which, after the Mr Mark Softer treatment, looks the part. The cockpit assembly, along with a grommet for the tail wheel were trapped between the fuselage halves.

The flying surfaces assembly were next. The landing light and the grommets for the wing pylons and mainwheel were placed in their respective slots before the upper and lower wing halves were mated together. The horizontal stabilisers were mated through interlocking tabs and were a perfect fit. The rudder came in two halves.

The next area was the front fuselage. The reduction gear was painted silver whilst the cylinders were painted steel. Hasegawa provided two style of cowl flaps and exhausts - early and late type. I had decided earlier on that I do not want to build any of the kit markings. Browsing the internet, I found out that the aircraft I intended to build has the later type exhausts. So I use the indicated parts for the later-type exhaust. The cowling interior was painted XF-71 before the entire assembly was glued to the fuiselage.

Painting and Decaling
As stated before, Hasegawa provided two marking schemes for this boxing of their Hayate. As the sub-title implies, both options were from the 22nd Sentai. The first is an early Hayate in brown with green patches and the second in green. Both options have silver undersides. However I decided to build a different aircraft. I still have leftover decals from my earlier Tamiya Hayate and I intended to build a machine from the 58th Shimbu-Tai (Special Attack Squadron aka Kamikaze based at Miyakonojo airfield in Honshu) flown by 2nd Lt. Yasushi Tominaga with its skull-and-crossbones insignia. The aircraft was painted in green and grey-green. First I sprayed the upper part of the model with Tamiya TS-30 Silver Leaf and then the green portion was painted using Tamiya XF-13 JA Green whilst the grey-green was painted using XF-14 JA Grey. Once the paint had dried, I used Dymo tape to rip up the JA Green, concentrating on high-use areas. The prop blades were painted Gunze H312 Light Green and the spinner XF-7 Flat Red.

With the exception of the squadron insignia and aircraft number, I used all of the kit's decals. Hasegawa's decals remain quite thick but at least the white parts were white, and not ivory as in their previous kits. The 58th Shimbu-Tai's insignia came from the spares box. It looked a bit aged and quite difficult to came off the backing paper and I had to give extra care. It all went well however and all the decals were given the Mr Mark Softer treatment.

Finishing
The remaining parts such as the aerial, pitot tube, drop tanks and landing gears can now be glued to the model. I added  a bit of Tamiya Weathering Master 'Soot' for exhaust stains and sludge wash for the panel lines. Finally Tamiya TS-80 Flat Clear was used to wrap up the build.

Conclusion
Hasegawa's Hayate is one of their best products in 1/48 scale and it was easy to build. In words of one modeler, it makes an average modeler good and good modelers even better, just like the real plane (it was easy to fly, even for pilots coming from the abbreviated training syllabus) 

Friday 14 June 2013

Attack Falcon Of The Desert


Historical Background
Buoyed by the success of the biplane Fiat CR.32 Freccias of the AviaciĆ³n Nacional and Aviazione Legionaria during the Spanish Civil War, Fiat proposed to the Regia Aeronautica a more advanced fighter based around the 840-hp Fiat A.71R1C.38 air-cooled radial engine and of a clean, robust sesquiplane (unequal span biplane) design. Despite the biplane configuration, the new CR.42 was of a 'modern' design based on a strong steel and alloy frame incorporating a NACA cowling for the engine with fairings covering its fixed landing gear. The CR.42 also proved to be agile, thanks to its low wing loading although it lacked pilot armour and radio. During evaluation, the CR.42 was piited against the Caproni Ca.165, another biplane design with higher speed at the cost of maneuverability. The Falco was eventually picked for series production as it was judged superior in terms of maneuverability - a performance indicator for fighter aircraft of the first- and second-generation but were increasingly secondary for modern monoplanes. The Fiat CR.42 Falco entered service in May 1939 and despite the general obsolescence of biplanes, about 300 had been delivered to the Regia Aeronautica by the time Italy entered the war. It also enjoyed export success, being purchased by Hungary, Belgium and Sweden. The Luftwaffe also took over some ex-Regia Aeronautica CR.42s following the Italian Armistice and later ordered 200 CR.42LW (Luftwaffe) for use in night harassment and anti-partisan roles.

In combat the Falco was unable to operate effectively against modern opposition, relying heavily on its maneuverability and the skills of its pilot to survive. Over the skies of Northern and East Africa, the fight was more or less equal against the opposition's bomber and recon planes and also against the Gloster Gladiator, the RAF's last biplane fighter. Even when pitted against the Hurricane and Spitfire at the abovementioned theatre and also during the Battle Of Britain, the Falco can still hold its own. Even the Belgian Falchi managed to score victory over the vaunted Messerschmitt Bf 109. Eventually however, like when facing the agile Japanese Zero, the best way to combat a CR.42 is by using the slashing attack rather than getting into a maneuvering combat. Faced with the change in the enemy's tactics and its own increasing obsolescence, the CR.42s were progressively withdrawn from fighter units and were re-assigned to attack units. The attack (or assalto) version of the Falco can carry bombs of up to 220lb under each wing.

The Kit
Classic Airframes is an American company renowned for producing limited-run models of aircraft that mainstream manufacturers tend to overlook, such as the British Defiant and Whirlwind. The CR.42AS kit is Classic Airframes' third CR.42 kit following their earlier release of the CR.42 fighter and CR.42 export version. The kit actually allows one to build the Assalto as well as Africa Settentrionale (North Africa = 'tropicalised' i.e fitted with sand filter). So with aftermarket decals, one can also build an assalto with or without the filter or a standard fighter with the filter.

The kit is of mixed-media type. The plastic parts was made from low-pressure ejection styrene but have good engraved and 'fabric' details. Being a short-run kit, the parts do not have locating pins. The resin parts consisted of the engine, some cockpit parts, exhausts (including extended exhausts for the Luftwaffe option), bomb racks and the bombs themselves. There were also two PE frets, made by Eduard, one of them in colour. The windshield was made of clear styrene, and not vacform (thank goodness!) Markings are provided for four aircraft. The instructions came from the earlier CR.42 kits and an additional sheet was included to show the steps for the AS version. There is also a photo of a completed cockpit to help in assembly. Decals were provided for four aircraft:

- Scuola Caccia d'Assalto, Ravenna circa 1942.
- Sezione Autonoma Collegamenti, Rome-Centocello, c. 1945-1946
- 15° Stormo d'Assalto, Barce, Cyrenaica c. 1942
- 2./Nachtschlachtgruppe (NSGr) 9, Turin-Aeritalia c. 1944

Construction
The cockpit assembly is made up from resin and PE. Construction looks straightforward and the enclosed xeroxed photo helps (and if the photo is not clear enough, there are clear, coloured copies on the internet). Dry-fitting showed that the cockpit floor is too wide so the first order of business was to sand down the edges  until it fits nicely between the cockpit halves. To help with assembly, I decided to build the cockpit from the centre outwards.I painted the interior Grigio Anticorossivo using Gunze H308 Light Grey. The rather difficult area is concerned with the PE parts especially those forming the delicate cockpit frame. Extra care was needed here to avoid distorting the cockpit frame through brute force or sheer carelessness. One half of the PE fret is in colour, which includes the seat belt and harness, cockpit instrumentation and side console, and they look beautiful. The two-part PE instrument panels were stuck together using Tamiya X-22 Gloss Clear and the assembly was glued together with the PE gunsight mounting on their places. The cockpit assembly was then glued to one half of the fuselage and then both fuselage halves were glued together.

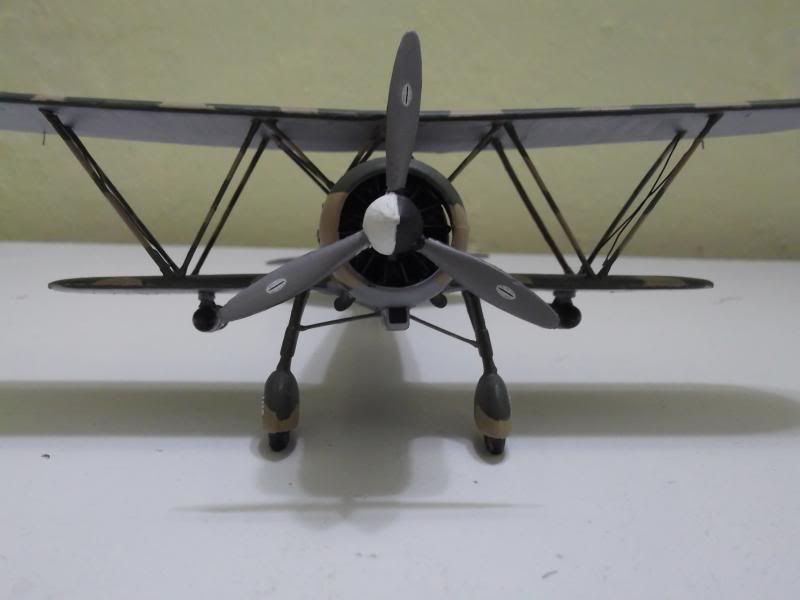
I then attached the lower wings, which is in one piece. Generally, fit is good except for the front, which received a bit of attention from Tamiya Putty. The horizontal tails were next and there is also a bit of fit issue here. I then turned my attention to engine. CA made really beautiful mould of the engine which consists of the crankcase and separate cylinders. From what I read in modeling magazines, CA resin engines did not fit inside their cowling but in this case, after assembling the cylinders to the crankcase and dry-fitting the cowling, the assembly fit perfectly. The crankcase was then painted XF-53 Neutral Grey and the cylinders Mr. Color 28 Steel and drybrushed Mr. Color 8 Silver. Afterwards, the PE rocker arms were superlgued to the front of the engine and then engine assembly was mounted to the airframe. For this, CA provided a positive mounting which sat the engine correctly. The sand filter was then attached to the cowling.

Now comes the rather hard part - mounting the upper wing. To help in this step, I taped the upper wing face (or the 'up' side) down on my working table. The model was then aligned over the upper wing and made level using plasticene. I worked inside-out, starting with the innermost cabane struts. CA however got their drawings wrong for the innermost cabane struts - it should be in the normal 'v' position instead of inverted. Suffice to say it took a lot of patience to assemble the struts but in the end I got it done. I also rigged the outermost struts but instead of using fishing lines (as with my I-153 built) I used copper wire and since I got a bit jaded after assembling the struts, I simply measure, cut and superglue the wire into position instead of drilling locator holes. The result? Sloppy, un-tensioned wires! The landing gears were the last part assembled prior to painting. Construction was straightforward. CA have the tyres with flat moulded in. It however looked like a flat tyre rather than tyres being compressed by weight! Unlike previous builts, I added the tiny parts, such as the flying control horns at this stage.

Painting and Decaling
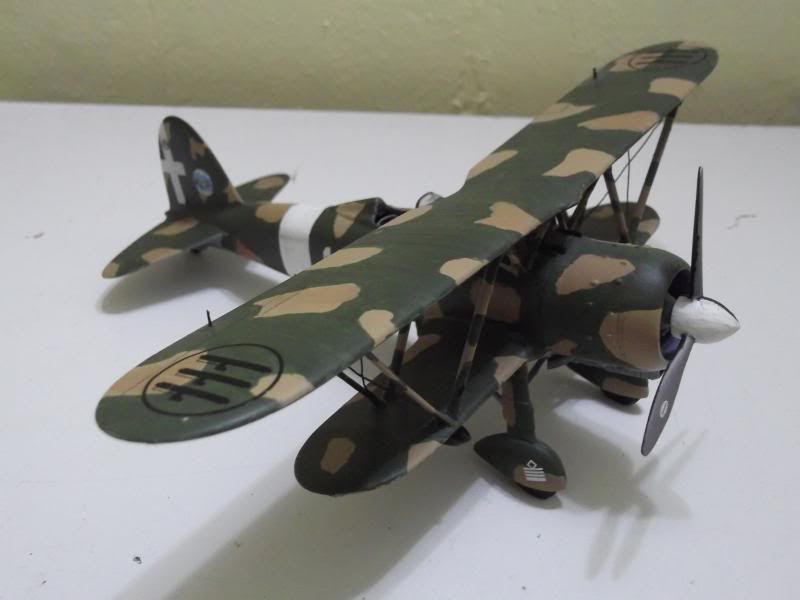
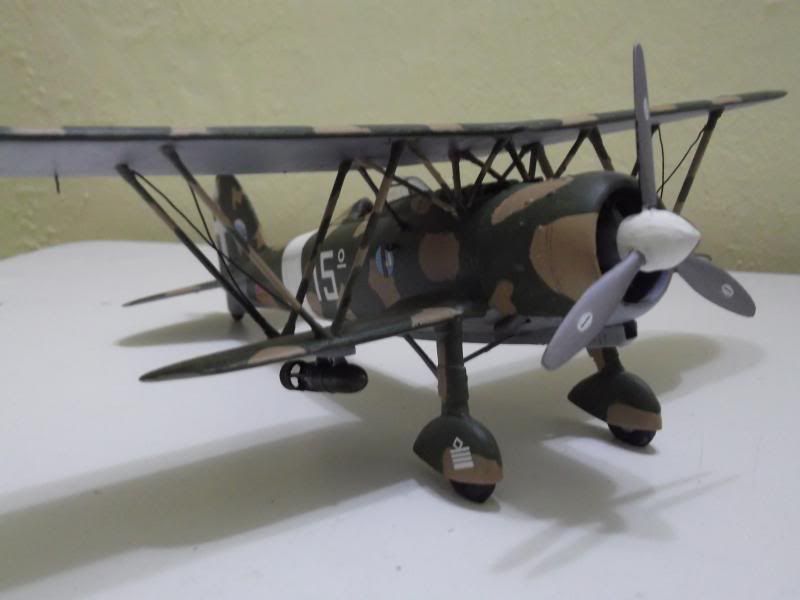
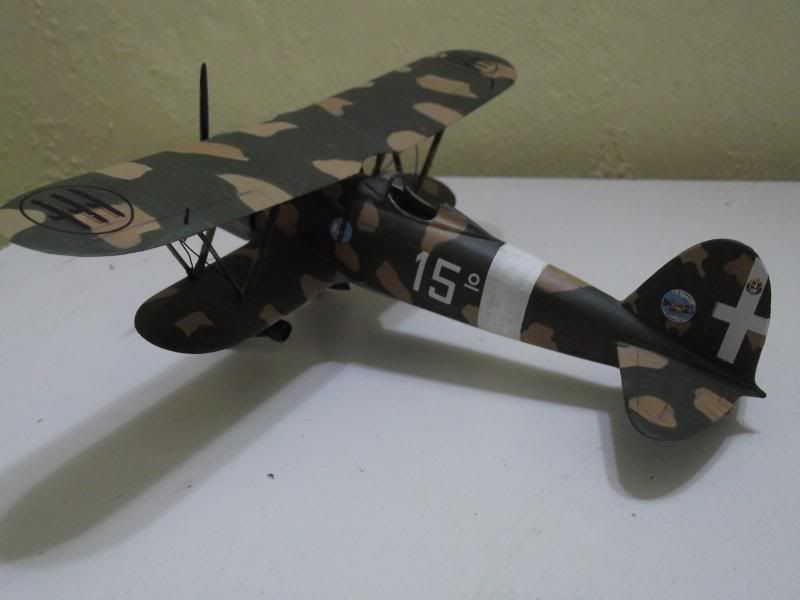
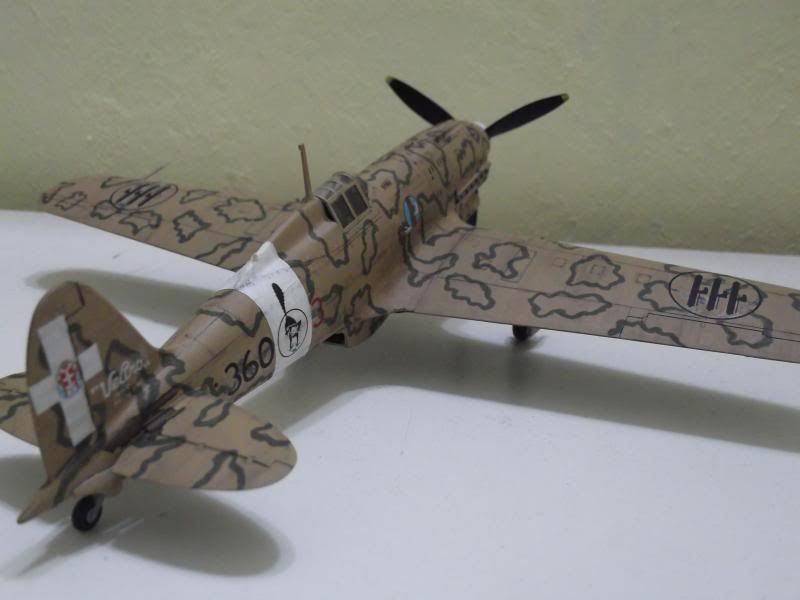
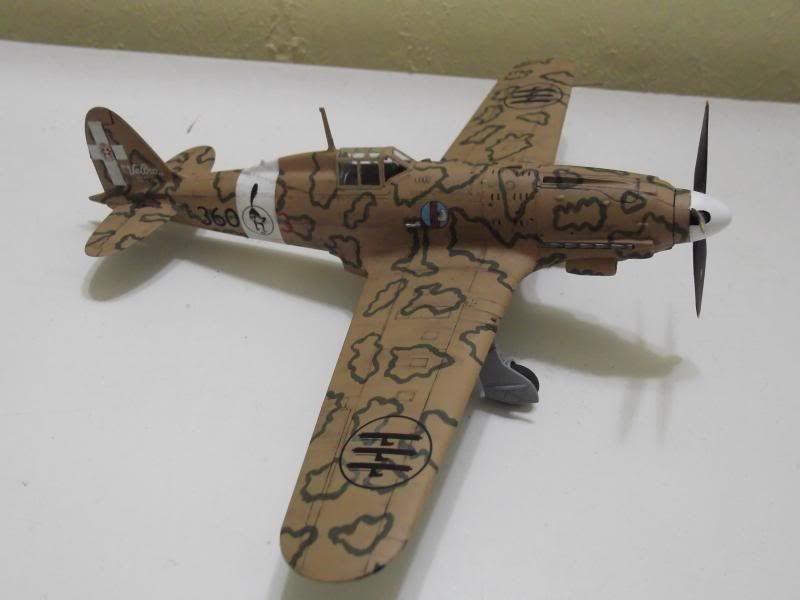
I should mention that the decision for marking options should be made before construction began as the options feature different details (the Luftwaffe Falco has extended exhausts and no wheel spats, two other options have partial wheel covers, for example). I chose the markings for 15° Stormo d'Assalto. Of so-called 'lizard' scheme, it consists of Grigio Azzurro Chiaro bottom and Verde Olivia Scuro upper with large blotches of Giallo 3 over the green. I used Tamiya XF-66 Light Grey and XF-2 Flat White for Grigio Azzurro Chiaro, Tamiya XF-67 NATO Green for the Verde Olivia Scuro and XF-59 Desert Yellow for the Giallo 3. The fuselage band was painted XF-2 Flat White. Once dry, I started putting on the decals. The decals were made by Microscale - thin and in good register. All the decals were then subjected to the usual Mr Mark Softer treatment.
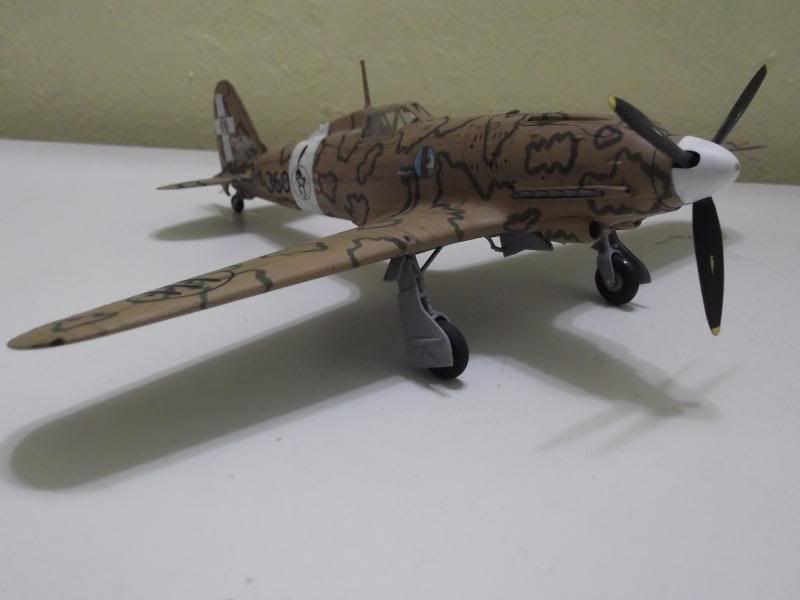
Finishing
To finish the model, I glued on the remaining parts. The propeller blades were painted XF-1 Flat Black on the inside faces and XF-16 Flat Aluminium on the outside and put on the decal for the manufacturer's label. The bomb racks were next and I had to resort to internet photos as there were no location markers for them. One of the bombs however has its tail broken as a result of clumsy sawing. The bomb was superglued back onto the pouring stub (at the broken area only) and then carefully cut again The bombs were painted XF-61 Dark Green and glued onto the racks. The whole of the model were then sprayed with Flat Clear.

Conclusion
The CR.42 was both my second biplane and Classic Airframes kit. The first was a Polikarpov I-153 Chaika which was also an earlier CA release. The CR.42 showed advances made by CA over the years despite being a limited-release modeling company. The resin parts are first-rate and so were the PE and the decals. The plastic parts, especially the fuselage were rather thick but it should be easy to overcome with dilligence. CA should be congratulated for producing the kit of one of the last fighter biplanes in service and to think of it, of the last biplane fighters in World War 2 (Gloster Gladiator, Polikarpov I-153, Fiat CR.42 and Avia B.534), models of two of them were made by CA. 

Thursday 6 June 2013

Italian Racing Dog


Historical Background
In 1941, in order to further improve the performance of its fighters, the Regia Aeronautica decided to licence-produce the German Daimler-Benz DB 605 1,475-hp liquid-cooled, supercharged inverted V-12 engine, which Fiat  produced as the RA.1050 R.C.58 Tifone (Typhoon). Aircraft manufacturers were invited to submit their designs using this engine as 'Series-5 Fighter' and imported DB 605s were provided for prototype use. Macchi's submission became the C.205, using the C.202 as starting point (the other entries were Reggiane's Re 2005 Sagittario and Fiat's G.55 Centauro). 

As Aeronautica Macchi had used the closely comparable (in size) licence-built DB601 in the C.202, the existing airframe can easily be adapted for the new engine. The C.205 was basically similar to the C.202 but with some differences: the tail and was larger, the aerial mast was bigger (in Serie III) and the cockpit and hump redesigned. It was designed mainly as an interceptor but with good escort and ground attack capabilities. The main production version, C.205V was first flown on 19 April 1942. It was however considered a stop-gap measure pending the definitive C.205N with bigger wings to improve better performance at high altitude (the latter did not see service eventually). The C.205 (named Veltro or Greyhound) was armed with two 12.7mm Breda-SAFAT machine guns in the nose. Early production aircraft (Serie I) was also armed with two 7.7mm machine guns in the wings. Later production aircraft (Serie III - there was no Serie II) replaced the wing machine guns with 20mm cannons.

The Regia Aeronautica placed an order for 250 C.205s and the first Veltro left the production line in September 1942. However due to the complexity of the manufacturing process coupled with the shortage of engines and strategic materials, Aeronautica Macchi only managed to complete the Serie I production of 100 aircraft in June 1943. By the time of the Armistice in September 1943, only 77 Serie IIIs were delivered. The Veltro entered service in February 1943 with the 1° Stormo the first unit using it in action in late April 1943. In their first combat the Veltros gave good account of themselves against the more numerous P-40s and Spitfires. Whilst it performed well, the armament for the early Veltros remain inadequate especially when used against bombers. At the time of the Armistice on 8 June 1943, there were only 66 C.205s left in usable condition. Six of them escaped to the south and joined the Italian Co-Belligerent Air Force and another 29 fled north to join the Aeronautica Nazionale Repubblicana. Macchi managed to complete another 72 Serie III aircraft until the factory was put out of action by American bombing in May 1944. The Veltro also served with the Croatian Air Force and the German Luftwaffe. Post-war, the Veltro was used by the Aeronautica Militaire Italiana until 1951 and it was also exported to Egypt with the aircraft coming from ex-Italian stocks and also by upgrading C.202s to C.205 standard.

The Kit
This kit is the first of Hasegawa's Veltros, being released in 1995. Upon opening the box, the content looks very familiar - it was virtually the same sprue and parts found in Hasegawa's C.202 kit with only the lower cowling, prop blades and spinner being new. The fuselage halves was redesigned to incorporate the Veltro's retractable tail wheel. Looking at the parts breakdown, which includes wing cannon barrels, Hasegawa has intended for multiple release using the same mould (which they did). The kit is of typical Hasegawa quality with nicely engraved panel lines. Decals were printed by Cartograf and provides markings for two aircraft. 

Construction
Where else to start building an aircraft model than the cockpit? Hasegawa provides a nice enough cockpit although detailers might want to add PE parts or substitute it with resin. The interior was painted Tamiya XF-21 Sky which to my eyes looked similar with the Italian Verde Anticorrosione. The seat was painted Mr. Color 8 Silver. Hasegawa did not provide seat belts and the seat looked real plain inside the cockpit. The instrument dials can be painted or one can use the decals provided - I chose the latter option. Before closing up the fuselage, I enlarged the slots for the exhausts as per the instructions. Then the cockpit assembly and a part for holding the propeller were inserted into their respective slots and the fuselage closed up. The upper cowling, air filter and horizontal tailplanes were then added. Fit was good for all these parts.

The wing assembly were next, no issues here except that the members of an internet modeling forum mentioned that some panel lines need to be smoothed over as they were not present on Serie I aircraft. I however found out about that only after the painting stage, so the panel lines remain. afterwards I glued the lower cowling to the fuselage. there is just a little fit issue but easily dealt with putty and sandpaper. the last part attached at this stage was the underbelly radiator. The wheel wells and the inside of the landing gear doors were painted RLM 76 Lichtblau before the main painting sequence.

Painting and Decaling
Hasegawa provided markings for two planes : a Veltro belonging to 360ĀŖ Squadriglia, 155° Gruppo, 51° Stormo and the other is from 88ĀŖ Squadriglia, 6° Gruppo, 1° Stormo. Hasegawa however got the illustrations reversed in the instructions - the pouncing cat insignia (51° Stormo) is marked as 1° Stormo and the Archer insignia of 1° Stormo as the 51° Stormo! Both marking options are in Nicchiola Chiaro tops and Grigio Azzurro Chiaro bottoms with Verde Oliva Scuro 'smoke ring' pattern. I first painted the bottom using a mix of Tamiya XF-66 Light Grey and XF-2 Flat White. The upper colour was painted using Tamiya XF-59 Desert Yellow. The 'smoke ring' patterns were painted using Tamiya XF-67 NATO Green. There is one reminder when painting though : do not trust the instructions 100%. The smoke ring patterns are exactly that : irregular ring shapes all around the upper fuselage and wings. Hasegawa's instructions however shows some apparently meandering pattern especially around the engine cowling and wing roots! The wing guns were represented by just two raised detail and should be replaced with hypodermic needles or plastic rod. Since I do not have any of the items, I simply paint it Flat Black and 'metalized' it with 2B pencil.

For the markings I chose the 51° Stormo for the simple reason that it has a cat in its insignia (I am a cat lover myself). Hasegawa again erred in its instructions - the red numeral 3 identifying the individual aircraft should always be forward of the fuselage ID band whilst the instructions had the '3' at the rear of the band for the starboard side. I also had to cut off two digits from the Roman numeral III and turn it into a 'I' for the stencils at the vertical stabiliser, as this model is of a Serie I aircraft.

Finishing
The remaining parts - landing gears and their doors, aerial, exhausts, pitot tube, canopy and the propeller - were fitted at this stage. The exhausts however looked quite shallow. As for the aerial, it was actually more suited for serie III aircraft as the serie I aircraft were fitted with C.202-style antenna. Humphhh, should've kept the aerial from my Folgore built! The entire model was then subjected to a sludge wash and everthing was sealed off with Tamiya TS-80 Flat Clear.


Conclusion
Hasegawa's Veltro is no doubt an excellent kit. The details and fit are very good and it came together easily. Its somewhat modular construction allows one to build a Serie III aircraft from this kit - all you need is an aftermarket decal sheet. And actually, I wanted to build an ANR machine just to illustrate the break-up of the Regia Aeronautica post-Armistice. but since someone had bought the ANR boxing of this kit before me at Hobby HQ, I had to buy this kit at World Hobby Miniatures and settle for the kit decals instead of getting an aftermarket decal sheet.  

Saturday 1 June 2013

Kallang Moo


Historical Background
In 1935, the US Navy issued a specification for a new carrier-borne fighter to replace the biplane Grumman F3F. Brewster Aeronautical Corporation came up with their XF2A-1 monoplane design to compete against Seversky's XFNF-1 (a navalized P-35) and Grumman's biplane XF4F-1 (Grumman later reworked this design as the more well-known Wildcat). Early tests showed that it has better performance against its rivals (the XFNF-1) was knocked out early due to its inability to reach 430 km/h) and the US Navy awarded Brewster with a contract for an initial batch of 54 aircraft designated F2A-1.

The F2A, despite its tubby appearance, had a host of modern features. It was of all-metal, stressed-skin construction although control surfaces remain fabric covered. Landing gears were hydraulically operated and the canopy streamlined into the fuselage. It however lacked self-sealing fuel tanks and pilot armour. The aircraft was powered by a 950-hp Wright R-1820-22 Cyclone and was armed with one 12.7mm M2 heavy machine gun and one 7.62mm Browning machine gun in the nose. In June 1938, production of the first variant, F2A-1 (export designation B-239) were underway. Production aircraft were weighed down by additional machine guns and other operational equipment specified by the US Navy, degrading its climb performance. The second variant the F2A-2 (export designation B-339) has more powerful version of the R-1820 but again, the plus performance figures were negated by increased weight. The F2A-1 and -2 however were well-liked by Navy and Marine pilots, having good turning and maneuvering abilities. The final version, F2A-3 however were weighed down even further with armour, more fuel and other equipments that degraded its performance even further.

In 1940, the British Purchasing Commission went to the United States to acquire American planes to supplement domestic aircraft production. The Buffalo caught the attention of the Committee and the remaining machines ordered by the French, suspended after the fall of France, were passed to the UK. The RAF acceptance personnel criticised the Buffalo for its lack of armament and armor, poor high-altitude performance, engine overheating, cockpit controls and maintenance issues whilst praising its handling, roomy cockpit and visibility. With a top speed of 520km/h at 6,400m but with fuel starvation issues above 4,600m, the Buffalo was considered to be unfit for Western European service. But with the shortage of fighters in the Asia-Pacific theater, the UK ordered additional 170 Buffalos using type specification B-339E to equip RAF, RAAF and RNZAF units in the region.

The Type B-339E, also known as Brewster Buffalo Mk1 in British service differed from the B-339 by having the arrester hook and naval life raft container removed. New items, including British gun sight, gun camera, larger tyre for the tail wheel, fire extinguisher, engine shutters, a larger battery and reinforced armour plating and armoured glass behind the cockpit canopy were added. These added some 400kg to its weight and the larger tail wheel added more drag, reducing speed at typical combat altitudes from 520km/h to 504km/h. To make matters worse, the Buffalo Mk1 was powered by Wright R-1820-G-105 Cyclone rated at 1000hp, 200hp less than those which powerd the F2A-2 (B-339). In addition, many of the Wright Cyclones were actually rebuilds from civilian Douglas DC-3s. So bad was the performance of the Buffalos that at least one RAF squadron threw out the armour plate, the armoured glass, gun camera and even the radio plus replacing the 12.7mm MGs with 7.7mm ones in order to improve the performance. Too add further insult, the pilots were inadequately trained and experienced in their mounts. The Japanese aircraft were of unknown quality and the best tactics to counter them were not yet developed (despite the American Volunteer Group's experience in China)

When hostilities began on 8 December 1941, the Buffalos performed adequately against the main Japanese fighter, the Nakajima Ki-27 Nate, scoring a respectable number of kills. However when confronted with the Nakajima Ki-43 Oscar, the Japanese soon overwhelmed the Buffalos. The Buffalos also suffered from engine overheating in the tropical heat, spraying oil against the windshield causing missions to be aborted and allowing greater freedom to enemy aircraft. By the end of the Malayan Campaign on 15 February 1942, the Buffalos claimed 80 kills, most of them bombers whilst losing at least 60 in combat, 40 on the ground and 20 in accidents. Surviving aircraft were withdrawn to India and Java. The Buffalo's performance in South-East Asia and during the Battle of Midway cemented its reputation as a hopeless fighter aircraft despite the fact that the Finns, who operated the better performing F2A-1, scored large number of kills against the Soviets.

The Kit
Tamiya released the B-339 kit in 2004. It wasn't new though - it was a re-release of the kit originally hitting the market in 1974. The original offering included parts and decals to build US, RAF and Dutch machines. The kit was already out-of-production by the time I started this hobby in the mid-1980s. Tamiya did a previous re-release in 1998 but one can only build the US F2A-2 version. The 2004 version returned the parts needed to build a B-339 such as the tailcone, British gunsight, and the larger tail wheel. The kit came in four dark grey and one clear sprues, a decal sheet and a painting mask (not precut though). Considering the age of the moulds, the details (both engraved and raised) are still sharp. The decals were printed by Cartograf , providing markings for four Buffalos (2 RAF, one Dutch East Indies Air Force and one US Navy) and looks very good indeed.

Construction
As usual the pilot's office gets the first attention. Tamiya suggested British Interior Green for its colour although being a US-build plane, I suspect that it should be US Zinc Chromate. Anyway, I succumb to the instructions and paint it British Interior Green using a mix of Tamiya XF-5 Green, XF-21 Sky and XF-65 Field Grey. Details were painted in Flat Black and the seat in XF-16 Flat Aluminium. The instrument panel is made up from plastic base and decal. The Buffalo, like the F4U Corsair, is of 'floorless' cockpit design and (in the model form) the seat is hung from the rear bulkhead. There is not much detail inside the cockpit and the fuselage halves were closed up. However there is some fit issues here especially on the decking behind the cockpit but nothing a reasonably competent modeler cannot do. The upper and lower wing halves were mated and the sub-assebly mated to the fuselage. The horizontal tailplanes were also added at this stage. The engine was painted Mr. Color 28 Steel and drybrushed Mr. Color 8 Silver and cemented to its slot. The cowling halves were then mated together and fixed in place.

Before I glued the canopy, I added the remaining cockpit parts. The roll bar however broke when I cut it off the sprue. I should have glued the broken parts together but one of the halves were lost to the carpet monster. Then, I should have cut the broken arm off and replaced it entirely with plastic rod. But what did I do? I just glued a bit of plastic rod to the broken arm and it ended up looking real bad! The canopy and the ventral window went next. As mentioned before, Tamiya includes masking tapes for these items. They are not precut like Eduard's but using a fresh blade and having a steady hand helps in cutting out the shapes. Looking at the painting diagram (I chose the 488 Squadron RNZAF scheme) there is no need to mask the ventral window as it was painted over. As usual, the fragile parts were left off until after painting is done.

Painting and Decaling
Tamiya gave you four marking options: 488 Squadron RNZAF, Kallang Singapore, December 1941; 67 Squadron RAF, Mingalodon, Burma, 1941; 2-VLG-V, Dutch East Indies Air Force, Java 1942 (before the fall of Singapore, it was also based at Kallang) and VS-201, USS Long Island (AVG-1), 1941. I chose the 488 Squadron option as it featured a nice dragon nose art. The upper camouflage pattern was painted using Gunze Aqueous RAF Dark Green and Dark Earth. The Dark Green used is actually for post-war aircraft but since that's the only shade available, I had to use it. Whilst the Dark Earth is of the right tone, I believe I added too much white (for scale effect). The bottom of the aircraft was painted XF-69 NATO Black and XF-21 Sky. On this particular aircraft (DW-O), the front of the engine cowling was taken from another aircraft, so the underside is painted wholly XF-21 Sky and the upper camouflage was painted with a slightly different shade of the respective colours. Once the paints were cured, it was decaling time. For the dragon nose art, Tamiya included white underlay decals to avoid underlying colours from bleeding through. The decals went on without any problems and responded well to Mr Mark Decal Softer.

Finishing
The remainder of the parts such as landing gears, aerials and propeller can now be added to the model. I however left off the bombs and their pylons off as Commonwealth Buffalos in Malaya and Singapore were used in air-to-air combat only. The model was then subjected to sludge wash and a final spray of Flat Clear. The masks were then peeled off and I can declare the build completed. Some time after I finished this model, I came across an internet discussion forum. A member of the said forum pointed out inaccuracies of Tamiya's marking instructions namely:
- the dragon nose art is on the left side only
- portside underwing roundel did not have yellow outer ring
- all wing roundels placed at the very tip of the wings
- code letters in Sky
- ventral window not painted over

Oh well.....

Conclusion
Tamiya's Buffalo has stood the test of time, considering the general state of model kits in the 1970s. The parts still fit very well (generally, that is) and the panel lines are crisp, it would be even better if the remaining raised panel lines (where appropriate) are engraved. The inclusion of painting masks is very welcome indeed. The decals are rather thick but have good register. The only downside is that decal placement instructions.....