Thursday 22 December 2016

Italian Workhorse


Historical Background
In December 1937, the Regio Esercito issued a requirement for a new tank to replace the L3 tankette and the M 11/39 medium tank. To save on development time, the tank was to be based on the M 11/39 but with a redesigned upper hull supporting a turret mounted with a Breda modello 35 47mm gun and a co-axial Breda 8mm machine gun while a twin Breda 8-mm was to be mounted in the hull; in other words, the new tank reverses the armament placement of the M 11/39. The development of the tank, designated Carro Armato Medio M 13/40 (13 from the weight in tons and 40 from the year of production, 1940) was placed under the supervision of the Inspectorate of Technical Services. The first prototype was made ready by Fiat-Ansaldo in October 1939 but the Army only accepted it for production in March 1940, following changes and set-up of the production lines.

The M 13/40 was constructed of riveted steel armour plates with thickness of 30mm (front), 42mm turret face, 25mm sides, 6mm bottom and 15mm on top. The fighting compartment was placed in a forward position with the driver and the radio operator/machine gunner in the hull and the gunner and the commander/loader in the turret. The entire lower hull was basically unchanged from the M 11/39. The running gear was made of two bogies per side, each with eight pairs of small road wheels, using leaf-spring suspension. The M13/40 was powered by a Fiat SPA 8 TM V-8 diesel engine, while contemporary designs were still using petrol engines. While sturdy, its power output was only 125 hp and can only drive the M 13/40 at 32 km/h in the best conditions. Being a diesel engine however, it gave the tank a good range while reducing the risk of fire. The M 13/40 was armed with the tank version of the Cannone da 47/32 M35 anti-tank gun. The gun had a performance similar to the Soviet 45mm gun arming the T-26 and BT tanks and can pierce 45mm of armour at 500 meters. This was sufficient against the British light and cruiser tanks, although still ineffective against the heavily armoured infantry tanks. 104 rounds were provided for the main armament, with 3,200 for the three (sometimes four, when the AA MG is placed on the roof) machine guns.

The M 13/40 saw action during the Italian invasion of Greece in 1940 and in North Africa, where many M 13/40s fought until the end in May 1943. While able to hold their own against the early Allied tanks, they became less effective when confronted with later tanks. Despite their relative firepower advantage over the British tanks, the units equipped with the tank were newly formed and thus lacked cohesion, this was worsened by the fact that the tanks were not fitted with radios and the crews lacked training. The M 13/40 first saw action during Operation Compass between 9 December 1940 to 9 February 1941, where they suffered large losses. Many were captured intact and were used by the Australian 2/6th Cavalry Regiment and 6th Royal Tank Regiment. The tanks were painted with large kangaroos on the turret sides to avoid friendly fire. The tanks were discarded when the 8th Army received better tanks. With the introduction of the QF 6 pounder AT gun, 75-mm armed Lee/Grant and 6-pounder armed Crusader III, the M 13/40's weakness were further unravelled. The thin armour can be easily pierced by the more powerful projectiles while the rivets used in the construction can become lethal projectiles inside the tank when hit.  

The M 13/40 spawned other variants. Chief among these were the M 14/41 medium tank, with a more powerful engine and better air filters (especially for service in the North African theatre); M 15/42 medium tank with petrol engine and longer 47 mm L/40 gun; Semovente Comando M40 turretless command tank and the Semovente 75/18 self-propelled gun, modeled after the German Sturmgeschutz assault guns.

The Kit
This is the original release of Tamiya's M 13/40, which first hit the stores when I was two (specifically 1974). Upon opening the box, you will find....a different tank. While the box top says that it contains parts to build an M 13/40, the parts inside the box are actually for the upgraded version of the M 13/40, that is the M 14/41. This is mainly because of the full-length fenders and lateral rather than longitudinal slats on the radiator grilles. There are also some details missing, or wrong, such as the exhaust mufflers, no inspection holes in the front upper fenders, missing bolt details and no lightening holes in the wheels. The level of moulding however is generally very good (for a 1970s kit that is). Decals provide markings for basically three vehicles : an M 13/40 (M 14/41?) from the Ariete Division, another one from the Littorio Division and a captured example used by the Australians, with large drawings of kangaroos on the turret sides. Extra company markings were provided for the Italian options. Despite the release of the newer (and actually being an M 13/40) kit, I stick to this one as it has been in my stash for years.

Construction
As usual construction started with the lower hull. Despite the instructions having you assemble the suspension and wheels, I started by adding the front and rear hull plates first and was followed by the idler wheel mounts. Afterwards, as per my usual style, the lower hull, suspension and wheels were painted with the latter two items while still on the sprue. I however used the newer kit's mix for the basic desert brown colour rather than the vague (which I assume to be XF-59 Desert Brown) one in the original kit. The paint was retouched afterwards and the suspension and wheels assembled. The M 13/40 family, like the Panzer IV, has 16 road wheels on each side, which makes for quite tedious painting and assembly. The one-piece engine deck, track and engine covers was then cemented to the hull. The tracks were left off until later as they are of the flexible vinyl type and can be added after painting. talking about the tracks, it was of the typical old style Tamiya ones with no details whatsoever on the inside face of the links.

The upper hull is a multi-piece affair consisting of the roof, side plates, access door, hull  machine guns (just the external parts only), periscope and the headlights. Make sure the assembly aligns correctly else you might have an offset upper hull. I did that by temporarily placing it on the lower hull to check the alignment. Although fairly aligned with the hull, there are a few gaps which had to be dealt with, especially on the joint between the roof and the sides. The upper hull assembly was then cemented onto the lower hull. Again there are gaps between the superstructure and the lower which needed puttying. The turret is also a simple affair, consisting of the shell, bottom, face, simplified trunnion, main gun barrel, hatch doors and an AA MG. The parts were cemented together with just a bit of filling needed on the roof. The muzzle is solid so I decided to drill them out. Unfortunately due to my crap drilling skills, the hole was off-centre! Oh well, better that than the solid muzzle. The exhausts and the boarding step were left off as I intended to add the tracks after painting has been done.

Painting and Decalling
As mentioned before, the kit's instructions stated that the base colour is 'sand brown' which I originally assumed to be Tamiya's XF-59 Desert Yellow. However, the instructions in the newer, re-tooled M 13/40 kit shows it to be 2 parts XF-60 Dark Yellow and 1 part XF-59 Desert Yellow and this was the mixture I used for this model (and on my model of the AB 41 armoured car). And, in of those moments, I realised that I have run out of XF-58 Olive Green, so no camouflage for this model. As for markings, I decided to do the less-known Littorio Division. There weren't any distinction between their markings and Ariete's - just the numerical designation. As for individual tank markings, I picked tactical symbols that identified the model as the 3rd vehicle in the 3rd platoon of the 1st company. Paint chippings was then simulated using XF-1 Flat Black and XF-64 Red Brown. The aerial recognition marking, a white circle, on the roof was not painted.

Finishing
OK, this is an out of the usual sequence affair. I decided to add piles of sandbags, acting as additional armour, to my model after basic painting had been done, Using the two-part epoxy putty technique previously used on my M5 Stuart, the sandbags were sculpted and placed onto the glacis plate. Somewhat absent-mindedly, I forgot to refer to many photographs available on the subject. There is quite a leeway here as the crews piled the sandbags on their vehicles as they see fit. The supplied jerricans, although of the Italian pattern, was crude. I replaced them with German jerricans from an AFV Club set (well, they were allies right?) The sandbags were painted XF-57 Buff and washed with brown. The same brown wash then was applied on the model although the leaf springs were washed with a black solution. As the model intended to represent a North Africa-based vehicle, an overall layer of dust was needed and I used MiG Productions Iraqi Dust (must get other shades of dust for variations). 

Conclusion
While fairly nice back in the 1970s, the first version of Tamiya's M 13/40 was crude by current standards especially the rubber band tracks and the solid gun muzzle (and not to mention being the wrong tank). Straight OOB, based on my readings, this particular Tamiya kit represents an early M 14/41 (more or less) and that particular error (or maybe not, depending on your point of view) has been rectified by Tamiya in 2008. The newer (and correct) M 13/40 not only have that tank's features but also some improvements such as better-detailed Italian jerricans, link-and length (and detailed!) track links and one-piece aluminium barrels. The original kit, while having good details, did not have a good fit especially between the fighting compartment and the hull. While cheap (and maybe even cheaper with the release of the newer version), it was something that only nostalgics or those not having access to the newer version or those trying to improve their modelling skills may try to build. 

Sunday 27 November 2016

Cobras Of The Sea


Historical Background
The emergence of the helicopter, specifically of  Bell's UH-1 Iroquois or Huey, made the theory of air cavalry practical. In Vietnam, the Huey fleet carried troops across the country, to fight at the ground and the time of their own choosing, rather than the enemy's. However, these unarmed Hueys were vulnerable to ground fire especially when they are nearing the landing zones. Without support from nearby artillery or other ground troops, the only way to pacify the landing zones was from the air, using an aircraft, preferably another, armed, helicopter that can closely escort the transport choppers and loiter over the battlefield. Originally the Army used UH-1s fitted with machine guns and rocket launchers, but was needed was a dedicated helicopter gunship Bell has been investigating such concept since the 1950s and in 1962 had revealed a mockup of what they called D-255 Iroquois Warrior concept. The D-255 was a purpose-built attack helicopter based on the UH-1B but with a slender fuselage and the two crew sitting in tandem. It was to be armed with a turret-mounted 40mm grenade launcher in the nose, a 20mm belly-mounted gun pod and stub wings to mount rockets or anti-tank missiles.

The Army was interested and awarded a proof-of-concept contract to Bell in December 1962. Bell modified a regular Bell Model 47 (UH-13 Sioux) into Model 207 Sioux Scout which had the hallmarks of a modern attack helicopter with sleek fuselage, tandem cockpit, chin-mounted turret and stub wings for weapons. Although impressed, the Army decided that the Model 207 was too small, underpowered and generally not suitable for practical use. Instead the Army launched the Advanced Aerial Fire Support System (AAFSS) which resulted in the large and fast Lockheed AH-56 Cheyenne. It proved to be too sophisticated and was eventually cancelled in 1972. Although Model 207 was rejected by the Army, Bell persisted with their idea of a smaller and lighter helicopter gunship. Bell mated the T53 turboshaft engine, the transmission and the rotor system of the UH-1C, adding to the latter a Stability Control Augmentation System with the design philosophy of the Sioux Scout and produced the Model 209.

With the war escalating in Vietnam and the AAFSS programme stuck in technical difficulties and political bickering, the US Army asked Boeing-Vertol, Sikorsky, Kaman, Piasecki and Bell for an interim gunship design. In April 1966, Bell's Model 209 won the evaluation and a first production contract for 110 airframes were signed. Bell added 'Cobra' to the UH-1's nickname of 'Huey' becoming Model 209 HueyCobra - the name adopted by the Army for its production AH-1G. For production some modifications was made, including the adoption of simple landing skids instead of retractable undercarriage, a new wide-blade rotor and plexiglass, instead of armoured glass canopy. The first HueyCobras were delivered in June 1967. The USMC was very interested in this new aircraft but preferred a twin-engined version for better safety margin in over-water operations and also a more potent weapons in the turret. Although the Department of Defense balked at providing the USMC with a 'different' aircraft (as it viewed commonality outweighed the advantages of a twin-engined design), the Marirines had their say and awarded Bell a contract for 49 AH-1J SeaCobras in May 1968. The GAU-2 7.62mm minigun and/or M129 40mm grenade launcher of the M28 turret was replaced with a 20mm XM197 three-barrel cannon which was basically a 'halved' M61 Vulcan cannon.

In the 1970s, the USMC requested a greater load-carrying ability in 'hot and high' situations. Using Model 309 KingCobra as a basis, Bell developed the AH-1T. This model also have full TOW missile-firing capability. In the 1980s, the Marines sought to replace their SeaCobras with a navalised version of the AH-64 Apache but was denied funding by the Congress in 1981. In turn, they proposed a more powerful version of the AH-1T, designated AH-1W, called the SuperCobra which also incorporated the ability to fire AIM-9 Sidewinder AAMs, AGM-122 Sidearm anti-radiation missiles and AGM-114 Hellfire ASMs. Dubbed the SuperCobra or Whiskey Cobra, it started to enter service in 1986. A total of 179 new-built helicopters and 43 rebuilt AH-1Ts were delivered to the USMC with the last delivery taking place in 1998.

Marine SeaCobras first saw action in June 1972, interdicting the Ho Chi Minh Trail near Hon La Island. Their next action was during Operation Urgent Fury where two AH-1Ts were shot down, killing three crewmembers. The AH-1W first saw action during the Gulf War when 78 were deployed. They flew 1,273 sorties with no combat losses (although three were lost to accidents) and were credited with the destruction of 97 tanks, 104 APCs and other vehicles and two anti-aircraft sites. The SuperCobras continue to give support to the USMC to this day. In 1996, the USMC launched an H-1 helicopter upgrade programme which include upgrading 180 AH-1Ws into AH-1Z Viper standard, which was eventually declared combat ready in 2010. The SuperCobra was also exported to taiwan and Turkey.

The Kit
The 1/72 scale Italeri kit of the Whiskey Cobra came out in 1987, roughly a year after it entered service. The kit consists of 70 parts moulded in featured raised, but nice panel lines. The interior however is fairly basic and some external features specifically the various probes and aerials) were pretty oversized or crude. I'm not sure myself about the accuracy but I am pretty sure the Hellfires doesn't look the part with a more pronounced tapering and a rather suspect shape of the tail fins. The transparent parts were however very clear. The small decal sheet provide markings for just one machine. Without any unit identifying markings and codes, I believe this was one of the development, rather than an operational machines.

Construction  
As usual with aircraft model kits, construction started at the cockpit. As per my usual style, the parts and the sidewalls were painted while still on the sprue. They were painted overall XF-1 Flat Black while the seat cushions were painted XF-62 Olive Drab. And, no, I didn't bother cutting up masking tapes to make the seat belts. Before joining the fuselage halves together, I crammed 10 grams of ballast underneath the cockpit floor, as suggested by the instructions. The stabilators is a one-piece affair also need to be inserted between the fuselage halves. The next step was concerned with the engine fairing. The mounting for the rotor shaft was glued in place but I left the rotor shaft itself at this time to avoid breakage. The halves were joined together, and was followed by the air intake bits. I was quite impressed when I found that they fitted nicely, requiring no filling or sanding. The exhausts, although assembled, was left off to facilitate painting.

The engine fairing assembly, together with the stub wings were then cemented to the fuselage. To ease handling, the landing skids were also left off at this stage. The gunner's console was cemented into place. Taking caution from previous builds, especially of Tamiya's P-47 Thunderbolt, the gunner's sight was also set aside for the time being. The turret was assembled sans the cannon barrels, which can be added later. The Night Targeting System turret was assembled, also without problems and as with any other vulnerable parts, the thingie in front of the NTS was also left off. The electronics bay cheek fairings and the outboard pylon mountings were cemented before the model went for the painting stage.

Painting and Decalling
The SuperCobra model is presented in the fairly typical 1980s camouflage for the type. The model was painted overall FS 36375 Light Ghost Grey using Mr. Hobby H308. The USMC Green was painted using Tamiya XF-13 JA Green while XF-69 NATO Black was used for the black. The rocket pods were painted XF-62 Olive Drab with a band of silver at the ends of the tube. With hindsight, I probably should have painted the pods XF-13. The Hellfire missiles were also painted XF-62. The instructions just mentioned one single colour for them although photos show them having yellow  bands and/or squares on them. They were duly painted using XF-3 Flat Yellow but by this time, I got lazy and painted them freehand without masks, with predictable results! The rotor hubs were painted Steel while the rotor blades were painted XF-1 Flat Black. Cannon barrels were painted XF-69 NATO Black, after which graphite powder was applied. The decals were then applied with no problems. I just wished Italeri included a line bird rather than the development one for the markings as was done with their 1/48 kit of the SuperCobra. 

Finishing
I started the final leg by supergluing the landing skids into place, allowing the model to stand. The weapons were. The Hellfires were mounted first on their racks, which were then superglued to the wing pylons. But before that, being the innermost weapons, the rocket pods were cemented into place. The inner wing pylons do not have any alignment tabs, they were aligned using faint raised lines on the stub wings - pretty hard to see with the layer of paint over it. The cannon barrels were then stuck into place through the opening in the turret. The various aerials, cable cutters and the countermeasures dispensers were painted on the sprues before being placed on their respective places on the model. The canopy was then cemented to the model and in contrast to the rest of the kit, it had a bad fit on the left side. And, in my effort to place the canopy, stray cement managed to crept underneath my fingers, reulting in blemishes on the clear parts. Arghhh! Ak Interactive Paneliner for Grey Camo and Brown/Green Camo was then apllied. The model was then sprayed with a couple of layers of Tamiya Semi-Gloss Clear.


Conclusion

Italeri's 1/72 scale is a simple kit and can be the starter kit for those attempting to build their first helicopter model. As I mentioned elsewhere, I'm not sure about the accuracy but it does look like a SuperCobra to me. On the positive side, the parts fitted nicely and on the debit side, the most glaring ones are the shape of the Hellfire missiles and the lack of details in the cockpit. The raised panel lines is not really a problem (unless it causes you nightmares) although I think it is a bit thicker than the previous Italeri helicopters I built. In any case, this the only kit of the SuperCobra in 1/72 scale, being reboxed by Tamiya, Modelist and Testors.

Monday 21 November 2016

A Reformed Stalinist


Historical Background
The Soviet IS (Iosef/Josef Stalin) heavy tank was introduced in 1944 as a successor of the KV series tank. It was mainly used as a breakthrough tank, using its heavy, high explosive shells against bunkers and entrenched positions. It was also heavily armoured against German 88mm weapons while its 122mm gun was also highly capable against the German Panther and Tiger tanks. Entering service in April 1944, the IS was used as the spearhead of the final Soviet offensives into Germany. In late 1944, a follow-up design, Obyekt 703 was developed by ChKZ. Known as the IS-3, the tank had improved armour layout and introduced the 'inverted frying pan' semi-hemispherical cast turret which became the hallmark of Soviet post-war tanks. Although having improved protection, the low, hemispherical design diminished the working headroom, especially for the loader (the Soviets simply work around this problem by specifying that only men no taller than 5' 4" would be conscripted for tank service). The low turret, although reducing height and allowing better concealment, also reduced the gun depression angle, since the breech had little room to pivot downwards. Thus the IS-3 (and subsequent Soviet tanks) was unable to take advantage of a hull-down position on a reserve slope. The pointed prow (to deflect shells) earned the IS-3 the nickname of Shchuka (pike) by its crew. The IS-3 was first publicly revealed on 7 September 1945 during the Allied victory parade on Charlottenburgerstrasse in Berlin.

The IS family received further upgrading in the shape of the IS-4. The tank is basically a lengthened IS-2 (adding an extra set of road wheels) with improved engine and armour. Armament was still the IS-2's original 122mm gun. Problems with mobility and speed caused only 250 units to be built. Another project was the IS-6. There were two of these. The first, Obyekt 253, was an attempt to provide a practical electrical transmission system for heavy tanks while the second, Obyekt 252, used a different suspension system and using mechanical transmission. The IS-6 project was halted as it offered no significant advantage over the IS-2 / IS-3. In 1948, the heaviest and largest member of the IS family was developed. This was the IS-7, weighing in at 68 tons, armed with a 130mm S-70 gun and was thickly armoured. Mobility wasn't affected much as it was powered by a 1,050 hp engine, giving it a power-to-weight ratio of 15.4 hp/ton, a ratio superior to most contemporary medium tanks. In tests, the armour proved immune not only to the wartime 12.8 cm PAK 44 rounds, but also its own 130 mm rounds. However for reasons unrecorded, but most probably arising from its mass and the attendant issues of bridges and rail transport, the project was cancelled.

After tinkering with mostly experimental designs, the Soviet authorities concluded that an updated IS-3 design would satisfy their needs. This design, the IS-8 began its development in 1948, using many components from the experimental designs such as electrical turret traverse and elevation from the IS-7, engine derived from the one used in IS-4 and IS-6 while the D25TA 122 mm gun was a slightly improved version of the gun arming the IS-2 and IS-3. The turret resembled the IS-3 turret but armour thickness was raised to 200 mm. The increased weight of the IS-8, coupled with improved engine cooling system led to a lengthened hull (with an additional set of road wheels). Production began either in late 1950 or early 1951 at Chelyabinsk. As part of de-Stalinisation programme following the death of Joseph Stalin in 1953, the IS-8 was redesignated T-10.

As production went on, improvements were added to the basic design. The T-10A incorporated the D-25TS gun with stabilisation in the vertical axis and also a bore evacuator. To help the loader, a simple ramming device was also added. Further improvements include the replacement of the sighting devices, the addition of a gyrocompass and a TVN-1 night vision device. In the mid-1950s, the T-10B was introduced. Externally similar to the T-10A, the T-10B added a two-axis stabilisation system and a new fire control sights. In 1957, the final variant, the T-10M was introduced. It has the longer M-62-TS gun which had a better armour penetration capability than the D-25 (185mm against 160mm at 1,000 meters) using the normal AP round. The gun can also fire the BP-460A HEAT round which can penetrate 300mm of armour. It was also fitted with a two-axis stabilisation system and having a distinctive multi-baffle muzzle brake. The DShKM 12.7mm co-axial and anti-aircraft machine guns were replaced with 14.5mm KPVT. The latter has a closer ballistic match with the M-62 gun and can be used for rough ranging of the main gun. The T-10M also has an uprated (750 hp) V-12-6 engine.

The concept of the heavy tank ended with the introduction of the first-generation main battle tanks which have the same amount of firepower and protection but on a lighter, more mobile platform (in the case of the Soviets, it was with the introduction of the T-64 in 1965). Production of the T-10 ended in 1962 with about 8,000 built, making it the most numerous of the Stalin tank family. However, unlike the IS-2 and IS-3, the T-10 was not exported to Soviet satellite and client states. After the type was retired from active service in 1970, the turret of some of the decommissioned T-10s found a new role as static defence emplacements along the Soviet-Chinese border. Nevertheless, as many as 1,000 heavy tanks remain in reserve until the late 1970s.

The Kit
Because of the closed nature of the Soviet society, model kits for their hardware are not readily available in the years gone by. Even if they exist, they are mostly inaccurate. As for the T-10 series, there were none save for the ancient and inaccurate Tamiya 'JS-III T-10' kit dating from the 1960s. Like the proverbial bus, new-mould T-10, specifically the T-10M version, came into the scene in 2015 when Meng and Trumpeter released their kits of the tank. The Meng kit won me over because of the rather dramatic presentation, with the large hammer and sickle flag in the background. The kit is comprised of 328 parts in dark green plastic, 10 in clear, 192 separate track links with separate, handed track pins (a la Modelkasten, which would present a new challenge to me), a two-piece track assembly jig, 18 PE parts, 20 poly caps plus the usual decal and instructions sheet. The parts look well-moulded while the cast pattern was restrained (this is after all a peacetime-built tank).

Some variation is allowed in the shape of whether one wants to have a plain turret or one which have tarp wrapped around the rear of it or having a stowage box. The decal sheet provides markings for four vehicles:
- 13th Guards Heavy Tank Division, 1st Guards Tank Army, Soviet Forces in Germany, Operation Danube 1968 (with a choice of three individual tank markings)
- 20th Independent Tank Battalion, 20th Guards Motor Division, 1st Tank Army, Soviet Forces in Germany, 1972-74
- 1st Guards Tank Army, Soviet Forces in Germany, Berlin Parade 1960
- 'A certain Soviet Army Unit', late 1960s-early 1970s (at least Meng didn't use 'Unknown Unit'!).    

Construction
As usual, construction started at the lower hull. The first step is concerned with wheel assembly but I skipped them and go straight for the lower hull. The suspension fairings were moulded separately needing some time to cement all 12 of them. The torsion bar limiter and the drive joint were made moveable so that they can be adjusted during the fitting of the tracks. The torsion bars were then fitted and they mimicked the real thing by being workable. As per my usual style, the lower hull and the wheels were painted at this time (with the wheels still on the sprue). The paint were touched-up after the wheels had come off the sprue. While assembly of the wheels was straightforward, some care need to be taken into account to avoid misalignments. The contact surface of the wheels were then covered with pencil graphite to simulate the wear. The wheels were then mounted to the lower hull.

I then moved on to the upper hull. I started by sub-assembling the storage boxes, smoke generators and the external fuel tanks. No problems here except that the seam lines would have to be cleaned from the latter two items (clean-up went well for the smoke generators but not for the fuel tanks). The smoke generator slotted into their place in a particular manner so you really have to follow the instructions. The various fittings were then cemented to the rear hull plate before the latter was cemented to the upper hull. There are gaps between the upper hull and the left and right sides of the hull plate. I used quick-curing superglue to join the parts as it seemed to be caused by warped plastic. To ease painting, the smoke generators and the external fuel tanks were left off at this time. While the headlights were easy to assemble and fit, I find it slightly difficult to align the brush guards. The PE parts were last dealt here. There were no problems with them save for Parts W2 and W3 which did not exactly meet on the prow of the forward hull and needed to be coaxed a bit.

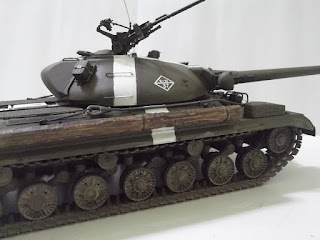
As I have already chosen an Operation Danube vehicle, holes were drilled on the back of the turret to accommodate the storage box. The various turret fittings were then cemented into place with the exception of the hand rails and the ammunition boxes (although the holders were cemented). It could be just me but there was a bit of a gap between the turret and the commander's sight. The gun can be made moveable through the use of poly caps inside the trunnion. The gun barrel is a two-piece affair with just a little bit of clean-up to be done after mating the halves (I still prefer a one-piece turned aluminium barrel). Thankfully the multi-baffle muzzle is moulded in one piece as it would be quite problematic to clean up the seam if moulded separately. The commander's and loader's hatches were multiple piece affair but they have a better definition than single-piece ones. The co-axial MG was left off at this time and so did the AA MG on the loader's hatch. The latter was assembled but left off the model for the time being. I found that the barrel can be placed later, and that helped for the painting.

Finally, the tracks were assembled. I must say that the most tedious thing about the kit's track assembly is just the cutting and the clean-up of the tracks. The rest was a breeze as the track assembly jig was a big help with just time constraint on my part (I did my work after 10 pm) prevented me from finishing assembly in one sitting. The instructions mention 87 links to complete the run but after test fitting, I found that the right-hand track needed 88 for a better fit. Nevertheless the instructions was quite fuzzy as to the orientation of the track links on the assembly jig (the tracks were shaded dark grey and so it wasn't very clear). I ended up studying the illustrations on the box top and even my Tamiya JS-2 for reference. (Actually the holes in the link lines up with molds on the jig and you know the link is wrongly placed when you can't insert the track pins through the slots in the sides of the jig)

Painting and Decalling
The tracks were painted XF-64 Red Brown and was then given a wash using AK Interactive Track Wash. The whole tank was painted a mix of Tamiya XF-51 Khaki Drab mixed with XF-3 Flat Yellow to approximate Russian Postwar Green (XB518 Zachchitniy Zeleno). The white 'invasion stripes' were painted XF-2 Flat White. To prepare the surface for decalling (even though there were just two of them), the entire model was sprayed Gloss Clear. There were actually three sub-options for the Operation Danube markings (just different numbers and diamond markings) and I chose the second one. There were no problems here. Although not really used by armour modellers, I applied AK Interactive Paneliner Wash for Green/Brown camouflage to enhance some panel lines. The tow cables were painted a mix of metallic colours (make that steel lightened with silver). The machine gun barrels were painted flat black, after which I applied graphite powder from a pencil. The unditching log was a combination of XF-55 Deck Tan, XF-59 Desert Yellow and XF-64 Red Brown.

Finishing
I started by wrapping the tracks around the wheels, pushing in the last track pins and retouching the paint. The lower hull and the tracks were then given a light application of Mig Productions' Rubble Dust pigment (as the real tanks were operating in an urban setting, although virtually no combat took place) . Not much pastel/pigment application nor weathering was done to the model as photos show that the T-10s were fairly clean during Operation Danube. The excess was then removed using a stiff brush.The smoke generator pots and external fuel tanks were next. The AA MG barrel was cemented into place, together with the ammunition boxes. The holes on the hatch were quite undersized so I had to enlarge them to allow the pegs on the MG mount to slot in. The tow cables were then attached and this step is one of the reasons of why you should read the instructions: the eyes won't fit into Part A9 if you have already cemented the latter onto the hull beforehand. A length of a guitar string was cut, painted steel and stuck in the aerial base (a hole was drilled into it beforehand). A final spray of Mr. Hobby Flat Topcoat finishes the build.

Conclusion
The T-10M was my first armour model from Meng and I must say I'm impressed with it. The parts feature well-moulded details and the fit was excellent - effectively no putty was necessary. Any misalignments, gaps and unnecessary ridges are all my fault and not of the kit. The build was straightforward and also quite importantly, no huge mass of eeny-weeny, tiny parts to test my eyesight and tweezer-handling skills. The Modelkasten-style track links were easy to build, especially with the help of the  assembly jig. Being practically a virgin in this kind of tracks, I found it refreshing. It looks like a T-10M to me and there is barely any bad words about this kit although one website showed the difference between Meng's and Trumpeter's offering and comparing them with available plans and it looked like Meng's T-10M was a bit 'off'. Anyway, with a number of modern-era (make that Cold War and post-Cold War) armour kits in their catalogue, I am looking forward for more builds of Meng kits - I already have the Leopard 1A3/1A4 in my stash and hoping to add their Merkava 3, AMX-30 and T-90 in my collection.

Wednesday 16 November 2016

The Devil Rides A Crocodile


Historical Background
With the trend towards battlefield air mobility in the 1960s, Soviet helicopter designer Mikhail Mil realised the potential for aerial infantry fighting vehicles which could be used to perform both infantry transport and fire support missions. A mock-up, designated V-24 was revealed at factory No.329 in 1966. The V-24 had an infantry compartment that could hold eight soldiers sitting back-to-back, a set of small wings at the top rear of the troop-carrying cabin which was capable of carrying up to six missiles or rocket pods and a GSh-23L cannon fixed to the landing skid. When the design was proposed to the Soviet High Command, it was met with some opposition, who prefer to have a more conventional design. Mil however managed to persuade Marshal Andrey Grechko, the Defence Minister's First Deputy, to convene an expert panel to look into the proposal. The panel's reaction was mixed, but convinced with the development and deployment of attack helicopters and gunships by the Americans in Vietnam, the supporters of the project held sway.

The Mil Design Bureau prepared two designs: a single-engined, 7-ton design and a twin-engined, 10.5-ton design, both using the 1,700 hp Isotov TV3-117 turboshaft used in the same design bureau's Mi-8 utility helicopter. During the design stage a number of changes were made including the replacement of the 23-mm cannon with a rapid-fire, multi barrel heavy machine gun in a chin turret and the ability to use the 9K114 Shturm (AT-6 Spiral) anti-tank missile. In May 1968, the twin-engined design (now called the Mi-24) was chosen. The full-scale mockup was reviewed and approved in February 1969. A tethered hover flight test was made on 15 September 1969 with the first free-flight conducted four days later. The prototype was followed by a batch of ten development aircraft which conducted an 18-month test programme beginning in June 1970. These produced more changes sucha s a 12-degree anhedral to the wings, moving the missile pylons from the fuselage to the wingtips, moving the tail rotor from the right to the left side of the tail and reversing the rotation direction. The first production version, Izdeliye 245 or Mi-24A achieved initial operational capability in 1971 and was officially accepted in 1972.

The Mi-24 was essentially a derivative of the Mi-8 'Hip' with the two top-mounted turboshaft engines driving an almost-similar main rotor. The original version (Mi-24A) has an angular greenhouse-style cockpit which was replaced by a tandem, stepped cockpits with separate armoured bubble canopy for the crew (who are also protected by a titanium tub, proof against 12.7 mm rounds) from Mi-24D onwards. Weapons, depending on the mission undertaken, ranging from free-fall bombs to laser-guided anti-tank missiles, were carried under the two mid-mounted stub wings, each with three weapons stations. On-board weaponry is turret-mounted 12.7 mm Yakushev-Borsov Yak-B gatling-style machine gun (on most variants) or fixed twin-barrel GSh-30K on Mi-24P or turret-mounted 23 mm twin barrel GSh-23L cannon (Mi-24VP and VM). A PKB 7.62 mm can be mounted on the passenger cabin window to protect the aircraft's blind side. Over time, the troop-carrying function became less important and the cabin was used to carry ammunition reloads.

The Mi-24, given the NATO nickname 'Hind', saw first action with Ethiopian forces against Somalia during the 1977-1978 Ogaden War. In 1978 it saw action with the Vietnamese Peoples' Air Force during the Cambodian-Vietnamese War of 1978. In the same year it also faced against Chad when it was used by the Libyans during their incursions into the former. The Hind's first extensive operation was during the Soviet occupation of Afghanistan from 1979 to 1989. Despite strong resistance from the Afghan Mujahideen fighters, the Hind was very effective against them. It was nicknamed Syaitan Arba (Satan's Chariot) and apparently a Mujahideen leader was quoted saying 'We are not afraid of the Russians, but we are afraid of their helicopters'.  Combat experience in Afghanistan demonstrated the disadvantages of carrying troops, incurring weight penalty while operating in hot and high areas. The troops were carried in Mi-8s while the Hinds concentrated on giving support. The troop compartment armour was also removed while a machine gun (or two) were mounted on the cabin windows, operated by a technician. The Mi-24s were usually operated in concert with Su-25 ground attack aircraft, protecting and escorting heliborne assaults and ground operations, convoy protection and hunter-killer-style operations. They were also used to protect transport aircraft coming in and out of Kabul, deploying flares to decoy man-portable surface-to-air missiles, of which the FIM-92 Stinger was the most effective.

Another conflict in which the Hind was used extensively was the Iran-Iraq War (1980-1988). Although causing severe damage to Iranian infantry and soft-skinned vehicles, it was less effective against tanks as the Iraqi Hinds were armed with the older 9M17 Skorpion (AT-2 Swatter) missile. A tactic was developed where the Hinds were used to suppress Itranian air defences while the armour was dealt with the HOT missile-armed Aerospatiale Gazelles. The Iran-Iraq War also saw air-to-air combat between helicopters, chiefly between the Hind and the AH-1J SeaCobras. It was claimed that these aerial engagements resulted in the loss of 6 Hinds and 10 SeaCobras. Weapons used in these engagements include the mounted cannon / machine gun, rockets and anti-tank missiles. The Hind continue to be developed and used in conflicts around the globe until today. In its native country, the Mi-24 was nicknamed 'Krokodil' (crocodile).

The Kit
The kit built here is the 1993 Tamiya re-boxing of the Italeri kit originally released the year before. The parts are spread among two sand-coloured and one clear sprues. The kit has raised details but petite and sharp (the fit will have to wait until construction starts) although some details were skipped or simplified. More serious shortcomings was that it was well, short in the diameter of the rotor blades and the tail boom, the rotor blades were too narrow, the stub wings were too long and the airfoil is reversed. While disappointing, I'd go on with the build as at the time I bought the kit, it was the only game in town (the Revell kit was another Italeri reboxing). The nice decal sheet provide markings for three aircraft:

1. Yellow 07 - Soviet Air Force
2. 0294 - Czechoslavakian Air Force
3. 96+22 - Luftwaffe

Construction
As usual, the cockpit received the first attention. I started by painting the parts while still on the sprue. Tamiya suggested that the interior is to be painted XF-19 Sky Grey, although I believe it to be Russian Interior Blue. I used a 50-50 mix of X-14 Sky Blue and XF-5 Flat Green. As for the seats, I weren't confident of my ability to properly trim it down and so I left them as they were (as moulded, the seats would be the most comfortable of all helicopter crew seat, they are quite wide, perhaps two persons can sit side-by-side at 1/1 scale!) . There weren't any decals for the instrument panel I had to paint them myself. Italeri also included a very rudimentary interior for the troop cabin and it is best closed unless an aftermarket set is available or if one wants to scratchbuild it. If one is building an aircraft without the heat dissipaters, the exhausts have to be assembled and then cemented to the roof of the troop compartment. The interior parts were then cemented to the right side of the fuselage, prior to closing up the latter.

Although the instructions have you place the tail rotor at this time, I skipped it as it would interfere with painting (it can still be removed, by the way). The troop compartment doors were then cemented in the closed position (it can be posed open by cutting the door in two and adding other parts required). Fit is not good and need to be carefully placed in the opening; nevertheless there is quite a gap between the door and the fuselage. Also, the clear parts did not fit snugly in the openings and with me being clumsy, resulted in cement smudges on the clear parts..darn it! The upper engine cowling, engine air intakes, the heat dissipaters and the IRCM 'ball' were assembled and fitted to the fuselage. All have fit issues, whether as to the components themselves and/or their fit to the fuselage which require filling and sanding. It was quite tedious as the gaps and steps occur at hard-to-sand areas.

Moving to the bottom of the fuselage, the turret-mounted machine gun was assembled but I set it aside for the time being. The radar pod went on without problem, just a seam line along the centre. The LLLTV/FLIR pod however has a step when assembled and to cure this problem, I cut off the locating tabs and align them by sight. While this avoided the step, it resulted in a gap between one side of the fairing and the fuselage, which require more puttying, and sanding. The wings were assembled and attached to the fuselage. again there is the issue of fit as the there is a bit of a gap at the wing roots and also between the left wing tip and the laser designator pod. There is also a sizeable gap between the wing and the weapons pylons. Talking about the weapons pylons, they were moulded together with the B-8 rocket pods. Not only this complicate painting, I also believe that the rocket pods were undersized. They would have to go and were cut away before the pylons were cemented to the wings.

Painting and Decalling
During the course of the build, I came to know a Linden Hill Decals sheet for Mi-24 stencils and decided that I must have one (despite, or perhaps because of, my love-hate relationship with modern aircraft stencilling). So I took an opportunity during a visit to KL to drop by at Hobby HQ. Mr. Low stocks the said decal, but unfortunately the price is quite steep. Nevertheless I managed to buy Begemot's Mi-24 decal sheet which have the stencils plus a bunch of interesting markings for Mi-24 users around the world. I have to disregard some marking suggestions as they are for the Mi-24P variant. A second round of elimination took out those without the heat dissipaters. That left me with just three choices - a Sandinista AF Mi-24D in 1987, a Soviet AF Mi-24V in Afghanistan, 1984 and an airshow Mi-24VM/ Mi-35M. I ended up choosing the Soviet AF Hind as the helicopter was best known for its role in the conflict.

For the underside blue, I used a mixture of roughly 60% XF-23 Light Blue, 30% XF-2 Flat White and 10% XF-8 Flat Blue. While Tamiya suggested XF-59 for the base colour, I feel that, after consulting photos, it should have a grey tint to it. After browsing the internet, I settled for a mix of 40% Gunze H315 (as substitute for Tamiya XF-20), 20% XF-52 Flat Earth and 10% XF-59 Desert Yellow. The brown camouflage pattern was painted using Tamiya XF-64 Red Brown. Afterwards it was time for the decals. I have used Begemot decals before (for my MiG-31) and found them to be thin and in register although a little flat in finish. It was the same for the Mi-24 decals, although I have to leave them in the sunlight for several hours as the decals has yellowed. One gripe though - the 'Danger' markings at the tail was quite transparent, showing the camouflage beneath it. I substituted them with leftovers given by a friend. Mr. Mark Softer was then applied.

Finishing
As usual I started with the landing gears. However, the way the kit main landing gears is engineered, the model would sit level with the surface whereas the actual Hind has a nose-up attitude. The main landing gears were repositioned and some trimming were done so that the struts and wheels were perpendicular to the ground. This however results in Part A75 becoming too short and they were replaced with a length of plastic rod cut to appropriate length. Originally I thought of having different weapons fit, such as having bombs or gun pods on the pylons but having none (there are no gun pods in my stash and I have run out of bombs form the Dragon Weapons Set), I settled for the prototypical load of four rocket pods using the ones from the Dragon set. The 9K114 Shturm missile tubes were also replaced with Dragon items as the kit ones were merely lengths of tube devoid of details. The cockpit transparencies , painted separately, was then attached. They did not sit properly, requiring a bit more sanding and retouching of paints (I however forgot the gunner's hatch!). 

While most wrong and missing details were left as they were, I did a few reworkings of the main rotor. The main rotor rotates clockwise (when viewed from above) but it was moulded the other way round. I shaved off the 'pimple' (it was the hydraulic reservoir on the real aircraft) on top of the hub and placed it on the bottom while the control rods swap places with it. The rotor blades were then cemented to the hub. There were sizeable gaps at each joint but I left them as they were for a while. As the real blades droop while idle, each blade was soaked in hot water and was then gently bent down. I didn't increase the chord of the blades as I felt it was too ambitious for me. The gap on each blade joint was then filled and painted. The Hind modelled was fitted with blade-type IFF aerials, so the moulded-on 'Odd Rods' IFF aerials were removed and replaced with ones made from scrap plastic. The model was then given a wash and was later sprayed with Mr. Hobby Matte Topcoat, finishing the build.

Conclusion
The 1/72 Italeri / Tamiya kit is not a good kit. There, I have said it. Not only it has a number (which is quite a lot, really) of glaring mistakes, the fit was also not good. It was a good kit for a modeller to get out of his comfort zone (I can say that I only rose part way...haha!), making a number of tweaks so that the kit represented a more accurate Hind. The competitors' Hinds represent a better value for money.