Showing posts with label USA. Show all posts

Wednesday, 6 May 2020

The Mudhen Returns To Mideast


Historical Background
The F-X fighter programme which resulted in the McDonnell Douglas F-15 Eagle was specifically tailored for air superiority mission with little consideration for air to ground missions (hence the phrase 'not a pound for air to ground'). The opposition by the F-15 Special Project Office in The Pentagon caused McDonnell Douglas to quietly work on the interdiction version of the Eagle envisioning it as a replacement for the F-111, the (then) remaining Phantoms and to augment existing Eagles. In 1978, the USAF initiated the Tactical All-Weather Requirement Study (TAWRS) which, amomng others, looked at McDonnell Douglas's proposal. The study recommended that the Eagle as the USAF's future strike platform and in 1979, McDonnell Douglas and Hughes teamed up to develop the F-15's air-to-ground capabilities. An F-15B, serial number 71-0291 was modified to act as a demonstrator and was first displayed at the Farnborough Air Show in 1980.

In March 1981, the USAF announced the Enhanced Tactical Fighter (later renamed Dual-Role Fighter) programme to procure a replacement for the F-111. The programme envisioned an aircraft capable of flying deep air interdiction missions without additional electronic support and fighter escort. McDonnell Douglas submitted its now-named F-15E while General Dynamics submitted the F-16XL. After a lengthy evaluation programme, the F-15E was chosen as the winner on 24 February 1984. Key factors in the selection of the F-15E over the F-16XL include lower development costs, belief that the F-15E had future growth potential and twin-engine redundancy. The first officially-completed F-15E was first flown on 31 March 1987 and the first production aircraft was delivered to the 405th Tactical Training Wing at Luke AFB, Arizona in April 1988. The USAF contracted for a total of 400 F-15Es (later revised to 392).

The F-15E Strike Eagle, although optimized for air-to-ground missions, retains the full air-to-air combat capabilities of the original Eagle. Although the prototype was basically a modified F-15B, production F-15Es have significant structural changes and using much more powerful engines (originally Pratt & Whitney F100-PW-220 rated at 105.7 kN with afterburner, later the Dash 229 version rated at129.7 kN with afterburner). The rear cockpit position is 'missionised' to allow the WSO to work the air-to-ground avionics (while still having flight controls, allowing the WSO to pilot the aircraft should it become necessary). Conformal Fuel Tanks (CFTs), containing 2,800 liters of fuel (in addition to the original  internal tankage) on either sides of the fuselage gave the Strike Eagle its long legs at a slight cost in drag and performance. The APG-70 radar system incorporates Doppler Beam Sharpening, Mapping and Synthetic Aperture Radar modes to enhance operational capabilities. One feature of the system is that it can 'freeze' the air-to-ground radar map and then goes back to air-to-air mode to check for aerial threats. In addition, the WSO is able to designate ground targets while the pilot engages aerial targets. The APG-70 was replaced by the APG-82 AESA radar beginning in 2014.

The F-15E carries most air-to-ground weaponry in the USAF inventory, from 'dumb' Mk 80 series bombs to precision strike JDAMs. Since it inherits the original Eagle's counter-air capabilities, they regularly carry air-to-air missiles and trained for counter-air missions. Precision delivery of weapons by day or at night and in poor weather was made possible by the use of LANTIRN pods mounted externally. The targeting pod (AN/AAQ-14, AN/AAQ-28 LITENING or AN/AAQ-33 Sniper Advanced Targeting Pod) contains a laser designator that can mark an enemy's position from as far away as 16 kilometers. The AN/AAQ-13 navigation pod  contains a terrain-following radar to allow the aircraft to fly safely at very low altitude and it even allows a hands-off terrain-following capability. The pod also contains a FLIR for night or low-visibility flight conditions. Tactical Electronic Warfare System (TEWS) integrates all the countermeasures available (RWR, chaff, flare, radar jammer). An AN/ALQ-131 ECM pod can be carried if required.

The F-15E, dubbed Strike Eagle (or more popularly, the Beagle ('bomb eagle') or Mud Hen) achieved initial operational capability on 30 September 1989 with the 336th Tactical Fighter Squadron of the 4th Tactical Fighter Wing at Seymour-Johnson AFB, North Carolina. The Strike Eagles were first deployed for combat during Operation Desert Storm conducting diverse targets, from mobile Scud missile launchers to fortified bunkers. They were also involved in 'tank plinking' attack missions prior to the start of the Coalition's ground offensive. An air-to-air 'kill' was scored on 14 February 1991, when an F-15E hit a flying/hovering Mil Mi-24 with a GBU-10 laser-guided bomb. USAF F-15Es continue to be deployed in various operations such as during Operations Northern & Southern Watch, Operation Deny Flight, Operation Enduring Freedom, Operation Iraqi Freedom, Operation Odyssey Dawn and Operation Inherent Resolve.

The Strike Eagle also enjoyed export success with variants being sold to Israel (F-15I Ra'am), South Korea (F-15K Slam Eagle), Saudi Arabia (F-15S/SA) , Singapore (F-15SG) and Qatar (F-15QA). Proposed variants include F-15SE Silent Eagle incorporating internal weapons carriage and use of radar-absorbent materials. Israel and Saudi Arabia have also used their Beagles in combat.

The Kit
Despite being in service since 1989, the F-15E received a rather cool attention from model kit companies. The 1/48 fraternity is quite well served with a number of kits depicting the E version but the 1/72 community was less so with the prototype-feature kit from Hasegawa (who then, true their policy, re-released it a number of times). The same goes with Airfix, Academy and Italeri. In 2011, Fujimi came up with a new-tool Beagle. While having all the 'E' features, it unfortunately suffered by being overscale, something around 1/66 rather than 1/72. In 2012, Hasegawa finally decided to do a new-tool F-15E in 1/72 scale. And now we have a relative newcomer, Great Wall Hobbies with their rendition and I think this kit is a worthy rival to the Hasegawa kit. First impression is good with parts displaying crisp recessed lines and nice (for 1/72 and in plastic) raised details. Unlike Hasegawa the GWH offering has a more contemporary ordnance to be hung beneath the model. Decals provide markings for three aircraft:
1. 87-0173 'Shark Mouth', 391st Fighter Squadron 'Bold Tigers', 366th Fighter Wing, Mountain Home AFB, 2002
2. 87-0169 'Tiger Lead', 391st Fighter Squadron 'Bold Tigers', 366th Fighter Wing, Mountain Home AFB, 2002
3. 89-0488 ' 336th Fighter Squadron 'Rocketeers', 4th Fighter Wing, Al-Udeid AB, Qatar 2003.

Construction
As usual with aircraft kits, construction started at the cockpit. The seats while having better details than kit-supplied parts of yore, still cannot compete against resin aftermarket ones. nevertheless I still used them for this build.  The cockpit features nice raised details, which although not mentioned, must be sanded off if one wants to use the decals for the instrument panels. I just applied them over the riased details. Also, GWH forgot to mention in their instructions about two further decals that needed to be placed for the WSO's office  And, as per my usual style, the parts for the cockpit were painted while still on their sprues. After the cockpit has been compeleted, the forward fuselage halves were closed together. While the forward bulkhead was used, I left off the radar parts as they won't be visible anyway. Modelling clay was then filled into the nose cavity to act as ballast, just in case. The intake tunnels have the vanes inside it but there are no actual locating holes and I opted not to add them.

GWH thoughtfully include the steps to build the model in flying pose so take note of the relevant parts to build the model with its wheels down. The main upper fuselage was assembled and was the attached to the lower fuselage/FAST pack. However GWH did not indicate holes to be drilled for the pylons (although I should have known better). I managed to pry back the wings and drilled the holes underneath the wings but it was too late for the fuselage bottom. The forward fuselage was the jointed to the main fuselage. The fairing behind the cockpit was then added. and, almost predictably, resulted in a number of seams. The exhausts were left off at this time. The fin tips are needlessly separate. The tangential pylons are butt-jointed to the sides - there are engraved marks to help you. Funnily enough, the instructions ask you to drill holes for them. Thankfully, holes have already been pre-drilled for the long pylons. The tabs to mount ordnance were however removed from most of the  pylons.

Painting and Decalling
While fighter Eagles were painted two-tone greys, the 'Bomb Eagle' was painted a uniform dark grey, specifically, FS 36118 Gunship Grey. The paint used was Vallejo AIr 71.097. The metallic end of the fuselage was painted Tamiya TS-30 Silver Leaf with certain parts were painted Mr. Color Super Titanium or Super Iron 2. The exhaust petals were painted Gunze Burnt Iron while the insides were painted Flat White. The ordnance were painted Olive Drab although somewhat bafflingly GWH suggested Gunship grey for the GBU-15. After the paint has dried, it was time for the decals. My selection is somewhat affected by the rather arbitrary weapons load selection suggested by GWH, which I think was influenced by the now-defunct F15e.info website. As I wanted to have a rather 'heavy' load, the third option was taken. The decals looked rather thick and several stencil decals shared the same carrying film. While somewhat shortening the decalling proces in theory, one might end up with large patches of silvering. I end up cutting up most of them into separate pieces, leaving just the decals for some 'No Step' stencils and the group on both sides of the cockpit.

Another issue with decals is concerned with the coloured strip at the top of the fins. GWH printed them in a way that they are all of the same orientation. Two of the four need to be printed facing the same side with the other two on the decal sheet. The way they are actually printed, the decals for the port fin inner right fin outer could not be used and I had to paint the relevant strips.  The decals were then bedded down with an application of Mr. Mark Softer. The panel lines between the control surfaces and the body were enhanced using AK Interactive Paneliner while the rst of the panel lines were slightly enhanced using a pencil. The inside of the exhausts were then weathered using Tamiya Modeling Master Soot.

Finishing
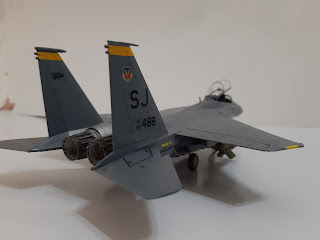
I started by assembling the landing gears. As usual in 1/72 and with models of modern planes, they are quite fiddly during assembly. After  being painted and weathered, they were attached to the model. Fit is quite tight and I ended up having a splayed main landing gears. After some trimming, they are now straight, perpendicular to the fuselage. Also, GWH moulded the main wheel tyres 'weighted'. However the instructions mis-pair the wheel halves and you might end up having a flat spot at the top of on one half of the wheel. Once the model stands on its legs, I added the weapons, pods and external tanks. I however use the Sidewinders and an AMRAAM from Hasegawa's US Aircraft Weapon Set V. The GBU-15 can easily be converted into AGM-130 simply by using adding part (which was marked as 'not used' in the instructions. If you still want have the weapon as a GBU-15, fill the holes at the bottom of the bomb. Next up is the canopy. I forgot to mention that there is a gap between the windscreen and the fuselage which needed filling. There was no problem encountered when fitting the canopy to the fuselage but by this time you realise that the tranparencies are pretty thick, especially when the canopy is in the open position. Finally the blade aerials were fitted and the build is finished.

Conclusion
The kit itself does not have any deal-breaker or any noticeable shortcomings and is a good alternative to the Hasegawa kit. The instructions however is a different matter and suffer from a number of mistakes. It probably wouldn't faze seasoned modellers but would probably cause some problems to newcomers to the hobby. Also the GWH kit, like the Hasegawa kit, only provide markings and ordnance and sensor options appropriate to the Operation Enduring Freedom / Operation Iraqi Freedom era (like clearly stated in the kit's sub-title). Aftermarket stuff were needed to to display the model in a more contemporary setting.

Sunday, 5 January 2020

Easy Eight


Historical Background
The US Army followed the events in Europe 1939-1940 and decided that their current medium tank the M2, was obsolete to face contemporary battlefield challenges and designed the M3 Medium Tank (later nicknamed Lee/Grant). The M3 was a stop-gap measure, with the main 75 mm gun in a right-side sponson with limited field of fire. In late August 1940, the Ordnance Department submitted characteristics for a new design to replace the M3. Development of the prototype was delayed to allow the M3 design to be finished and enter production. On 18 April 1941, the Ordnance Department chose the simplest design, called the T6. It was basically a modified M3 hull and chassis and mounted a fully-rotating turret armed with the M3 75 mm gun. The design borrowed many features from existing tank design such as the vertical volute spring suspension, rubberised track links and the usage of Continental R975 radial engine. The T6 prototype was completed on 2 September 1941 and production commenced in the next month.

The production M4s were kept as close as possible to the M3, including the tracks, suspension and transmission. The hull upper hull however was changed to cast type and the side entry door was eliminated. The lower hull was made of large welded parts with the bogies bolted to the hull to ease maintenance and repair. The upper hull was cast for the M4A1 version and welded for the rest of the variants (plus the cast front and welded rear 'composite hull' M4). The M4 was powered by a Continental R975 air-cooled radial petrol engine rated at 400 hp. 660 liters of petrol was carried, allowing a range of 195 km. Later versions was powered by Ford V8 petrol or General Motors diesel engine. The frontal armour was 51 mm thick while the turret front was between 64 mm to 76 mm, The front upper hull was angled at 56 degrees with the lower half rounded, making the armour effective against most early war anti-tank weapons. Even so, the early versions had shot traps, located just in front of the driver and co-driver's positions.

The M4, nicknamed Sherman (after General William Tecumseh Sherman) was originally armed with a L/40 M3 75 mm gun. The standard M61 round fired by this gun can penetrate 87 mm of RHA at 100 meters and 70 mm at 1,000 meters, sufficient to destroy Panzer IIIs and IVs. After protracted development, the Sherman was later armed with a more powerful M1/M1A2 76 mm gun, in a new T23 turret, giving it at least a parity with L/48-armed Panzer IVs. The main armament was backed by two Browning M1919 machine guns; one co-axial with  with the main gun and another in the hull. 60 rounds was provided for the main gun with the machine guns shared 4,750 rounds between them. For anti-aircraft and further anti-infantry/soft-skin capability, a Browning M2 12.7 mm machine gun can be mounted on the roof.  The Sherman was manned by a crew of five: commander, gunner, loader, driver and assistant driver/hull gunner. Each of the crew members had a periscope to allow 360-degree view of the outside.

Production began at the Lima Locomotive Works, Lima, Ohio with all the first production tanks going to the British Army. By the end of the war, ten other production lines were opened, delivering some 48,000 M4s. The Sherman was produced in a  number of variants but the most produced ,a nd the preferred model by the US Army was the M4A3. The M4A3 was basically the same with the M4 but was powered by a Ford GAA V-8 engine. The early M4A3s were armed with a shorter (L/31) M2 75 mm gun, which was later replaced with the L/40 M3 gun. Late versions of the M4A3 was armed with the more powerful M1/M1A1 76 mm gun. Work was also done to improve the Sherman's ride qualities and  this resulted in the finalization of the Horizontal Volute-Spring Suspension or HVSS.  Wider track was also included with the HVSS system. While this resulted in a heavier and wider vehicle, the ground pressure is reduced. The HVSS was applied to the late M4A3 variant and resulted in the M4A3(76)W HVSS or M4A3E8. The latter designation, coupled with the easier ride of the HVSS gave rise to the 'Easy Eight' nickname for this variant. A total of 2,617 M4A3E8 were built between by Detroit Tank Arsenal between August 1944 and April 1944.

The Sherman was originally issued in small numbers to familiarise the US Armored Divisions. American Shermans saw their first combat during Operation Torch in November 1942. The M4A1 (and the original M4) were the prime variants used by the US Army until the introduction of the M4A3 with a more powerful (500 hp) engine. The Easy Eight saw their first action during The Battle Of The Bulge. As individual tanks, the Sherman was inferior to the German tanks such as the Panther being weakly armed (at least for the early version) and thinly armoured. As a type however, it was superior to the German panzers, being reliable, easy to maintain and more mobile than the ponderous Tigers. Easy Eight were retained by the US Army post-World War 2 and saw combat again during the Korean War.

The Kit
In the 1970s, Tamiya came up with their kit of the Easy Eight and it is suffice to say that it is a collector's item. Although Tamiya released a number of new mould 'mainstream' M4A3s in the late 90s and the early Noughties, the M4A3E8 remain unkitted by them. In 2014, they released the re-boxed Asuka kit and eventually, in 2015, they released their own kit of the Easy Eight. This kit is packed inside a rather small (for a 1/35 WW2-era medium tank kit) box. Opening up the box, there are just six olive-colored sprues, one clear sprue, lower hull, turret shell, a pair of band-style rubber tracks, decals, poly caps and the instruction sheet. Obviously many parts, especially the HVSS were simplified, but the existing details are sufficient for many modellers. The relevant parts also has convincing cast texture moulded. Being a Tamiya kit, I don't expect any complications during construction. The decal sheet markings for two Easy Eights (the difference between the two is that one of them sports a blacked-out Allied Star).

Construction
Instead of a single hull pan, Tamiya has the lower hull as a multi-part assembly. The left and right side pieces have a further sub-piece which need to be cemented first. The joint between the side pieces and the bottom piece is reinforced by part P2. Apparently the engine bulkhead, Tamiya moulded holes in it for the non-existant engine (although they may be useful for those who wants more details for their model). The rear hull panel were next. No problem here but Tamiya apparently forgot to include the engine access door in their instructions. The part is however easily identified on the sprue. Moving to the transmission cover, I lost Part L9 to the Carpet Monster and have to fashion a replacement (badly!) using scrap plastic. The exhaust deflectors were assembled but I couldn't orient them in place. I'm not sure myself, but I think that the position for R17 and R18 should be swapped (either that or I somehow got it wrong while trying to insert it in place!). In the end, I just cut off the tabs and glued the deflector in place.

As mentioned before, the HVSS suspension is one of the items simplified in the Tamiya kit. While this means no articulation and lesser details, it makes up for a quick and hassle-free build. The main suspension unit consists of just four parts per bogie (not including the wheels and the mount). They were quickly assembled but for a short while was set aside as I wanted to do some weathering on the lower hull. The tracks were painted beforehand using AK Interactive Track Primer, followed by the same company's Track Wash. The tracks were later drybrushed silver. The ends can be joined together using regular hobby cement but I stick to using cyanoarcyclate glue. The tracks for my kit is a bit warped at the ends but it was easily rectified by cement. They fit without problem and the orientat

The upper hull is designed so that it can be attached to the lower without cement. Tamiya did this by using a clip at the front and a large pin which slots into a poly cap arrangement at the rear. The hull sponson, which was hollow in previous Tamiya (in-house) Sherman kits is closed by the fenders. The latter is also made stable with a spacer. Holes for the lifting lugs at the front hull were the drilled. And just to get the repetitive out of the way, the fender braces were cemented first. Since I intended to have the crew hatches shut, the periscopes were left off. While the front lifting lugs were moulded 'whole', the rear pair were moulded in half, and were to be cemented to stubs on the rear deck. Most of the fittings on the upper hull were then cemented but I temporarily left the pioneer tools and spare track links off to ease painting. The rear hull rack, while assembled, was also left off at this time. The upper hull was then attached to the lower hull. I applied a bit of Tamiya Thin Cement to close the few tiny gaps along the joint.

Painting and Decalling
There is just one colour used for US World War 2 era vehicles. This time I used Vallejo Air 743 Olive Drab. I was thinking of adding a brown filter after the initial paint layer has dried but apparently (according to Tamiya), late-war OD have a more greenish hue than the OD used earlier. So I ditched the brown filter. Wash solution from AK Interactive was then used to visually raise the details. The tools were also painted while still on the sprue although I used sand yellow to paint the wooden handles. Once dried, brown wash was used to make them look more like wood. Afterwards, it was time for the decals. As mentioned before, the markings selection is very bland with just two anonymous Easy Eights from the 4th and the 5th Armoured Divisions. While the majority of M4A3E8s at the time were indeed devoid of personalised markings, I wonder why didn't Tamiya pick the ones with those markings. I tried to make it look more interesting by using markings from the 4th AD with the blacked out US stars on the turret. With just four pieces of decals, this process took less than 10 minutes! 

Finishing
I brown-washed a pair of wood piece and placed them on the front of the hull (the bracket of this purpose has already been moulded in place). The model then received the usual wash and I tried the streaking method for this model. The running gear and the tracks received a rather thick pasting of Vallejo Dark Mud. Parts where the muddy boots of the crew stepped on the tank were splattered with a light mud solution. Afterwards, tank supplies using parts from Academy, Tamiya, Hero and the stash were placed on the relevant parts of the model. To hang the stuff on the turret, I cemented a length of plastic rod on the right side of the turret. I then robbed the metal tow cable from my broken Dragon M4A3(76) and placed it on the model. The commander's machine gun and the gun cradle were replaced with spares from Dragon's Sherman Firefly The original kit's cradle was cut and replaced. Since the I chose the markings for a tank in Bastogne during the Battle Of The Bulge,, I think I wanted to add some 'snow'. Using a mixture of water and white glue as adhesive, I sprinkled (and also mixing it with the aforementioned adhesive) sodium bicarbonate on the tracks, road wheels and at various points on the model.

Conclusion
If you want to punish yourself build an intricate kit with all the bells, whistles and screws, this model is not for you. The Tamiya kit is geared towards the more casual crowd (or those seeking relief after building 1,000+ parts kits). Anyway, admittedly mre simplified than its rivals, the Tamiya kit of E8 does have sharp and nice enough details. The letdown in this kit (to my viewpoint) is the rather uninspired markings chosen. This was can however be an advantage: being rather nondescript, you can work to your heart's content with regards to additional items you want to add to the model.

Sunday, 29 September 2019

Cobraaaa!!!!


Historical Background
The emergence of the helicopter, specifically of  Bell's UH-1 Iroquois or Huey, made the theory of air cavalry practical. In Vietnam, the Huey fleet carried troops across the country, to fight at the ground and the time of their own choosing, rather than the enemy's. However, these unarmed Hueys were vulnerable to ground fire especially when they are nearing the landing zones. Without support from nearby artillery or other ground troops, the only way to pacify the landing zones was from the air, using an aircraft, preferably another, armed, helicopter that can closely escort the transport choppers and loiter over the battlefield. Originally the Army used UH-1s fitted with machine guns and rocket launchers, but was needed was a dedicated helicopter gunship Bell has been investigating such concept since the 1950s and in 1962 had revealed a mockup of what they called D-255 Iroquois Warrior concept. The D-255 was a purpose-built attack helicopter based on the UH-1B but with a slender fuselage and the two crew sitting in tandem. It was to be armed with a turret-mounted 40mm grenade launcher in the nose, a 20 mm belly-mounted gun pod and stub wings to mount rockets or anti-tank missiles.

The Army was interested and awarded a proof-of-concept contract to Bell in December 1962. Bell modified a regular Bell Model 47 (UH-13 Sioux) into Model 207 Sioux Scout which had the hallmarks of a modern attack helicopter with sleek fuselage, tandem cockpit, chin-mounted turret and stub wings for weapons. Although impressed, the Army decided that the Model 207 was too small, underpowered and generally not suitable for practical use. Instead the Army launched the Advanced Aerial Fire Support System (AAFSS) which resulted in the large and fast Lockheed AH-56 Cheyenne. It proved to be too sophisticated and was eventually cancelled in 1972. Although Model 207 was rejected by the Army, Bell persisted with their idea of a smaller and lighter helicopter gunship. Bell mated the T53 turboshaft engine, the transmission and the rotor system of the UH-1C, adding to the latter a Stability Control Augmentation System with the design philosophy of the Sioux Scout and produced the Model 209.

With the war escalating in Vietnam and the AAFSS programme stuck in technical difficulties and political bickering, the US Army asked Boeing-Vertol, Sikorsky, Kaman, Piasecki and Bell for an interim gunship design. In April 1966, Bell's Model 209 won the evaluation and a first production contract for 110 airframes were signed. Bell added 'Cobra' to the UH-1's nickname of 'Huey' becoming Model 209 HueyCobra - the name adopted by the Army for its production AH-1G. For production some modifications was made, including the adoption of simple landing skids instead of retractable undercarriage, a new wide-blade rotor and plexiglass, instead of armoured glass canopy. The first HueyCobras were delivered in June 1967 and saw extensive service during the Vietnam War, taking over the role of assault helicopter from the 'snake' Huey gunships.

The Cobra has a slim fuselage, designed to present as small a profile as possible against enemy ground fire. Due to the slimmer shape and lighter weight, the Cobra is twice as fast as the Hueys it escorted. The original variants were powered by a single Lycoming T53-L-11 turboshaft engine rated at 1,100 hp allowing it a speed of 277 km/h. The crew seating arrangement, which has since become the virtual standard for attack helicopters, placed the pilot at the rear seat, which is slightly elevated behind the co-pilot/gunner. The gunner also a full set of flight controls. The weapons turret under the nose were originally used to mount two 7.62 mm miniguns or two 40 mm grenade launchers or one of each weapon. Later versions of the Cobra mounts the M197 20 mm three-barrel cannon in the turret. The stub wings can carry up to 1,360 kg of various weapons but usually consist of folding fin aerial rocket tubes, gun pods or, later, anti-tank guided weapons.

Originally not equipped to fire anti-tank guided weapons, the Cobra was fitted with the M65 TOW/Cobra system complete with M65 Telescopic Sight Unit and M73 reflex Sight, creating the AH-1Q variant in 1973. The AH-1S is an upgraded -1Q variant with 1,800 hp Lycoming T53-l-703 turboshaft. The -1S was followed by the -1P with glass cockpit, improved low-altitude performance and composite rotor assembly. The AH-1E introduced the three-barrel M197 cannon while the AH-1F introduced laser rangefinder, infra-red countermeasure equipment, digital flight systems and heads-up display. Prior to 1988, all the S,P,E,Q and F Cobras were simply known as various variants of the AH-1S. Apart from the Vietnam War, US Army Cobras took part during Operation Just Cause in Panama in 1989, Operation Desert Shield / Desert Storm in 1990/1991 and Operation Restore Hope in Somalia in 1993 and Operation Uphold Democracy in Haiti in 1994. 300 Cobras were lost due to enemy action and accidents during the Vietnam War with a further three during Desert Storm. The Cobra was phased out and replaced by the AH-64 Apache in US Army service beginning in 1990 and fully retired from service in 2001. Retired machines were passed to allied nations and also the USDA Forest Service. The Cobra was exported and used by the armed forces of Israel, Japan, Jordan, Turkey and Pakistan.       

The Kit
Hasegawa came out with a 1/72 kit of the single-engine Cobra in 1997 when they released the JGSDF version of the AH-1S. The US version was released in 2000 while the one I use in this build is a 2015 reboxing of the 2000 kit. And, according to online reviews, this is the most accurate version of the -1S (at least for the 1/72 version). The parts are spread among five dark olive drab sprues, one clear sprue and a small decal sheet. The parts are well moulded and have engraved panel lines. Some are marked as 'Not for use' as probably they are only relevant to the JGSDF version. Details are acceptable for 1/72 scale and from casual viewing, it looks like it's going to be a simple, straightforward build. It also includes two crew figures. The decals provide markings for just one helicopter : a snake from the 7th Cavalry, US Army.

Construction
Almost inevitably with flying machine models, even the rotary winged ones, construction started with the cockpit. And as per my usual practice, the relevant parts were painted while on the sprue. There were just two paints needed for the cockpit - flat and gloss black. The parts were then removed from the sprue and the resulting scars were then touched up. The parts were then assembled, the crew fifures however were not used. The provided decals were then used to represent the instrument panels on the cockpit sides. Before the fuselage halves were cemented together, holes were drilled or puttied over where needed and the cockpit sides were painted Black. Afterwards, the completed cockpit plus the bottom of the fuselage (Part A4) were inserted into one of the cockpit halves and the whole fuselage was cemented together. The tail skid was however left off at this time.

Next up were some of the external features. The tail fins were first and some care were needed here to avoid gaps. The stub wings were next. The halves were mated together, sanded and then cemented to the fuselage. The pylons for the FFAR pods were also added at this time although the TOW missile assembly was left off. The last sub-assembly I added to the model at this time was the sight at the nose. In order to ease handling during painting and decalling, the landing skids were left off. Although the tail rotor, the M197 cannon and the exhaust were assembled, they were set aside at his time.


Painting and Decalling
Hasegawa has you paint the model entirely in Olive Drab. However, based on my readings during my AH-64 Apache build, US Army helicopters are painted Helo Drab instead of Olive Drab. For modellers, only Model Master has this particular paint in their range. I'm not going to wait for several more weeks in order for newly-ordered paint to arrive. So decided to use the next best alternative : Tamiya's XF-51 Khaki Drab. While it does not exactly match Helo Drab, looking at photos on the internet shows that Helo Drab can assume shades from OD to Dark Grey but I think XF-51 is just about the shade of the 'original' Helo Drab. The FFAR pods and the TOW tubes however were painted US Olive Drab. The M197 cannon was painted black and then I decided to use my newly acquired AK Interactive weathering pencil 'Gun Metal'. The pencil works as the usual pencil-watercolour combo. The graphite(?) is moistened and then applied over the parts....and voila, metallic-looking parts! The narrow sealing tape however was not painted as I doubt my ability to cleanly mask and paint such a narrow line.

The decals were then applied in the usual manner and was then given the Mr. Mark Softer treatment.

Finishing
Finishing at this stage means permanently attaching the remaining sub-assemblies. I started with the weapons first. By the way, the kit FFAR pods were replaced with the ones from the Italeri weapons kit as the latter has the 'rocket heads' (for what its worth) poking from the tubes, whilst the kit ones are more or less 'empty'. Once the skids were attached, I found that the model was not very stable and usually went tail-heavy. However once the main rotor was put in place, it no longer has that nose-up attitude. The cannon assembly and the canopy howere were quite a tight fit and the cannon nearly broke apart when I try to insert it into its slot. The canopy needed a bit of sanding to get it into place; however the finished still has quite a noticeable gap. The model received a coat of Gunze Flat Coat and the masks were then removed, finishing the build.

Conclusion
Hasegawa's 1/72 Cobra is an easy kit to build and without any real shortcomings. The details are convincing enough especially in 1/72 although those who wants more detail can easily add them.

Friday, 13 September 2019

American Badass


Historical Background
In the late 1960s, the United States and West Germany co-operated to develop a new 'joint' main battle tank. Known as MBT-70, the programme was very ambitious and incorporated various innovations. The programme ultimately failed and cancelled by the Congress in November 1971. In its place, a new design, the XM803 was initiated but being more expensive while only having the same performance the M60, it was cancelled in December of the same year. The funds were reallocated into a new project, the XM815. The XM815 reused most of the XM803 features, but simpler and therefore less expensive. The XM815 was then redesigned XM1 and given the name Abrams after General Creighton Abrams, who become the US Army Chief of Staff in June 1972 and was considered the equal of, if not better than, the legendary Patton.


In June 1973, contracts to build the prototypes were given to Chrysler and Detroit Diesel. These were delivered in February 1976. Armed with the ubiquitous M68 gun (the licence-built Royal Ordnance L7 105mm gun), the prototypes were not only compared to each other but also the West German Leopard 2. Chrysler's prototype was powered bya turbine engine it was this design that was selected for production. Initial production was set up at the Lima Army Modification Centre in Lima, Ohio in 1979. Eleven Full-Scale Engineering Development (FSID) vehicles, still designated XM1, were produced in 1979 before the first full-production Abrams rolled out in the next year (the first FSID XM1 was given the nickname 'Thunderbolt' after General Abrams' personal mount during World War 2). In 1982, after around 1,000 M1 have been built, Chrysler was bought by General Dynamics Land Systems (GDLS). 


The M1's hull is made of solid RHA with the parts welded together. The hull front has downward-sloped 'beak' while the engine deck is raised to accommodate the turbine engine. The Abrams also incorporated composite armour inspired by the British Chobham armour. This gave the frontal turret armour of the baseline M1 an effective thickness of 350mm against APFSDS rounds and 700mm against HEAT rounds. In 1988, armour protection was improved by adding classified layers of depleted uranium and other undisclosed material. Introduced into the M1A1 model, the added material increased the effective frontal armor to 600mm against APFSDS and 1,300mm against HEAT. Interior protection against spalling is provided by a layer of kevlar. To further protect the crew from ammunition cook-off, fuel and ammo are stored in armoured compartments with blowout panels. The Abrams is also equipped with halon firefighting system and small hand-held fire extinguishers are also carried. Some Abrams, mostly seen in the USMC, are equipped AN/VLQ-6 Missile Countermeasure System that can impede the guidance system of ATGWs. 


As mentioned before, the original M1 was armed with the M68A1 105mm gun. It was getting outclassed by the then new Soviet tanks - the T-64 and T-72 by the mid-1980s . To combat newer armour technology and to increase effective range, a newer, larger gun was needed. The German Rheinmetall L/44 120mm smoothbore gun was selected to arm the M1A1 and M1A2 variants. Built under licence by Watervliet Arsenal, it entered service as M256A1. Able to fire various type of rounds as with its predecessor, the highlight of the gun was the M829 series of APFSDS rounds which were developed specifically to address the threat posed by the aforementioned Soviet-designed tanks. Secondary weapons consist of an M2 12.7mm heavy machine gun in front of the commander's hatch and two M240 7.62mm machine guns - one in front of the loader's hatch and another mounted co-axial with the main gun. 42 rounds of 120mm, 900 rounds of 12.7mm and 10,000 rounds for the 7.62mm machine guns were carried.


At the heart of the Abrams is the 1,500 hp  Lycoming (later Honeywell) AGT 1500 multi-fuel gas turbine capable of delivering 1,500 shaft horsepower. The power waqs transmitted by a six-speed (four forward, two reverse) Allison X-1100-3B hydro-kinetic automatic transmission. The Abrams is able to reach 97 km/h on road but with the engine governor in place, is limited to 72 km/h - this is mainly to prevent damage to the drivetrain and shock injuries to the crew. The multi-fuel nature of the powerplant means it can accept diesel, kerosene, petrol and jet fuel JP-4 and JP-8. For logistical reasons, JP-8 is preferred by the US military. While highly reliable, the engine is a notorious fuel guzzler, consuming 6.3 liters per mile. The engine however is quieter than a diesel and for this it received the nickname 'Whispering Death' during its first REFORGER exercise. 


The Abrams received a number of improvement packages with the most significant in the late 1990s with the introduction of the M1A2. The A2 includes improved fire control system, the commander's independent thermal viewer, weapons station, position navigation equipment and digital datalinks. Systems Improvement version One (SEPv1) provide digital maps, Linux communications and improved air conditioning. SEPv2 added Common Remotely Operated Weapons Station (CROWS / CROWS II) color displays, better interfaces, a new operating system, improved armour and upgraded transmission. To improve survivability in urban environments, the TUSK (Tank Urban Survival Kit) was initiated. Upgrades include reactive armour blocks on the tank sides and slat armour to the rear to protect against RPGs and other shaped-charge explosives. A Kongsberg RWS replaced the original, exposed commander's 12.7mm MG while a Transparent Armor Gun Shield with thermal sight was added to the loader's M240 MG. An exterior telephone allows accompanying infantry to communicate with the tank commander. The TUSK package is field-installable and 505 units were delivered by General Dynamics Land Systems. 


The Abrams entered combat during Operation desert Storm in February 1991 where it proved superior to T-55s, T-62s, Type 59s and export-version T-72s of the Iraqi Army. The long firing range of its gun outranged the Iraqi tanks, a decisive advantage in armoured warfare. Nine Abrams were destroyed during the campaign - seven through friendly fire while the other two were deliberately destroyed to prevent capture after receiving critical damage. None resulted in fatalities. Further combat took place in 2003 during Operation Iraqi Freedom. To prevent (or at least reduce) incidents of friendly fire, the Abrmas (and indeed all of the Coalition's vehicles) were fitted with Combat Identification Panels. However, as of 2005, casualties was higher with at least 80 Abrams suffered damage, 17 of them beyond repair. The majority of the damage was caused by IEDs. In operations against the Daesh in 2014, about 1/3 of 140 M1A1s of the Iraqi Army were damaged or destroyed; some were captured by the opposition. 

Today the US Army operates some 1,174 M1A2 and M1A2SEPs and 4,293 M1A1s (including variants), the USMC operates 403 M1A1while Australia have 59 M1A1 AIM, Egypt (1,200), Iraq (140), Kuwait (218) and Saudi Arabia (440). All the export tanks lack the depleted uranium layer in their armour. 


The Kit

In 2016, Meng Models joined the ranks of 1/35 Abrams model kit producers when they issued their    version of the M1A2. The second kit depicting the TUSK modifications (the first was Tamiya), the kit alllows one to build a TUSK-modified Abrams straight from the box. The box has the same footprint as the rest in the T-Rex series but deeper than usual to fit the eight sand-coloured sprues, three clear sprues, four dark brown sprues, two sheets of PE, a bunch of poly caps plus the usual decal sheet and instruction booklet. The parts are very well-moulded and have great details. There are a lot of ejector towers on the reverse side of many of the parts though  The individual-link track looks more complex to assemble than anything I have done before and should provide me with a new challenge! The kit allows two styles of TUSK: the 'straight-edge' TUSK-I or the scalloped TUSK-II ERA plates and decision has to be made early as to which markings to choose. Speaking of which, four were provided:

1. 1st Battalion, 22nd Infantry Regiment, Iraq 2008 (TUSK II)
2. E Troop, 2nd Squadron, 3rd Armored Cavalry Regiment, Iraq 2011 (TUSK I)    
3. 3rd Squadron, 2nd Armored Cavalry Regiment, Iraq 2011 (TUSK I)
4. 'Ghetto Blaster II', 68th Armored Regiment,1st Brigade, 4th Infantry Division, Iraq (TUSK I)

Construction
As usual with land vehicle kits, work started at the bottom of the hull. The foremost pair of torsion bars are of multi-part assembly and are workaable so careful application of cement is a must especially between C20/C31, C37/C38, C32/C64 and C39/C63 as the contact area is very small and to avoid accidentally gluing C29 and C36. The mud scraper was not added as it would mean extra work removing the bolt heads on the mount. The torsion bars are of the typical Meng style which can flex over diorama terrain. While the instructions have you place the wheels next, I skipped that part at this time and add the hull top first. But before the roof can be mated to the hull, the ejector towers on the reverse side of the roof have to be removed else it won't fit at all to the hull. Holes and notchess also need to be opened on the upper hull before fixing the roof and the hull together. The notches require filling as I cut them a bit too large. The engine exhaust grille is a multi-part assembly and can be posed open (when one have an aftermarket engine set that is)

Next up is assembly of the running gear. Really no problems here except for that bit of hate-love relationship I have with tank running gear in general (lots of wheels!!). Anyway, it was straightforward except that a number of the inner wheels have flash on the outside face and needed some clean-up. The tracks, as mentioned before, is a multi-part affair, and meng as usual, provided a jig to help with the assembly. I however took a totally different route. I took the DS rubber track from my Dragon M1A2 SEP (long story about why I dismantled the earlier kit). The DS is overly long for the Meng kit but a dry run shows that the excess length can be hidden behind the skirting plus, the track fit Meng's sprocket teeth. The side ERA blocks fit nicely in place although the side skirts needed a bit of 'persuasion' towards the rear of the hull.

Work on the turret was started by drilling a number of holes into the roof and also the bottom half of the turret. The position of the holes were clearly marked with indentations and arrows and 'M1A2' embossed in the plastic. The trunnion was then assembled and I noticed that despite being designed to be totally hidden by the mantlet, there are details embosssed on the trunnion. The gun was then assembled. The PE part X is meant to remain moveable and so the instructions has you taping (instead of cementing/supergluing) it to Part  D40. I eventually decided to superglue it in place after deciding to set the gun at a certain elevation. And just to be different from previous builds, the gunner's sight protective doors were posed open. meng provided different styles of armoured cables on the turret roof and the instructions need to be followed as to which version is needed for the tank you're building.

The Commander's cupola is basically a model-within-a model construction and was made separately. The periscopes (Part J1) were very tight fit and I have to sand the sides down a bit so that they are easier to fit in place. The cupola itself is a two-piece construct and there are two styles to choose (they are the same, just the way they were moulded). I however assembled just the basic cupola at this time. The shields and screens were assembled but was kept separate until after painting. The loader's shield has a gap between the panels and needed some puttying. The right-hand panel also seemed to out-of-position too, despite my effort to rectify it.

Painting and Decaling
Before the tracks were fitted onto the model, it was painted first. It was painted overall XF-1 Flat Black and after the paint has cured, the 'metal' parts of it were treated with AK Interactive Track Wash. It was then aside. I don't have the exact colour to match the modern US Sand colour so I select the next best available in my arsenal - AK Interactive AK4006 Buff Light Shade. To my eyes it looks fair enough although it is more yellow-ish and has less grey than the actual colour! Unfortunately seepage happened at one of the loader's armoured glass panel and it cannot be cleaned off as it seeped between the two already-joined clear panels! The hubs of the main wheels were painted Tamiya X-19 Smoke as these are actually translucent, which allows monitoring of the lubricating fluid inside. The whole model then received a wash using AK Interactive OIF and OEF Vehicle Wash. The periscopes / vision blocks were painted a mixture of clear colours to obtain the purplish sheen usually seen but mine ended up mainly reddish. For markings, I chose 'Ghetto Blaster II' as it was more eye-catching than the rest.

Finishing
I started by fully assembling the commander's and loader's shields and putting them in place. This was followed by the Counter Sniper / Anti-Material Mount on the mantlet. The 'grenades' for the smoke discharger were painted and then fitted in place - I used the longer ones as they were a bit easier to handle. Then accessories were added to the model using parts from the kit itself, the spares box and also Meng's own Modern US Military Individual Load-Carrying Equipment Set and Equipment For Modern US Military Vehicles set. The model did not receive much weathering (read paint chipping) as the paint on the real tank is seldom seen as such (besides, its supposed to be resistant against corrosive chemicals, what more against boot scrapes). The aerials were then put in place. Sice Meng only provides aerial bases only, the rods were made using guitar strings and for the rightmost aerial, I use the one from my Dragon M1 kit. The kit then received  a spray of flat clear. My clear parts masking however is bad and many of the armored glass panels were 'frosted' as a result. The model then recieved an overall 'dust' coverage using thinned Tamiya Buff. The lower parts of the model were then were liberally covered with MiG Production Iraqi Dust pigments. Once dried, the excess were brushed off.

Conclusion
Modellers have a number of choices to build an Abrams in 1/35. Although another Abrams may be seen to be superfluous, Meng's M1A2 TUSK is very much welcome. The details were quite sharp and yet not as complicated as other brands'. Well, I do cheated somewhat by using the tracks from my Dragon kit! It was a fun build and anyone with even those with little experience building tank kits will have no problem with this kit (the multi-part tracks may be a different matter).