Showing posts with label Sherman. Show all posts

Thursday, 14 January 2021

Achilles' Tracks


Historical Background
After studying the German Blitzkrieg of 1939-1941, the US Army incorporated the idea of tank destroyers - fast, lightly armoured vehicles with high velocity anti-tank guns to deal with the armoured spearheads of the blitzkrieg. The result was the M10 Gun Motor Carriage based on the M4 Sherman tank but with thinner armour in order to comply with the high speed requirement. At the same time the British were examining the design for a low-silhouette tank destroyer with a 360-degree rotating turret mounting the hard-hitting Ordnance QF 17-pounder gun with armour able to resist 50 mm rounds at 800 yards. However, with the British resources and industry working at full capacity, together with the availability of Lend-Lease, the project was cancelled and they received the M10, nicknamed Wolverine in British service. The British received their first Wolverines in 1943 and found the M1 3-in anti-tank gun arming them gave better performance than the Ordnance QF 6-pounder anti-tank gun and equal to the 7.5-cm KwK 40 gun arming the Panzer IV and Sturmgeschutz III.

The British however still wanted to mount the 17-pounder gun but the main problem is how to mount the gun onto the existing vehicles. However, the initial batches of the British M10 had an easily modified mounting to facilitate the replacement of the M7 gun with the newer M1. The mounting also allowed the British to eventually mount the 17-pounder gun. But for later batches of M10s, only the T71 type can be converted while the T70 can only mount the lighter M1. The M10-based conversions were nicknamed Achilles Ic while M10A1-based conversions were called Achilles IIc. The 17-pounder was able to penetrate 131 mm of armour at 1,000 meters at 30 degree angle of penetration using APCBC rounds. The limited-availability APDS round can penetrate 192 mm at the same range and angle of attack. By comparison, the same APCBC rounds fired from the American 3-in gun can only penetrate 88 mm of armour while the very limited HVAP round can only penetrate 127 mm of armour. All these numbers show the clear superiority of the 17-pounder gun. Because of its length, the 17-pounder gun of the Achilles was fitted with a counterweight, giving it a distinctive appearance compared to the M10.

In practice, the British used the Achilles as a mobile anti-tank gun, able to reinforce an infantry attack and engage counterattacking enemy forces, while waiting for the slower towed 17-pounders be brought into position. This was actually in line with the original American concept of the tank destroyer. The Achilles was usually used in an offensive manner in support of Churchill tank-equipped units, which was not supported by the Sherman Firefly or the Challenger tank. The Achilles equipped the units of the Royal Artillery and Royal Canadian Artillery in Armoured Divisions or Corps Anti-Tank Regiments. The most successful action taken by the Achilles was during Operation Charnwood, when Achilleses and towed 17-pounders of the 245th Battery, 62nd Anti-Tank Regiment of the Royal Artillery stopped an attack by a mixed force of Panzer IV and Panther tanks of the 12th SS-Panzer Division Hitlerjugend, destroying thirteen panzers while losing four of their number.

The British received 1,650 M10s during the war, of which 1,100 were converted into Achilles standard. It was planned that 1,000 would be converted in time for Operation Overlord but eventually only 124 had been converted by 6 June 1944. Losses among Achilles-equipped unit at the time meant that replacements were often regular M10s, much to the crews' dismay. The numbers however picked up by the end of 1944 finally reaching the figure stated beforehand. 

The Kit
Two years after the release of the M10, AFV Club released the 'Anglified' version - the Achilles. The majority of the parts in this kit are the same with the ones in the M10 kit. The Achilles kit added a new sprue containing British-specific parts such as the gun mantlet, British-style fire extinguishers, British No.19 radio, spare track-link mounts, three Sten Guns with alternate metal stocks and six 17-pounder rounds for the ready-round racks. A new turned aluminium barrel is also included. Decals provide markings for six vehicles:
1. 93rd Anti-Tank Regiment, Royal Artillery, 5 Corps Italy 1944
2. 1st Army Corps, Normandy 1944
3. 75th Anti-Tank Regiment, Royal Artillery, 11th Armoured Division, Belgium 1944-45
4. 4th Anti-Tank Regiment, Royal Canadian Artillery, Netherlands 1945
5. 21st Anti-Tank Regiment, Royal Artillery, Guards Armoured Division, Netherlands 1944
6. 1st Anti-Tank Regiment, 1st Polish Armoured Division, Netherlands 1944

While other reviewers didn't mention it,  the decals in my kit were badly printed, with the Guards Armoured Division insignia and all of the arms of service insignias out of register. 

Construction
Since the Achilles, like the original M10 is an open-topped vehicle, construction started at the interior. Not much however is included (and as I have never seen the actual interior, it's rather moot actually). What were there however was nicely detailed. There are seats for the driver and his assistant but no control columns were included. The instrument panel was painted and drybrushed (although I shouldn't bother, really). The ammo rack on the sponson is there but unlike the M10, rounds were not provided. The beautifully-detailed transmission were next. After assembly, it was cemented to the transmission cover and the whole thing was mated to the main hull. The interior then received a rather heavy dark wash. Moving on to the suspension, AFV Club's VVSS suspension has a bit more breakdown than other companies' allowing more articulation especially for dioramas (which I don't need). It was quite tedious but strangely enough, after all the effort making the suspension articulate, they have the wheels with hollow backs.....The rear plate and all the fittings was then fitted to the hull, although I left the exhaust for the time being.

Before doing anything else to the upper hull, the faint raised circles marking the locations of the applique armour bosses were sanded off (unless you're doing the Canadian version).  Like the M10 kit, the driver and co-driver's hatches can be made moveable but I also decided to cement them shut as there were no sitting figures to fit there nor there were interior to speak of. The rear plate was then cemented but the tools placed there were left off until after painting has been done. The fit was was quite bad and needed putty to fill the gap. It should be noted that there is a difference for the location of the tools between the Canadian version and the rest of the options in the kit The grouser rack were then cemented to the hull. Again the location is different on the Canadian option. At the front of the hull, AFV Club gave options for the placement of the radio aerial and the right-hand side light (either on the same location as on the M10 or on the front plate for the former and either on the edge of the front plate or on top of the right headlight for the latter). The empty ammo racks on the sponson were partially filled with ammo from Bronco - just to have something in it.

On to the turret then. The turret is basically a carry-over from the M10 kit. However the upper rear panel is a straight piece of plastic which need to be folded to fit on the lower half (fit is a bit of a misnomer here). Also, instead of generic ammunition style (or using ammo from the M10), AFV Club provided 'proper' 17 pounder ammunition for the turret ready racks. I did not use them however. Instead I used the even better items from Bronco. They are however larger than the kit ammo but fortunately, they fit into the kit ammo racks (except for the topmost, right-side rack). A Sten Gun with alternative butts was also provided. The instructions have the magazine in place but I don't think the gun was stowed as such, so the magazines were left off. The real difference of the turret is at the front with a different mantlet and the gun (of course) and the differently-shaped counterweights on the rear of the turret. The M2 heavy machine gun was left off the this time to ease handling of the turret. And, to ease painting (more or less) the interior parts were painted before they were assembled, with touching-up of the paint took place after construction.

Painting and Decalling
Allied vehicles are pretty straightforward to paint by (usually) having just one colour. In the interest of accuracy, the Achilles should be painted SCC15 (British) Olive Drab. Since I usually paint using Tamiya stuff and Tamiya does not have this colour, they need to mixed using Tamiya paints. I However ran out of some of the paint, and so I painted it 'straight' XF-62 Olive Drab. The majority of marking options in the kit have plain schemes and to add a bit more variety to my collection, I decided to finish my model in the Guards Armoured Division markings. The camouflage pattern was painted using Tamiya XF-69 NATO Black. The decals were applied next. They settled without any problems but you can't help noticing the rather obvious mis-register (is there such a word?) of the decals especially the arms of service marking. The model then received a wash using stuff from AK Interactive.

Finishing
I didn't mention it early on but the tracks were fitted onto the running gear before the upper hull was cemented to the lower half. The tracks were painted XF-64 Red Brown as base while the track pads were painted XF-69 NATO Black. It was earlier decided that turret opening is wide enough for some parts to be left off and so only at this time the ammo pieces were put in place, together with the aforementioned Sten. AFV Club did not include stowage so I added some from my stash and from Bronco's 17-Pounder Ammunition Set and British Field Accessories Set. The turret and upper hull received a thin layer of XF-57 Buff to stimulate dust. The Buff layer for the hulls was streaked down to simulate rain marks. The marks were enhanced here and there using AK Interactive Weathering Pencil. The lower hull received mud applications using Vallejo Splash Mud, Ammo Dark Mud and AK Interactive Earth Effects. 

Conclusion
While the amount of detail is pretty good for the outside, I believe that interior is simplified and is something that is not so good for an open-topped vehicle. The fit is also not very good especially for the turret walls and the rear hull plate which require putty. The decals is one of the worst for a mainstream kit with out-of-register printings. And, apparently, like their M10 kit, the turret is rather inaccurate although I don't have any means to verify the claim. Anyway it does look like an Achilles's turret so there. It is nevertheless a very buildable kit and recommended to all. Of course, if you want to have an easier build, there' always the newer Tamiya kit of the same vehicle!

Sunday, 5 January 2020

Easy Eight


Historical Background
The US Army followed the events in Europe 1939-1940 and decided that their current medium tank the M2, was obsolete to face contemporary battlefield challenges and designed the M3 Medium Tank (later nicknamed Lee/Grant). The M3 was a stop-gap measure, with the main 75 mm gun in a right-side sponson with limited field of fire. In late August 1940, the Ordnance Department submitted characteristics for a new design to replace the M3. Development of the prototype was delayed to allow the M3 design to be finished and enter production. On 18 April 1941, the Ordnance Department chose the simplest design, called the T6. It was basically a modified M3 hull and chassis and mounted a fully-rotating turret armed with the M3 75 mm gun. The design borrowed many features from existing tank design such as the vertical volute spring suspension, rubberised track links and the usage of Continental R975 radial engine. The T6 prototype was completed on 2 September 1941 and production commenced in the next month.

The production M4s were kept as close as possible to the M3, including the tracks, suspension and transmission. The hull upper hull however was changed to cast type and the side entry door was eliminated. The lower hull was made of large welded parts with the bogies bolted to the hull to ease maintenance and repair. The upper hull was cast for the M4A1 version and welded for the rest of the variants (plus the cast front and welded rear 'composite hull' M4). The M4 was powered by a Continental R975 air-cooled radial petrol engine rated at 400 hp. 660 liters of petrol was carried, allowing a range of 195 km. Later versions was powered by Ford V8 petrol or General Motors diesel engine. The frontal armour was 51 mm thick while the turret front was between 64 mm to 76 mm, The front upper hull was angled at 56 degrees with the lower half rounded, making the armour effective against most early war anti-tank weapons. Even so, the early versions had shot traps, located just in front of the driver and co-driver's positions.

The M4, nicknamed Sherman (after General William Tecumseh Sherman) was originally armed with a L/40 M3 75 mm gun. The standard M61 round fired by this gun can penetrate 87 mm of RHA at 100 meters and 70 mm at 1,000 meters, sufficient to destroy Panzer IIIs and IVs. After protracted development, the Sherman was later armed with a more powerful M1/M1A2 76 mm gun, in a new T23 turret, giving it at least a parity with L/48-armed Panzer IVs. The main armament was backed by two Browning M1919 machine guns; one co-axial with  with the main gun and another in the hull. 60 rounds was provided for the main gun with the machine guns shared 4,750 rounds between them. For anti-aircraft and further anti-infantry/soft-skin capability, a Browning M2 12.7 mm machine gun can be mounted on the roof.  The Sherman was manned by a crew of five: commander, gunner, loader, driver and assistant driver/hull gunner. Each of the crew members had a periscope to allow 360-degree view of the outside.

Production began at the Lima Locomotive Works, Lima, Ohio with all the first production tanks going to the British Army. By the end of the war, ten other production lines were opened, delivering some 48,000 M4s. The Sherman was produced in a  number of variants but the most produced ,a nd the preferred model by the US Army was the M4A3. The M4A3 was basically the same with the M4 but was powered by a Ford GAA V-8 engine. The early M4A3s were armed with a shorter (L/31) M2 75 mm gun, which was later replaced with the L/40 M3 gun. Late versions of the M4A3 was armed with the more powerful M1/M1A1 76 mm gun. Work was also done to improve the Sherman's ride qualities and  this resulted in the finalization of the Horizontal Volute-Spring Suspension or HVSS.  Wider track was also included with the HVSS system. While this resulted in a heavier and wider vehicle, the ground pressure is reduced. The HVSS was applied to the late M4A3 variant and resulted in the M4A3(76)W HVSS or M4A3E8. The latter designation, coupled with the easier ride of the HVSS gave rise to the 'Easy Eight' nickname for this variant. A total of 2,617 M4A3E8 were built between by Detroit Tank Arsenal between August 1944 and April 1944.

The Sherman was originally issued in small numbers to familiarise the US Armored Divisions. American Shermans saw their first combat during Operation Torch in November 1942. The M4A1 (and the original M4) were the prime variants used by the US Army until the introduction of the M4A3 with a more powerful (500 hp) engine. The Easy Eight saw their first action during The Battle Of The Bulge. As individual tanks, the Sherman was inferior to the German tanks such as the Panther being weakly armed (at least for the early version) and thinly armoured. As a type however, it was superior to the German panzers, being reliable, easy to maintain and more mobile than the ponderous Tigers. Easy Eight were retained by the US Army post-World War 2 and saw combat again during the Korean War.

The Kit
In the 1970s, Tamiya came up with their kit of the Easy Eight and it is suffice to say that it is a collector's item. Although Tamiya released a number of new mould 'mainstream' M4A3s in the late 90s and the early Noughties, the M4A3E8 remain unkitted by them. In 2014, they released the re-boxed Asuka kit and eventually, in 2015, they released their own kit of the Easy Eight. This kit is packed inside a rather small (for a 1/35 WW2-era medium tank kit) box. Opening up the box, there are just six olive-colored sprues, one clear sprue, lower hull, turret shell, a pair of band-style rubber tracks, decals, poly caps and the instruction sheet. Obviously many parts, especially the HVSS were simplified, but the existing details are sufficient for many modellers. The relevant parts also has convincing cast texture moulded. Being a Tamiya kit, I don't expect any complications during construction. The decal sheet markings for two Easy Eights (the difference between the two is that one of them sports a blacked-out Allied Star).

Construction
Instead of a single hull pan, Tamiya has the lower hull as a multi-part assembly. The left and right side pieces have a further sub-piece which need to be cemented first. The joint between the side pieces and the bottom piece is reinforced by part P2. Apparently the engine bulkhead, Tamiya moulded holes in it for the non-existant engine (although they may be useful for those who wants more details for their model). The rear hull panel were next. No problem here but Tamiya apparently forgot to include the engine access door in their instructions. The part is however easily identified on the sprue. Moving to the transmission cover, I lost Part L9 to the Carpet Monster and have to fashion a replacement (badly!) using scrap plastic. The exhaust deflectors were assembled but I couldn't orient them in place. I'm not sure myself, but I think that the position for R17 and R18 should be swapped (either that or I somehow got it wrong while trying to insert it in place!). In the end, I just cut off the tabs and glued the deflector in place.

As mentioned before, the HVSS suspension is one of the items simplified in the Tamiya kit. While this means no articulation and lesser details, it makes up for a quick and hassle-free build. The main suspension unit consists of just four parts per bogie (not including the wheels and the mount). They were quickly assembled but for a short while was set aside as I wanted to do some weathering on the lower hull. The tracks were painted beforehand using AK Interactive Track Primer, followed by the same company's Track Wash. The tracks were later drybrushed silver. The ends can be joined together using regular hobby cement but I stick to using cyanoarcyclate glue. The tracks for my kit is a bit warped at the ends but it was easily rectified by cement. They fit without problem and the orientat

The upper hull is designed so that it can be attached to the lower without cement. Tamiya did this by using a clip at the front and a large pin which slots into a poly cap arrangement at the rear. The hull sponson, which was hollow in previous Tamiya (in-house) Sherman kits is closed by the fenders. The latter is also made stable with a spacer. Holes for the lifting lugs at the front hull were the drilled. And just to get the repetitive out of the way, the fender braces were cemented first. Since I intended to have the crew hatches shut, the periscopes were left off. While the front lifting lugs were moulded 'whole', the rear pair were moulded in half, and were to be cemented to stubs on the rear deck. Most of the fittings on the upper hull were then cemented but I temporarily left the pioneer tools and spare track links off to ease painting. The rear hull rack, while assembled, was also left off at this time. The upper hull was then attached to the lower hull. I applied a bit of Tamiya Thin Cement to close the few tiny gaps along the joint.

Painting and Decalling
There is just one colour used for US World War 2 era vehicles. This time I used Vallejo Air 743 Olive Drab. I was thinking of adding a brown filter after the initial paint layer has dried but apparently (according to Tamiya), late-war OD have a more greenish hue than the OD used earlier. So I ditched the brown filter. Wash solution from AK Interactive was then used to visually raise the details. The tools were also painted while still on the sprue although I used sand yellow to paint the wooden handles. Once dried, brown wash was used to make them look more like wood. Afterwards, it was time for the decals. As mentioned before, the markings selection is very bland with just two anonymous Easy Eights from the 4th and the 5th Armoured Divisions. While the majority of M4A3E8s at the time were indeed devoid of personalised markings, I wonder why didn't Tamiya pick the ones with those markings. I tried to make it look more interesting by using markings from the 4th AD with the blacked out US stars on the turret. With just four pieces of decals, this process took less than 10 minutes! 

Finishing
I brown-washed a pair of wood piece and placed them on the front of the hull (the bracket of this purpose has already been moulded in place). The model then received the usual wash and I tried the streaking method for this model. The running gear and the tracks received a rather thick pasting of Vallejo Dark Mud. Parts where the muddy boots of the crew stepped on the tank were splattered with a light mud solution. Afterwards, tank supplies using parts from Academy, Tamiya, Hero and the stash were placed on the relevant parts of the model. To hang the stuff on the turret, I cemented a length of plastic rod on the right side of the turret. I then robbed the metal tow cable from my broken Dragon M4A3(76) and placed it on the model. The commander's machine gun and the gun cradle were replaced with spares from Dragon's Sherman Firefly The original kit's cradle was cut and replaced. Since the I chose the markings for a tank in Bastogne during the Battle Of The Bulge,, I think I wanted to add some 'snow'. Using a mixture of water and white glue as adhesive, I sprinkled (and also mixing it with the aforementioned adhesive) sodium bicarbonate on the tracks, road wheels and at various points on the model.

Conclusion
If you want to punish yourself build an intricate kit with all the bells, whistles and screws, this model is not for you. The Tamiya kit is geared towards the more casual crowd (or those seeking relief after building 1,000+ parts kits). Anyway, admittedly mre simplified than its rivals, the Tamiya kit of E8 does have sharp and nice enough details. The letdown in this kit (to my viewpoint) is the rather uninspired markings chosen. This was can however be an advantage: being rather nondescript, you can work to your heart's content with regards to additional items you want to add to the model.

Sunday, 6 May 2018

American Panzerjager


Historical Background
In the aftermath of the Battle Of France, the US Army perceived that in the face of the German Blitzkrieg tactics, its units are expected to be faced by large numbers of German tanks attacking on a relatively narrow front. The enemy was expected to break through the thin anti-tank gun screen. Therefore it was decided that the main anti-tank units, the Tank Destroyer battalions should be concentrated and made mobile. This was later turned into the so-called tank destroyer doctrine and was championed by Lt. General Lesley McNair, Commanding General, Army Ground Forces. Under this doctrine, the tank destroyer battalions were to be held as reserve at the corps or army level and to be moved quickly to the site of enemy armoured breakthrough, using aggressive tactics to destroy enemy tanks. This led to a requirement for a fast, heavily-armed vehicle. Although equipped with a turret, the tank destroyer was more heavily gunned, but, in order to be more maneuverable, more lightly armoured than a regular tank, This doctrine was considered to cause the delay in introducing the M26 Pershing heavy tank and limited the Sherman's armament to just 3"/76mm.

The first prototype of a standardised tank destroyer (as there already existed the half-track M3 75mm GMC and the truck-based M6 37mm GMC) was based on the M3 Medium Tank chassis but it was later decided to use the M4 (Sherman) Medium Tank chassis. The first M4-based prototype was designated 3-in Gun Motor Carriage T35. It was armed with a M7 3-in (76.2mm) gun in a circular, open-topped turret (developed from the defunct M6 heavy tank project) and placed on top of a M4A1 chassis. The second prototype, the M35E1 used the M4A2 chassis and used a pentagonal turret with flat, sloped sides, frontal 'beak' and inverted-slope rear face. The turret and the hull plates were held in place by large nuts. In June 1942 it was standardised as the 3-in Gun Motor Carriage M10 and was ordered into production. The M7 gun fired a number of anti-tank rounds including M79 AP, M62 APCBC, M93 HVAP and the APHE. The last mentioned, despite its shortcomings were included in 54 rounds carried. Two large counterweights were carried at the back of the turret because of the weight of the weapon and the lightness of the turret. An M2 .50-cal machine gun, along with 1,000 rounds can be mounted at the top rear of the turret. The weapons were supplemented by the crew's personal weapons for self-protection. Being an M4A2-based vehicle, the M10 was powered by a General Motors 6046 diesel engine rated at 375hp. Later, the M10A1 variant were produced, these differed from the M10 by being based on the M4A3 chassis and used a petrol engine and the last 300 vehicles were armed with a M1 3-in gun with a better performance than the M7.

The M10 first saw action during the final stages of the North African campaign in 1943. The vehicle was successful as it was able to destroy most German tanks in the theatre. The M10 however did not conform to the actual tank destroyer doctrine, and in mid-1944 was supplemented by the smaller and lighter M18 Hellcat. The M10 later faced the Tiger and Panther tanks in Europe, whose frontal armour was proof against the M10, unless a HVAP round was used. In theory, the open-topped turret is a liability in urban or forested areas, making the crew vulnerable to grenades, mortars and artillery. However the turret was liked by the crews as it allow better visibility and communication with the infantry. And should the vehicle be disabled, the open turret allowed them to escape more easily. The doctrine of using armoured vehicles working in close support with the infantry also helped protect them from enemy infantry. Some individual vehicles rigged extra armour to act as a roof, protecting them from mortar and artillery fire. Towards the end of the war, the armour of the M10 was proved to be too thin and was vulnerable to German infantry anti-tank weapons such as the Panzerfaust and the Panzerschreck. To help bolster protection, crews started to pile sandbags on the frontal plate and baulks of timber for the sides. Another weakness was the slow turning rate of the turret - it took 2 minutes to make a full turn, because of manual traverse. However since they operated in larger numbers, and generally being more maneuverable than their opponents, the weakness was not really a distinct disadvantage.

Several hundred M10s were delivered to the Allies as part of Lend-Lease. The British designated their M10s as '3 in Self- Propelled' or 'M10 3 in SP' and was operated by the Royal Artillery. The British M10s saw action in Italy and North-West Europe, many being upgraded with the QF 17-pounder anti-tank gun as the 17pdr SP Achilles. 54 M10s were delivered to the Soviet Union, although there were few records of them in action. The Free French Army also operated M10s, where one M10 named Sirocco, assigned to the Regiment Blinde de Fusiliers Marins, disabled a Panther tank during the liberation of Paris. The Panther was parked near the Arc de Triomphe, with Sirocco at the other end, at the Place de la Concorde. Requiring a snap shot, Sirocco managed to get a first-round hit when the gunner remembered the textbook length of the Champs-Elysses, dialed the range and fired.

A total of 6,706 M10 and M10A1s were built between June 1942 and December 1943. 300 of those were turretless M10A1s designated Full Track Prime Mover M35 used as artillery tractors. Apart from the M18, the M10 was also supplemented by the M36 GMC, armed with a 90-mm gun.

The Kit
Until 1999, the only 1/35 kit of the M10 was the 1960s-vintage Tamiya kit (and its Academy copy). The kit has only basic detailing and is oversized, being more of 1/32 scale. In that year, AFV Club, the Taiwan-based scale model manufacturer released this new-tool kit. The kit consists of 332 plastic parts, 8 vinyl parts (2 track runs and six components for the suspension), 1 nylon string, 1 turned aluminium barrel, 1 spring and a decal sheet. The kit is well-moulded and having good detail, although it, like Tamiya Shermans, has hollow-backed road wheels. Being an open-topped vehicle, AFV Club has included a fairly complete interior, which was way better than the Tamiya kit. No ready rounds are included in the kit and AFV Club suggests a separately available brass ammunition set.  The M10's distinctive applique armour bosses are moulded separately, with tiny raised circles moulded on the hull for their placements. The separate bosses make it easier for modelers to hang goodies on the hull and the turret, without cutting them off first. Grouser racks are also included, together with 26 grousers. The tracks are of the T49 three- bar steel cleat style. AFV Club also suggested the alternative (separately available) workable T51 rubber padded track. Recoiling gun gimmick was included through the use of the supplied spring. Decals provide markings for six vehicles:

1. 'Pistol-Packin' Mama', Tank Destroyer School, Texas 1943
2. 634th Tank Destroyer Battalion, Germany 1944
3. ROC Army, Jinmen Island 1958
4. 'Le-Malin', French 2nd Armored Division, France 1944
5. 'Lion', France 1945
6. 'Essling', France 1945

Construction
Since the M10 is an open-topped vehicle, construction started at the interior. Not much however is included (and as I have never seen the actual interior, it's rather moot actually). What were there however was nicely detailed. There are seats for the driver and his assistant but no control columns were included. The instrument panel was painted and drybrushed (although I shouldn't bother, really). The ammo rack on the sponson is already moulded on but thankfully the tubed rounds are separate, avoiding the ugly moulded-on ammo of Academy's M18. The beautifully-detailed transmission were next. After assembly, it was cemented to the transmission cover and the whole thing was mated to the main hull. The interior then received a rather heavy dark wash. Moving on to the suspension, AFV Club's VVSS suspension has a bit more breakdown than other companies' allowing more articulation especially for dioramas (which I don't need). It was quite tedious but strangely enough, after all the effort making the suspension articulate, they have the wheels with hollow backs.....The rear plate and all the fittings was then fitted to the hull, although I left the exhaust for the time being.

Before doing anything else to the upper hull, the applique armour boss were assembled (they were of two-piece affair) and cemented to the hull. Faint raised circles mark their locations. The driver and co-driver's hatches can be made moveable but I decided to cement them shut as there were no figures to fit there nor there were interior to speak of. The rear plate was then cemented but the tools placed there were left off until after painting has been done. The same goes with the track grouser racks and the track grouser themselves. Before I forgot, the fire extinguisher was painted it was placed on the left hull as per the instructions. Unlike my previous armour builds, the upper hull and the hull pan was not mated prior to painting. Holes were drilled into the transmission cover after which plastic rods were inserted to act as support for timbers used to hold sandbag armour in place. The sandbags were made with two-part putty and while I *think* it looked better than the earlier sandbags on my M13/40 and M5A1 models, there are still plenty of rooms for improvement!

The turret was a multi-piece assembly with separate walls. The details on the walls were cemented first onto the respective walls. AFV Club however did not include the ready rounds and I have to turn to my stash to fill the turret racks - they are however 76 mm rounds instead of 3-inch, so some artistic license was used here, besides, I have no idea of the differences between the two calibres! As mentioned before, AFV Club included the recoil gimmick for the gun but the weight of the metal barrel made the whole assembly quite wobbly so I just superglued the gun in place. The inside of the turret was painted before assembly while the applique armour bosses on the turret walls were left off temporarily while I worked out the stowage

Painting And Decalling
Again, if it's a World War 2-era US vehicle, it will be in Olive Drab. Tamiya XF-62 was the paint used this time while the tyres were painted using XF-63 German Grey. The tracks and grousers were painted a base of XF-64 red brown and given a wash using AK Interactive track wash while the tools (still on their sprues) were painted Steel and Red Brown. The 'timbers' holding the sandbags in place were unpainted and were just given a wash of red brown. As for markings, although the French M10s have colourful insignias, I prefer to have the M10 in its 'native' user's markings and therefore went for a US Army vehicle. I also preferred a front line vehicle and so the first option was out of contention also, leaving the rather bland and boring second option (the majority of M10s have rather boring markings anyway!). The sandbags were painted XF-57 Buff and given a brown wash.

Finishing
The panel lines, engine grille and the armor bosses were given a pin wash. the track grousers were then placed on the hull racks. Note that there aren't enough of the grousers to fill the racks.For accessories, items from Tamiya Allied Vehicle Accessories Set were selected, painted XF-49 Khaki, given a wash and were then cemented to the turret sides - the rolled canvas however needed sanding down (as it was meant to go on a rounded surface, like a Sherman turret perhaps) in order to avoid gaps between it and the turret. There was a slight gap remaining so I slotted a canvas bucket, also from the Tamiya set between the canvas and the turret wall. Other additional items include C-Ration boxes (also from Tamiya), generic boxes from Academy and gas cans from Hero. These were placed on the engine deck. Not much weathering was done, just applying Mig Productions European Dust on the lower hull and tracks.

Conclusion
The AFV Club M10 was considered to be the better of the two M10 kits available at the time I bought my copy. I have not seen the Academy one so I really cannot make a fair comparison. Nevertheless AFV Club kits are bit 'fussier' to build and apparently the shape of the turret is a bit off but to my eyes, it still looks very much like an M10. Nowadays, modellers would probably pick up the new Tamiya kit of the M10 but the AFV Club is still a good alternative. My nitpick with this kit is the lack of rounds for the turret ammo rack and the lack of personal weapons, otherwise it is indeed an excellent kit.

Sunday, 4 March 2018

Rounded Sherman


Historical Background
The US Army followed the events in Europe 1939-1940 and decided that their current medium tank, the M2 was obsolete to face contemporary battlefield challenges and designed the M3 Medium Tank (later nicknamed Lee/Grant). The M3 was a stop-gap measure, with the main 75 mm gun in a right-side sponson , with limited field of fire. In late August 1940, the Ordnance Department submitted characteristics for a new design to replace the M3. Development of the prototype was delayed to allow the M3 design to be finished and enter production. On 18 April 1941, the Ordnance Department chose the simplest design, called the T6. It was basically a modified M3 hull and chassis and mounted a fully-rotating turret armed with the M3 75 mm gun. The design borrowed many features from existing tank design such as the vertical volute spring suspension, rubberised track links and the usage of Continental R975 radial engine. The T6 prototype was completed on 2 September 1941 and production commenced in the next month.

The production M4s were kept as close as possible to the M3, including the tracks, suspension and transmission. The hull upper hull however was chaneged to cast type and the side entry door was eliminated. The lower hull was made of large welded parts with the bogies bolted to the hull to ease maintenance and repair. The upper hull was cast for the M4A1 version and welded for the rest of the variants (plus the cast front and welded rear 'Composite hull' M4). The M4 was powered by a Continental R975 air-cooled radial petrol engine rated at 400 hp. 660 liters of petrol was carried, allowing a range of 195 km. Later versions was powered by Ford V8 petrol or General Motors diesel engine. The frontal armour was 51mm thick while the turret front was between 64 mm to 76 mm, The front upper hull was angled at 56 with the lower half rounded, making the armour effective against most early war anti-tank weapons. Even so, the early versions had shot traps, located just in front of the driver and co-driver's positions.

Progressively thicker armour was added to later models and once in combat, crews often add improvised additional protection, using sandbags, wire mesh, spare track links and even wood. The sandbag armour was fairly effective on the sloped frontal armour where it gave extra protection against HEAT warheads (but not AP rounds). In 1944 however, General George S. Patton banned the use of sandbag armour as it was alleged that the sandbags were generally ineffective while the weight added extra burden on the tank. Research also showed that the M4 was prone to catch fire when hit by the enemy, caused by the explosion of ammunition stowed in the sponson above the tracks. This unwelcome trait gave the M4 grim nicknames such as Tommycooker by the Germans and Ronson by the British. A partial remedy was found by welding 25 mm thick additional armour plate to the sides containing the ammunition stowage while later models moved the ammo racks to the hull floor with water jackets surrounding the main ammo stowage. The tanks with the water jackets were known as 'wet stowage' (suffixed 'W') while the earlier stowage was known as 'dry'.

The M4, nicknamed Sherman (after General William Tecumseh Sherman) was originally armed with a L/40 M3 75 mm gun. The standard M61 round fired by this gun can penetrate 87 mm of RHA at 100 meters and 70 mm at 1,000 meters, sufficient to destroy Panzer IIIs and IVs. After protracted development, the Sherman was later armed with a more powerful M1/M1A2 76 mm gun, giving it at least a parity with L/48-armed Panzer IVs. The main armament was backed by two Browning M1919 machien guns; one co-axial with  with the main gun and another in the hull. 60 rounds was provided for the main gun with the machine guns shared 4,750 rounds between them. For anti-aircraft and further anti-infantry/soft-skin capability, a Browning M2 12.7 mm machine gun can be mounted on the roof.  The Sherman was manned by a crew of five: commander, gunner, loader, driver and assistant driver/hull gunner. Each of the crewmembers had a periscope to allow 360 view of the outside. On early versions, direct vision slits was provided to the driver and his assistant. Despite the inclusion of bulletproof glass and hinged covers, the slits were removed from later models due to bullet splashes.

Production began at the Lima Locomotive Works, Lima, Ohio with all the first production tanks going to the British Army. By the end of the war, ten other production lines were opened, delivering some 48,000 M4s. The Sherman was produced in a  number of variants but the most distinctive was the M4A1 with a fully cast, rounded hull. Other distinguishing features were the inverted U-shaped backplate and the rear hull panel similar to the M3. Early M4A1s can also be distinguished by the return rollers being placed on top of the bogies (also like the M3) - it was changed with the more well-known style in Summer 1942. Originally there was only one turret hatch but another one over the loader's position was introduced in December 1943. The early M4A1s were armed with a shorter (L/31) M2 75 mm gun, which was later replaced with the L/40 M3 gun. Late version of the M4A1 was armed with the more powerful M1/M1A1 76 mm gun.

The Sherman was originally issued in small numbers to familiarise the US Armored Divisions. However, following the fall of Tobruk to the Germans and with Egypt and the Suez Canal threatened by further German advance, a decision was made to deliver Shermans to the British. The British received the M4A1 version (called Sherman II) and saw first combat during the Second Battle of El Alamein in October 1942. American Shermans saw their first combat a month later during Operation Torch. The M4A1 (and the original M4) were the prime variants used by the US Army until the introduction of the M4A3 with a more powerful (500 hp) engine. As individual tanks, the Sherman is inferior to the German tanks such as the Panther, being weakly armed (at least for the early version) and thinly armoured. As a type however, it was superior to the German panzers, being reliable, easy to maintain and more mobile than the ponderous Tigers.

The Kit
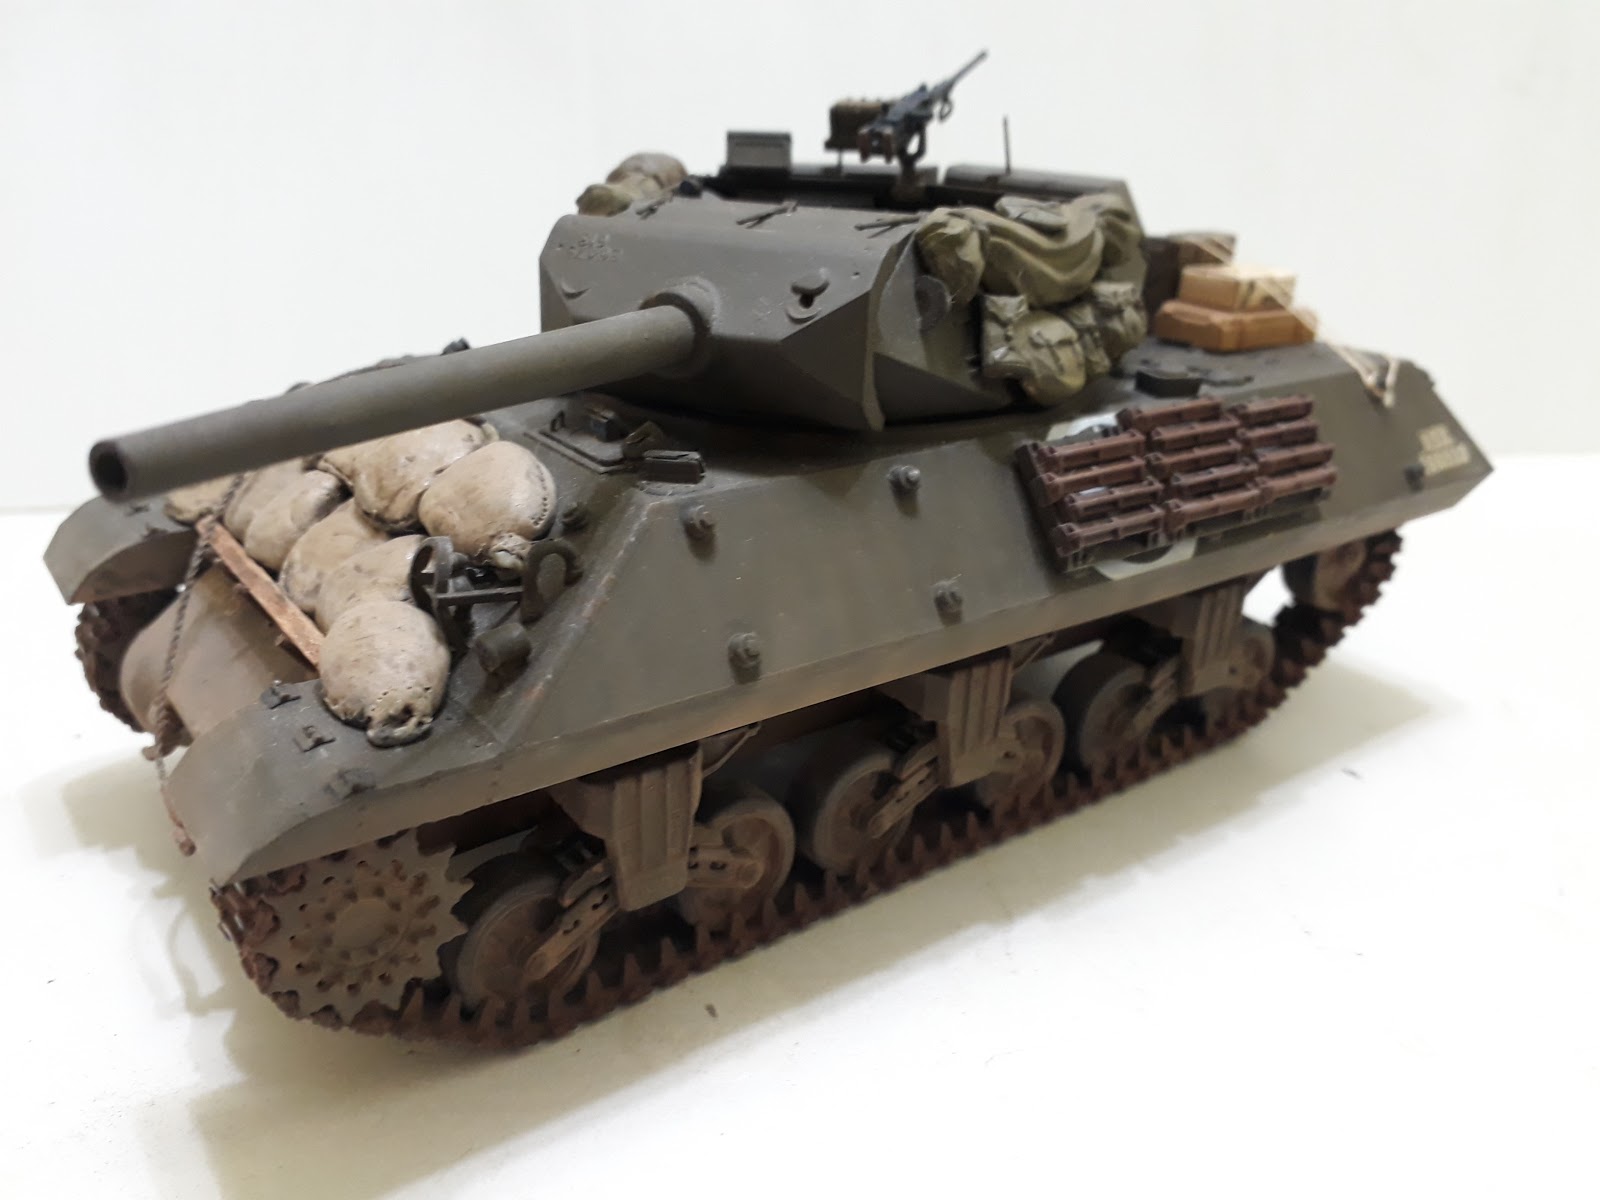
Dragon's Kit No. 6404 of the 1/35 ''39-'45 Series' is another entry in that company's new generation of Sherman tanks. Released in 2008, the kit was made up of 305 gray and 22 clear parts, a small fret of PE part, two lengths of one-piece tracks, a length of braided metal wire plus the usual decal and instruction sheets. The breakdown of the parts are similar with the earlier release of 'El Alamein Sherman' (that is, Sherman II/M4A1 used by the British during the Battle of El Alamein) but with the British-specific parts such as stowage bins dropped. The plastic parts are what we would expect from Dragon: well-executed. This specific boxing represented an early production M4A1 with direct vision slits for the driver and his assistant and with the early VVSS system (aka 'M3 type'). The tracks are of the DS100 soft styrene type and are most welcome by me after the tedious experience gluing the three-part tracks for my Firefly kit. The PE set was restricted to just light guards, vent covers, tool  tie downs and straps and fender tips. Decals provide markings for two vehicles: 'Hannibal', H Company, 66th Armored Regiment, 2nd Armored Division, Operation Husky, Sicily 1943 and 'Honky Tonk', H Company, 1st Armored Regiment, 1st Armored Division, Sidi Bou Zid, Tunisia 1943.

Construction
I started the building process with the suspension. The six sets of vertical volute suspension system (VVSS) took some time although the build was not as complicated as certain other companies' VVSS. It was also simpler as this particular kit is of an early model M4A1 with M3-style suspension (without the guide skid). Well in any case, despite the larger number of parts per suspension, it wasn't as tedious as having to cut, clean assemnle and paint 16 road wheels of a Panzer IV (and its derivatives)! After finishing the VVSS, they were set aside and I turned my attention to the lower hull. The rear panel and the transmission cover were cemented on the main body. Since the running gear would be mounted by this time, I painted them and the lower hull first. I must also mention that the cast texture on the transmission cover (and also the turret was very nice) and so I don't have to enhance them like I did on my Firefly model.

The upper hull, like the rest of the kit, was well done but still sporting the recessed weld beads. I reminded myself to place stretched sprue on the panel lines, flood them with Tamiya Extra Thin cement and turn them into raised weld beads but end up realising I have not done so only after decal. This was then followed by the rest of the fixtures and fittings on the hull except the pioneer tools. The upper hull was the cemented to the lower half. As the tracks were of the one-piece DS 100 style, they were left off at this time. The turret was next on the line and there wasn't much of a problem here, and as usual, the interior was devoid of any details. The turret has a convincing cast texture and I left the as it is  There are two types of gun barrel included in the kit; I chose the 'straight' one. The gun mantlet was completed first before being cemented to the turret shell. The rest of the turret assembly was straightforward with no problems. No M2 heavy machine gun was included (and the Sherman somehwat looked a litte bare without it).

Painting And Decalling
You can paint WW2-era US Army vehicles any colour you like, as long as it's Olive Drab. For this kit I used Tamiya's XF-62 Olive Drab. As all of the Army vehicles were painted a base of Olive Drab, I took a pause and decide which markings to use. Both are attractive ('Hannibal' is of two-colour scheme while 'Honky Tonk' has large American flag of both sides) but 'Honky Tonk' got the nod as it was more 'vibrant' (haha) with large US flags on both flanks. The kit however does not include the yellow band round the turret so it has to be painted. A brown filter was applied. The decals were then applied with no problems even on the rather irregular cast texture (helped by Mr Mark Softer of course). and then followed by the usual wash. The rubber part of the tracks was painted XF-69 NATO Black while the metal prortions were painted a 50/50 mix of XF-69 and XF-64 Red Brown.  The tools' handles were simply painted XF-59 Desert Yellow with the metal parts in Steel (what else?)

Finishing
The kit comes without any accessories (the tools and tow cable are standard issue so they don't count!) So I rummaged through my stash and came up with two ration boxes (the crew must be very fond of tomato juice!), two jerricans, a 75mm ammo crate, a duffel bag and a generic canvas roll; all coming from Tamiya and Academy vehicle accessories sets. And yes, I do think that just two ropes won't hold the stowage on bumpy desert surface but I got tired by this time of this build. While handling the model, it somehow managed to slip through my hands - no major casualties here except the co-axial MG barrel broke and were nowhere to be seen (I'm sure it will resurface in the next month, if not ever) so I have to cut off a barrel from Academy's M1919 MG from the same tank accessories set mentioned above and stick it in place as replacement. The model then received an overall thin cover of XF-57 Buff while the lower reaches of the hull received an additional layer of Mig Productions Iraqi Dust pigment.

Conclusion
What else can I say about Dragon kits? The parts fit well while the 'Smart Kit' concept means a less involved build (with less PE parts). The styrene track simplify the build further and at the same time having very acceptable details plus the 'live' nature of the (actual) tank's tracks means that there is no need to replicate track sag on the model. Dragon also appeared to have the Sherman as its own as nearly all variants of the Shermans have been kitted by them!