Historical Background

By the early 1960s, the T-54/55 family was a rugged and proven design. However, realising the Western armies were catching up and that the T-54/55 family have come to the end of their development potential (being based on World War 2 ideas and concepts). A new design team at Nizhny Tagil was designing the rather revolutionary (as it was designed with a smoothbore gun) T-62 to adress the issues. At the same time, Alexander Morozov, chief engineer of the T-54/55 moved to the KMDB bureau in Kharkov. Studies have begun in 1951 and the KB-60M team led by Morozov came up with Obyekt 430, with three prototypes built. The new design was radical by using a compact opposed-piston engine with two lateral gears on each side. It also has a new suspension featuring lightweight, small-diameter road wheels and tracks with rubber joints. However the armament was the same D-54TS 100mm gun as the T-55 and the glacis armor was kept at 120mm. As it did not present clear superiority over the T-55, production was not pursued and worked commenced on a newer design, Obyekt 432.
Obyekt 432 was armed with a smoothbore 115mm D-68 gun and replaced the human loader with an elctro-hydraulic automatic loading system. This risky feature allowed a smaller internal space which in turn lowered the silhouette (by 76mm) and consequently the weight (from 36 tonnes in Obyekt 430 to 30.5 tonnes). The capture of an Iranian M60, armed with the L7 / M68 105mm gun resulted in the adoption of composite armour. Although raising the overall weight to 34 tonnes, it was compensated by installing a more powerful (700 hp) 5TDF engine. Morozov considered Obyekt 432 worthy of production and gave the greenlight after the tank prototype was unveiled in September 1962 and successfully passed all tests. The production line was set up in 1963 and the tank was redesignated T-64 after the year of its introduction into service. The T-64 was considered a better tank than the T-62, with regards to greater mobility and protection.

Even as the first T-64s were just rolling off the assembly line, the design team has already begun work on Proyekt 434. This would be armed with the new and more powerful D-81T 125mm smoothbore gun derived from the towed 2A45 anti-tank gun (and given the GRAU index 2A46). The larger gun would mean a low ammunition load (just 25 rounds and unacceptable by the authorities) but the dimensional parameters did not allow the designers to enlarge the design. Therefore the autoloader was retained (although using a new 6ETs10 design), allowing 28 rounds to be carried. The gun was also equipped with a 2E23 3-plane stabiliser coupled to a TPD-2-1 sight. A TPN-1-43A periscope for night driving was provided for the driver while a L2G infrared projector was mounted co-axially to the left of the gun for night fighting. Armour was modified and spring-loaded plates ('gill armour') were mounted along the mudguards. Some small storage spaces were created along the turret while the snorkel was mounted to the rear of the turret. Hatches were widened and an NBC system was installed. Prototypes were tested in 1966-1967 and production of the type, known as T-64A was started in 1968 after 600 T-64s were built. Morozov was awarded the Lenin Prize for his work and the T-64A also influenced the cheaper T-72 design.

Designed for elite formations, the T-64A underwent a first round of modernisation in 1971-72. The fire-control system was upgraded, replacing the original sights with a TPD-2-49 day sight incorporating an optical coincidence rangefinder and a TPN-1-49-23 night sight and stabilisation using a 2E26 system. Night vision was provided courtesy of TBN-4PA (for the driver) and TNP-165A (for the commander) night vision equipment. The commander was also provided with a 12.7mm NSVT AA machinegun, which can be remotely controlled through a PZU-5 sight. The T-64AK command version was also introduced during that period. Work beginning in 1973 with Obyekts 476 and 477 ended with the 'B' variant of the T-64 in 1976. The T-64B has a more powerful engine and the ability to fire ATGMs through the main gun tube. Both versions underwent other modernisation cycles until production ended in 1987. After the dissolution of the Soviet Union, Ukraine, which now controls the factory in the renamed city of Kharkiv, continue the development of the type, resulting in the T-64BM Bulat.

Despite being produced since 1963, the T-64 family only entered formal service in 1967 with the 41st Guards Tank Division in the Kiev Military District. As a tank with various new technologies, teething problems were anticipated and it was prudent that they were based near the factory for technical support. As the Soviets' most modern tank at the time, they were concentrated in East Germany and Hungary in anticipation of war with NATO. They were not deployed during the Soviet intervention in Afghanistan although it was possible that some were tested there. T-64s of the 59th Guards Motor Rifle Division saw limited combat experience during the crisis in Moldova in 1992 and they may also got involved in Chechnya. T-64s were finally used in a larger scale during the Ukrainian Civil War in 2014 when the Ukrainian forces were deployed against pro-Russian separatists. Due to the high price tag and the high technology used, the T-64 was never exported by the Soviet Union. Post-Cold War, Russia still operates around 2,000 T-64s. Ukraine has 1,500 (900 of them were in storage for reserve and export) of which 100 are of the latest T-64M Bulat standard. Other ex-Soviet Union users include Kazakhstan and formerly, Belarus. The T-64 were also used by emerging small states such as Transnistria and Donetsk Peoples' Republic. In 2014, The Democratic Republic of the Congo received T-64BV from Ukraine, so far becoming the only non-CIS nation to operate the tank.
The Kit
In 2012, Trumpeter came up with the first of their T-64 family, dubbed 'T64' Mod 1972. I put the quote marks as this kit is actually T64
A Mod 1972. The 550 or so parts were spread among 20 light grey and 1 clear plastic trees, 1 soft vinyl tree (which, rather inexplicably, includes the unditching log), a one-piece hull and turret, three small frets of PE, a metal barrel and the usual decal and instruction sheets. At least some of the PE parts have no plastic originals, PE is all you have. The tracks are of the link-and length variety although trumpeter do have a separately available workable separate track links. There are two styles of mantlet covers : one for 0 angle and the other at a slight elevation. Build options allow two versions : with ('Estate 1') or without ('Estate 2') the commander's MG (Cookie Sewell mentioned that the those are Model 1972 and 1969 respectively but added that a bit more work need to be done other than simply adding or leaving the machinegun). The decals provide a pair of Guards badges, five sets of numbers and pairs of numbers 0 to 9. There is just one colour option.
Construction
While studying the instructions prior to assembly, I noticed that there are a number of unassigned slots on the lower hull sides. The instructions didn't mention anything about them but I guess it has something to do with other versions of the T-64 (mounting for the bracing struts of skirts, perhaps?). They were duly filled and sanded off. While a review site mention that the axles fit loosely inside their slots, I found that they are not and fit positively. The mud scrapers are PE and Trumpeter provided a template to bend them into shape. No problems here although I got disoriented while looking at the diagram (that's what you get when building the model at 11.30 p.m) which also resulting in Parts B17, B18 and B25 initially cemented the other way round. Rather than continuing with the wheels and tracks, I decided to do the upper hull first. This also means that Parts B26 would be left off at this time.

Before cementing the upper hull plate, three holes need to be bored in first. The mass of indents underneath the upper hull plate means you have to study the diagram a bit before committing your drill bit. The upper hull plate did not really fit well to the lower hull tub, but I just need to apply a bit of a pressure for a clean fit. The fittings on the front glacis plate were then cemented onto it but I left the towing clamps off for the time being (BTW, the kit only provides towing eyes but not the tow cable itself, which needed to be sourced from elsewhere). The three thingies on the engine deck are made of vinyl and one one of the suffered from slight deformation. Parts PE-B11 and -B12 were left off at this time as I found they could be knocked out easily during handling. Although not mentioned in the instructions, Part B24 (2 pieces) were added onto the engine deck. Areas soon under PE screens were painted Flat Black before the screens were added.
I decided to use the long-range fuel tanks, thus parts PE-A13 and D14 were used. Instructions for the assembly of the tanks were not included so I resorted to the internet (using the instructions for other Trumpeter T-64 kits). Before adding the wheels and tracks, I decided to add a basic mud mixture to the lower hull at this time as it would be easier without the wheels in the way (although the smaller wheel of the T-64 could make it easier even when already cemented to the suspension). Only afterwards the wheels were joined and placed on the suspension. Although no polycaps were provided, friction kept most of the road wheels in place while the loose ones were cemented. And as per my usual MO, the tracks were painted first before being snipped off the sprue tree.There were no real issues with the tracks with just a real minor clean-up problem.

Work on the turret was started by removing details on the turret roof and drilling a number of holes into the turret shell. While most manufacturers mould shallow holes to mark the areas to be drilled, Trumpeter have them in the shape of faint raised ridges (perhaps because the dome-shaped turret makes it harder to mould the indents inside the turret shell?). BTW the decision whether to finish the model with or without the commander's NSVT machine gun would have to be made at this time as each version have different details to be removed. The sub-assemblies such as the turret-mounted boxes, the main searchlight, station-keeping light and the snorkel were tackled first and they were then set aside. The 'straight' mantlet cover was used and the turned metal barrel was chosen. However, part PE-A19 cannot be slipped over the muzzle. The trick I learned and used in my AFV Club
Centurion model cannot be used here as the fume extractor is moulded together with the barrel and any horrible cut cannot be hidden as with the Centurion. So, it was left off. The rest of the turret fitiings, PE parts and the sub-assemblies were then cemented to the turret. The holes I drilled earlier turned out to be out of alignment, resulting in a rather asymmetric position of the boxes. Trumpeter also didn't mention that there are two types of the searchlight arms, to be used in conjunction with the mantlet cover selected.
The instructions, like Hobby Boss's
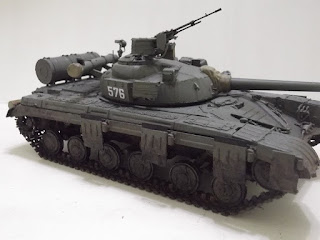
ZTZ-96, puzzlingly suggests Tamiya's XF-20 Medium Grey to represent dark green! Instead I used XF-65 Field Grey (which is green) instead of XF-20. This was followed by the regular wash process. The tracks were painted a base of XF-64 Red Brown and accented with AK Interactive Track Wash. The model then received the regular wash treatment. For markings, they are rather bland (as befitting the Soviet tanks of the Cold War era). Trumpeter provided five number sets and a 'number jungle' for those to fancy their own selection of three digits. Also available are two Guards badges. For my kit, the factory worker generously provided an 'extra' decal sheet for my spares stash! Anyway I chose number 576 and ignored the Guards badges as they were usually applied during parades only.
Finishing
Despite its shortcomings, I had to use the kit-supplied unditching log. It was painted a base of XF-55 Deck Tan and dry-brushed with Vallejo Camouflage Medium Brown. The NSVT machinegun, which remain separate from the mount until now was cemented. Graphite from a pencil was rubbed onto the machinegun to get that 'metallic' look. As Trumpeter did not include the towing cables, the spares box was raided again, using a leftover string while the cable eyelets came from the kit (it's a mystery why Trumpeter only gives you the eyelets only). Although two cables were made, I only used one at the end. Some paint scratches were made using Tamiya XF-11 JN Green and oil/fuel spills were made using X-19 Smoke. The lower hull and the tracks were then slathered with Vallejo thick mud and when dry, AK Interactive Earth Effects was applied. The turret was then put in place. It was a tight fit but it means that I wouldn't have to worry about the turret falling off in a mishap!
Conclusion
Trumpeter's T-64A Model 1972 is a good kit with not many problems encountered while building it. While the kit itself is all right, the instructions is slightly confusing with a few mislabelled and unmarked parts - perhaps not a problem for a seasoned modeller but can be a bit confusing to newcomers. The instructions also omitted steps to assemble and install the long-range tanks, but in the age of information, you can go to certain websites which have instructions from other Trumpeter T-64 kits to use as guide. Other negative points include the rubbery unditching log - with soft surface details unlike the regular styrene type.


