Historical Background
Before World War 2, the US Army sought to improve the mobility of its forces. The Ordnance Department evaluated the half-track design by buying and testing the French Citroen-Kegresse P17. In 1931, the P17 concept was used in the T14 half-track which emerged as the M2 Half-Track. At the same time, the White Motor Company produced a prototype half-track using their own chassis and the body of the M3 Scout Car. It was longer than the M2 and was standardised in 1941 as the M3 Half-Track. The M3 was generally used as personnel carrier, shuttling infantry back and forth. It was however easily adaptable for other roles, from ambulance to self-propelled gun.

When the Army needed mobile anti-aircraft battery, the M3 was chosen as a basis. The first of a number of AA vehicles was the T1E4, standardised as the M13 Multiple Gun Motor Carriage on 27 July 1942. The M13 was armed with a pair of M2 12.7mm heavy machineguns, mounted on a M33 Maxson mount. The turret itself was mounted on a powered turntable. The guns were fired electrically and were aimed with a Mark 9 reflector sight. A total of 1,103 M13s were built and they first saw action in Italy. However it was noted that the twin' Ma Deuces' lacked firepower and work began on a four-gun mount, designated T61. It was accepted into service as the M45 mount. The lower pair of guns was mounted slightly behind the upper pair in order to make space for the lower pair's ammo boxes. The new mount was tested on the M3 half-track designated T58 and was redesignated M16 Multiple Gun Motor Carriage after it was accepted into service. Production began in May 1943, replacing the M13 on the lines. The M16 was followed by the M17, which was based on the M5 Half-Track (the M17 replaced the M14, which was M5-based version of the M13)

The M16 was usually deployed alongside the M15 Combination Gun Motor Carriage (1x37mm, 2x12.7mm MG). They were grouped into Anti-Aircraft Artillery companies of US Armoured Divisions; 8 of each type per company. They were also used in AA battalions and Corps and Army Level, defending high-value locations such as Headquarters, bridges and railway junctions. The M16 first saw service also in Italy in early 1944 and defended the Anzio beach-head from Luftwaffe attacks. However, for the rest of the war, the Luftwaffe was no longer a force to be reckoned with and the M16 was mainly used in the infantry support role, earning it the gruesome nickname of 'The Meatchopper'. The M16 returned to its primary job during Operation Bodenplatte and also defending the Ludendorff Bridge at Remagen, following its capture by US troops in March 1945. The M16 saw limited use in the Pacific mainly on the Philippine island of Luzon. The M16 was one of the few WW2 half-tracks to see service post-1945. It was used during the Korean War, again as infantry support weapon. Following the end of that war, it was replaced by the M41-based M42 Duster.
The Kit
Tamiya's M16 MGMC is another of their ancient kit, being released in 1976. While not as crisply molded as current kits, the Tamiya M16 can still hold its own. The kit shares the same basic part as the M3A2 APC and M21 mortar carrier kits and like the rest of the Tamiya US M3 family, suffered from a less-detailed and too-loose one-piece track link. Test fitting showed that the kit has very good fit, a hallmark of the Tamiya brand. In general the base 'canvas' is there, you just need that extra bit of effort to make it look like some gorgeous, 21st century model kit. The decal sheet contains a number of the Allied star plus vehicle registration and unit identifier markings. The decal placement guide is sort of a no-frills affair with a four-view drawing and the appropriate marking combo list. Three are from World War 2-era and one from the Korean War.
Construction

While most vehicle kit started at the chassis, the M16 kit started with the Maxson mount. The mount, like the rest of the kit, has sufficient, but inadequate amount of detailing, especially on the four M2s. The mount however is nicely engineered and went together easily. However, as some parts would be quite unreacheable when assembled, they were painted first and touching ups to be done later. The ammo cans were split down the middle and the seams were quite hard to remove in places. A vinyl tubing was run either side of the gun mount and two copper wires placed inside each of them to act as firing cables for the guns. Once completed, the mount was set aside. Turning to the chassis, Tamiya provided the same chassis as the one in their M3A2 kit. before starting, leftover plastic (or more probably not-needed moulding) was removed. The chassis include the bottom half of the engine, which was painted flat black and afterwards, the exhaust, and suspension springs were put in place. Also cemented was a long rod ( I think is the shaft for the cable reel). The axles and the suspension for the tracks was then assembled. While the axles are OK, the track suspension was thicker (in scale) than the real items.

Next, the assembly of the cab. The fit is good although, again, the detail is light especially the dashboard - the instrument bezels have rather faint raised lines and pretty hard to paint; decals are best used here but I don't have any. The engine grille have armoured louvres and can be posed in the opened position. While the lights assembly was done, the louvres were left off at this time, to ease paiting and application of decal. The cab doors are moulded as one piece but it can be cut and the upper half can be posed in the lowered position, which I did. The pioneer tools and the jerricans on the outside were also left off at this time. After the cab has been assembled, I painted the interior area first. The driver's and co-driver's seat was assembled and painted separately and were then cemented to the floor of the cab. The 'glass' for the windscreen was made from a piece of acetate and thankfully, the shape has already been cut in place. The armoured cover for the windscreen can also be posed in the deployed or open positions.
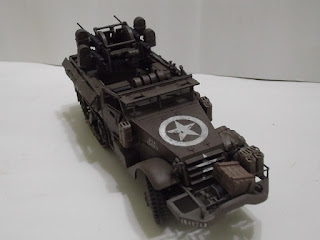
For the fighting compartment, I only glued the base for the Maxson mount; the ammo bins, spare headlights, seat cushions and the hinged panels are all left off. Speaking of the panels, each of them have a couple of ejector pin marks which need to be filled and sanded. The front bumper was also assembled but set aside at this time. At this time, I took note of the tyres, which have flash in the middle, which was cut away and the stubs sanded (apparently not enough, as the excess are still visible, especially when the wheels were weathered). The tracks are one-piece affair and typical of the Tamiya kits of the same vintage, there is no feature whatsoever for the inside face. Before painting, I decided to add a bracket for stuff on the front bumper, using styrene strips. I only build one on the left-hand side. The jerrican/bracket combo on the sides of the cab were discarded as they do not have the cover and that the cans have only two carrying handles. They were replaced with similar items from the Academy Tank Supplies Set.
Painting dan Decaling
As usual with American World War 2-era vehicles, the M16 was painted olive drab, this time using Gunze H52. As usual some flat white were added for scale effect. However I think I overdid it, making the paint too light. maybe I should strip the paint and do it again but since I have nearly run out of OD, I decided not to and hoping that subsequent weathering actions would help. I then added a filter using brown. And, at least to my eyes, the 'original' colour was restored. The decals were then applied the usual way. The decal for the stencilling 'Left Hand Drive Max. Speed 20 MPH' at the back of the fighting compartment was left off as it was only applied during the Americans' stay in the UK prior to Operation Overlord (in order to remind the British public of the American vehicles' left-hand driving position). The unit identifier decal for the rear however folded upon itself and I was unable to restore it.
Finishing

I started with the gun mount. I originally wanted to have ammo belts from the ammo boxes to the guns, but the Academy ones from its US Machine Gun Set was not up to the standard of the guns in the set, so the guns went ammo-less. The copper wires (which were painted black beforehand) were linked to the guns and the mount can be inserted into place. The bags were then glued to the outer sides of the wall, at about the hinges for the upper part of the walls. The upper walls were then glued in the opened position. A few of the packs in the kit was replaced with ones from the Tamiya Allied Vehicle Accessory Set. The tracks were painted flat black and then washed with the AK Interactive track wash. A pair of jerricans were placed in the makeshift bracket. They are marked 'USMC' but were hidden by their placement and also a box set next to them. M2 barrels from the Academy US MG set was placed in the fighting compartment to act as spare barrels and a pair of M1 carbines from the kit was set in the driving compartment.
A light was black-brown was was then done on the model. For dust effects, I used Tamiya Weathering Master Set Sand, applying it underneath the model and on the tracks and tyres.
The Tamiya kit of the M16 is old and the mould is not up to the standards of the 21st century. Nevertheless it is still an accurate enough kit for the average modeller and the ease of build compensates its shortcomings. Still it is best if the guns be replaced with better replacements (such as M2s from the Academy MG kit; I have that set but there were only two complete M2s remaining) and the jerricans and the tracks definitely have to be replaced.


