Showing posts with label Italeri. Show all posts

Wednesday, 14 February 2018

Supersonic Hun


Historical Background
In early 1949, with the wealth of captured German aerodynamics data, North American Aviation began researching for sustained Mach 1 flight. In January 1951 while its subsonic F-86 fighters were clashing successfully with the MiG-15 over Korea, North American Aviation handed an unsolicited proposal to the USAF for a supersonic day fighter named Sabre 45 because of its 45° wing sweep and being an evolution of the Sabre. The aircraft would be powered by a Pratt & Whitney J57 turbojet which provided the best performance among the early jet engines. In July 1951, the mock-up was inspected and after over a hundred modifications were made, it was accepted as the F-100 on 30 November 1951. In January 1952, the USAF ordered 23 prototypes (YF-100) followed by 23 F-100A models in February and another 250 in August.

Like the F-86, the F-100 has a nose-mounted air intake although thinner and more oval than the original Sabre. The wing of course has more sweep angle than the F-86 and it was also thinner. Decision was also made to move the ailerons inboard, allowing the Super Sabre to have a better rate of roll. Internal armament consists of four Pontiac M39E 20-mm cannons while external ordnance can range from unguided rockets to tactical nuclear weapons. The pre-production YF-100A first flew on 25 May 1953, seven month ahead of schedule, while the first production F-100A was first flown on 9 October of the same year. Test pilots however noted lack of stability at high speeds leading to inertia coupling. Although officially entering service on 17 September 1954 with the 479th Fighter Wing, the USAF declared that it was not ready for large-scale deployment due to deficiencies in the design. By November 1954, there were six major accidents including one on 12 October 1954 which killed North American's chief test pilot, George Welch.

The accidents forced the USAF to ground the entire fleet until February 1955. Because of the still existing problems, the A model was taken out of service beginning in 1958 with the last aircraft leaving active service in 1961. During that time another 47 'A' models were lost to attrition. The F-100A's place was taken by the 'C' model, which was built to satisfy Tactical Air Command's need for a fighter-bomber. The F-100C has longer wings to improve roll but otherwise similar to the F-100A and having all its problems. The inertia coupling was partially solved when the fleet was fitted with yaw and pitch dampers. To allow carriage of weapons and extra fuel, six hardpoints were made available underneath the wings. However not all F-100Cs can carry conventional munitions and like the A model, it suffered from attrition, losing 85 by the time the variant was retired in 1970.

The final single-seat version, the F-100D, became a dedicated ground attack machine with secondary air-to-air fighter capability. Key features of this variant include autopilot, in-flight refueling, ECM equipment and Sidewinder capability. To further address the dangerous flight characteristics, the wing span was extended by 66 cm and the tail area increased by 27%. 65 of the D model were modified to fire the AGM-12 Bullpup missile. As a type, the F-100 received numerous modification programmes during its service life. Many were concerned with the structure, electronics and to improve ease of maintenance. One of them was the replacement of the afterburner can with the one from retired F-102 Delta Daggers.

The F-100 saw combat service during the United States' involvement in Vietnam. Six Super Sabres were deployed to Don Muang air base in Thailand on 16 April 1961, acting as the vanguard for the type's involvement in the conflict until withdrawn in 1971. The Super Sabres mainly acted as fighter-bombers giving close support to ground troops and anti-MiG escort while two-seat F-100F model acted as Forward Air Controllers and performing the first anti-radar, Wild Weasel missions. By the end of their deployment on 31 July 1971, Super Sabres have logged 360,283 combat sorties : just four wings of F-100s have clocked a larger number of combat sorties than their WW2 predecessor, the P-51. Despite being used as escort fighters flying into North Vietnam early in the war, the F-100s recorded no MiG kills, save for one 'probable' on 4 April 1965.  No F-100s were shot down by enemy fighters but 242 were lost through other causes (186 by AA, seven from sapper attcks and 45 in operational incidents).

The F-100 was also used by Turkey, France, Denmark and Taiwan. The last-named received ex-USAF F-100As which were retrofitted with D model vertical tails. A number was lost during reconnaissance missions over China. The Super Sabres of the Armee de l'Air was used during the Algerian War of Independence.

The Kit
The Tamiya kit was released in 2001 following the original Italeri release in 1998. It was originally thought to be a straight re-release of the earlier, 1980s-vintage ESCI kit. Close inspection revealed that while the Italeri kit may indeed a re-release, there are some difference between it and the earlier ESCI kit. as follows:
1. An extra, non-existent frame on the canopy
2. Shorter (275- US gallon) fuel tanks
3. More detailed landing gear parts
4. Raised details for the instrument panel
5. Better-detailed ejection seat(s)
6. External ordnance

The kit engineering is fairly simple but it featured nicely engraved panel lines. Two types of exhaust nozzles were included - standard and the F-102 type. However the air intake is fairly shallow and ended at the cockpit. The decal sheet feature markings for three aircraft - each from USAF, Armee de l'Air and the Danish Air Force.

Construction
As nearly always with aircraft model kits, construction started at the cockpit. Also, as usual I painted the parts while still on the sprue - Gunze Aqueous H317 for the majority of the cockpit and seat, Tamiya XF-1 for the instrument and side panels and  the sidewalls white for the switches and dials. While having more details than the original ESCI kit, they were quite pitiful compared to other kits in the scale. Before joining the fuselage halves together, a ballast of 20 grams was placed at the nose (I just crammed plasticine in the nose halves until it feels 'right'). The wing parts were assembled; no problems here really, but the wing fences were a bit loose in their slots. As the intake trunking was non-existent, the 'bulkhead' was painted black before the intake was cemented to the fuselage. The intake-fuselage joint was not smooth and I had to sand the area for a seamless joint. Another area with bad fit was the lower tray on the fuselage (with two troughs for the two of the cannons) - I still wonder why do they have to make that area separate. As the canopy is a one-piece affair and a couple of decals go on both the canopy and the fuselage, it was attached and masked off. However, like the lower tray mentioned above, the canopy-fuselage fit was not great.

Painting and Decalling
I decided to finish the kit as a Hun from the 353rd TFS, 354th TFW (based at Myrtle Beach, Florida) 1958. Tamiya's instructions have you paint the interior compartment silver but I am of the opinion that they were actually painted US Interior Green. So I made a mix of 2 parts XF-5 Flat Green to one part XF-3 Flat Yellow paint the interior accordingly. The unpainted rear fuselage (on the real aircraft) was painted a mix of Gunze 8 Silver and 61 Burnt Iron while the exhaust was painted straight Burnt Iron. After masking, the rest of the fuselage was painted Tamiya TS-30 Silver Leaf (although with hindsightI think TS-17 Gloss Aluminium would be more appropriate). Afterwards the decals were applied. No problems here as Italeri's in-house decal are pretty good. Inside faces of landing gear bay covers and the airbrake were painted Gunze Silver 8. Tamiya Weathering master 'Soot' was used on the exposed metal area of the fuselage to simulate heat weathering (maybe other shades or colours were more appropriate but that's what I have in my arsenal).The decals were the treated to the usual decal solution application.

Finishing
I forgot to mention that I tried to remove that extra frame on the canopy. While it was removed without a hitch, the clean-up process went awry in the sense that I could not get the canopy clear again - not sure why but I guess my sandpaper were not fine enough (just down to 1500 grit only). Anyway, lesson learnt - try find finer grade of sandpaper and more importantly, do on scrap plastic before committing yourself. As usual, the landing gears were added first to allow the model to stand on its 'feet'. As for 'things under the wings', I decided to substitute the M117 bomb and rocket pods with a pair of AGM-12 Bullpup and a pair of Mk 81 bombs. Both are from Hasegawa weapons sets. The Bullpup has raised mould parting lines while the bombs have a pair of ejector pin marks, all of which needed cleaning up. Flat clear was sprayed onto the bombs while the Bullpups received a semi-gloss coat. Although many photos show USAF Super Sabres have their speed brakes raised while on the ground, I have them lowered for added visual interest. Some paint touch-ups were needed after removing the masks.There was no locating hole on the wing surface for the refuelling probe so I have to cut off the locating tab and just use Mark I Eyeball to place the aforementioned probe.

Conclusion
Although rather old, the Tamiya/Italeri/ESCI F-100 kit is still a good model. The glitches in the kit are rather minor and any reasonably competent modeler can sort them out (and count me out for that). Coupled with a rather low price (I got mine for RM36.00 which I think is half the price of of Hrumpeter's Hun) it was indeed a bargain.

Sunday, 27 November 2016

Cobras Of The Sea


Historical Background
The emergence of the helicopter, specifically of  Bell's UH-1 Iroquois or Huey, made the theory of air cavalry practical. In Vietnam, the Huey fleet carried troops across the country, to fight at the ground and the time of their own choosing, rather than the enemy's. However, these unarmed Hueys were vulnerable to ground fire especially when they are nearing the landing zones. Without support from nearby artillery or other ground troops, the only way to pacify the landing zones was from the air, using an aircraft, preferably another, armed, helicopter that can closely escort the transport choppers and loiter over the battlefield. Originally the Army used UH-1s fitted with machine guns and rocket launchers, but was needed was a dedicated helicopter gunship Bell has been investigating such concept since the 1950s and in 1962 had revealed a mockup of what they called D-255 Iroquois Warrior concept. The D-255 was a purpose-built attack helicopter based on the UH-1B but with a slender fuselage and the two crew sitting in tandem. It was to be armed with a turret-mounted 40mm grenade launcher in the nose, a 20mm belly-mounted gun pod and stub wings to mount rockets or anti-tank missiles.

The Army was interested and awarded a proof-of-concept contract to Bell in December 1962. Bell modified a regular Bell Model 47 (UH-13 Sioux) into Model 207 Sioux Scout which had the hallmarks of a modern attack helicopter with sleek fuselage, tandem cockpit, chin-mounted turret and stub wings for weapons. Although impressed, the Army decided that the Model 207 was too small, underpowered and generally not suitable for practical use. Instead the Army launched the Advanced Aerial Fire Support System (AAFSS) which resulted in the large and fast Lockheed AH-56 Cheyenne. It proved to be too sophisticated and was eventually cancelled in 1972. Although Model 207 was rejected by the Army, Bell persisted with their idea of a smaller and lighter helicopter gunship. Bell mated the T53 turboshaft engine, the transmission and the rotor system of the UH-1C, adding to the latter a Stability Control Augmentation System with the design philosophy of the Sioux Scout and produced the Model 209.

With the war escalating in Vietnam and the AAFSS programme stuck in technical difficulties and political bickering, the US Army asked Boeing-Vertol, Sikorsky, Kaman, Piasecki and Bell for an interim gunship design. In April 1966, Bell's Model 209 won the evaluation and a first production contract for 110 airframes were signed. Bell added 'Cobra' to the UH-1's nickname of 'Huey' becoming Model 209 HueyCobra - the name adopted by the Army for its production AH-1G. For production some modifications was made, including the adoption of simple landing skids instead of retractable undercarriage, a new wide-blade rotor and plexiglass, instead of armoured glass canopy. The first HueyCobras were delivered in June 1967. The USMC was very interested in this new aircraft but preferred a twin-engined version for better safety margin in over-water operations and also a more potent weapons in the turret. Although the Department of Defense balked at providing the USMC with a 'different' aircraft (as it viewed commonality outweighed the advantages of a twin-engined design), the Marirines had their say and awarded Bell a contract for 49 AH-1J SeaCobras in May 1968. The GAU-2 7.62mm minigun and/or M129 40mm grenade launcher of the M28 turret was replaced with a 20mm XM197 three-barrel cannon which was basically a 'halved' M61 Vulcan cannon.

In the 1970s, the USMC requested a greater load-carrying ability in 'hot and high' situations. Using Model 309 KingCobra as a basis, Bell developed the AH-1T. This model also have full TOW missile-firing capability. In the 1980s, the Marines sought to replace their SeaCobras with a navalised version of the AH-64 Apache but was denied funding by the Congress in 1981. In turn, they proposed a more powerful version of the AH-1T, designated AH-1W, called the SuperCobra which also incorporated the ability to fire AIM-9 Sidewinder AAMs, AGM-122 Sidearm anti-radiation missiles and AGM-114 Hellfire ASMs. Dubbed the SuperCobra or Whiskey Cobra, it started to enter service in 1986. A total of 179 new-built helicopters and 43 rebuilt AH-1Ts were delivered to the USMC with the last delivery taking place in 1998.

Marine SeaCobras first saw action in June 1972, interdicting the Ho Chi Minh Trail near Hon La Island. Their next action was during Operation Urgent Fury where two AH-1Ts were shot down, killing three crewmembers. The AH-1W first saw action during the Gulf War when 78 were deployed. They flew 1,273 sorties with no combat losses (although three were lost to accidents) and were credited with the destruction of 97 tanks, 104 APCs and other vehicles and two anti-aircraft sites. The SuperCobras continue to give support to the USMC to this day. In 1996, the USMC launched an H-1 helicopter upgrade programme which include upgrading 180 AH-1Ws into AH-1Z Viper standard, which was eventually declared combat ready in 2010. The SuperCobra was also exported to taiwan and Turkey.

The Kit
The 1/72 scale Italeri kit of the Whiskey Cobra came out in 1987, roughly a year after it entered service. The kit consists of 70 parts moulded in featured raised, but nice panel lines. The interior however is fairly basic and some external features specifically the various probes and aerials) were pretty oversized or crude. I'm not sure myself about the accuracy but I am pretty sure the Hellfires doesn't look the part with a more pronounced tapering and a rather suspect shape of the tail fins. The transparent parts were however very clear. The small decal sheet provide markings for just one machine. Without any unit identifying markings and codes, I believe this was one of the development, rather than an operational machines.

Construction  
As usual with aircraft model kits, construction started at the cockpit. As per my usual style, the parts and the sidewalls were painted while still on the sprue. They were painted overall XF-1 Flat Black while the seat cushions were painted XF-62 Olive Drab. And, no, I didn't bother cutting up masking tapes to make the seat belts. Before joining the fuselage halves together, I crammed 10 grams of ballast underneath the cockpit floor, as suggested by the instructions. The stabilators is a one-piece affair also need to be inserted between the fuselage halves. The next step was concerned with the engine fairing. The mounting for the rotor shaft was glued in place but I left the rotor shaft itself at this time to avoid breakage. The halves were joined together, and was followed by the air intake bits. I was quite impressed when I found that they fitted nicely, requiring no filling or sanding. The exhausts, although assembled, was left off to facilitate painting.

The engine fairing assembly, together with the stub wings were then cemented to the fuselage. To ease handling, the landing skids were also left off at this stage. The gunner's console was cemented into place. Taking caution from previous builds, especially of Tamiya's P-47 Thunderbolt, the gunner's sight was also set aside for the time being. The turret was assembled sans the cannon barrels, which can be added later. The Night Targeting System turret was assembled, also without problems and as with any other vulnerable parts, the thingie in front of the NTS was also left off. The electronics bay cheek fairings and the outboard pylon mountings were cemented before the model went for the painting stage.

Painting and Decalling
The SuperCobra model is presented in the fairly typical 1980s camouflage for the type. The model was painted overall FS 36375 Light Ghost Grey using Mr. Hobby H308. The USMC Green was painted using Tamiya XF-13 JA Green while XF-69 NATO Black was used for the black. The rocket pods were painted XF-62 Olive Drab with a band of silver at the ends of the tube. With hindsight, I probably should have painted the pods XF-13. The Hellfire missiles were also painted XF-62. The instructions just mentioned one single colour for them although photos show them having yellow  bands and/or squares on them. They were duly painted using XF-3 Flat Yellow but by this time, I got lazy and painted them freehand without masks, with predictable results! The rotor hubs were painted Steel while the rotor blades were painted XF-1 Flat Black. Cannon barrels were painted XF-69 NATO Black, after which graphite powder was applied. The decals were then applied with no problems. I just wished Italeri included a line bird rather than the development one for the markings as was done with their 1/48 kit of the SuperCobra. 

Finishing
I started the final leg by supergluing the landing skids into place, allowing the model to stand. The weapons were. The Hellfires were mounted first on their racks, which were then superglued to the wing pylons. But before that, being the innermost weapons, the rocket pods were cemented into place. The inner wing pylons do not have any alignment tabs, they were aligned using faint raised lines on the stub wings - pretty hard to see with the layer of paint over it. The cannon barrels were then stuck into place through the opening in the turret. The various aerials, cable cutters and the countermeasures dispensers were painted on the sprues before being placed on their respective places on the model. The canopy was then cemented to the model and in contrast to the rest of the kit, it had a bad fit on the left side. And, in my effort to place the canopy, stray cement managed to crept underneath my fingers, reulting in blemishes on the clear parts. Arghhh! Ak Interactive Paneliner for Grey Camo and Brown/Green Camo was then apllied. The model was then sprayed with a couple of layers of Tamiya Semi-Gloss Clear.


Conclusion

Italeri's 1/72 scale is a simple kit and can be the starter kit for those attempting to build their first helicopter model. As I mentioned elsewhere, I'm not sure about the accuracy but it does look like a SuperCobra to me. On the positive side, the parts fitted nicely and on the debit side, the most glaring ones are the shape of the Hellfire missiles and the lack of details in the cockpit. The raised panel lines is not really a problem (unless it causes you nightmares) although I think it is a bit thicker than the previous Italeri helicopters I built. In any case, this the only kit of the SuperCobra in 1/72 scale, being reboxed by Tamiya, Modelist and Testors.

Wednesday, 16 November 2016

The Devil Rides A Crocodile


Historical Background
With the trend towards battlefield air mobility in the 1960s, Soviet helicopter designer Mikhail Mil realised the potential for aerial infantry fighting vehicles which could be used to perform both infantry transport and fire support missions. A mock-up, designated V-24 was revealed at factory No.329 in 1966. The V-24 had an infantry compartment that could hold eight soldiers sitting back-to-back, a set of small wings at the top rear of the troop-carrying cabin which was capable of carrying up to six missiles or rocket pods and a GSh-23L cannon fixed to the landing skid. When the design was proposed to the Soviet High Command, it was met with some opposition, who prefer to have a more conventional design. Mil however managed to persuade Marshal Andrey Grechko, the Defence Minister's First Deputy, to convene an expert panel to look into the proposal. The panel's reaction was mixed, but convinced with the development and deployment of attack helicopters and gunships by the Americans in Vietnam, the supporters of the project held sway.

The Mil Design Bureau prepared two designs: a single-engined, 7-ton design and a twin-engined, 10.5-ton design, both using the 1,700 hp Isotov TV3-117 turboshaft used in the same design bureau's Mi-8 utility helicopter. During the design stage a number of changes were made including the replacement of the 23-mm cannon with a rapid-fire, multi barrel heavy machine gun in a chin turret and the ability to use the 9K114 Shturm (AT-6 Spiral) anti-tank missile. In May 1968, the twin-engined design (now called the Mi-24) was chosen. The full-scale mockup was reviewed and approved in February 1969. A tethered hover flight test was made on 15 September 1969 with the first free-flight conducted four days later. The prototype was followed by a batch of ten development aircraft which conducted an 18-month test programme beginning in June 1970. These produced more changes sucha s a 12-degree anhedral to the wings, moving the missile pylons from the fuselage to the wingtips, moving the tail rotor from the right to the left side of the tail and reversing the rotation direction. The first production version, Izdeliye 245 or Mi-24A achieved initial operational capability in 1971 and was officially accepted in 1972.

The Mi-24 was essentially a derivative of the Mi-8 'Hip' with the two top-mounted turboshaft engines driving an almost-similar main rotor. The original version (Mi-24A) has an angular greenhouse-style cockpit which was replaced by a tandem, stepped cockpits with separate armoured bubble canopy for the crew (who are also protected by a titanium tub, proof against 12.7 mm rounds) from Mi-24D onwards. Weapons, depending on the mission undertaken, ranging from free-fall bombs to laser-guided anti-tank missiles, were carried under the two mid-mounted stub wings, each with three weapons stations. On-board weaponry is turret-mounted 12.7 mm Yakushev-Borsov Yak-B gatling-style machine gun (on most variants) or fixed twin-barrel GSh-30K on Mi-24P or turret-mounted 23 mm twin barrel GSh-23L cannon (Mi-24VP and VM). A PKB 7.62 mm can be mounted on the passenger cabin window to protect the aircraft's blind side. Over time, the troop-carrying function became less important and the cabin was used to carry ammunition reloads.

The Mi-24, given the NATO nickname 'Hind', saw first action with Ethiopian forces against Somalia during the 1977-1978 Ogaden War. In 1978 it saw action with the Vietnamese Peoples' Air Force during the Cambodian-Vietnamese War of 1978. In the same year it also faced against Chad when it was used by the Libyans during their incursions into the former. The Hind's first extensive operation was during the Soviet occupation of Afghanistan from 1979 to 1989. Despite strong resistance from the Afghan Mujahideen fighters, the Hind was very effective against them. It was nicknamed Syaitan Arba (Satan's Chariot) and apparently a Mujahideen leader was quoted saying 'We are not afraid of the Russians, but we are afraid of their helicopters'.  Combat experience in Afghanistan demonstrated the disadvantages of carrying troops, incurring weight penalty while operating in hot and high areas. The troops were carried in Mi-8s while the Hinds concentrated on giving support. The troop compartment armour was also removed while a machine gun (or two) were mounted on the cabin windows, operated by a technician. The Mi-24s were usually operated in concert with Su-25 ground attack aircraft, protecting and escorting heliborne assaults and ground operations, convoy protection and hunter-killer-style operations. They were also used to protect transport aircraft coming in and out of Kabul, deploying flares to decoy man-portable surface-to-air missiles, of which the FIM-92 Stinger was the most effective.

Another conflict in which the Hind was used extensively was the Iran-Iraq War (1980-1988). Although causing severe damage to Iranian infantry and soft-skinned vehicles, it was less effective against tanks as the Iraqi Hinds were armed with the older 9M17 Skorpion (AT-2 Swatter) missile. A tactic was developed where the Hinds were used to suppress Itranian air defences while the armour was dealt with the HOT missile-armed Aerospatiale Gazelles. The Iran-Iraq War also saw air-to-air combat between helicopters, chiefly between the Hind and the AH-1J SeaCobras. It was claimed that these aerial engagements resulted in the loss of 6 Hinds and 10 SeaCobras. Weapons used in these engagements include the mounted cannon / machine gun, rockets and anti-tank missiles. The Hind continue to be developed and used in conflicts around the globe until today. In its native country, the Mi-24 was nicknamed 'Krokodil' (crocodile).

The Kit
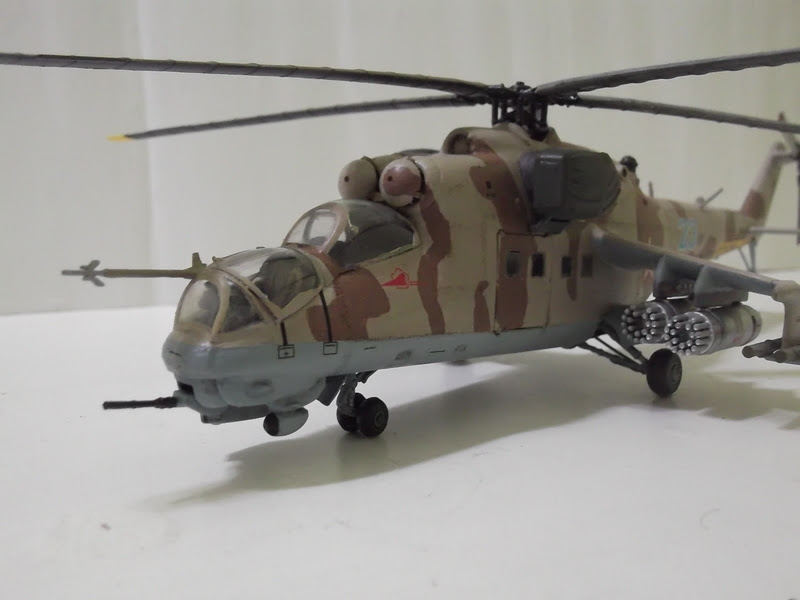
The kit built here is the 1993 Tamiya re-boxing of the Italeri kit originally released the year before. The parts are spread among two sand-coloured and one clear sprues. The kit has raised details but petite and sharp (the fit will have to wait until construction starts) although some details were skipped or simplified. More serious shortcomings was that it was well, short in the diameter of the rotor blades and the tail boom, the rotor blades were too narrow, the stub wings were too long and the airfoil is reversed. While disappointing, I'd go on with the build as at the time I bought the kit, it was the only game in town (the Revell kit was another Italeri reboxing). The nice decal sheet provide markings for three aircraft:

1. Yellow 07 - Soviet Air Force
2. 0294 - Czechoslavakian Air Force
3. 96+22 - Luftwaffe

Construction
As usual, the cockpit received the first attention. I started by painting the parts while still on the sprue. Tamiya suggested that the interior is to be painted XF-19 Sky Grey, although I believe it to be Russian Interior Blue. I used a 50-50 mix of X-14 Sky Blue and XF-5 Flat Green. As for the seats, I weren't confident of my ability to properly trim it down and so I left them as they were (as moulded, the seats would be the most comfortable of all helicopter crew seat, they are quite wide, perhaps two persons can sit side-by-side at 1/1 scale!) . There weren't any decals for the instrument panel I had to paint them myself. Italeri also included a very rudimentary interior for the troop cabin and it is best closed unless an aftermarket set is available or if one wants to scratchbuild it. If one is building an aircraft without the heat dissipaters, the exhausts have to be assembled and then cemented to the roof of the troop compartment. The interior parts were then cemented to the right side of the fuselage, prior to closing up the latter.

Although the instructions have you place the tail rotor at this time, I skipped it as it would interfere with painting (it can still be removed, by the way). The troop compartment doors were then cemented in the closed position (it can be posed open by cutting the door in two and adding other parts required). Fit is not good and need to be carefully placed in the opening; nevertheless there is quite a gap between the door and the fuselage. Also, the clear parts did not fit snugly in the openings and with me being clumsy, resulted in cement smudges on the clear parts..darn it! The upper engine cowling, engine air intakes, the heat dissipaters and the IRCM 'ball' were assembled and fitted to the fuselage. All have fit issues, whether as to the components themselves and/or their fit to the fuselage which require filling and sanding. It was quite tedious as the gaps and steps occur at hard-to-sand areas.

Moving to the bottom of the fuselage, the turret-mounted machine gun was assembled but I set it aside for the time being. The radar pod went on without problem, just a seam line along the centre. The LLLTV/FLIR pod however has a step when assembled and to cure this problem, I cut off the locating tabs and align them by sight. While this avoided the step, it resulted in a gap between one side of the fairing and the fuselage, which require more puttying, and sanding. The wings were assembled and attached to the fuselage. again there is the issue of fit as the there is a bit of a gap at the wing roots and also between the left wing tip and the laser designator pod. There is also a sizeable gap between the wing and the weapons pylons. Talking about the weapons pylons, they were moulded together with the B-8 rocket pods. Not only this complicate painting, I also believe that the rocket pods were undersized. They would have to go and were cut away before the pylons were cemented to the wings.

Painting and Decalling
During the course of the build, I came to know a Linden Hill Decals sheet for Mi-24 stencils and decided that I must have one (despite, or perhaps because of, my love-hate relationship with modern aircraft stencilling). So I took an opportunity during a visit to KL to drop by at Hobby HQ. Mr. Low stocks the said decal, but unfortunately the price is quite steep. Nevertheless I managed to buy Begemot's Mi-24 decal sheet which have the stencils plus a bunch of interesting markings for Mi-24 users around the world. I have to disregard some marking suggestions as they are for the Mi-24P variant. A second round of elimination took out those without the heat dissipaters. That left me with just three choices - a Sandinista AF Mi-24D in 1987, a Soviet AF Mi-24V in Afghanistan, 1984 and an airshow Mi-24VM/ Mi-35M. I ended up choosing the Soviet AF Hind as the helicopter was best known for its role in the conflict.

For the underside blue, I used a mixture of roughly 60% XF-23 Light Blue, 30% XF-2 Flat White and 10% XF-8 Flat Blue. While Tamiya suggested XF-59 for the base colour, I feel that, after consulting photos, it should have a grey tint to it. After browsing the internet, I settled for a mix of 40% Gunze H315 (as substitute for Tamiya XF-20), 20% XF-52 Flat Earth and 10% XF-59 Desert Yellow. The brown camouflage pattern was painted using Tamiya XF-64 Red Brown. Afterwards it was time for the decals. I have used Begemot decals before (for my MiG-31) and found them to be thin and in register although a little flat in finish. It was the same for the Mi-24 decals, although I have to leave them in the sunlight for several hours as the decals has yellowed. One gripe though - the 'Danger' markings at the tail was quite transparent, showing the camouflage beneath it. I substituted them with leftovers given by a friend. Mr. Mark Softer was then applied.

Finishing
As usual I started with the landing gears. However, the way the kit main landing gears is engineered, the model would sit level with the surface whereas the actual Hind has a nose-up attitude. The main landing gears were repositioned and some trimming were done so that the struts and wheels were perpendicular to the ground. This however results in Part A75 becoming too short and they were replaced with a length of plastic rod cut to appropriate length. Originally I thought of having different weapons fit, such as having bombs or gun pods on the pylons but having none (there are no gun pods in my stash and I have run out of bombs form the Dragon Weapons Set), I settled for the prototypical load of four rocket pods using the ones from the Dragon set. The 9K114 Shturm missile tubes were also replaced with Dragon items as the kit ones were merely lengths of tube devoid of details. The cockpit transparencies , painted separately, was then attached. They did not sit properly, requiring a bit more sanding and retouching of paints (I however forgot the gunner's hatch!). 

While most wrong and missing details were left as they were, I did a few reworkings of the main rotor. The main rotor rotates clockwise (when viewed from above) but it was moulded the other way round. I shaved off the 'pimple' (it was the hydraulic reservoir on the real aircraft) on top of the hub and placed it on the bottom while the control rods swap places with it. The rotor blades were then cemented to the hub. There were sizeable gaps at each joint but I left them as they were for a while. As the real blades droop while idle, each blade was soaked in hot water and was then gently bent down. I didn't increase the chord of the blades as I felt it was too ambitious for me. The gap on each blade joint was then filled and painted. The Hind modelled was fitted with blade-type IFF aerials, so the moulded-on 'Odd Rods' IFF aerials were removed and replaced with ones made from scrap plastic. The model was then given a wash and was later sprayed with Mr. Hobby Matte Topcoat, finishing the build.

Conclusion
The 1/72 Italeri / Tamiya kit is not a good kit. There, I have said it. Not only it has a number (which is quite a lot, really) of glaring mistakes, the fit was also not good. It was a good kit for a modeller to get out of his comfort zone (I can say that I only rose part way...haha!), making a number of tweaks so that the kit represented a more accurate Hind. The competitors' Hinds represent a better value for money. 

Monday, 9 May 2016

Sky Shark


Historical Background
By the 1970s, the Soviet Defence Ministry decided that the Mil Mi-24 was not going to meet future Red Army requirements. On the Ministry's advice, a new resolution was passed by the Central Committee of the Communist Party and the Council of Soviet Ministers to develop a new combat helicopter which could be fielded by the Soviet Army in the 1980s and beyond. The main task of this helicopter is to destroy enemy armoured forces close to the edge of the forward battle area (FEBA). Two design bureaus with extensive experience between them, Kamov and Mil was chosen to compete. Kamov's designers, led by Sergei Mikheyev, believed that the task of flying, navigating, target detection and tracking can be automated to a degree that a single crew member can perform all the functions. The designers also have survivability in mind, incorporating armour around the cockpit and other vital areas and also redundant systems. Crew survivability is enhanced by installing an ejector seat, the Zvezda K-37-800. The prototype, designated V-80 was rolled out in June 1982 and first flew on 23 July of the same year.

The V-80 was further developed into V-80Sh-1. The latter model was chosen for production by the Council Of Ministers on 14 December 1987, after competitive trials against the rival Mi-28 design. The actual order for production was however only given in 1990. In March 1992, during a symposium in the United Kingdom, the V-80Sh-1 was publicly described as 'Ka-50'. The Ka-50 was revealed to the public at Mosaeroshow '92 held at Zhukovskiy / Ramenskoye Airport in August 1992. The second prototype was displayed at the Farnborough Airshow in September of the same year, painted with an image of a werewolf on its rudder, earning it the 'Werewolf' nickname. The fifth prototype was used in a movie titled 'Chernaya Akula' (Black Shark), after which the Ka-50 earned its lasting nickname (NATO codenamed the helicopter as 'Hokum'). Although proposed to be the replacement for the Mi-24, the collapse of the Soviet Union curtailed defence spending and only 65 were operational by 2011. At the same time the Mi-28 was also ordered into production and the Hakum was selected to be the special forces' support aircraft while the Havoc (Mi-28) was chosen to be the main helicopter gunship of the Russian army.

The Ka-50 featured Kamov helicopters' distinctive feature: the contra-rotating, co-axial main rotors with no tail rotor. This allow aerobatics usually not possible with conventional helicopters and also allowing a higher speed. The lack of tail rotor also allows 100% engine power be used for the main rotors and reduce vulnerability to ground fire. The ejection seat is novel in a helicopter. Before the seat is deployed, explosive charges in the rotor hub jettisoned the blades first. The Hokum is also fitted with electronic radio and sighting-piloting-navigating systems that allow day and night operations in all weather conditions. For self protection, the helicopter is fitted with radar warning receiver, electronic warfare system and chaff and flare dispenser. The cockpit is protected by armour plates against armour-piercing 12.7 mm bullets and 23 mm fragmentation cannon rounds. The Ka-50 is armed with a 2A42 30 mm cannon mounted semi-rigidly on the right side of the fuselage and provided with 460 armour-piercing, fragmentation and/or explosive incendiary rounds. Six external hardpoints on the stub wings can carry up to 2,000 kg of ordnance including up to 12 9K121 Vikhr (AT-16 Scallion) anti-tank missiles.

In December 2000, a pair of Ka-50s were sent to the Chechnya to join the Russian Army operations against the Chechen separatists. Along with the pair was a Ka-29 to provide reconnaissance and target designation. On 6 January 2001, the Ka-50 fired its first shots 'in anger'. On 9 January, one of the Ka-50s, escorted by a Mi-24, used unguided 80 mm S-8 rockets to destroy an ammunition dump near the settlement of Komsomolskoye. On 6 February, the two Ka-50s, escorted by the Ka-29 destroyed a fortified insurgent camp in a mountainous, forested area near the village of Tsentoroj using two Vikhr missiles. Finally on 14 February, eight targets were destroyed in the Oak-Yurt and Hatun areas.  For the time being, the Ka-50 was only operated by the Russian Air Force. The Ka-50 was developed into the Ka-50N and Ka-50Sh night-capable helicopter, but no orders were forthcoming. A twin-seat version was also developed - the Ka-52 'Alligator' which so far enjoyed a better export success, with 50 being ordered by Egypt.

The Kit
Italeri released their kit of the Hokum in 1993 with Tamiya re-releasing it under their label in the next year. Unlike their Mi-28 kit (named simply 'Soviet Attack Helicopter', which was based on speculative DoD drawings), the Ka-50 kit was more accurate, at least in general shape and outline (I'm not a rivet counter anyway). The Tamiya version was moulded in their usual tan/light sand-coloured styrene (the original was moulded in a dark, brownish-black plastic). The parts are spread among two solid and one clear sprue and featured finely raised panel lines (even though the trend was moving towards engraved panel lines at that time). Exterior stores include a pair of S-8 rocket tubes and 12 Vikhr missiles plus the 2A42 cannon. Holes for the weapons pylons have been pre-drilled into the stub wings. Decals provide markings for two aircraft, and since the kit came in the early 1990s, they did not represent operational machines. One was '018', a test machine at Akthoubinsk in 1991 (camouflaged) and the other is the Farnborough '92 participant in overall black.

Construction
As always, construction of an aircraft model started at the cockpit. For this build however, I substituted the kit cockpit with the excellent resin replacement from Neomega. It was painted according to the kit instructions and set aside for a while. next, the instructions have you partially assemble the rotor assembly (the drive shaft and rotor heads). I think that this might lead to breakage so I just glued the together the base (Parts B7, B8, B9 and B11) and inserted them in the starboard fuselage half. The cockpit was then superglued and the fuselage was closed up, with the cockpit nicely fitting in. The same however cannot be said with the fuselage halves which have a bad fit, resulting in a seam along the fuselage (although I think, with proper attention and due dilligence, it can be overcome, or at least minimised). While admiring the details of the Neomega set, I can't help but worry whether they would be visible when the canopy is in place.

And yes, when the canopy was in place, it nearly obscures most of the interior. I coud have the entry door in the open position but I decided to have it closed. Hmmmmphh. The canopy itself is problematic with rather major alignment problem - glue it to fuselage and there will be a step between the canopy top and the upper fuselage; aligning it with the top will create a gap at the bottom.The engine fairings and the air intakes were assembled and cemented to the fuselage with no fit problems. The exhausts were left off at this time. The stub wings were assembled and attached to the fuselage but like the exhausts, the weapons pylons were also left off. The tails, while falling at existing panel lines, the gap looked a bit deeper than usual because of the less than perfect fit. As they would also interfere with painting, the landing gears, air data probe and the cannon were also left off.

Painting and Decalling
As mentioned before, the painting options are for two non line birds (one airshow demonstrator, the other for evaluation purposes). I wasn't keen on any of them so I looked for other options. While browsing the internet, I came across Begemot Decals website showcasing their products. They also kindly allow users to download their instruction sheets. The decal sheets for the Ka-50 still consist of test birds but I spotted one, just one, colour scheme of an operational combat test Black Shark in Chechnya. It has the same camo pattern as '018' in the kit's decal sheet but that's where the similarity ends. The kit has the camouflage in sand/dark green (using XF-59 Desert Yellow and XF-26 Deep Green) while Begemot has it in light green (FS 34227) and Khaki Drab (Tamiya XF-51(?)). I went for Begemot's suggestion and painted the model Gunze H312 and Tamiya XF-51. The black portion was painted Tamiya XF-69 NATO Black. The lower fuselage was painted Tamiya XF-23 Light Blue.

The decals were not used as the Ka-50s sent to Chechnya have all markings, except technical stencils, removed.

Finishing
To start the finishing process I worked from the bottom. I started at the landing gears, allowing the model to stand on its wheels. The weapons then received my attention. The S-8 rocket pods were painted silver; the Vikhr missile tubes were painted XF-64 Red Brown and XF-1 Flat Black. The missile racks were glued to the pylons first before cementing the weapons themselves to ensure proper alignment. Once that was done, the exhausts were assembled. Unfortunately they are moulded 'short', leaving a gap in the plates inside the exhausts. It can be rectified but lacking the proper tools, I decided to leave it as it is. I concentrated on the rotors. Italeri had the rotor blades molded 'straight', with no droop, which is almost always seen on idle choppers. To have the droop, I immerse the rotor blades in hot water, and then gently bending them. Weathering was done just to highlight some of the panel lines and rivets. As the paint on the real aircraft was flat, the model received a layer of Gunze Super Clear Flat spray.

Conclusion
Italeri's (and Tamiya by association) 1/72 Kamov Ka-50 helicopter can be described as a curate's egg. Although I don't bother measuring the kit and compared it to official drawings, it does look like a Ka-50. The details, although mainly of the raised variety is quite acceptable. The major letdown is the fit with almost everything having gaps and steps, plus that 'short-shot' exhausts. I also have to add that the cannon is also a bit disappointing as it lacked detail, being externally mounted and all.  

Sunday, 10 January 2016

Mirage For The Millenium


Historical Background
The Mirage 2000 can trace its origins in the defunct Anglo-French Variable Geometry aircraft project of 1965. Following the fiasco, Avions Marcel Dassault worked on several new concepts evolved from the Mirage G prototype. This resulted in a design called Avions de Combat Futur (ACF). The Armee de l'Air issued a requirement to develop the ACF and Dassault offered their 'Super Mirage' design. However it was too costly and was cancelled in 1975. At the same time Marcel Dassault had been working on a smaller, simpler and cheaper alternatives to the ACF. These designs congealed into an aircraft known originally as 'Super Mirage III' and finally as 'Mirage 2000'. After the cancellation of the ACF, Dassault offered the Mirage 2000 as an alternative. The French government accepted the proposal in December 1975. The prototype first flew on 10 March 1978 and in the same year's Farnborough Airshow, the new aircraft displayed excellent handling characteristics. It also showed full controllability while flying at 204km/h and at an angle of attack of 26°, proving that fly-by-wire technology was able to overcome the delta wing's shortcomings.

The Mirage 2000 featured a thin, low-set delta wing with cambered sections and a 58° leading edge. Two small strakes were placed just behind the air intakes. The Mirage 2000's design is naturally unstable but with a redundant fly-by-wire automatic flight control systems, it has a high degree of agility while having easier handling. The aircraft was powered a SNECMA M53 low by-pass ratio turbofan producing 14,000 lb dry thrust and 22,000 lb with afterburner. The Mirage 2000 is equipped with two 30mm DEFA 554 cannons with 125 rounds each and can carry 14,000 lb of stores on nine pylons. The usual air-to-air load are two Matra Super 530 BVR missiles and two Matra R.550 Magic IR-homing missiles (they have since been replaced by the MICA missile). The attack versions of the Mirage 2000 can carry a wide array of weapons, both guided and unguided, including nuclear weapons. The Mirage's main sensor is the multi-mode Thomson-CSF RDM multi-mode radar (for export and early French aircraft) or the same company's RDI pulse-doppler radar. The Mirage 2000-5 variant uses the more advanced Thales RDY multi-mode radar.

The first variant to enter service was the single-seat Mirage 2000C (Chasseur = fighter) in 1984. The first 37 airframes were completed with the RDM multi-mode radar and powered by a SNECMA M53-5 turbofan engine. The 38th airframe onwards were powered by upgraded M53-5 P2 engine. In 1987, the RDI radar entered service. This radar has a range of 150 km and allow usage of Matra Super 530 SARH missiles and improved look-down/shoot-down capability. A two-seat operational conversion trainer, the Mirage 2000B was also acquired for crew training. The two-seat B was further developed into dedicated strike variants - the nuclear-capable Mirage 2000N and the conventional attack variant, the Mirage 2000D. By the late 1980s, the basic Mirage 2000 design was beginning to age compared to fighter designs from elsewhere. Thomson-CSF then began a privately-funded update of the Mirage 2000C, designated Mirage 2000-5. A Mirage 2000B and a Mirage 2000C were reworked to this standard, which entered service in 1997. Improvements include Thales TV/CT CLDP laser designator pod, RDY radar (which allowed detection of up to 24 targets, simultaneously tracking 8 and engaging four of them separately using Matra MICA missiles).

The Mirage enjoyed some export success, being bought by the air forces of Brazil, Egypt, Greece, India, Peru, Qatar, Taiwan, Qatar and UAE. French Mirages were used during the Gulf War, operations over The Balkans (where one D model was shot down) and during Operation Harmattan in Libya in 2011. Greek Mirages were used during the tension between Greece and Turkey in 1996, shooting down a Turkish AF F-16D on 8 October. The Indian Air Force used their Mirages during the Kargil War in 1999, performing well despite the altitude and that their 'Vajras' (the name given to the Mirages) have only limited interdiction capability (the Indian Mirage 2000H were basically Mirage 2000C fighters and not the 'D' version). The Armee de l'Air Mirage 2000s were being replaced by the Rafale omnirole fighters, beginning in 2006.  

The Kit
The 1/72 Italeri kit of the Mirage 2000C was first released in 1992 and was re-released by Tamiya in 1994. The parts are spread among two light grey and one clear sprues. The fuselage was split vertically while the wings have a one piece bottom and separate upper halves. Details were generally OK although I feel like the panel lines were too deep.  The seat was oversized and best replaced with an aftermarket one. External stores include a  centreline fuel tank, a pair each of Matra Super 530D BVR missiles and Matra R.550 Magic IR-homing missiles. Also included is a cluster of Durandal anti-runway weapons, which weren't used in the C version. Decals provide markings for two aircraft; one from the Hellenic Air Force and the other from the Armee de l'Air. I can't read Japanese so I had no idea which units are they from. The French one, based on the aircraft ID number, is probably from GC I/5 'Vendee'. Whatever units they were from, the markings were seriously boring, as will be explained later.

Construction
As usual with aircraft kits, work started at the cockpit. The cockpit parts were painted XF-19 Sky Grey (instead of the suggested XF-20 Medium Grey) for the simple reason that I don't have the latter. The side consoles and the instrument panel was painted XF-1 Flat Black. Lack of decals made me use dots of Flat White to represent the 'dials' and 'switches' as best as I can. As mentioned before, the kit seat was oversized, so it was replaced with a resin replacement from Aires. It was actually an SJU-5 for the F/A-18 but I found out that the SJU-5 was a license-build version of the Martin Baker Mk.10, so it was OK. The parts were then cut off the sprue, the paint touched up and were then assembled. Before closing up the fuselage, 10 grams of weight (I use fishing weights)  was placed inside the nose cavity. The fuselage was then closed, taking care to avoid visible seams along it. Holes were then drilled into the lower wing to accommodate weapons and fuel tank pylons.

As per the instructions, the single-piece lower half of the wing/fuselage bottom was attached to the main fuselage assembly. The upper wing halves were then cemented. Having done that, I believe the upper wing halves should be cemented to the fuselage first - by cementing the lower wing half first, it created a step at the blended wing-fuselage joint. While I puttied them, there is still a faint step remaining. The intakes were assembled and thankfully, no fit problems were found here. The intakes were also engineered so that the joint between them and the fuselage fell on a natural panel line. Pylons for weapons were cemented to the fuselage, and so are the VOR aerials on the fin and strakes on the intakes.  The instrument panel shroud was then cemented, followed by the windscreen. Fit between the windscreen and the fuselage was not good, requiring some putty. The rest of the parts were however left off until after painting and decalling have been done.

Painting and Decalling
Both marking options in the kit featured the same colours, even patterns, so I didn't have to finalise my choice beforehand (I already made up my mind beforehand anyway, it's going to be the French airctaft). As usual, Tamiya suggested colours from their own paint line and so I used XF-20 for the radome, XF-66 Light Gray for the lighter portion of the camo and XF-18 Medium Blue for the darker colour. The landing gear wells were painted Gunze 8 Silver. However, looking at photos of Mirages, most show a darker shade of grey for the radome. Not sure what shade though, I simply used a lightened Tamiya XF-63 German Grey. The jet nozzle was painted Burnt Iron. Tamiya also have you paint the external fuel tank XF-56 Metallic Grey but after consulting photos, many of them showing grey, I painted it the same colour as the aircraft, namely XF-66 Light Grey.

The decals, as usual from Italeri, are very nice and respond well to decal setting solutions. I however goofed up with one of the 'walk/no walk' decals and have to paint diagonal lines using X-7 Red. The warning stripes and the various warning / emergency canopy jettison signage provide the extra colours to the model. While many photos of the Mirages of the 'Vendee' escadrille show them looking very bland, many other photos show them with distinctive unit markings. Perhaps the Italeri development team only have photos of the 'Vendee' during their 'boring markings' period. And at about this time I found out that the Mirage depicted by this kit was a development, rather than production aircraft and it was evidenced by panel lines which were no longer in place in production aircraft but was depicted in this kit, especially around the nose. I decided to do nothing about the panel lines but will do certain modifications later.

Finishing
As usual I started by assembling the landing gears first, to allow the model to stand on its own. As the parts have already been painted beforehand, some minor touching up were needed. I forgot to mention that the inner main wheel doors were moulded in the closed position. This is however not a problem, as the inner doors are always closed whenever the aircraft is on the ground. The cannon barrels were then cemented into place. I however removed them immediately when they look like two rods placed at the bottom of the fuselage as an afterthought. After consulting photos, I halved the major portion of the 'cannons', leaving the muzzle intact. They were then re-glued to the model and I shaped new fairings. Needless to say, the work entailed more retouching of the paint. The in-flight refuelling probe was next. However I felt that the instructions had it in the wrong place (that, or I misinterpreted the drawing). After consulting photos, the probe was placed closer to the windscreen; good thing it was butt-jointed so no need to drill and/or fill holes.

The weapons were next. Instead of using kit weapons, I used the Matra Super 530D and Magic missiles from Heller's aircraft weapons set. Not only better looking, the Heller 530Ds were cast as one piece plus decals were available for all the weapons. There were two types of centreline fuel tank, and I chose the finless type. The fit is however, bad, leaving gaps either at the front or the back of the tank....Hmpphh...more filling and paint touch-ups! I also believed that the pitot tube was too long. It was cut and repositioned on the nose. The model then received a watercolour sludge wash and once dry were sprayed with Tamiya Semi-Gloss Clear.

Conclusion
Italeri kits (this is after all their kit) are virtually hit or miss affairs. They are bold enough to kit subjects others would only touch with a barge pole. Sometimes they got a winner, others, turkeys. As for the Mirage, I think it was both a hit and a miss. A hit as there aren't that many 1/72 Mirage 2000s in the market, the general shape is nice enough and accurate enough to be a Mirage 2000. The misses are some fit issues, that oversized ejection seat, some missing details in the cockpit and the pre-production aircraft features. Technically the last mentioned wasn't their direct fault as their kit was actually a re-boxed ESCI kit (OK, they should have checked first). Anyway, as I looked at the big picture, it does look like a '2000 and furthermore my build philosophy is 'as long as it looks good from three feet away, then it's good enough!' Hahaha!