Showing posts with label Italy. Show all posts

Thursday, 22 December 2016

Italian Workhorse


Historical Background
In December 1937, the Regio Esercito issued a requirement for a new tank to replace the L3 tankette and the M 11/39 medium tank. To save on development time, the tank was to be based on the M 11/39 but with a redesigned upper hull supporting a turret mounted with a Breda modello 35 47mm gun and a co-axial Breda 8mm machine gun while a twin Breda 8-mm was to be mounted in the hull; in other words, the new tank reverses the armament placement of the M 11/39. The development of the tank, designated Carro Armato Medio M 13/40 (13 from the weight in tons and 40 from the year of production, 1940) was placed under the supervision of the Inspectorate of Technical Services. The first prototype was made ready by Fiat-Ansaldo in October 1939 but the Army only accepted it for production in March 1940, following changes and set-up of the production lines.

The M 13/40 was constructed of riveted steel armour plates with thickness of 30mm (front), 42mm turret face, 25mm sides, 6mm bottom and 15mm on top. The fighting compartment was placed in a forward position with the driver and the radio operator/machine gunner in the hull and the gunner and the commander/loader in the turret. The entire lower hull was basically unchanged from the M 11/39. The running gear was made of two bogies per side, each with eight pairs of small road wheels, using leaf-spring suspension. The M13/40 was powered by a Fiat SPA 8 TM V-8 diesel engine, while contemporary designs were still using petrol engines. While sturdy, its power output was only 125 hp and can only drive the M 13/40 at 32 km/h in the best conditions. Being a diesel engine however, it gave the tank a good range while reducing the risk of fire. The M 13/40 was armed with the tank version of the Cannone da 47/32 M35 anti-tank gun. The gun had a performance similar to the Soviet 45mm gun arming the T-26 and BT tanks and can pierce 45mm of armour at 500 meters. This was sufficient against the British light and cruiser tanks, although still ineffective against the heavily armoured infantry tanks. 104 rounds were provided for the main armament, with 3,200 for the three (sometimes four, when the AA MG is placed on the roof) machine guns.

The M 13/40 saw action during the Italian invasion of Greece in 1940 and in North Africa, where many M 13/40s fought until the end in May 1943. While able to hold their own against the early Allied tanks, they became less effective when confronted with later tanks. Despite their relative firepower advantage over the British tanks, the units equipped with the tank were newly formed and thus lacked cohesion, this was worsened by the fact that the tanks were not fitted with radios and the crews lacked training. The M 13/40 first saw action during Operation Compass between 9 December 1940 to 9 February 1941, where they suffered large losses. Many were captured intact and were used by the Australian 2/6th Cavalry Regiment and 6th Royal Tank Regiment. The tanks were painted with large kangaroos on the turret sides to avoid friendly fire. The tanks were discarded when the 8th Army received better tanks. With the introduction of the QF 6 pounder AT gun, 75-mm armed Lee/Grant and 6-pounder armed Crusader III, the M 13/40's weakness were further unravelled. The thin armour can be easily pierced by the more powerful projectiles while the rivets used in the construction can become lethal projectiles inside the tank when hit.  

The M 13/40 spawned other variants. Chief among these were the M 14/41 medium tank, with a more powerful engine and better air filters (especially for service in the North African theatre); M 15/42 medium tank with petrol engine and longer 47 mm L/40 gun; Semovente Comando M40 turretless command tank and the Semovente 75/18 self-propelled gun, modeled after the German Sturmgeschutz assault guns.

The Kit
This is the original release of Tamiya's M 13/40, which first hit the stores when I was two (specifically 1974). Upon opening the box, you will find....a different tank. While the box top says that it contains parts to build an M 13/40, the parts inside the box are actually for the upgraded version of the M 13/40, that is the M 14/41. This is mainly because of the full-length fenders and lateral rather than longitudinal slats on the radiator grilles. There are also some details missing, or wrong, such as the exhaust mufflers, no inspection holes in the front upper fenders, missing bolt details and no lightening holes in the wheels. The level of moulding however is generally very good (for a 1970s kit that is). Decals provide markings for basically three vehicles : an M 13/40 (M 14/41?) from the Ariete Division, another one from the Littorio Division and a captured example used by the Australians, with large drawings of kangaroos on the turret sides. Extra company markings were provided for the Italian options. Despite the release of the newer (and actually being an M 13/40) kit, I stick to this one as it has been in my stash for years.

Construction
As usual construction started with the lower hull. Despite the instructions having you assemble the suspension and wheels, I started by adding the front and rear hull plates first and was followed by the idler wheel mounts. Afterwards, as per my usual style, the lower hull, suspension and wheels were painted with the latter two items while still on the sprue. I however used the newer kit's mix for the basic desert brown colour rather than the vague (which I assume to be XF-59 Desert Brown) one in the original kit. The paint was retouched afterwards and the suspension and wheels assembled. The M 13/40 family, like the Panzer IV, has 16 road wheels on each side, which makes for quite tedious painting and assembly. The one-piece engine deck, track and engine covers was then cemented to the hull. The tracks were left off until later as they are of the flexible vinyl type and can be added after painting. talking about the tracks, it was of the typical old style Tamiya ones with no details whatsoever on the inside face of the links.

The upper hull is a multi-piece affair consisting of the roof, side plates, access door, hull  machine guns (just the external parts only), periscope and the headlights. Make sure the assembly aligns correctly else you might have an offset upper hull. I did that by temporarily placing it on the lower hull to check the alignment. Although fairly aligned with the hull, there are a few gaps which had to be dealt with, especially on the joint between the roof and the sides. The upper hull assembly was then cemented onto the lower hull. Again there are gaps between the superstructure and the lower which needed puttying. The turret is also a simple affair, consisting of the shell, bottom, face, simplified trunnion, main gun barrel, hatch doors and an AA MG. The parts were cemented together with just a bit of filling needed on the roof. The muzzle is solid so I decided to drill them out. Unfortunately due to my crap drilling skills, the hole was off-centre! Oh well, better that than the solid muzzle. The exhausts and the boarding step were left off as I intended to add the tracks after painting has been done.

Painting and Decalling
As mentioned before, the kit's instructions stated that the base colour is 'sand brown' which I originally assumed to be Tamiya's XF-59 Desert Yellow. However, the instructions in the newer, re-tooled M 13/40 kit shows it to be 2 parts XF-60 Dark Yellow and 1 part XF-59 Desert Yellow and this was the mixture I used for this model (and on my model of the AB 41 armoured car). And, in of those moments, I realised that I have run out of XF-58 Olive Green, so no camouflage for this model. As for markings, I decided to do the less-known Littorio Division. There weren't any distinction between their markings and Ariete's - just the numerical designation. As for individual tank markings, I picked tactical symbols that identified the model as the 3rd vehicle in the 3rd platoon of the 1st company. Paint chippings was then simulated using XF-1 Flat Black and XF-64 Red Brown. The aerial recognition marking, a white circle, on the roof was not painted.

Finishing
OK, this is an out of the usual sequence affair. I decided to add piles of sandbags, acting as additional armour, to my model after basic painting had been done, Using the two-part epoxy putty technique previously used on my M5 Stuart, the sandbags were sculpted and placed onto the glacis plate. Somewhat absent-mindedly, I forgot to refer to many photographs available on the subject. There is quite a leeway here as the crews piled the sandbags on their vehicles as they see fit. The supplied jerricans, although of the Italian pattern, was crude. I replaced them with German jerricans from an AFV Club set (well, they were allies right?) The sandbags were painted XF-57 Buff and washed with brown. The same brown wash then was applied on the model although the leaf springs were washed with a black solution. As the model intended to represent a North Africa-based vehicle, an overall layer of dust was needed and I used MiG Productions Iraqi Dust (must get other shades of dust for variations). 

Conclusion
While fairly nice back in the 1970s, the first version of Tamiya's M 13/40 was crude by current standards especially the rubber band tracks and the solid gun muzzle (and not to mention being the wrong tank). Straight OOB, based on my readings, this particular Tamiya kit represents an early M 14/41 (more or less) and that particular error (or maybe not, depending on your point of view) has been rectified by Tamiya in 2008. The newer (and correct) M 13/40 not only have that tank's features but also some improvements such as better-detailed Italian jerricans, link-and length (and detailed!) track links and one-piece aluminium barrels. The original kit, while having good details, did not have a good fit especially between the fighting compartment and the hull. While cheap (and maybe even cheaper with the release of the newer version), it was something that only nostalgics or those not having access to the newer version or those trying to improve their modelling skills may try to build. 

Saturday, 14 November 2015

Snake Eater From Italy


Historical Background
The Agusta (now AgustaWestland) A129 Mangusta (mongoose) can trace its origins to a 1972 Italian Army requirement for a light observation and anti-tank helicopter. The Italians' need coincide with a similar requirement by West Germany. This led to a joint project between Agusta and Messerschmitt-Bolkow-Blohm (MBB). However following preliminary works, MBB dropped out of the project, leaving Agusta to proceed alone. Initially Agusta studied the development of a combat-oriented derivative of their A109 utility design. However they decided to proceed with a new design, with a slim fuselage, tandem stepped cockpit and engines mounted high on the fuselage sides. In 1978 work formally began on this design, the A129. The first prototype flew on 11 September 1983 and the Italian Army initially ordered 60. The new helicopter followed the design convention set by the AH-1 Cobra by having a slim fuselage with the crew seated in tandem (gunner in front, pilot at the back) staggered so that the pilot has a better view forward. The rear of the A129 however was derived from the A109. The fuselage is highly angular and armoured for crew protection. The composite rotor blades were able to withstand hits from 23 mm shells and the entire airframe is made crashworthy.

The Mangusta is powered by two Piaggio (Rolls-Royce) Gem 2-1004D turboshaft engines rated at 890 hp each. This allowed the A129 to fly up to 170 mph and a combat range of 320 miles. It has a rate of climb of 2,025 feet per minute and a service ceiling of 15,500 feet. The Mangusta is also equipped with infra-red night vision systems allowing day and night operations in all weather conditions. On newer aircraft, laser system is fitted to allow self- or third-party target designation. The Mangusta is designed to undertake anti-armour, armed reconnaissance, ground attack, escort, fire support and anti-air missions. The weapons are carried on two hardpoints under each stub wings and include BGM-71 TOW (later AGM-114 Hellfire), Israeli Spike-ER ATGW, 70 mm or 81 mm folding-fin aircraft rockets or 12.7 mm machine gun pods. Since 2003, anti-air capability was realised when FIM-92 Stinger missile was cleared for use. The original Mangusta did not have any built-in cannon but the three-barreled 20-mm M197 cannon on  nose-mounted Oto-Melara TM-197B turret was installed on the A129 CBT variant.

There are four variants of the Mangusta. Apart from the original A129, there is A129 International, an upgraded version with five-bladed rotor, the aforementioned M197 20-mm cannon, ability to fire Hellfire and Stinger missiles, advanced avionics and LHTEC T800 turboshafts. The third variant is A 129 CBT (ComBaT): basically the International but retaining the original engines (with new transmission). The final major variant is the T129 / AW129 for Turkey with Turkish avionics and missiles. Deliveries of the 60 Italian Mangustas started in 1990 and 1999, the last batch of 15 was upgraded to the CBT standard. In late 2001, it was decided to upgrade the entire A129 fleet to this standard. In 2011, AgustaWestland modified 24 airframes to a new ARH-129D standard and manufacture a further 24 for the Italian Army. In January 2015, the Italian Army opted for an enhancement package which focused on improving the Mangusta's endurance, speed and the crew's situational awareness and information handling capabilities, reduction of crew workload and integrating the systems with tactical UAVs.

The Mangusta has seen deployment with the United Nations' peacekeeping operations in Somalia, Angola and Kosovo. The Mangusta was also used in Iraq, supporting Italian ground forces in Nasiriyah while others were deployed to Afghanistan.  

The Kit
Despite being based in the same country that produces the Mangusta, Italeri only came up with a kit of the helicopter in 1999. Portraying the early standard of the A129, the kit's 79 or so parts were spread among two olive drab and one clear sprues. External details are good but the interior is poor, with too-heavy seat belts and seat cushion details and that there are no collective levers! Although in general the external details are good, some of them are overscale such as the crew access step. The clear parts are OK except that windshield wiper is moulded-on, making painting difficult. The rotor blades have built-in droop which is a good thing. Weapons provided are of the prototypical helicopter gunship load of four TOW missile tubes and a rocket pod for each wing. The decals are of typical Italeri fare - nice and well-printed (except for the slightly offset central dot of the Italian AF roundel. Markings are provided for two machines : E.I. 936, CAE, Viterbo, 1998 and E.I. 933, 7th Regiment 'Vega', Casarsa della Delizia, 1998. Tamiya in 2001 re-released this kit under their label.

Construction
As usual with aircraft models, work started with the cockpit. The parts were first painted separately on their sprues. The whole cockpit (and also the cockpit side walls) was painted XF-19 Sky Grey with details (just the tips of the control column and the seats really) in XF-1 Flat Black. The oversized seat belts were painted XF-10 Flat Brown with the seat cushions XF-62 Olive Drab. The side consoles and instrument panel decals were then applied. While the usage of decal instrument panels are OK in my book for 1/72 aircraft, the manufacturers should at least print them to represent there real thing. The A129's instrument panel includes MFDs but the kit decals have them entirely printed with dials. The cockpit parts were then cemented together while the instrument panels were cemented to the their places at the right-hand side fuselage. The nose sensor turret was assembled and was then trapped between the fuselage halves. Also before the fuselage halves were mated together, the main and tail rotor shafts were inserted and glued into their places. Afterwards I found out that the sensor turret was quite wobbly so I cemented it permanently using Tamiya Extra Thin Cement.

Next up is the engine nacelle assembly. Made up of seven pieces, the fit was not very good especially between the main body of the nacelle and the air intakes. The whole thing however fitted nicely with the fuselage. The tail stabilisers were fitted and with part of the tail wheel unit moulded to the fuselage, a bit of care has to be taken here to avoid the landing gear stalk snapping off. The stub wings was made up of two parts (perhaps to avoid sink marks) and they were duly assembled.  Fit here was good and the wings were then mated to the fuselage. The TOW and rocket tubes were assembled but were set aside at the moment. Other parts, such as the main landing gear, weapons, rotor assembly and sensor probes were left off at this time to avoid breakage during painting. Now its off to the painting stage.

Painting and Decalling
Both marking options are painted in the same colour : Olive Drab. In an online build review, the modeller felt that it should be a lighter colour, like Tamiya XF-49 Khaki. While I'm inclined to his reasoning, I have run out of that particular colour and am not going to wait for it to come through the mail. So I ended up using Tamiya XF-62. It was applied to the whole of the model unless the particular part/area require another colour. The tyres were painted Gunze H77 Tyre Black while the rotor blades XF-69 NATO Black. Part of the landing gear strut was painted silver. The sensor turret was also painted silver, followed by a layer of clear yellow. Then it was time for the decals.  Army combat helicopters, from whatever military they belong to, almost invariably have boring colour schemes (because of their job of course). I chose the 7th Regiment machine as the checkerboard tail markings added a bit of interest. The decals were excellent as usual and that the slightly off-centre roundel isn't really noticeable.

Finishing
To finish the model, I started by attaching all the landing gear parts. They fit nicely although the same cannot be said for the canopy, leaving a sizeable gap. The weapons pods were next and they were followed by the sensor probes and crew access step. They're all overscale especially the latter especially when you compare them with the size of the weapons pods. The rotor blades were then cemented to their places and this was followed by a spray of Flat Clear. The canopy mask was then removed, finishing the build.


Conclusion
This has got to be one of the fastest kits I have ever build (that is, in terms of building hours, rather than days). The combination of small size, not a lot of parts, generally good fit plus, of course, being an OOB build without any parts being replaced made this a rather enjoyable task, despite the kit's certain shortcomings. The price is very affordable, especially the original Italeri boxing. Highly recommended to helicopter modellers of all skill levels (maybe not the complete novice). As far as I know, at the time of writing, this is the only available A129 kit in the market. I read in the Scalemates website that there is another company, YUMTK/Interavia with a kit of the Mangusta (apparently of the International/CBT standard) but have not surfaced in any online modelling websites. Another one is Cunarmodel (also of CBT standard) but there is no further info about this company. Extratech produced a PE set for Italeri's Mangusta but I'm not sure whether it is still available.

Saturday, 31 October 2015

Ariete!


Historical Background
From the 1970s to 1995, the Italian Army armoured units were equipped with American M60A1 and west German Leopard 1 MBTs. In the 1980s, a decision was made to replace these tanks with a new, indigenous design. A consortium formed by Iveco-Fiat and Oto Melara called Consorzio Iveco Oto or CIO was entrusted with the development of the new tank. The basic specification called for a fast, day/night capable vehicle with the ability to fire on the move utilising sophisticated fire-control system. The new tank was designated C1 and given the name 'Ariete' (ram) in honour to the Italian 132nd Armoured Division 'Ariete' of World War 2 fame, The first prototype was rolled out in 1986 and by 1989, six pre-production vehicles were produces. The Ariete was supposed to enter service in 1993 but due to delays, the first vehicle was only delivered in 1995. In 2002, the 200th (and the last) vehicle was delivered.

The tank is of conventional design and bears a passing resemblance to other contemporary Western tank designs (especially the German Leopard 2). The hull, designed by Iveco has a very well-sloped glacis and flat sides. Armour is classified, although it is understood to be a laminated steel/composite type similar to Chobham armour protecting the Abrams and Challenger tanks. The Ariete is fully NBC treated and can be sealed so that it can ford rivers up to 5 meters deep. The turret, together with the main weaponry was developed by Oto Melara. The turret, which looks similar to the Challenger tank has well-sloped front face and short lower beaks, the latter to reduce shot traps. The gun, designed by OTO Breda, is of the 120 mm smoothbore type and able to fire standard NATO 120 mm rounds. It was provided with 42 rounds, 15 of which is in the ready-to-use locker at the rear turret bustle. Secondary armament consists of two 7.62 mm MG42/59 machine guns: one located co-axially with the main gun and another was placed at the loader's hatch. For self-protection, two four-grenade launchers armed with smoke or chaff grenades are placed on the turret sides.

The Ariete's FCS, designated OG14L3 TURMS was manufactured by Galileo Avionica, includes day and night capability for the commander's SP-T-694 primary sight and a stabilised platform for the gunner's thermal sight and laser rangefinder and also a FCS computer which calculates all the relevant data such as weather and wind conditions, elevation of the gun, attitude of the tank and even barrel wear to increase accuracy. The FCS is also part of the Ariete's communication system and can be used to share battlefield data with other vehicles. The Ariete is powered by a 25.8-litre turbocharged V-12 Fiat-Iveco MTCA diesel engine rated at 1,250 hp. This gave the Ariete a top speed of 65 km/h and a range of 600 km. Power was transmitted through a ZF LSG3000 automatic transmission with four forward and two reverse gears. The computer-assisted transmission allows the Ariete to accelerate from 0-32 km/h in 6 seconds, climb a gradient of 60 degrees and ford a depth of 1.25 m without preparations.

The Ariete has been used in peace-keeping operations in the former Yugoslavia during the 1990s and also in Iraq following Operation Iraqi Freedom. In Iraq, the Ariete has an additional armour package added on the turret front and sides and the front half of the hull sides. An additional MG 42/59 was mounted on the commander's cupola and both roof machine guns have shields added to protect the user. An upgraded version, the C2, with a higher-rated engine, additional armour, autoloader, FCS and hydropneumatic suspension are scheduled to be in production in the 2015-2020 time frame.


The Kit
Trumpeter's kit of the Ariete (in fact, at the time of writing, the only one in 1/35) was released in 2005. The kit represents an early production vehicle, as the Ariete has undergone changes in the meantime. The kit consists of 229 olive-coloured parts, a small sheet of clear acetate for the optics, a length of twine,  a pair of single-length vinyl tracks, a small decal sheet and of course the instruction sheet. The parts look well-moulded although some details are not very well-defined, such as the track grousers, which looked cruder (but not by much) than the ones from Tamiya's Leopard 2 kit. There is essentially just one marking scheme (the 'option' is just whether to use the green or red rhomboid decals on the turret front). Colour is simply marked as 'TC10' without reference as to what it is called nor to its manufacturer. I suspect that it was from the Gunze range and after googling found out that it was part of their German Colour Set, specifically RAL 6031 Bronzegrun.

Construction
As usual with armour kits, construction starts at the bottom. All the suspension parts were cemented to the lower hull, starting with the shock absorbers. While Trumpeter have you finish one side before moving to the other, I decided to add the similar parts on both sides before tackling the suspension arms. So I only fit the latter after all the absorbers have been cemented. The suspension arms have positive locating tabs so there is no issue of misaligned suspension here. because of the lack of poly caps, the wheels (and also the lower hull sides) were first painted, with the wheels being painted on their sprues. They were then cut off the sprue, the scars retouched and the wheels mounted on the suspension, bar the drive sprocket. The tracks are also left off at this time.

I then moved on to the upper hull. It is of single mould with separate engine deck and rear panel. The air intake is moulded solid but with nice grille effect (still it can't beat a PE grille). The driver's hatch has separate periscope parts but unfortunately they are of solid opaque plastic. The headlights, track grouser, grab handles and some small but not fragile parts were also added at this time. It was during the assembly of the upper hull did I realise how close the Ariete resembled the German Leopard 2. I then returned to the lower hull. The tracks were painted, with the metal parts (on the real thing) washed with AK Interactive track wash. They were then looped and the pin heads melted down with a heated screwdriver. The upper hull was then cemented to the lower half and the side skirts can now be put in place. The spare track at the rear of the hull and the vulnerable rear-view mirrors were left off.

While the hull reminded me of the Leopard 2, the turret looked fairly similar to the Challenger. The turret assembly kicked off with the mating of the barrel halves. Fit is okay although there is a tiny bit of seam line down the middle. The barrel comes moulded with the muzzle reference system, meaning a bit of detail of the system was lost. The clear acetate for the vision blocks were painted clear blue and the cut off the sheet and superglued to their places. I wish that clear styrene was used here. The gun assembly was then put in its place and the turret halves were glued together, leaving the gun moveable. The turret hatches were assembled and as there were no figures whatsoever, were cemented in the closed position. The various small parts for the turret were then cemented. While most feature decent detailing, the smoke grenade tubes look very plain. Trumpeter also suggested the builder to replace the moulded-on bolt details on the turret face with separately-moulded bolts (Part C53) if one so wish. The tools and the roof machine gun were left off at this moment to facilitate painting.

Painting and Decalling
As I mentioned before, Trumpeter stated that the colour for the Ariete is TC10, without reference to any model paint manufacturer. I have a hunch that it was from GSI Creos (ex-Gunze Sangyo) and after a short Google search, I found out that it was NATO Green. I used my tried-and-trusted Tamiya XF-67, lightened with some 20% XF-2 Flat White.The tyres and mudflaps were painted GSI H77 Tyre Black while the MG42/59 was painted Flat Black and when dry, were 'polished' with graphite powder. After paint had dried, the decals were placed. As the numbers involved are quite small, this was quickly completed. I used the red rhomboid decals, just to make it stand out from the green of the hull. Although not really needed, I gave the decals a Mr Mark Softer treatment. The model was then given a black-brown wash.

Finishing
There really aren't much to do here. The tracks were painted XF-64 Red Brown overall and XF-1 Flat Black was then applied to the 'rubber' parts. They were then looped and the ends secured with superglue. I don't bother using heated screwdrivers or something like that, and the connecting posts were left as they were, since they will be hidden behind the skirting. The tools were painted their respective colours and then cemented to their places on the turret. The lower hull, running gear and the tracks were then covered with a thin mixture of water and Mig Productions' European Dust pigments. Once dry the excess were removed. The AA MG was put in its place and since I don't have anything to put inside the turret stowage basket and that I have run out of brass/copper wire for the aerials, the build ends here.

Conclusion
The Ariete is one of Trumpeter's 'modern' kits and it shows in the quality of moulding and engineering. While the details do not reach the level of say, Dragon, what was in the kit is enough to satisfy the average modeller. The fit was also good, where no putty was needed. Of course Trumpeter has gone from strength to strength and established themselves as one of the leading companies in the industry today.

Tuesday, 8 September 2015

Italian Cavalry Scout


Historical Background
In 1938, the Italian Royal Army (Regio Esercito), issued a request for a new armoured car to replace the Lancia IZM, basically a souped-up version of the 1918-vintage Lancia-Ansaldo cars. The IZM was however underpowered and had poor off-road capability. Ansaldo-Fossati came up with a four-wheel drive, four-wheel armoured car concept. The new vehicle need to fulfil the requirement for a fast and versatile car for colonial policing and and the army's cavalry. Production soon started in 1940 and the vehicle was given the designation Autoblinda 40, or AB 40. The main features of the AB 40 include all-riveted hull with sloped armour, rear-mounted engine and twin machineguns in a turret. The wheels can have the tyres removed and the car be used on rails. The two spare tyres were hanged in the way so that they can rotate freely and help in navigating rough terrain. The four-wheel drive, while revolutionary, was however quite troublesome. The AB 40 was however produced in small quantity: just 25. They were used during the Italian 'invasion' of southern France in June 1940 and afterwards they were sent to Libya.

In the Fall of 1940 however, a new requirement was issued. A modified version of the AB 40 was required, equipped with a 20mm Breda modello 35 autocannon. The easiest solution was to replace the original turret with the turret from the L6/40 light tank. Tests of the prototype was promising and the AB 40 on the production line was replaced with this version, dubbed AB 41 (after the year of first production, 1941).  Apart from the 20mm cannon, the AB 41 was armed with a co-axial 8mm Breda modello 38 machinegun. Another Breda 38 (a carryover from the AB 40) was retained on the rear of the crew compartment. A total of 456 20mm and 1,992 8mm rounds were carried. With the additional weight of the turret, a more powerful Fiat SPA ABM 6-cylinder petrol engine was needed. Rated at 120hp, the new engine allowed the Ab 41 to maintain a top speed of over 70km/h and the higher torque also offered better off-road capability. Range was a respectable 250 miles. The complicated drive system provided six forward and four reverse gears and to fully exploit the latter, a second driver was placed at the rear of the crew compartment (also a carryover from the AB 40). All AB 41s were equipped with radio and a long aerial, making them useful scout vehicles. Armour was also good (15mm for the front plate). The vehicle was not without flaws however, chiefly the one-man turret, unprotected fuel tank and the lack of interior bulkhead, making life unbearable for the crews in North Africa.

The AB 41 was used in all theatres of war in which Italian troops took part: North Africa, the Balkans, Eastern Front and the Italian homeland. They were issued to cavalry, Bersaglieri and the Polizia dell'Africa Italiana (Italian African Police). Like the AB 40, the AB 41 can be converted for railway patrol duty using a conversion kit, resulting in the Ferrovaria (railroad) version. The Ferrovaria was especially useful in the Balkans where the partisans were actively resisting the Axis occupiers. Following the Italian Armistice in September 1943, 57 AB 41s were confiscated by the Germans who renamed them Panzerspahwagen AB41 201(i). There are only two vehicles derived from the AB 41. The AS 42 Sahariana was basically a turretless AB 41 and developed for operations in hot and dry (read North Africa) combat conditions. Another version was the AB 43, armed with a  47mm Canone da 47/32 M35 anti-tank gun. Just 12 of the latter were produced before the armistice. Another 120 were built for the Germans. In total, 550 AB 41s were built.

The Kit
Despite being the most important Italian armoured car during World War 2, the AB 41 was not kitted by a mainstream manufacturer until 2005 when Italeri announced their kit. The kit comprised of 140 parts in tan-coloured plastic plus six rubber tyres. The usual decal sheet and instructions are there but no PE parts are included. However like Tamiya kits, the Italeri AB 41 has enough details to satisfy the average modeller. The details are well-moulded and I am very pleased with the embossed details on the side wall of the tyres. However, while all the doors and hatches can be posed open, there is no interior detail. The painting instructions are in colour and separate from the assembly instructions. The kit provide markings for five vehicles, including two German vehicles for those who won't build anything without a Black Cross (even the box art shows the German option!):

1. German Army, Aufkl.Abt.236, 162nd (Turkische) Infantry Division, Italy, early 1944
2. German Army, I./Elite-Polizei regiment, Bolzano, Italy, Summer 1944
3. Regio Esercito, Unknown unit, Sicily 1943
4. Regio Esercito, Lancireri di Montebello Regt, Rome, September 1943
5. Repubblica Sociale, Gruppe Corazzato Leonessa, Torino, Italy, early 1945

Construction
The build started at the chassis and Italeri provided a rather simple affair which consists of a horizontal 'pan', two sides and the ends. There are just small lips to align the parts but in the end, two u-shaped parts stabilises the joint. Next up were the suspension and steering mechanism. They are simpler than most other kits but care has to be taken since parts B8 and B9 have a tight fit and might snap if one is not careful (I end up enlarging the holes). More parts for the suspension were added to the kit. Again Fit of Parts B13 and B14 is fairly tight. To ease handling, Parts B15 and B16 were cemented directly to the chassis, rather than cementing them to Parts B13 and B14 first. This proved to be a blessing as it allows me to adjust the parts with Parts B18 and B20 (the brake drums). Should they be cemented as instructed, the brake drums might not fit properly. The suspension was finished by adding the drive shafts. While there is a notch at each wheel end of the assembly for positive placement, there were none for inside the chassis. The best way to fit this is by cementing the wheel ends and align the ends inside the chassis.

The hull of the kit was made up of multiple panels, rather than a basic shell onto which smaller panels are attached. First parts C22 and C24 are cemented to their respective sides of the walls. As the separate panels may lead to alignment issues, Italeri provided four cylindrical stiffeners, to be placed between the walls. These add some rigidity while building up the hull. However the locating pins are slightly too long and need to be trimmed. The bottom rear hull panel was then cemented. Before assembling the rest of the hull panels, the rear-facing machinegun was fitted into the upper rear panel; the design of the parts allow the machine gun to swivel freely in its place. There is a bit of fit problem between Parts 30C and 31C but a quick sanding work eliminated the problem. The rest of the panels did not have good fit but the open bottom made for some flexibility, allowing the joints mated better through finger pressure. For those who want to show off the headlights, you will be disappointed with this kit as the lenses and glasses are solid ( I simply place the covers in the closed position). There are a number of ejector pin marks but they are mostly at the wheel arches (all six of them) and are judged to be mostly hidden, so I left them as they were. 

Work on the turret was started by assembling the main armament. The breech end of the gun and also the machine gun is fairly simple but not really an issue as I'm going to close off all the hatches. The muzzle of the gun is separate and require care when cementing it to avoid seams. Apart from the machine gun and the main gun (and the telescopic sight), there isn't anything much inside the turret. There is a turret traverse wheel but since the turret hatch would be closed, I didn't put it in place. The wheels remain separate from the body and the tyres were not fitted to the wheels at this time. It's off to the paint shed.

Painting And Decalling

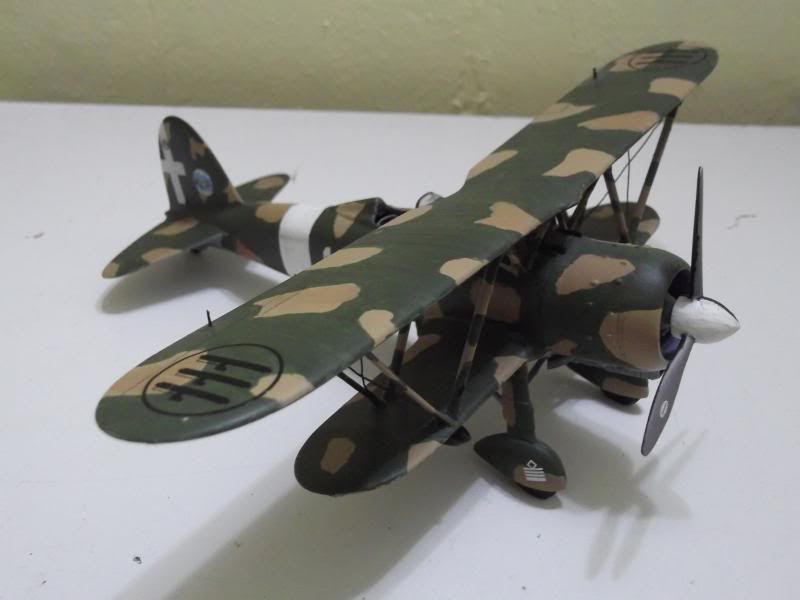
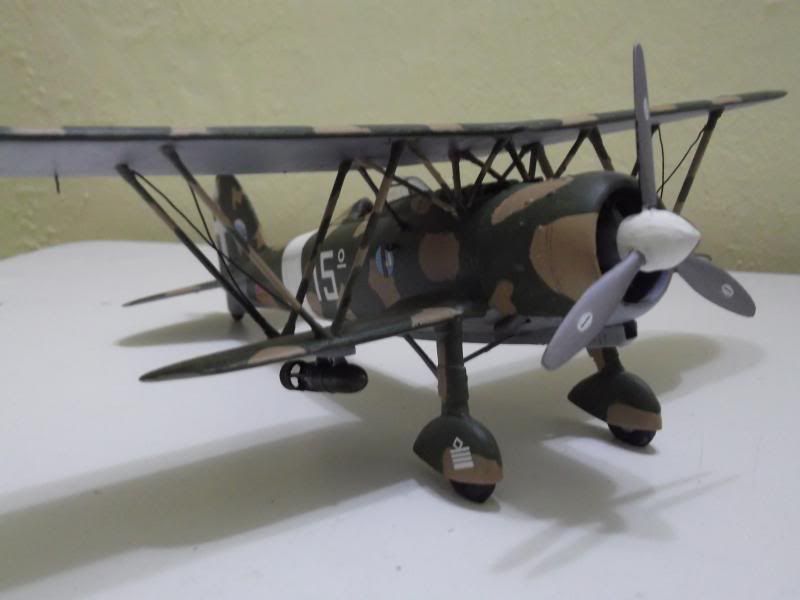
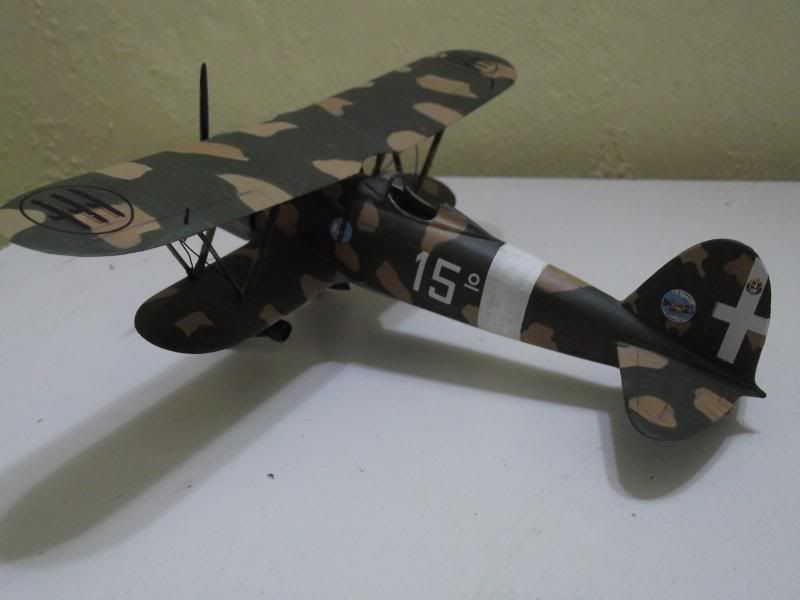
Italeri, like Tamiya, has a rather annoying habit (depending on your POV, really) of having only their paints in the colour callouts. Checking on instruction sheets available online, I painted the model a basic layer of 2:1 Tamiya XF-60 Dark Yellow and XF-59 Desert Yellow plus 20% white for scale effect. Afterwards it was time to decide which markings to use. The German vehicles were rejected out of hand, leaving the Italians. The 'Black Shirt' vehicle is simple, without camouflage patterns but para-military organisations are not really my cup of tea. That left the the two Army vehicles. I finally chose the Sicily-based vehicle as the pattern is less confusing than the other. The green is painted using a 60/40 mix of XF-65 Field Grey and XF-58 Olive Green while XF-64 Red Brown was used for the brown. Aftwerwards, the decals were applied and as usual the decals perform flawlessly. A thin layer of XF-57 Buff was then applied all over the model to 'tie-up' the colours.

Finishing
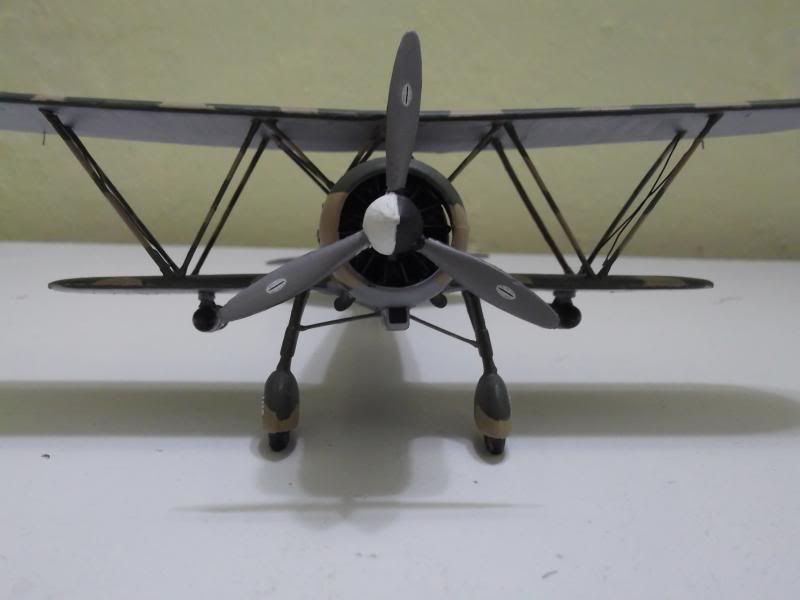
The smaller parts can now be fixed to the model. Due to some rather clumsy cutting, I clipped off the lower part of one of the horns; I however have run out of putty and reluctantly have to leave it as it is. Another clumsy handling resulted in one of the width indicator snapping off, and again, the carpet monster quickly grabbed it as it hit the floor. Replacing one meant replacing both of the indicators. Using the surviving piece as a guide, I cut 0.5mm plastic rod to size, drill a hole in each of the indicator bases and use leftover balls from a Legend Productions Merkava III update set. It look smaller than the original but perhaps it is more to scale. The pioneer tools were painted and fixed onto their places Finally the exhaust, after being painted Burnt Iron was fitted. Pin wash was then applied. The wheels and tyres were assembled and afterwards, I applied Tamiya Weathering Master Sand all over the wheels. Once completed, the wheels were mounted on the model.

Conclusion
Despite a number of issues (admittedly they are minor), the AB 41 kit has good enough details overall. Italeri are also to be commended for producing a model of a vehicle many mainstream manufacturers ignore - because of the lack of Black Crosses and unpronouncable names (even Tamiya, who has a licensing agreement with Italeri, only adopt the follow-on AB 43 kit, as the vehicle was almost exclusively used by the Germans!). The simple construction makes it very attractive and I believe there is a number of aftermarket goodies that can be used to spruce up this kit.  

Friday, 14 June 2013

Attack Falcon Of The Desert


Historical Background
Buoyed by the success of the biplane Fiat CR.32 Freccias of the Aviación Nacional and Aviazione Legionaria during the Spanish Civil War, Fiat proposed to the Regia Aeronautica a more advanced fighter based around the 840-hp Fiat A.71R1C.38 air-cooled radial engine and of a clean, robust sesquiplane (unequal span biplane) design. Despite the biplane configuration, the new CR.42 was of a 'modern' design based on a strong steel and alloy frame incorporating a NACA cowling for the engine with fairings covering its fixed landing gear. The CR.42 also proved to be agile, thanks to its low wing loading although it lacked pilot armour and radio. During evaluation, the CR.42 was piited against the Caproni Ca.165, another biplane design with higher speed at the cost of maneuverability. The Falco was eventually picked for series production as it was judged superior in terms of maneuverability - a performance indicator for fighter aircraft of the first- and second-generation but were increasingly secondary for modern monoplanes. The Fiat CR.42 Falco entered service in May 1939 and despite the general obsolescence of biplanes, about 300 had been delivered to the Regia Aeronautica by the time Italy entered the war. It also enjoyed export success, being purchased by Hungary, Belgium and Sweden. The Luftwaffe also took over some ex-Regia Aeronautica CR.42s following the Italian Armistice and later ordered 200 CR.42LW (Luftwaffe) for use in night harassment and anti-partisan roles.

In combat the Falco was unable to operate effectively against modern opposition, relying heavily on its maneuverability and the skills of its pilot to survive. Over the skies of Northern and East Africa, the fight was more or less equal against the opposition's bomber and recon planes and also against the Gloster Gladiator, the RAF's last biplane fighter. Even when pitted against the Hurricane and Spitfire at the abovementioned theatre and also during the Battle Of Britain, the Falco can still hold its own. Even the Belgian Falchi managed to score victory over the vaunted Messerschmitt Bf 109. Eventually however, like when facing the agile Japanese Zero, the best way to combat a CR.42 is by using the slashing attack rather than getting into a maneuvering combat. Faced with the change in the enemy's tactics and its own increasing obsolescence, the CR.42s were progressively withdrawn from fighter units and were re-assigned to attack units. The attack (or assalto) version of the Falco can carry bombs of up to 220lb under each wing.

The Kit
Classic Airframes is an American company renowned for producing limited-run models of aircraft that mainstream manufacturers tend to overlook, such as the British Defiant and Whirlwind. The CR.42AS kit is Classic Airframes' third CR.42 kit following their earlier release of the CR.42 fighter and CR.42 export version. The kit actually allows one to build the Assalto as well as Africa Settentrionale (North Africa = 'tropicalised' i.e fitted with sand filter). So with aftermarket decals, one can also build an assalto with or without the filter or a standard fighter with the filter.

The kit is of mixed-media type. The plastic parts was made from low-pressure ejection styrene but have good engraved and 'fabric' details. Being a short-run kit, the parts do not have locating pins. The resin parts consisted of the engine, some cockpit parts, exhausts (including extended exhausts for the Luftwaffe option), bomb racks and the bombs themselves. There were also two PE frets, made by Eduard, one of them in colour. The windshield was made of clear styrene, and not vacform (thank goodness!) Markings are provided for four aircraft. The instructions came from the earlier CR.42 kits and an additional sheet was included to show the steps for the AS version. There is also a photo of a completed cockpit to help in assembly. Decals were provided for four aircraft:

- Scuola Caccia d'Assalto, Ravenna circa 1942.
- Sezione Autonoma Collegamenti, Rome-Centocello, c. 1945-1946
- 15° Stormo d'Assalto, Barce, Cyrenaica c. 1942
- 2./Nachtschlachtgruppe (NSGr) 9, Turin-Aeritalia c. 1944

Construction
The cockpit assembly is made up from resin and PE. Construction looks straightforward and the enclosed xeroxed photo helps (and if the photo is not clear enough, there are clear, coloured copies on the internet). Dry-fitting showed that the cockpit floor is too wide so the first order of business was to sand down the edges  until it fits nicely between the cockpit halves. To help with assembly, I decided to build the cockpit from the centre outwards.I painted the interior Grigio Anticorossivo using Gunze H308 Light Grey. The rather difficult area is concerned with the PE parts especially those forming the delicate cockpit frame. Extra care was needed here to avoid distorting the cockpit frame through brute force or sheer carelessness. One half of the PE fret is in colour, which includes the seat belt and harness, cockpit instrumentation and side console, and they look beautiful. The two-part PE instrument panels were stuck together using Tamiya X-22 Gloss Clear and the assembly was glued together with the PE gunsight mounting on their places. The cockpit assembly was then glued to one half of the fuselage and then both fuselage halves were glued together.

I then attached the lower wings, which is in one piece. Generally, fit is good except for the front, which received a bit of attention from Tamiya Putty. The horizontal tails were next and there is also a bit of fit issue here. I then turned my attention to engine. CA made really beautiful mould of the engine which consists of the crankcase and separate cylinders. From what I read in modeling magazines, CA resin engines did not fit inside their cowling but in this case, after assembling the cylinders to the crankcase and dry-fitting the cowling, the assembly fit perfectly. The crankcase was then painted XF-53 Neutral Grey and the cylinders Mr. Color 28 Steel and drybrushed Mr. Color 8 Silver. Afterwards, the PE rocker arms were superlgued to the front of the engine and then engine assembly was mounted to the airframe. For this, CA provided a positive mounting which sat the engine correctly. The sand filter was then attached to the cowling.

Now comes the rather hard part - mounting the upper wing. To help in this step, I taped the upper wing face (or the 'up' side) down on my working table. The model was then aligned over the upper wing and made level using plasticene. I worked inside-out, starting with the innermost cabane struts. CA however got their drawings wrong for the innermost cabane struts - it should be in the normal 'v' position instead of inverted. Suffice to say it took a lot of patience to assemble the struts but in the end I got it done. I also rigged the outermost struts but instead of using fishing lines (as with my I-153 built) I used copper wire and since I got a bit jaded after assembling the struts, I simply measure, cut and superglue the wire into position instead of drilling locator holes. The result? Sloppy, un-tensioned wires! The landing gears were the last part assembled prior to painting. Construction was straightforward. CA have the tyres with flat moulded in. It however looked like a flat tyre rather than tyres being compressed by weight! Unlike previous builts, I added the tiny parts, such as the flying control horns at this stage.

Painting and Decaling
I should mention that the decision for marking options should be made before construction began as the options feature different details (the Luftwaffe Falco has extended exhausts and no wheel spats, two other options have partial wheel covers, for example). I chose the markings for 15° Stormo d'Assalto. Of so-called 'lizard' scheme, it consists of Grigio Azzurro Chiaro bottom and Verde Olivia Scuro upper with large blotches of Giallo 3 over the green. I used Tamiya XF-66 Light Grey and XF-2 Flat White for Grigio Azzurro Chiaro, Tamiya XF-67 NATO Green for the Verde Olivia Scuro and XF-59 Desert Yellow for the Giallo 3. The fuselage band was painted XF-2 Flat White. Once dry, I started putting on the decals. The decals were made by Microscale - thin and in good register. All the decals were then subjected to the usual Mr Mark Softer treatment.

Finishing
To finish the model, I glued on the remaining parts. The propeller blades were painted XF-1 Flat Black on the inside faces and XF-16 Flat Aluminium on the outside and put on the decal for the manufacturer's label. The bomb racks were next and I had to resort to internet photos as there were no location markers for them. One of the bombs however has its tail broken as a result of clumsy sawing. The bomb was superglued back onto the pouring stub (at the broken area only) and then carefully cut again The bombs were painted XF-61 Dark Green and glued onto the racks. The whole of the model were then sprayed with Flat Clear.

Conclusion
The CR.42 was both my second biplane and Classic Airframes kit. The first was a Polikarpov I-153 Chaika which was also an earlier CA release. The CR.42 showed advances made by CA over the years despite being a limited-release modeling company. The resin parts are first-rate and so were the PE and the decals. The plastic parts, especially the fuselage were rather thick but it should be easy to overcome with dilligence. CA should be congratulated for producing the kit of one of the last fighter biplanes in service and to think of it, of the last biplane fighters in World War 2 (Gloster Gladiator, Polikarpov I-153, Fiat CR.42 and Avia B.534), models of two of them were made by CA.