Monday 30 January 2017

Stalin's Iron Falcons


Historical Background
With the tide of war turning against the Axis Powers in 1943, Soviet engineers can now devote their work to develop an indigenous turbojet of their own design in order to catch up with the West. To help the indigenous jet engines move along, captured German BMW 003 and Jumo 004 engines were used as basis. These engines, developed under shortages in wartime Germany were unable to generate thrusts of more than 2,500 lb. While the engines (now designated RD-20 and RD-10 respectively) were used to power the Soviet's first-generation jet fighters - the Yak-15 and the MiG-9, they were more seen as developmental efforts rather than 'proper' jet fighters. Mikhail Khrunichev, the Soviet aviation minister and Alexander Yakovlev suggested to Stalin that the USSR buy the conservative but fully mature Rolls-Royce Nene from the UK to conserve development time but was rebuffed by Stalin as he did not believe anyone would sell their secrets to the Soviets. Nevertheless Stalin gave his consent to the proposal and a delegation which include Vladimir Klimov and  Artem Mikoyan travelled to London to request the engines.

To the Soviets' surprise (especially Stalin), the British Labour government of the day, specifically the Minister of Trade, Sir Stafford Cripps, was perfectly willing to provide technical information and a license to manufacture the Nene. Sample engines, together with blueprints were duly purchased and brought back home. After evaluation and adaptation to Russian conditions, the Nene was manufactured as the Klimov RD-45. To take advantage of the new engine, the Council Of Ministers ordered Mikoyan-Gurevich OKB to build two prototypes of high-altitude day interceptor. German research and experience during the war years showed that swept wings would give better performance at transonic speeds and with the wealth of German documents captured at the end of World War 2, the MiG design incorporated that particular feature, among others, for their I-310 prototypes. The I-310 has 35° wing and tail sweep with two wing fences on each wing to improve airflow over the wings. The RD-45 was fed by a split-forward air intake. It made its first flight on 30 December 1947, demonstrating excellent performance, proving itself superior to the rival Lavochkin La-15 design.

The MiG was approved for mass production and was designated MiG-15. Entering service in 1949, it was given the NATO ASCC reporting name of 'Fagot' (meant to be 'a bundle of sticks' rather than the 'other' meaning; and it was originally intended to be given the name 'Falcon'). The MiG-15 was originally intended to intercept large American bombers such as the B-29. To ensure the destruction of such a large target, the MiG-15 was armed with two 23mm and a single 37mm cannons. These weapons provided tremendous firepower in the interception role but the low rate of fire and the low muzzle velocity made it more difficult to shoot at the more maneuverable fighters. The cannons also have different ballistics trajectory making aiming difficult and subjecting the UN fighter pilots in Korea the sight of 23mm rounds passing over and the 37mm rounds passing beneath their aircraft. Although the RD-45 have excellent performance, it was quite a gas guzzler while having a short service (reputedly less than 100 hours). Klimov came up with the improved VK-1 generating 5,952 lb of thrust (legally speaking, the VJ-1 and the RD-45 were illegal copies of the Nene but the Soviets claimed that they had re-engineered the engines to the extent that they are now indigenous Soviet designs). This plus a number of small upgrades, including a more closely placed 23mm cannons resulted in the MiG-15bis ('second'), Although overall an excellent machine, the MiG-15 was not without shortcomings. Its lack of an 'all-flying' tail meant that it cannot exceed Mach 0.92 where flight controls become ineffective. Additionally, it tended to spin after a stall and the pilot was often unable to recover.

The MiG-15 first saw action during the final stages of the Chinese Civil War when the Soviets sent the 50th IAD to the Chinese Communists aid in February 1950. On 28 April 1950, a Captain Kalinikov scored the first kill for the MiG-15 - a P-38 Lightning of the Kuomintang. When the Korean War erupted about two months later, the KPAF, equipped with World War 2-era Soviet prop fighters was completely overwhelmed with the numerical and qualitative superiority of the USAF using the F-80 Shooting Star and the F-84 Thunderjet. The 50th IAD was transferred to the northeast of China and back in the Soviet Union, pilots were recruited to serve in Korea. Volunteers had to be under 27 years old and preference was given to World War 2 veterans. They formed the 29th Guards IAD. Although widely suspected by the West and constantly denied by the Soviets, the end of the Cold War finally revealed the role played by the Soviets. The pilots wore Chinese uniforms or civillian clothings. Cards with common flying terms in Korean (and spelt phonetically in Cyrillic) was issued to them. They were also prohibited from flying over enemy-held territory where they might be shot down and captured, thus revealing the Soviets' participation. The aircraft was also painted in Chinese and North Korean markings.

On 1 November 1950, eight MiGs intercepted 15 F-51Ds, shooting down one of the Mustangs. On the same day, another three MiGs intercepted around 10 F-80s and 1st Lieutenant Semyon F. Khominich scored the first jet-to-jet kill when he shot down 1st Lt. Frank van Sickle's F-80. The presence of the MiGs also forced the B-29s to operate during the night. However, on 9 November, the MiGs suffered their first loss when Captain Mikhail F. Grachev was shot down by an F9F Panther piloted by Lt. Commander William T. Amen from USS Philippine Sea. To counter this threat, three squadrons of North American F-86 Sabres were rushed to the theatre. More experienced units were sent by Stalin including the 324th IAD commanded by Col. Ivan Kozhedub, the Allies' highest-scoring ace during World War 2. Records show that the 64th IAK (the parent MiG organisation in Korea) shot down 647 F-86s, 185 F-84 Thunderjets, 118 F-80s, 28 F-51s, 11 F-94s, 65 B-29s, 26 Meteors and 17 various other aircraft. 659 were lost, mainly to Sabres and with the Americans' claimed loss of 78 Sabres, the kill : loss ratio was around 6:1 in favour of the F-86. Nevertheless, the highest scoring ace of the Korean War was not Col. Joseph C. McConnell (16 victories) as previously believed but Colonel Yevgeny Pepelyaev with 22.5 kills.

Although a few damaged Sabres were salvaged for evaluation, the USAF wanted an intact example and initiated Operation Moolah, offering a reward of US$100,000 and political asylum to pilots who defected with their MiG-15. On 5 March 1953, Franciszek Jarecki brought his plane to Denmark where his plane was inspected by American specialists before the aircraft was returned to the Poles. The more celebrated defector was No Kum-Sok, who landed his MiG at the Kimpo Air Base on 21 September 1953. The plane was thoroughly inspected and tested, including by Chuck Yeager, who reported the MiG's dangerous handling faults. The MiG-15 was also used to intercept Western reconnaissance aircraft and other conflicts such as in the Middle East and between Taiwan and China where it suffered the distinction of being the first victim of the Sidewinder missile in 1958. The MiG-15 was widely exported (and license built as the S-102/S-103 (Czechoslovakia) and Poland (Lim-1/ Lim-2). Apparently over 18,000 was built, making it the most-produced jet fighter of all time.

The Kit
There have been a number of MiG-15 kits in 1/72 scale but they are either inaccurate or no longer available. The best available before the Eduard MiG-15 was Hobby Boss's. They are good but a bit simplified. Eduard came up with their family of MiG-15s in 2014, initially releasing the baseline MiG-15 and followed by the bis. As per their usual practice, the simplified 'Weekend Edition' followed not long after. Simplified it may be, but for Eduard aficionados and modellers in general, it just meant that the PE, resin (if any) and masks are not included and the choice of markings reduced to just one (or two). This allows modellers inexperienced with the said media  (or loath them) to still enjoy their kits as the basic styrene parts are well-detailed and moulded. This particular kit has 74 parts in grey plastic, 7 parts in clear plastic, Eduard's Super Fabric seat belts and a small decal sheet. Parts for the basic MiG-15 was included but one cannot be made as some bis parts were already moulded / engraved (such as the airbrakes). The decal sheet provide markings for 'Yellow 30' (ex Red 1976) in the mid-1950s.

Construction
As usual work started at the pilot's office and as usual I painted the parts while still on the sprue. They were painted according to Eduard's directions of mainly Gunze 308 Light Ghost Grey with Flat Black upholstery and the top of the control stick and blue for a detail on the cockpit floor. The cockpit details was then enhanced with a dark grey wash. My copy of the kit must be of a later batch as the instructions showed the seat belts (the ones on the internet I have seen lacked it in the instructions) although there is no mention on how to apply them - I managed to do so by checking out Eduard's website. It should be gently removed from the backing paper using a sharp blade and a pair of tweezers and sticking them using white glue. Although without PE detailing, it may be a blessing in disguise as the Profipack version have the pre-painted PE in Russian cockpit blue-green whereas MiG-15s have their cockpit painted grey. The nose wheel well was assembled and cemented to the front of the cockpit where care has to be given else it might not align with the fuselage bottom. The cockpit tub was then cemented together. I couldn't find suitable weight to fit in the designated area so I crammed as much plasticine as I can inside the cavity.

At the back of the plane, Eduard provided a two-piece exhaust shaft  with a bulkhead already moulded with a rear end of a jet turbine (to avoid the see-through effect while having some detail). They were painted Burnt Iron although I shouldn't have bothered painting the whole length of the thing. before the fuselage halves were jointed, the interior walls were painted Gunze 8 Silver. The cockpit assembly and the exhaust assembly was cemented to the right half (and I think the exhaust assembly was handed). Caution: the rudder need to be cemented to either fuselage half before closing up (ask me how I found that). The fuselage fitted beautifully except at the front but it was nothing a clamp can't overcome. The instrument panel was then inserted into place. I used the flat face and decals option than the raised details as they looked way oversized while not having instrument face details. (As a matter of interest, the instrument face decal included a vertical white line slightly off centre - the line is there on the real aircraft as it was a reference point for pilots to shove their control stick against, should they got themselves into a spin)

The lower half of the nose is a separate piece to allow Eduard to mould the original and bis cannon arrangements separately and accurately and before it was cemented to the fuselage, more plasticine were crammed into the cavity. After the piece was securely in place, the nose / intake lip was assembled and cemented. Holes for the external fuel tank were drilled and the wing halves cemented together. The wings were then joined to the fuselage where I found that the fit was not good. Well, it's time for the filler then. The tailplanes however went on without any problems. I was thinking of cementing the cannons at this time but seeing how close they would be to the landing gears and that they may interfere while I work the gear and the doors, I left it for later. The two clear parts for the bottom of the fuselage was dry fitted at first, showing that the round one (the cover for the ARK-5 radio compass) having a rather poor fit and needed some sanding before it can fit in the recess.

Painting and Decaling
Although it was clearly stated in the diagram that the MiG is painted overall silver (specifically Mr. Color Super Metallic 'Super Fine Silver'), I suddenly had doubts whether it was actually silver, or bare metal or painted aluminium. After consulting various sources, I concluded that the MiGs were left in bare metal. However, I have run out of Tamiya AS-12 and so with a heavy heart, I sprayed Tamiya TS-30 Silver Leaf. The lower portion of the extreme nose is painted SM 04 Super Stainless - another colour I did not have at the time. However I believe that portion of the nose was reinforced to withstand the cannon blasts. I thus looked to photo references of MiG-19s, which have reinforced skin next to the cannon muzzles, for ideas and came up with my own concoction for that colour (which may or may not be accurate). There is no mention about the clear parts underneath the fuselage. So after hunting down pics on the internet, the clear rectangular part was painted over while the ARK-5 radio compass cover was left off as it is.

As mentioned before, there is just one marking scheme, a Korean War veteran back in Mother Russia in the mid-1950s. The scheme feature faded original Bort number 1976 and the North Korean insignia overlaid with the Soviet Red Star and new Bort number 30. Ideally, the original markings should be printed with lower colour density but Eduard have them in full colour and instructed the modeller to lightly overspray them before applying the newer markings. After giving some thoughts, I decided to have the model in the original markings only. After the decals have recovered from their setting solution bath, the panel lines were enhanced with AK Interactive Paneliner (I used the 'for blue and grey camouflage'). At this time I sort of have an idea of transforming the all-silver paint job into something that mimicked, more or less, a natural metal finish. Random panels were given washes or maybe something akin to a filter layer of aluminium, metallic grey, smoke (Tamiya X-19). It wasn't perfect of course but at least it gave that natural metal-ish look.

Finishing
As usual I started by fitting the landing gears first so that the model can stand on its own. It ended up with the tail on the worktable - not enough ballast in the nose! Thankfully the rear cockpit decking was not yet in place so I can fit some more plasticine in the cavity behind the cockpit. I also realized that the left wing have more anhedral than the right wing and the same goes with the right tail plane! The wing is not much of an issue as the model look balanced on its landing gear but the same cannot be said for the tail plane! Anyway, the finishing stage goes on and I drilled holes into Part B12 as photos of the real aircraft show it to be perforated. The final, more fragile parts were cemented after the drop tanks have been fitted - although the kit also provide slip-on style external tanks, only the finned type were used with different attachment pylons for variety.

Conclusion
The Eduard MiG-15 family definitely filled the void in 1/72 scale. While the Airfix and Hobby Boss kits are still available, the former still retain some inaccuracies while the latter was a bit simplified (although still accurate). The Eduard kit is well moulded with very nice surface detailing and although lacking the extras such as PE parts and paint masks, it still represents a value for money. Fit is generally very good although the hiccups I encountered may be purely as the result from my clumsiness. A must if you build and collect 1/72 jets due to its place in history. Now I'm off looking for its adversary, the Sabre.....


Sunday 15 January 2017

Heir To The Panther


Historical Background
In the mid-1950s West Germany's rapid industrial recovery from World War 2, allowed it, among other West European nations, to rebuild its military to face the Soviet threat. A new main battle tank was part of the Bundeswehr's plan and in November 1956, a project known as the Standard-Panzer was started. On 25 July 1957, the detailed specifications were released, calling for a 30-ton tank with a power output/weight ratio of 30 hp/ton, armour able to resist rapid-fire 20mm rounds, treated against NBC and armed with a 105mm gun. Armour was given the least priority here as it was assumed that all AFVs cannot be protected against hollow charge projectiles. At the same time, France was interested in the Standard-Panzer, following the failure of its AMX-50 project. The two countries agreed to jointly develop a common tank called the Europa-Panzer, which was intended to equip Western European armies, replacing the American-supplied M47 and M48 Pattons. Three West German and one French team would submit their proposals. The West Germany teams were Arbeitsgruppe A led by Porsche, Arbeitsgruppe B led by Rheinmetall and Arbeitsgruppe C led by Borgward. In September 1958, Italy joined the development programme.

Although the Phase I prototypes weren't finished, it was decided to start Phase II prototypes in 1959. In 1961, Arbeitsgruppe A was assigned to build 26 pre-series (O-series) prototypes, Arbeitsgruppe B 6 vehicles but Arbeitsgruppe C, with its AMX-13-like design, failed to submit their original prototypes in time. In 1963, Arbeitsgruppe A's design, with a new cast turret and several hull changes were chosen as the winner. Before mass production of the standard version can be started, it was decided to add an optical range-finding system which led to an increased height of the turret and the addition of bumps on the turret sides to accommodate the sights. In 1963, France decided to leave the programme and pursued their own design, which led to the AMX-30. The new tank was given the name 'Leopard' to continue with the tradition started with the Panther and Tiger tanks of World War 2 fame. The production line was set up at Krauss-Maffei in Munich from early 1964 with the first batch being delivered between September 1965 and July 1966.

Following the lessons learned during World War 2, the Leopard has a well-sloped hull although not very thick (the thickest, for the turret front and mantlet, was 70mm). This was later rectified by the use of add-on armour plates. The turret was originally of cast construction which was later changed to welded joints. The Leopard is powered by a multi-fuel  MTU MB 838 CaM 500 engine generating 819 hp at 2,200 rpm. With the relatively lightweight hull, it gave the tank a sprightly performance. Cross-country ride was very smooth, courtesy of shock absorbers on three front and two rear road wheels. The Leopard is armed with a license-built Royal Ordnance L7 105mm rifled tank gun firing all kinds of ammunition available to NATO armies. 55 rounds were carried. Secondary armament comprise of a 7.62mm MG42/59, MG3 or FN MAG machine gun co-axially mounted with the main gun and another similar weapon mounted in the commander's cupola. 5,000 rounds of 7.62 x 51mm ammunition were carried.

The Leopard (also known as Leopard 1) was produced in a number of basic variants, designated A1 to A5. The 1A3 version, entering production in 1974, was fitted with a new welded turret, incorporating two spaced steel plates with a sandwiched plastic filling, and a distinctitive wedge-shaped mantlet. This turret is roomier than the earlier cast turret while doubling the protection. 110 were built. Next was 1A4, forming the sixth batch of vehicles, 250 in number. Externally similar to 1A3, this variant included a new computerised fire control system and a new EMES 12A1 sights. The commander was also provided with the PERI R12 independent night sighting system. These additions however resulted in the reduction of the main armament ammunition from 55 to 42. The Leopard 1 chassis was also used for the Flakpanzer Gepard AA vehicle, Bruckenleger Biber armoured bridgelayer and Bergepanzer II armoured engineering vehicle.

Apart from the Bundeswehr, the Leopard 1 enjoyed considerable export success, being sold to (or having building license issued to) Belgium, the Netherlands, Norway, Denmark, Italy, Australia, Canada, Turkey and Greece. Most of these countries no longer operated their Leopard 1s, which were then transferred to Brazil, Chile, Ecuador and Lebanon. The Leopard 1 MBT was used in combat during peacekeeping operations in The Balkans during the 1990s. On 29 April 1994, during Operation Bollebank, the Danish contingent of the UNPROFOR came under artillery fire from Bosnian Serb forces. Their commander decided to return fire using the seven Leopard 1A5s in the column, firing 72 rounds which destroyed several artillery pieces, bunkers and an ammunition dump. Almost six months later, on 25 October during Operation Amanda, a Bosnian Serb T-55 fired upon three Danish Leopard 1A5s, One of the Leopards suffer a slight damage while return fire knocked the T-55 out and also destroyed a recoilless rifle. Canada sent their Leopard C1 to Kosovo in 1999 and the upgraded C2 variant to Afghanistan from 2006 to 2011.

The Kit
Meng's Leopard 1A3/A4 is my second armour model kit from them (and the third kit overall when the F-102 is taken into account). It was first released in 2013 and comprised of 283 dark green parts, 180 brown parts (the separate-link tracks), ten clear, the PE, two lengths of vinyl tracks, poly caps, a length of string and the usual decal and instruction sheets. The parts are all well-detailed and moulded crisply while the vinyl tracks have good details with no ejector marks; the separate tracks have even better detail but were marred by two shallow ejector pin circles.  Options were given for turret details and the kit allows the building of either the A3, A4 or the Greek GR1 so one needs to pay attention to instructions. Accuracy-wise, well, some online reviewers mentioned about inaccurate shapes but hey, is there really such a thing as a perfect model kit? They can be rectified but I think I'll leave them as they are. The decal sheet provide markings for:
1. Leopard 1A3, 2nd Squadron, 304th Panzer Battalion, mid-1980s (tricolor camo)
2. Leopard 1A3, 4th Squadron, 301st Panzer Battalion, 1980s (dark green)
3. Leopard 1 A4, 4th Squadron, 293rd Panzer Battalion, 1980s (dark green)
4. Leopard 1A4 (GR), Helllenic Army (four-colour camo)

Construction
Before starting, it should be noted that you must make a choice at this time as the four marking options feature different details. I decided to build the third option. As usual, construction started at the bottom by cementing all the suspension parts to the lower hull. After building their excellent T-10M, it was quite a surprise when I found that the shock absorbers and suspension arms have minimal detail. Perhaps the designers have the opinion that 'if it can barely be seen, why bother with details?' Also like the T-10M kit, the Leopard also feature moveable torsion bar suspension to help modellers pose the model in a diorama setting. There was also the possibility of mounting the return roller mounting upside down by mistake. However, the mounts already moulded on the lower hull can be used as a guide. The wheels is one of the shortcomings of the kit, having wrong details on the outside wheel and hollow on the inside face of the inner wheel. Anyway the wheels were assembled but not yet mounted, save for some test-fitting (which was great).

I then concentrated on the upper hull. Construction here was pretty straightforward as the parts all fit nicely. The engine exhaust grilles however were too shallow- I might need to apply a heavy dark wash here later on. Anyway, I worked in a counter clockwise direction beginning from the driver's hatch cementing the smaller parts onto the upper hull shell. However, the headlights and rear-view mirrors were left off for the time being. The former was because of the need to facilitate painting and the latter in order to avoid them being knocked off and worse, becoming the meal for the Carpet Monster. The rear panel was then worked upon with most of the smaller details cemented onto it. The upper hull and the lower hull was then cemented together, followed by the rear panel. While there weren't any problems with the upper-lower hull joint, there was a gap at the back panel/hull joint which required some puttying and sanding. With the modern tanks' feature of the side skirts, I usually painted the lower hull and put the tracks onto the model at this time. This time however I left them unpainted, with all the wheels and tracks mounted later; the side skirts would be painted separately from the hull.

Moving on to the turret,  I deviated from the instructions by working on the turret shell first. I struggled a bit when inserting part H12 into place but ended up OK. The trunnion was assembled and I was quite concerned as it was loose, and could make the gun point downwards (more on this later). The turret shell was the cemented together with the rear panel falls on the weld seams, requiring just a small correction to restore the beads. There are alternative parts here, chiefly the gunner's and commander's sights. While the alternate sights were shown, what to do with the raised placement marks were not. Common sense prevailed and the excess plastic was removed. The gun barrel and the mantlet was assembled and again, I wish for a one-piece turned aluminium (or even plastic) barrel. The IR searchlight was assembled but left alone at first, while I place the gun assembly to the turret. As expected the gun pointed downwards, but when the mantlet cover was cemented into place, it put the gun in a roughly zero-angle plane. The IR searchlight was then put in place. The rest of the parts were assembled and cemented onto the turret without any problems.

Painting and Decaling
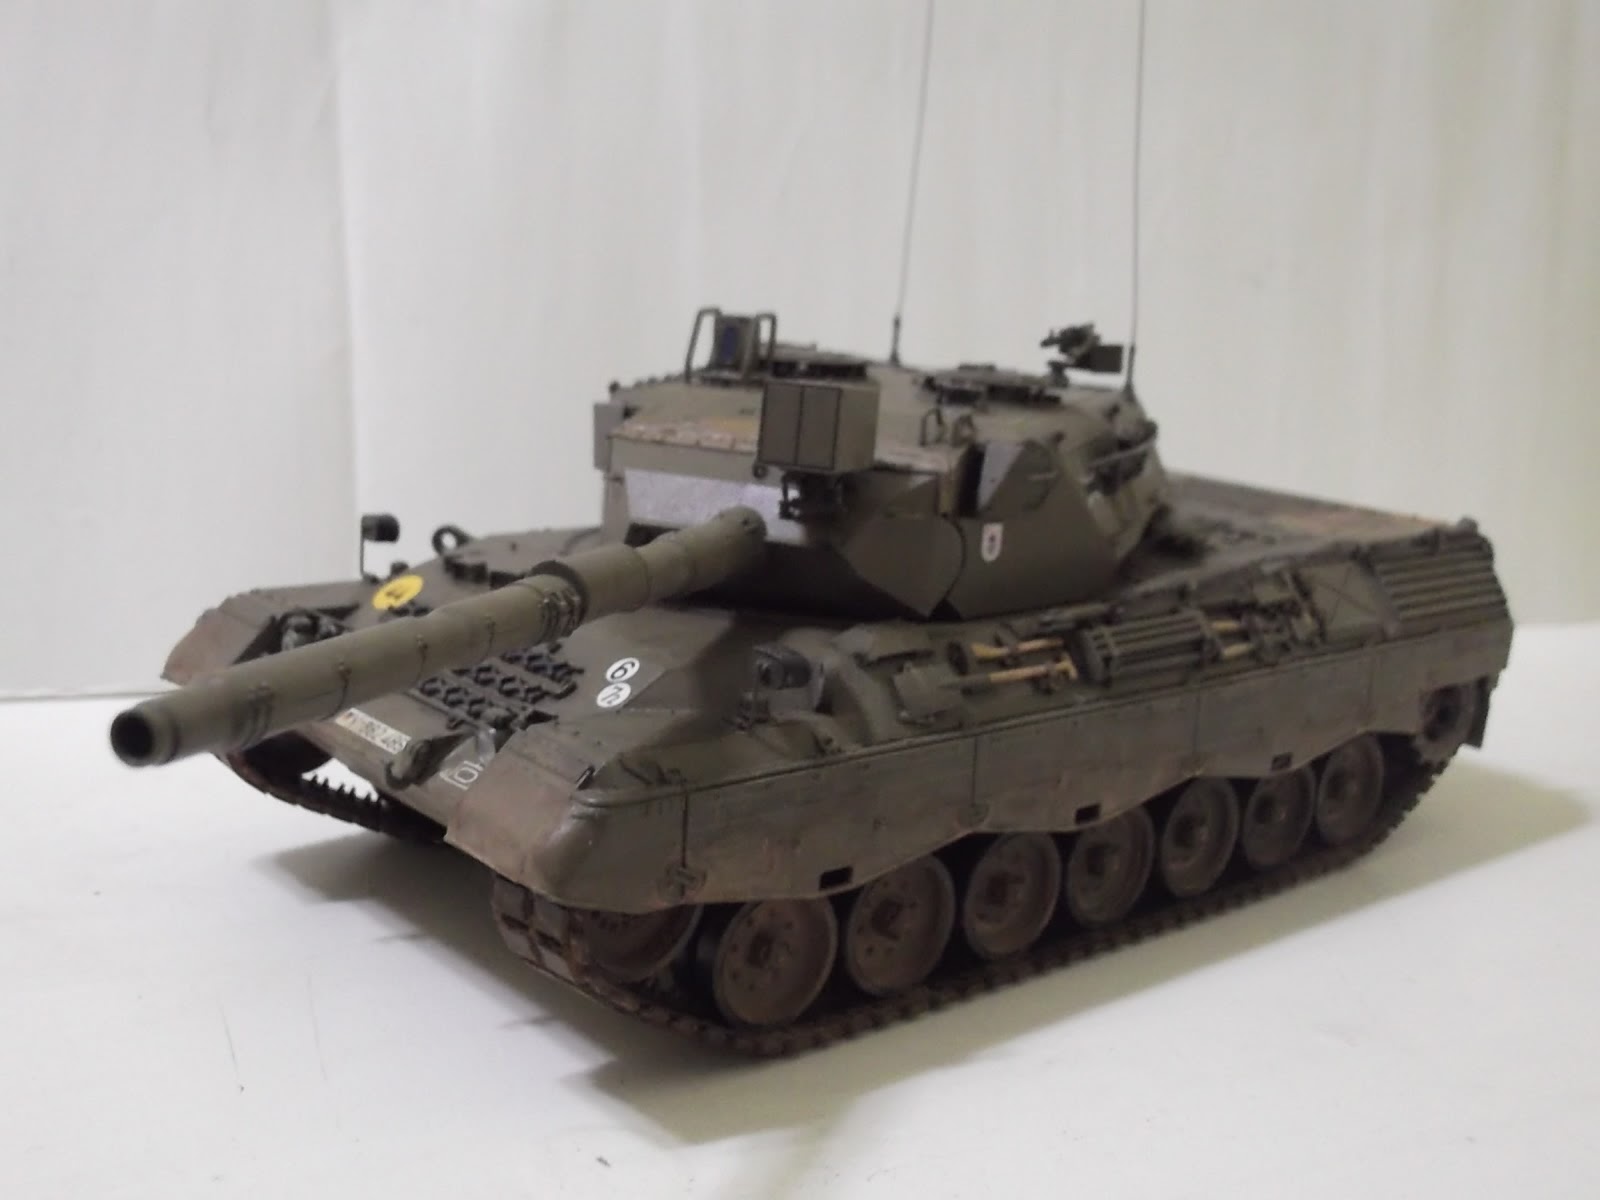
The markings I chose was for the Leopard 1A4 of the 293rd Panzer Battalion. This option, together with the 1A3 of the 301st Panzer Battalion was in overall Dark Green. Moving away from my traditional paint supplies (specifically Tamiya), the kit was painted using Vallejo US Dark Green. Although the paint is formulated for airbrushes, I find it suitable (way better actually than Tamiya and Mr. Color paints) for hand brushing, although it may not be economical for hand brushing in the long run. Although I think (and I didn't bother to check internet forums beforehand) the paint already has the scale factor built in, I added a bit of white. The rest of the tank was however painted using my usual Tamiya paints. The 'metal' portion of the tracks were painted XF-64 Red Brown and then washed with AK Interactive Track Wash while the 'rubber' parts were painted Mr. Color H77 Tyre Black. The model then received a gloss coating prior to decalling. The decals, printed by Cartograf, performed beautifully on the glossy surface. There is no need to use decal setting solutions here but I just dabbed a bit of Mr Mark Softer out of habit.

Finishing
I started at the bottom by placing the wheels. Since I'm using the one-piece tracks (the tension of which may pull the wheels up), the first and the last suspension bars were frozen in place using Tamiya Extra Thin Cement. The tracks were then laid on as usual and they were followed by the side skirtings. There are seams between on the mud flap (split between the hull and the side skirtings) which need to be smoothed over (and the paint retouched afterwards). The tools were painted XF-59 Desert Yellow and Vallejo US Dark Green and was then placed on the model. There are two options for the rear mudflaps - one hanging open and the other folded - I chose the hanging one. Although not mentioned in the instructions, I painted the road wheel hubs XF-7 Red, as the German vehicles were regularly seen with the hubs painted so. The model then was washed with a brown-black paint mixture. The hull was then washed with Buff and afterwards an application of dust pigments was done to the lower hull. A guitar string was cut and superglued to the aerial base.

Conclusion
The Meng Leopard 1A3/A4 is a nice kit. Yes it has a number of shortcomings, most notably the road wheel detail and accuracy and the shallowness of the engine exhaust vents. Despite that, it was still better than the old Tamiya and Italeri Leopard kits with regards to fit and (the rest of the) details. Although a number of shortcuts were made by Meng they were mostly negligible for a casual modeller (or hidden, in the case of the suspension).