Historical Background

In 1927, Nikolai N. Polikarpov designed and built a single-seat biplane fighter with the designation I-3. It was a success and eventually led to him being assigned to head a team tasked to design and deliver a 'modern' fighter designated I-6 by the middle of 1930. The project failed and the engineers, together with Polikarpov, was sent to the gulag. While in prison, he was assigned to develop the I-5 fighter with Dmitri Grigorovitch. The project was a success and he was eventually freed in August 1932. In the meantime, Andrei Tupolev was designing a modern monoplane fighter designated I-14. He was concerned about the design and ordered two back-up biplane designs, the I-14A and I-14B. Polikarpov was handed the I-14A project, based on his experience designing The I-5. The I-14A flew in October 1933 and proved to be an excellent design and was ordered into production as the I-15. The I-15 was followed by the I-15bis with a straight, rather than 'gulled' upper wing, spatted undercarriage and a longer engine nacelle.

In July 1937, in a meeting chaired by Stalin, it was concluded that the biplane Fiat CR.32 was superior to the monoplane I-16. The Fiat had scored impressively against Soviet aircraft flown on behalf of the Republicans during the Spanish Civil War, but this was mainly due to the I-16 pilots dogfighting against the more nimble Fiats, rather than using their superior speed to break off combat. The presence of the Bf 109 was ignored, and instead of producing a superior monoplane to succeed the I-16, an improved biplane was sought. Polikarpov was instructed to carry out studies to improve the performance of the I-15 and the I-15bis without sacrificing their maneuverability. The new fighter was designated in-house as the I-15ter, with VVS designation I-153. The I-153 design was based on the I-15bis but with a stronger structure and was fitted with a manually retractable undercarriage to reduce drag. The upper wing reverted to the gull design of the original I-15. The four PV-1 7.62mm machine guns of the I-15bis were replaced with faster-firing 7.62mm ShKAS machine guns. Power was provided by a Shvetsov M-62 radial engine, replacing the M-25 of the I-15. The I-153 was of a mixed metal and wood construction. The metal frame has duralumin skinning on the forward fuselage and fabric for the rest. The wings are fabric-covered wood while tail surfaces are fabric-covered duralumin.
The I-153 made its first flight in August 1938. The M-62 engine was not ready at the time and it was powered by a 750-hp M-25 engine instead. Although the prototype failed factory testing, production was allowed to continue in conjunction with the ongoing test and development programme. Tests showed that the I-153 surpassed the performance figures for the I-15bis. In 1939, production finally switched to the M-62-based design. The new engine improved performance at altitude although speed at sea level was virtually unchanged. A speed of 443 km/h at 4,600 m was recorded with a service ceiling of 9,800 m. The figures were actually disappointing and caused the I-153 to fail the state acceptance trials. Production however continues as there was an overriding need to not disrupting production until more advanced fighters could be introduced. Numerous proposals were tested to improve the speed but it was obvious that the biplane had arrived at its limits.
The I-153 (nicknamed
Chaika = gull) entered service in 1938. It saw its first combat during the Nomonhan Incident in 1939. On 7 July 1939, a flight of nine Chaikas was flown with their wheels down, hoping to trick the Japanese into believing that they are I-15s. Just before they entered combat, the wheels were retracted. The Soviets claimed four Ki-27 shot down in this engagement. The Ki-27 was superior to the I-15bis and I-16 but was more evenly matched with the I-153. The Japanese however learnt their lessons and dealt accordingly; as a result the I-153 could only be used in concert with the I-16. 70 I-153 were sent to the Far East and 23 were lost. The I-153 was also used by the Chinese Nationalist Air Force, operating 93 against the Japanese. The I-153's next combat experience was during the Winter War of 1939-1940, suffering losses against the smaller
Suomi Ilmavoimat. Following the war, Finland operated 21 captured I-153s. On the eve of Operation Barbarossa, the I-153 made up one-third of the Soviet fighter strength in the west, with vast numbers destroyed (mostly on the ground) during the first few days of combat. The I-153 remained as a frontline fighter until early 1942, being also used as a ground-attack aircraft.
The Kit
Classic Airframes until its (supposedly temporary) closure a few years back, specializes in producing lesser-known and lesser-modelled aircraft in 1/48 scale. The I-153 kit was released in 1996 and consists of 24 parts moulded in grey plastic, 9 parts in tan resin, 21 PE parts, photo negatives for instrument panel, two vacuum-formed cockpit windscreens and a small decal sheet. There is minimal engraved surface detail (after all, this is a fabric-covered aeroplane) but the fabric effect looks good. The thick plastic parts suffer from some flash and as with many other short run kits, the sprue gates are larger than those of mainstream kits. The second plastic sprue tree was unique, reminding me of a wagon wheel. Decals provide markings for two aircraft: Red 6, 8th Fighter Regiment, Black Sea Fleet and Red 16, Minsk, June 1941.
Construction
As usual with aircraft kits, construction started at the cockpit, which consists mainly of PE and resin parts. The resin parts are well cast and the PE parts very petite. Generally it was a rather straightforward assembly. The PE cockpit 'cage' was fiddly though and got a bit crooked because of my ham-fisted handling. Although fairly straightforward, the instructions are rather vague about placements of certain parts such as the breeches of the machine guns and the instrument panel. And, when working with a short-run kit, the rule 'fit twice, glue once' was applied here to ensure a good fit. And since the instructions are vague, I'm willing to take some liberties, as long as the parts fit! Furthermore, most of the cockpit would be actually hard to see from the outside. As for painting, CA just mentioned 'Dark Grey' for the interior colour so, I decided to use Gunze H317 Dark Gull Grey with details in brown, black and gun metal.
The fuselage halves were then mated together. Once cured, I drilled holes in the fuselage for rigging the model. The wings were then cemented into place and unlike the fuselage halves they went on without a problem. Again holes were drilled for the rigging. The wing struts however presented a bit of a problem as the locating pins did not work as intended. I end up cutting them off and positioned the struts by sight only. To finish building at this stage, the cowling was fitted. CA however moulded all the engine shutters fully closed. It's OK as there is no engine was provided. With hindsight, I think I should have used the extra engine cowling from my Eduard
I-16 as both aircraft are powered by the same engine plus the Eduard kit includes the style of cowling used by the I-153.
Painting and Decaling
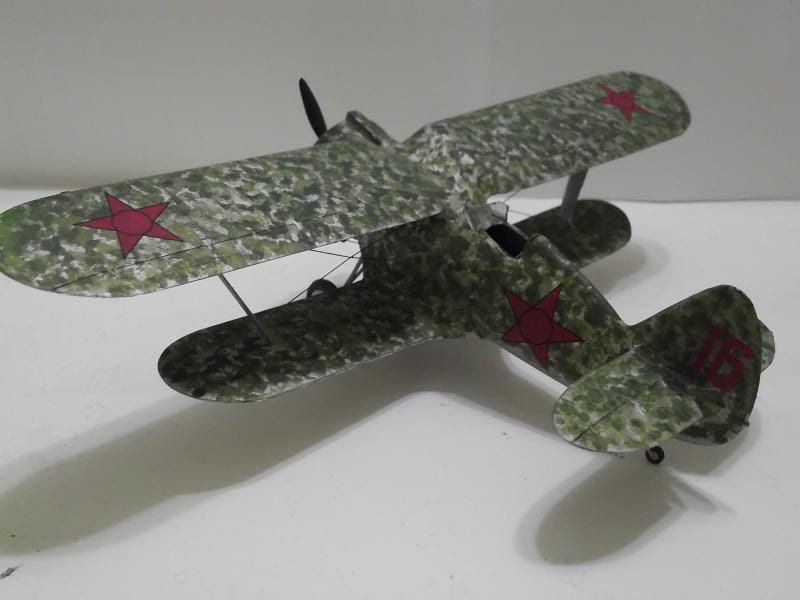
Despite my predilection for colourful aircraft, I decided to finish my I-153 as 'Red 16'. I found a photo of the internet, supposedly of this aircraft wrecked on the ground. The colour is silver overall with splotchy green upper fuselage. Some modelers paint Red 16 in the style of an I-153 restored in New Zealand, which has large green spots over silver fuselage and light blue undersides. I decided to paint the model as in the wartime photo. The model received a coat of Tamiya TS-30 Silver Leaf overall and then, using an old paintbrush I dab XF-5 Flat Green all over the model bar the bottom. The decals were then applied. They are very thin and settled nicely. However the national insignia on the wings were left off until after rigging has been completed. They were then subjected to the usual Mr. Mark Softer treatment.
Finishing
I took a slightly different approach this time by doing the rigging first. I am quite nervous as this was the first time I do any kind of rigging on my models (this kit was built before my CR.42, plus the CR.42 has a simple rigging). I used 1-pound fishing line and using the holes drilled into the fuselage as starting points. The lines were secured into their start points using superglue. Once the glue has cured, the lines were threaded into the holes in the wings. They are pulled taut and a drop of superglue was dropped into the hole. I didn't use accelerator so I have to maintain tension on the rigging wire until the glue set. The excess line was then cut using a new blade and the holes filled with putty and sanded. The paint were retouched and I finally applied the star decals.
The landing gears were next and there isn't any problems here. Finally the windshield was applied. This is truly new territory for me as I have never used vacform canopies. To start with I borrowed a pair of scissors from my wife's sewing kit and carefully cut away excess plastic (BTW Classic Airframes supplied two canopies in case you messed the first one up). The windshield was then painted first and then glued into place. Sludge wash was then applied but I only did it on the control surfaces only while regular wash was done on the engine cowling. The propeller was fixed into place and finally a spray of Flat Clear finishes the build.
Conclusion
As mentioned elsewhere, Classic Airframes' niche is basically 'planes no one else want to kit'. World War 2 was not fought with Bf 109s, Fw 190s, Mustangs, Thunderbolts and Spitfires only and many I-15, I-153, MS.406, Bloch 152, Fiats and Gladiators took up the burden during the early years. Classic Airframes deserve a pat in the back just by filling this niche. As for the kit itself, it exhibits many of the hallmarks of a short-run kit, yet it was surprisingly fairly easy to build. While the rigging scared me at first, it wasn't that hard, mainly due to the actual aircraft's rather minimal rigging in the first place. All in all, a good kit. Shame about CA's announcement that they decided to close shop, apparently for the time being. Hopefully they'll bounce back with new kits!


No comments:
Post a Comment