Historical Background

In mid-1940, the British Army was considering a follow-on cruiser tank design. A specification, including the use of the Ordnance QF 6-pounder gun was drawn up by the Directorate of Tanks and Transport. This led to General Staff specifications A23 for a Churchill Tank-based cruiser tank from Vauxhall, A24 from Nuffield Mechanisation and Aero Ltd based on the Crusader tank and A25 from Birmingham Railway Carriage and Wagon Company (BRCW), also based on the Crusader. At a Tank Board meeting in January 1941, it was decided that as the new tank needed to be in production by early 1942, it should be based on an existing design to avoid the need for prototypes. Six of the Nuffield design was ordered. The Nuffield design was based on the 410 hp Liberty aero engine with an expected top speed of 24 mph. Armour would be 63-70 mm at the front. The schedule had slipped in the meantime and the first tank only began trials in March 1942, with the tank judged unsatisfactory. At the same time, Rolls-Royce's design team was working on a tank engine based on the famous Merlin aero engine. Working with Leyland, they produced the Meteor, which gave a higher power output while having the same size as the Liberty. The lead designer met with BRCW and produced a prototype powered by the Meteor. However Leyland expressed doubts about the Meteor and wanted to manufacture the Liberty instead. By now, the General Staff requirement was changed to A24 Cromwell I from Nuffield, A27L ('Liberty') Cromwell II from Leyland and A27M ('Meteor') Cromwell III from BRCW.

In November 1942, to avoid confusion, A24 was renamed 'Cavalier', A27L 'Centaur' and A27L dropped the 'III' suffix, becoming the Cromwell. The Cavalier was not selected for mass production and those built were used in training and auxiliary roles. The A27 was to start production in November 1942. Rolls-Royce were unable to build any Meteors as they were fully committed in building Merlin, and manufacture was turned over to the Rover Car Company. Since Rover would need time to set up the production lines for the Meteor, the Liberty-engined Centaurs were built first. In January 1943, sufficient Meteor engines were available and production switched to the Cromwell. The Centaur was designed so that it can be fitted with Meteor engine, so although many entered service as they are, others were converted into Cromwells, simply by changing the engine.

The Cromwell used the Christie suspension as with the previous cruisers, with five road wheels per side and with no track return rollers. It has a lower profile than the Sherman although protection level was roughly the same. The Cromwell however was made of flat surfaces which maximises the risk of armour penetration by the more powerful German tank guns, this was not helped by riveted construction used in the early batches of the tank, The armour plate was bolted onto the chassis, with large bosses on the outside on the turret. The first three variants of the Cromwell was armed with the Ordnance QF 6-pounder gun but this was replaced in the Cromwell IV by a Ordnance QF 75 mm gun, essentially the 6-pounder redesigned to fire the US M3 75 mm gun ammunition. The new gun gave better capability against soft targets than the 6-pounder (or for that matter, the 17-pounder) but performance against armour was poor, penetrating only 68 mm of RHA at 500 yards at a 30 degree angle of attack. Two 7.92 mm Besa machine guns formed the secondary armament. One is mounted co-axially with the main gun and another in a gimbal mount on the hull front. A 2-in 'bombthrower' was mounted on the top of the turret.

The Cromwell first saw action in Normandy where it formed the bulk of the 7th Armoured Division (The Desert Rats), specifically the 22nd Armoured Brigade. Because of its low silhouette, it was also used in the armoured reconnaissance regiments of the 11th Armoured Division (2nd Northamptonshire Yeomanry) and the Guards Armoured Division (2nd Battalion of the Welsh Guards). Later on the Cromwell equipped the 10th Mounted Rifle Regiment of the Polish 1st Armoured Division and the three regiments of the 1st (Czechoslovak) Independent Armoured Brigade. The bocage country of Normandy restricted the Cromwell's best asset, its mobility but following the breakout, the Cromwell came on its own. Despite its inferiority in firepower, the tank was generally well-liked by its crews, being reliable and having good peformance, allowing it to outflank and outmaneuver (once in open country) the more ponderous Tiger and Panther tanks. The Cromwell was also used by Portugal, Israel, Finland and Greece post-war.
There were eight variants of the Cromwell with Marks VI and VIII being close-support version, armed with a 95-mm howitzer. The Cromwell was also built with five types of hull with alphabetical designations A to F. The difference was related to the hull crew hatches and engine door arrangement. The Cromwell chassis was also used for other vehicles, most notably the A30 Challenger and the post-war A30 Avenger and FV 4101 Charioteer tanks/self-propelled guns. A total of 3,066 Cromwells were built.
The Kit
Tamiya's Military Miniatures Series Kit No.35221 was released in 1997 and I believe was one of the most welcomed kit at that time. The kit comprises of 165 parts spread over five dark green sprues, one clear sprue, a lower hull tub, two lengths of vinyl tracks, a length of nylon string, nylon mesh, the ubiquitous polycaps plus a decal sheet. The parts are well moulded although to keep up with the Tamiya philosophy, some parts are simplified (plus, after all, this was a 1990s kit) to ease the building process. A commander's figure is included and the clear parts include extras such as bottles and goggles.
Decals provide markings for four vehicles:
1. C Squadron, 5th Royal Tank Regiment, 22nd Armoured Brigade, 7th Armoured Division
2. B Squadron, 2nd Battalion, Welsh Guards Armoured Reconnaissance Regiment, Guards Armoured Division
3. Armoured Observation Post Tank, 5th Royal House* Artillery, 7th Armoured Division (*it should be 'Horse')
4. 'Hela', Division HQ Squadron, 1st Polish Armoured Division
5. 'Taureg II', Division HQ, 11th Armoured Division
Construction
The building steps in the instruction sheet are slightly out of the usual sequence by having you assemble the rear panel first. There wasn't any problem here although I can't help but note the well-executed bolt details. The next construction was the wheels which I skipped, although the wheels were cut off the sprue. The suspension arms were then cemented to the lower hull, together with the front and rear panels. The outer panels were then cemented and the first option was encountered here. The option was that modelers can chose whether to use the external or internal track tensioning system. After pausing for thought, I added parts C26 and C27. Luckily my guess was right, as the external system was used on Cromwells while the internal system was used on Centaurs - the instructions didn't say which is which.

Afterwards I moved on to the upper hull. The upper hull parts were moulded as one piece, which also include the fenders. While normally I would have to fit the wheels and tracks before adding the upper hull, the Cromwell's usage of the Christie suspension plus the fairly generous space between the fender and the top of the road wheels (plus no return rollers) meant that I don't have to. The upper and lower hull were attached together without any problems. The hull machine gun was assembled and placed in position on the front panel. This was followed by the engine deck side panels and all the hatches, which I cemented in the closed position. The storage boxes were assembled and fixed in their positions. The mesh was cut and placed inside its frame. Tamiya do have a PE set for the grilles, but this being the Tamiya of the 1990s, was only available separately. Soon after, I decided to add the Normandy cowl. Even though the instructions mentioned that the mesh should not be attached if the cowl is used, I left it as it was. The mudguards were then cemented but I left the outer panels off at this time.
Finally, it was time to assemble the turret. The gun barrel is a two-part affair and a bit of care is needed in the assembly to avoid visible seam lines. There is also a fairly complete breech assembly. The gun was assembled and mounted onto the front plate of the turret. The turret shell was assembled and mimicking the real tank, the turret armour plates were separate pieces. Once the basic turret was completed, its fittings were then cemented. The commander's hatch was posed open as I intended to use the figure.
Painting and Decaling

For painting, Tamiya suggested that the Cromwell be painted a mixture of 1 part XF-1 Flat Black, 4 parts XF-26 Deep Green and 4 parts XF-52 Dark Earth. However, using research done by Mark Starmer, I painted the Cromwell SCC15 Olive Drab, using Mr. Starmer's suggestion of 5 parts XF-61 Dark Green, 2 parts XF-62 Olive Drab and 2 parts XF-3 Flat Yellow. This mixture is quite dark and it was suggested that a bit more Flat Yellow can be added. I however think I added too much! Once the painting was done, it was time tho choose the markings. After discounting the HQ and OP tanks (as they really weren't in the thick of combat and usually armed with dummy guns), I was left with the Desert Rat and the Welsh Guards options. I almost unhesitatingly chose the latter as they are more 'colourful' with four markings on the lower hull (bridge classification, arms of service, unit designator and divisional insignia). The decals are old, not a problem really, but I neglected to put them back in their plastic packaging, causing the unit designator marking on the right side of the hull and the small star at the back of the turret to disintegrate. I managed to rescue them mostly, and then did an unconvincing repair job using paints. The worst case scenario however was the air ID star on the turret roof. While it still maintained its integrity, its location across the ventilator caused trouble. I used a lot of Mr Mark Softer and also had to retouch it using white paint.
Finishing
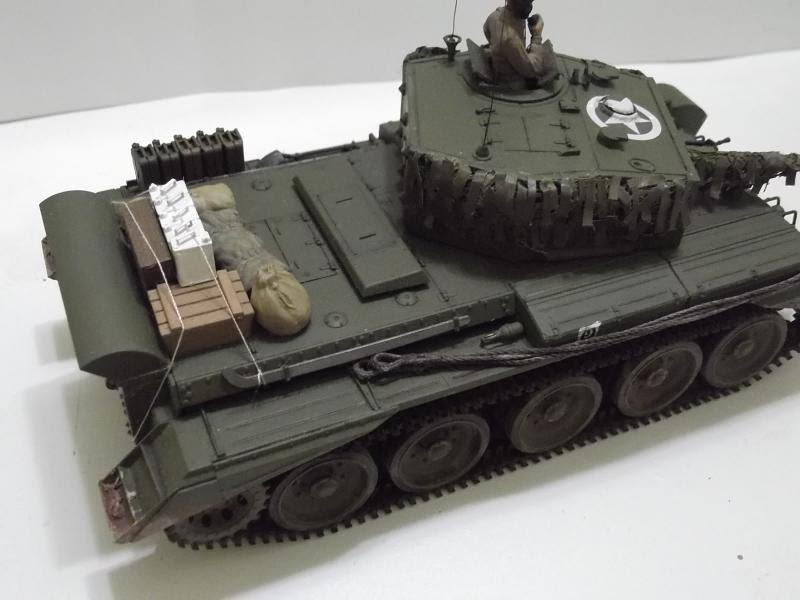
I wanted to try something new with this kit and decided to add camouflage nets (as befits this particular tank's reconnaissance role). While I should use ready-made scale camo nets, I decided to just made them using medical gauze. The gauze were painted first - yes, a messy affair- with olive drab and khaki. The hessian tape strips found on British camo nets were made using Tamiya tapes, also painted OD and khaki. A length of copper wire was tied between the turret's lifting eyes to act as hangers for the net. The gauze was cut into roughly 1 cm square pieces and were hung on the turret and was kept in place using a water-white glue mixture. The net were hung in layers although it looked matted together, without volume. Another group of camo net was placed on the gun barrel. The camo net looks OK from 3 feet away but looked horrendous close-up!

I scratch-build a bracket on the left-hand side fender for fuel can storage using plastic strips. The cans themselves came from Tamiya's Allied Vehicle Accessories Set. On the rear deck I placed 6-pounder ammo boxes and 2-gallons flimsies from Bronco, a generic box from Academy and a rolled tarp, barracks and duffel bags from Tamiya. The jerricans and the ammo boxes were painted in SCC15 Olive Drab and SCC2 Brown while the flimsies were painted white. The bags were painted XF-57 Buff and the tarp was painted XF-49 Khaki. They were tied-up (sort-of) using a thread from my wife's sewing kit. And yes, in real life, with the way I tie them up, they would soon come crashing down when the tank started to move. Weathering was limited to application of Tamiya Weathering Stick and Mig Productions' European Dust pigments. The tank commander uniform was painted a mix of Khaki and Flat Earth instead of Dark Green as per the instructions. Lengths of copper wire was cut, painted Flat Black and placed on the model as radio aerials.
Conclusion
Another fine kit from Tamiya and one of the then-new generation of their kits which upped kit-moulding technology in the 1990s. The fit is good and the kit didn't give any trouble during construction. It's introduction partly filled (at that time) the need for British subjects in a genre awash with panzers and Shermans. The rather low parts count aided in a relatively quick construction, allowing modellers to concentrate their effort elsewhere. It's a relatively old kit which can still stand up to its more recent rivals.


No comments:
Post a Comment