Historical Background
The World War I-vintage FT-17 was the staple of the French armoured force until 1935. But as early as 1926, a plan was drawn to introduce the
char d'accompagnement, a cheap, mass-produced light tank to replace the FT-17. However, the Renault tanks developed to fill the requirement were neither light nor cheap. In 1933, Hotchkiss proposed a solution (which eventually became the H35). But for political purpose, Hotchkiss's solution was turned into the so-called Plan 1933 and the whole of the French armaments industry was invited to submit their proposals in August 1933. Fourteen responded, from small armouries to automotive companies. Renault, the prime French military contractor at the time cannot afford to lose the contract and rushed the prototype. In fact, when the specification was changed on 21 June 1934, to increase armour thickness from 30mm to 40mm, it cannot be implemented by Renault. They submitted the ZM design anyway to the Commission de Vincennes in December 1934. The prototype performed well but was sent back to Renault for additional armour and to mount the APX turret in April 1935. The prototype was still undergoing tests when tension mounted following the German re-armament. This prompted a swift modernisation of the French tank fleet and the ZM was to be put into production. On 29 April 1935, the Commission awarded a contract for 300 R35 (as the ZM was now known) even though the model had not yet been perfected. On 4 June 1936, the first production examples left the factory and were subjected to further extensive tests.

The R35 is of cast construction with the hull consisting of three cast modules bolted together. Maximum hull thickness was 43mm (glacis) and between 30-40mm for the sides, rear and the engine deck. The cast APX-R turret was equipped with a domed rotatable cupola fitted with vertical viewing slits. Of the typical 1930s one-man design, the commander rotated the turret by a hand-crank or using his weight. He was also not always provided with a seat and just stood on the floor of the hull. The turret hatch, when hinged down can also act as the commander's seat. Early batch of R35s were armed with a short Puteaux L/21 SA18 37mm gun and a 7.5mm Chatellerault fortress machinegun. Later vehicles were still equipped with the same gun but with a better sight and have a MAC31 Reibel machinegun fitted. A total of 72 armour-piercing and 58 high-explosive rounds were carried for the main gun and 2,400 for the machinegun. The running gear was based on the AMR35 cavalry tank with five double roadwheels - four in two sets of bogies and a single at the front. Power was provided by a Renault V-4 engine rated at 85hp allowing a road speed of 20km/h and a range of 130km.

Due to deteriorating situation in Europe, 2300 R35 were ordered by 1939. But due to delays by APX regarding the turret, rate of production fell and at the outbreak of war on 3 September 1939, only 975 have been delivered. They, as mentioned above, were intended to replace the FT-17 but the crews need time to retrain and as a consequence, there were still eight battalions of FT-17s in service in May 1940. The R35 also enjoyed some export success with Poland receiving 50, Turkey (100), Yugoslavia (54) and Romania (41). The Poles actually rejected the R35 when two were bought for tests in 1938. They found it unreliable and preferred the Somua S35 instead. However with war becoming more imminent and their own 7TP tanks insufficient, it was decided to order 100 R35s in April 1939 with the first 50 arriving in June of the same year. Most were assigned to the 12th Armoured Battalion and in September 1939 formed part of the 21st Light Tank Battalion. They formed the general reserve of the Polish High Command and defended the so-called Romanian Bridgehead. Following the Soviet invasion on 17 September 1939, the unit was split with 34 tanks withdrawn to Romania and the rest formed the Dubro Operational Group. Romania absorbed the 34 tanks into its own existing fleet of R35s, allowing the 2nd Armoured Regiment to have two tank battalions.
At the start of Operation Fall Gelb on 10 May 1940, France had 900 R35s in service. The R35s were formed into
Groupements de Bataillons de Chars, which were purely armoured formations without other organic components and were intended for close support of the infantry. Despite its role, the R35 can effectively tackle the German Panzer I and II while its armour was proof against the standard German 37mm anti-tank rounds. The R35s equipped the Ie, IIe, IIIe, IVe, Ve, VIIe, VIIIe and IXe Armees and the Armee des Alps. However, when it was shown that the doctrine did not work, 135 R35s of the 2e, 24e and 44e Bataillons de Chars de Combat formed the 4th Division Cuirassee de Reserve on 15 May 1940 while the 40e and 48e BCC reinforced the 2e DCR. Following the fall of France, the majority of the R35s fell into German hands who promptly used 131 of them as Panzerkampfwagen 35R 731(f) and used in garrison duties or driver training. Several others were turned into tank destroyers with the designation 4.7cm Pak(t) auf Panzerkampfwagen 35R (f) ohne Turm. Others have their turret removed and the latter were then placed in the so-called Tobruk bunker. R35-equipped tank units in Morocco and Syria, the 63e and 68e BCC (Syria) and 62 BCC (Morocco) later fought against the Allies during the invasion of Syria and Operation Torch. They were later taken over by the Free French 1e CCC. Other R35s saw service with the Italians, Hungarians and Swiss. The last combat action of the R35 took place in the Middle East in May 1948 when five Syrian tanks attacked a kibbutz at Degania Alef.
The Kit

I can probably say that Hobby Boss is one of the more adventurous mainstream model manufacturers nowadays, producing kits of vehicles that were overlooked by its more illustrious rivals. The R35 was released last year (2014) after the anti-tank version used by the Germans (that is quite abnormal as, like the real vehicles, models of derivatives are usually released after the base vehicle, but anything sporting the Black Cross sells). For a small vehicle, the box is packed with parts - 304 in beige plastic, 72 in light brown plastic (the tracks), 52 brass PE parts, one metal barrel and a small decal sheet. Many of the parts are for the interior, including the engine, transmission and the crew compartment. While the engine and transmission are fairly complete, the fighting compartment lacked the ammo storage racks. The tracks are of the link-and-length type and allow the modeller some quite considerable time-saving. All the parts are nicely moulded. Some of the PE parts however lacked the bend lines and may cause some difficulty. Despite the fact that the R35 was the most numerous French tank, not to mention enjoying some export and foreign usage, the decals provide markings for just two vehicles, one of the French Army and another is in the de rigueur German markings. Both are from that most famous military formation in modeling hobby - 'unknown unit'!
Construction
Like Bronco's Hotchkiss H39, the R35 has a fairly complete interior, including the engine and transmission. However, as I intended to complete this model 'buttoned up', I skipped most of steps 1-4 of the instructions. The rest of the build at this juncture were concerned with the rear panel of the hull, which I also skipped for the time being. The lower hull was then assembled and I only add part B26 to help aligning the walls and strengthening the assembly. I then moved to the rear panel. The two doors on the rear panel did not have good fit and I had to trim the openings for them to have better fit. The mountings for the idler wheels (and also acted as the mount for the towing hooks) and the towing hook were assembled and like the doors, they were also of not perfect fit. The rear panel was then cemented to the lower hull.

Next came one of the tricky (if not the trickiest) part of the build - the suspension. Each of the two-wheel bogies have four brackets made of PE brass (numbered PE-1 and PE-4) while the single-wheel bogies have one PE part (PE-1 in the instructions, although it should be PE-18). The edge of the PE parts need to be bent at right angles; additionally, the inner part (PE-4) need to be bent into a curve. Without a form to bend the curve and without even bend lines, I came to the conclusion that this was next to impossible. However, browsing the internet, I came upon tips given by Matt Ashley of Perth Military Modeling Site - replace the PE with plastic card. The forms were traced on the plastic card and cut. However, the plastic brackets still followed the unbent PE form and need to be trimmed. Knowing how bad I am with blades, I decided to tack them on the OUTSIDE surface of the bogie. It will look horrible, I know but it would have to do. The numerous parts of the bogies also allow unwanted movements during assembly and I have to ensure that everything aligns,

Once completed the bogies were set aside and I moved on to the upper hull. While dry-fitting the single-piece upper hull, I found that while the rear half fitted fairly nicely, I have to flex the lower hull walls a bit in order for the front half to slid into place. Once done, there are however gaps between the glacis plate the hull sides; there is also a seam on the front of glacis plate - they were dealt with the usual way. The transmission cover and the driver's hatch was then cemented in the closed position. A couple of PE parts were superglued to the transmission cover with part PE-5 (the grab handle) being difficult to bend because of the lack of bending lines. Then it was time to fix those bogies to the hull. Again I faced some difficulties here as the fit between the bogies and the hull were rather loose and that the pegs were too long (or the holes too shallow). I ended up cutting a bit of the pegs off. It helped a bit although in the end I had to use superglue to fix the bogies to the hull. There were alternate idler wheels (opened or closed holes) and it's entirely up to the modeler to choose. However the wheel is a three-piece affair and the outer rims are separate but without any locating pins. So care again have to be exercised as the wheels have perforations that need to be aligned.
Finally, the turret is assembled. The interior detail consists of just the gun breech. While the drawings show the presence of the elevating wheel, it wasn't present on the sprues. The breech assembly were straightforward although I have to carve away excess plastic for a good fit between the breech and the gun cradle. Two small brackets were cemented to act as trunnions for the gun - the left-hand bracket was a bit of a challenge because of its location. The rear hatch is designed to be moveable although the hinge pins were too long and need to be trimmed a bit. The vision ports and the cupola were then cemented and this was followed by the lower turret ring. The very small turret lifting rings, and the even smaller ones on the cupola was then cemented, burrs and all. Once the cement has dried, I cut off the burrs - it was easier this way.
Painting and Decaling
As mentioned before, Hobby Boss only provided two marking schemes - one French, the other German with no indication as to which unit the tanks belong. The box art however shows a marking not included in the kit! Anyway, I chose the French scheme. The instructions have you paint it a camouflage colour of XF-64 Red Brown and XF-61 Dark Green. Rather simple-mindedly, referring to the Tamiya
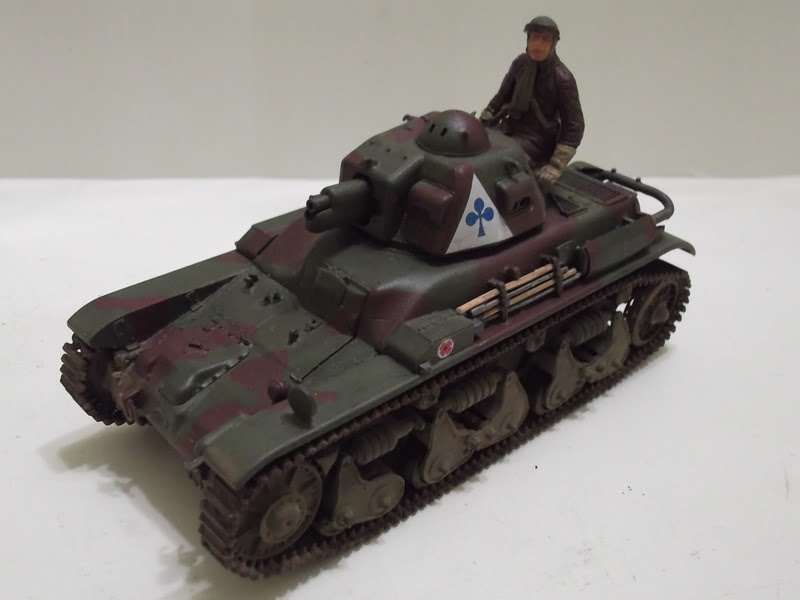
Char B1bis instructions and some photos of built-up models, I decided that the suggested colours were 'wrong' and used XF-9 Hull Red and XF-58 Olive Green. There were just four decals to be applied - one on each side of the hull and another two for the turret sides. And as mentioned before, there is no indication as to which unit the markings belong and the best I can make it out is that this particular tank belongs to the 4th platoon (club symbol) of the 1st Company (blue) of an anonymous regiment.
Finishing

While I'm comfortable with the link-and-length tracks, the rather wobbly assembly of the suspension filled me with a bit of trepidation. And I found that the return rollers sit too close to the hull and therefore will not align with the wheels. The original stubs were removed and I drilled holes into the return rollers. A new stub made from 1mm rod was made for each wheel and they were cut so that they align with the rest of the wheels. My usual method for assembling separate/link-and-length was by starting at the bottom and make my way to the top. This however resulted in a rather misaligned assembly for the right-hand side track. I change the method by starting with the top run first for the left-hand side track and it did have a better appearance. However, the left idler was a bit lower when compared with the right side. Also the forward part of the upper track run somehow warped, resulting in a gravity-defying upward curve. The cement has set however by this time and I just have to live with it. Oh well! The tracks were then washed with the AK Interactive track wash solution.
The rest of the assembly was concerned with the differently-painted parts and also the track guards. While the left-hand track guard fit flawlessly, the right-hand side did not fit well so I trimmed a bit of the locating stub. Afterwards, it also fit nicely. The exhaust system was painted Burnt Iron and enhanced with a bit of Tamiya Weathering Master Rust. The PE heat shield for the muffler caused problem as it is without bending lines engraved (furthermore, I do not have any 'proper' PE bending gizmos). So I'll pretend that the shield was dented when the driver backed the tank into something! The model then received a very thin wash of XF-57 Buff and followed by a pinwash of the usual-black-brown paint mix.
As I have Miniart's French Tank Crew figure set in my stash, I decided to use one of them and since the turret hatch was made operable, I chose the sitting commander's figure. Test fitting however showed that he can't fit into the turret properly so I have to do what's necessary: amputate his legs below the knees! To paint him, instead of using Miniart's instructions, I used the Tamiya one (again from the Char B1bis kit). I also left the googles off.
Conclusion
In a nutshell, it was actually a nice kit and in general I do not face fit problems. The PE is however a bit of a letdown as it was fairly thick and lack folding lines, resulting in its substition with plastic sheet for some components of the model. Another letdown was the minimalist approach to the markings (and colour scheme), a shame really as the R35, being the most numerous French tank, came in many colour schemes, most of them very catchy indeed. Having said that, I still recommend this kit.


No comments:
Post a Comment