Saturday, 28 December 2013

Lightning Over Remagen


Historical Background
Late in 1940, the Reichluftfahrtministerium opened a tender for a jet-propelled reconaissnce aircraft with a range of 2,156km (1,340m). Only one company replied : Arado Flugzeugwerke. They offered their E.370 design,  a high-winged aircraft with a Junkers Jumo 004 engine under each wing. In order to maximise fuel capacity and to keep weight down, the aircraft did not have conventional landing gear. Instead, the aircraft were to take-off from a jettisonable, three-wheeled trolley and land on three retractable skids. Arado's estimated range for their design however, fell short of RLM's but the latter liked the design and ordered two prototypes as the Ar 234. Problems with the Jumo 004 engine delayed flight tests. Prototype V1 only flew on 15 June 1943 and on 2 August 1944, prototype V7 flew the first reconnaissance mission by a jet aircraft.

Earlier in July, having seen the promise of the design, the RLM ordered two prototypes of a schnellbomber version, known as Ar 234B. Since the aircraft was very slender and the interior was filled with fuel tanks, the bombload had to be carried externally on racks. The external bombload, coupled with the prospect of immobile aircraft littering the airfields post-mission made the landing skids system impractical. The B version was modified to have fully retractable tricycle landing gear, resulting in the deletion of the mid-fuselage fuel tank and a slight enlargement of the same area. Also the proposed rearward firing defensive gun system was abandoned in production aircraft although the periscope sighting system was retained for rearward vision. Normal bombload consisted of two 500kg (1,100lb) bombs suspended below the engines or a single 1,000kg (2,200lb) bomb semi-recessed underneath the fuselage. Maximum bombload was 1,500kg (3,310lb).

Production was slow however but the prototypes were used operationally in the reconnaissance role with Sonderkommando Sperling (earlier known as Sonderkommando Gotz), Sonderkommando Hecht and Sonderkommando Sommer. Cruising at 740km/h at over 9,100m altitude, these flights were mainly undetected by the Allies. The bomber version were however limited to 668km/h while carrying their load - yet they were still faster than any other Luftwaffe's bombers still in service. The bomber version was only operated by Kampfgeschwader 76, which began partial conversion to the type in June 1944. KG76 undertook the first bombing missions by jet aircraft when their aircraft attack rail targets in Namur, Belgium on 24 December 1944 and continue to attack targets in Belgium and Holland until early 1945. The unit was also involved in attacks against the Allied bridgehead at Remagen, specifically the Ludendorff Bridge across the Rhine. The unit continue to fly against both Western Allies and Soviet armies, flying until 15 April 1945. The unit surrendered to the British on 8 May 1945.

A pair of Ar 234B-2s were converted to act as prototypes for night fighters. Dubbed Natchigall (nightingale), the aircraft was fitted with FuG 218 Neptun radar with a pair of MG151/20 20mm cannon and a twin 20mm cannon gun pod in ventral position. The radar operator was located in a cramped compartment in the rear fuselage.Two aircraft were converted and served with Kommando Bonow. A number of other variants were proposed, including the four-engined 'C', which was the only other variant that made physical form before the end of the war. In all, only 210 aircraft were built.

The Kit
For years, the only available Arado Ar 234 in 1/48 scale was from Hobbycraft. The kit was OK but was underscale. In 2002, Hasegawa came up with a new injection-moulded kit of the Blitz. I consider it to be one of the important aircraft in aerial warfare, so the Hasegawa kit became one of my 'I Want YOU In My Collection' aircraft. Having said that, I only managed to buy the kit in August 2013! The kit was moulded to the usual Hasegawa standards. The parts spread over eight sprues, with the entire nose moulded in clear plastic.Clear plastic was also used to mould the panel for recon camera windows; there were also parts for the recon cameras (both of which are irrelevant for this kit). Decals were provided for three aircraft : 'F1+GS' from 8./KG76, 'F1+AS' flown by Oberfelwebel Josef Bruchlos, also from 8./KG76 and 'F1+MT' from 9./KG76 flown by Hauptmann Josef Regler. The decals look OK. However there were no decals for the stencils.

Construction
As there was a gap of 11 years between release and my build, I can rely on build articles on the internet to avoid the pitfalls with this kit. As with any other model aircraft kits, I started with the cockpit. The cockpit parts were painted Tamiya XF-63 German Grey with touches of XF-64 Red Brown to imitate leather parts. The entire cockpit then look quite drab so I added XF-2 Flat White to some dials, especially those on the bombsight. The rest of the instruments came in the shape of decals. Once the basic pilot's office was completed, I attached the rudder pedals underneath the cockpit floor. The instructions have you assemble the front fuselage next; however I deviated by assembling the fuselage first. Despite being the bomber version, Hasegawa included steps to assemble the recon cameras but I skipped them entirely (the instructions even tell you the optional nature of the cameras). I usually did not attach landing gears early in the build, however after studying the instructions and dry-fitting, I decided that it would be better if I followed the instructions. The main landing gears and the wheel wells were first painted Tamiya XF-22 RLM grey. They were then assembled and attached to their locations on the main fuselage. The wheels and gear doors were however left off until later. The fuselage halves were then mated together, along with the underfuselage bomb recess.


Next I assembled the wings. Forewarned by the online build reviews, I cut all the locating pins and aligned the wing halves 'manually, so to speak. Whilst this resulted in perfectly aligned wing halves, it meant a slightly asymmetric hole for the pitot tube. No problem though, just a dab of filler and later re-boring the hole set things back in motion. The tailplanes went up next although I did not attch the elevator horns at this stage. I the returned to the front fuselage. Being of a tricycle landing gear configuration, the model of the Blitz is vulnerable to tail sitting and Hasegawa recommended that 20g of weight to be put in the space behind the cockpit bulkhead. I ran out of fishing weights and I end up using plasticene and since there is no way I can measure 20 grams of weight, I used the tied and tested method of balancing the model on my finger!

Then it is time to attach the bulkhead. As it is, the bulkhead cannot fit into its slot, so some judicious sanding and dry-fitting were needed. The assembled cockpit were then slotted into place. Next, the cockpit enclosure were put into place. Extra care were needed here as the fit was not great plus the need to avoid glue smears on the clear parts. I originally wanted to add some wiring to the back of the instrument panel and control pedals as the design of the Ar 234 makes them highly visible. In the end I didn't do it due to lack of suitable copper wires. The engines were then assembled but I left them off the wings to ease painting. The clear parts were then masked off. The bomb and the RATO gear were assembled but, together with the smaller bits, were left off until after painting.

Painting and Decaling
Ar 234s were painted in late war camouflage of RLM 81 Braunviolett and RLM82 Lichtgrun upper colours and RLM 76 Lichtblau for the bottom. I used Tamiya XF-5 Flat Green for RLM 82 and Gunze Sangyo acrylic for RLM 81 and RLM 76. The camouflage pattern is of the hard-edged, geometric shape: I used Tamiya tape to mask the pattern for painting. It should also be noted that the three marking options have different patterns, so the decision to build which marking had to be made prior to painting. I chose 'F1+AS', the aircraft used by Oberfelwebel Josef Bruchlos to attack the Ludendorff Bridge. The aircraft, together with Obfw. Bruchlos went missing after the attack. The unpainted (on the real aircraft) portion at the rear of the engine nacelles were painted Burnt Iron. The cockpit framing was painted Tamiya X-18 Semi-Gloss Black. Hasegawa suggested that the periscope is to be painted RLM66, however looking at available photos, it looks like the periscope is painted the surrounding external colour.

Once the paint was dry, it was time for the decals. The decals work nicely and went down well with Mr Mark Softer. There were no data stencil decals however. The RATO gear was painted silver with the parachute pack painted XF55 Deck Tan and XF57 Buff;  the relevant decals were then applied. Then it was time to add the remaining parts.

Finishing
I started with the main gear wheels and then followed by the assembly of the nose gear. Once the glue was set, I put the model on its 'feet' for the first time and apparently I put enough weight (perhaps more than enough) to avoid a tail-sitting stance. The gear doors were next and these were followed by the engine pods. The ADF antenna were next, but I decided not to paint it as I do not have a small enough brush to paint the tiny ridges plus it still looks good in its unpainted stage. The large bomb was painted RLM76 but I vary the tone, just to differentiate it from the underside RLM76. The RATO pack went on next - I found that their mountings were quite fiddly to assemble. Finally, tiny parts such as lights, control horns and various aerials were attached. I did not attach the auxiliary fuel tanks however, just the sway braces. Finally the model was subjected to a sludge wash and a coat of flat clear.

Conclusion
As I mentioned before, the Hasegawa offering was one of my 'Most Wanted' kits. Granted it wasn't perfect (the oversized bulkhead and mismatched wing halves being the highlight), but relative ease in building it compensates for that. A pair of smaller bombs should also made nice alternatives to the single large bomb.  

Monday, 23 September 2013

Eagle Owl : Night Defender of The Reich


Historical Background
The He 219 had its genesis in Heinkel's P.1055 high-speed bomber project. It was an advanced design, incorporating pressurised cockpit, ejection seats, tricycle landing gear and remote-controlled defensive armament. The P.1055 was to be accompanied by a night-fighter variant, the P.1056, armed with four 20mm cannons. However, the RLM considered the aircraft as 'too risky' and rejected Heinkel's proposal. At the same time however, Kammhuber was looking for a new night fighter for his command. Heinkel responded by offering a redesigned P.1055 as the P.1060. This was of similar layout, but smaller and powered by the largest mass-produced liquid-cooled engine in Germany, the Daimler-Benz DB603 with annular radiators similar to Jumo 211 engines. DB603 was not noted for altitude performance, but Daimler offered the 'G' version to address the problem. Heinkel, using their own funds, submitted their proposal to RLM in January 1942 but was rejected in favour of Ju 88 and Me 210-based designs. Construction of the prototype began in February 1942 but suffered a serious setback a month later when Daimler was unable to get the engine ready in time. The prototype eventually flew on 6 November 1942 with the 'C' version of the DB603. Kammhuber was so impressed when he saw the prototype and ordered the He 219 into production - to the fury of Milch. The aircraft however had yaw/roll stability problems but were corrected by lengthening the fuselage and enlarging the tails. The rear-facing guns were deleted and forward-firing armament was increased to six 20mm cannons (two in wing roots and four in a ventral gunpack). Radar equipment was UHF-band FuG-212 Lichtenstein C-1.

In March 1943, the P.1060, now known as He 219 Uhu (Eagle Owl) defeated rival designs from Dornier and Junkers. The Heinkel was unique, being the first operational aircraft to be fitted with ejection seats. Pre-production prototypes were ordered as Heinkel He 219A-0 and in June 1943, three prototypes were  sent to front-line units for operational testing. On the night of 11-12 June 1943, Major Werner Streib of Nachtjagdgeschwader 1 flew prototype V9 and claimed five RAF night bombers. He however crashed the prototype upon landing at NJG1's base at Venlo. Despite this success, Milch kept trying to have the programme killed, enraging Kammhuber. This resulted in the (verbal) fighting between the two and led to Kammhuber's transfer to Norway, commanding Luftflotte 5. Work however continued and the first production model, the A-2 was equipped with longer nacelles carrying extra fuel tanks, VHF-band FuG 220 Lichtenstein SN-2 radar set and Rüstsatz R1 kit featuring two 30mm cannon in Schräge Musik installation which allowed German night fighters to attack their targets from below. With the departure of Milch  in mid-1944, the RLM gave greater priority to the He 219 (also because the Ju 388 and Ta 154 were nowhere near series production). The final variant was the A-7, powered with improved DB603E engines and was armed with two MG151/20 20mm cannons in the wing roots, two MG151/20 20mm cannons in the ventral gunpack and two 30mm MK108 in the Schräge Musik installation.

Despite the need, the programme was marred by political rivalries between Generalleutnant Josef Kammhuber, chief of the German night fighter command, Ernst Heinkel, the manufacturer and Generalfeldmarschall Erhard Milch who was responsible for aircraft production at the Reichluftfahrtministerium (RLM - German Aviation Ministry). It was also complicated and expensive, further limiting the number of aircraft produced.  Only 294 were built. The Uhu served mainly with Nachtjagdgeschwader 1. They had some successes against the RAF bomber streams but increasingly suffered from losses at the hands of night-fighting de Havilland Mosquitos.

The Kit
Tamiya released this kit in 1997, answering the calls from modellers who wanted a model of (probably) the Luftwaffe's best night fighter of World War 2. The kit comes in five medium grey sprue trees, a small clear sprue containing the cockpit transparencies, gunsight, ADF 'window' and the extreme tail, a small decal sheet and most impressively, a nose ballast. The nose ballast helps the model to stay on its three points and also forming the nose wheel well and part of the cockpit. There is an option for opened or closed cowl flaps and dropped flaps. Details are finely engraved overall although the exhaust stacks look crude. They should not be a problem since they would be covered by the nicely detailed exhaust shrouds. Two styrene tubes, acting as spars, help in giving the long wing some strength. The most delicate parts would be the FuG 220 radar aerials - they are thin and need careful separation from the runners. Actually one can backdate the kit simply by changing the angle of the dipole aerials. Decals are provided for three planes : 'TH', 1./NJG1 May 1945; 'G9+CH', 1./NJG1, May 1945 and 'D5+CL', 3. NJG3, May 1945.

Construction
As always, construction started at the cockpit. Since Tamiya made the nose ballast as part of the cockpit /  nosewheel well, I primed it using Tamiya Surface Primer. The various parts that made the cockpit were then painted Tamiya XF-63 German Grey. However, Tamiya did not specify the colours for various knobs and switches, save for a few small areas in red, making the cockpit drab and featureless. Using some common sense and what few photos of the interior of the He 219, I painted most of the switches white while the headrest were painted XF-68 NATO Brown. Tamiya provided decals for seat belts, which should really be substituted with PE parts. I used them anyway but refrain from using decal softening agent as they will make the belts look painted on! The cockpit sub-assembly was then glued to the ballast using superglue and the cockpit halves can be mated. Despite earlier dry fitting, I can't clamp the extreme nose properly, leading to fit problems later.

The next step is concerned with fitting the nose landing gear. I however skipped this step as the lanky gear could interfere with subsequent steps. So I jumped to wing assembly. The kit wings consist of upper and lower halves, the engine nacelles and the main wheel wells. Speaking about the last, I believe Tamiya missed the rear bulkhead and one can see all the way to the ends of the nacelles. Any modeler would box-in the wells using plastic sheet but, being me, I just left them as they were. The wheel wells were then painted Tamiya XF-22 RLM Grey. The flaps were separate and while I glued the halves together, they remain unattached until later. Next I assembled the engine halves; while they match perfectly, assembling them to the wings produced a step in the joint which I sanded off. The radiator grills were glued to the front of the engine nacelles - I chose the closed flap option. The landing gears were assembled and painted XF-22 rather than TS-48 (RLM66 Schwarzgrau) as I believe RLM02 Grau was still being used even late in the war. The landing gears were however left off until later.

Following that I assembled the tail. The endplates were butt-jointed to the tail and some eyeballing were needed to ensure proper alignment. Then the MK108 Schräge Musik installation were placed in their compartment. I did not paint the interior as it would be closed and that only the cannon muzzles were visible. The wings were then mated to the fuselage. The spars did help in ensuring proper alignment and also adding strength to the rather long wings. I then return to the front fuselage, attaching the nose and the rather fragile Lichtenstein SN-2 aerial bases. The aircraft I modeled was equipped with Schräge Musik and according the sources I read on the internet, aircraft so equipped were provided with a second Revi 16B/G gunsight on the canopy, between the two headrests with the reflector glass slightly in front of the pilot's head. I used a discarded sight from a previous built; I however did not add the reflector glass. Since I intend to spray paint the model, I attach the canopy parts and masked them off.

Painting and Decaling
In general, the Luftwaffe's night fighters were painted RLM76 Lichtblau with a mottling of RLM75 Grauviolett. Tamiya provided three marking options: two with RLM75/76 and another ('TH') also in 75/76 but with the undersurfaces in RLM22 Schwarz. The last option looks sinister with its black undersurfaces but I prefer something with a little splash of colour so I chose 'D5+CL'. To paint the 75/76 pattern, I first paint the relevant parts of the model RLM75 using Tamiya AS4 Gray Violet. When dry, I placed bits of Blu-Tack to act as masks on the corresponding parts. Admittedly the pattern did not match the pattern in the instruction sheet but it did look good enough for me. The process was also tedious and it took me more than a week to finish and I sometimes did it in front of TV. Once done, I sprayed Tamiya AS5 Light Blue all over the model. The Blu-Tack can then be removed, revealing Grauviolett pattern among the Lichtblau. However, I can't get a soft edge between the colours, mostly.  The exhaust stubs were painted Burnt Iron.

The decals went on next. Again, after looking at other resources, I found out that Tamiya made a rather fundamental mistake. They had the Werknummer for D5+CL as '310188' but actually it was '310189'! There is no alternate number decal for me so 310188 it would be! The decals were however quite all right and respond well to Mr Mark Softer. The still loose parts were also painted at this stage. Tamiya suggested X-18 Semi-Gloss Black for the flame dampers but I painted them XF-69 NATO Black which was followed with an application of Tamiya Weathering Master 'Rust'. Without thinking I almost painted the prop blades black but consulting the instruction sheet, they were painted XF-27 Black Green. The Peil G6 DF aerial were painted silver. With my failing eyesight I should have painted the part entirely in silver and then removing the paint from the raised areas.

Finishing 
The loose parts can now be glued onto the model. I started from the rear by adding the rear aerials for the FuG 220 radar and the aerials for the FuG16ZY radio. As for the FuBI 2F blind landing instrument antenna, I read somewhere that Tamiya got it wrong - it should be of the 'towel rack' configuration rather than the blade supplied in the kit. I have the materials to fabricate the 'towel rack' but decided to use the kit antenna to save time. The Peil G6 slots easily into its recess on the upper fuselage; so is the cover for the searchlights on the left wing. Finally it was the turn for the most vulnerable parts, the forward aerials for the FuG 220 radar. Clean-up of the parts (including the rear aerial of course) was not tedious but care has to be taken so that the frail parts do not break on their sprue or while cleaning up the remains of the runner. Then I run a 2B pencil along the panel lines and finally a spray of Tamiya TS-79 Flat Clear ends the build.

Conclusion
As usual Tamiya has come up with the goods which enhanced their reputation further. There were hardly any hiccup with the fit of the kit and I believe the difficulties I face at the front fuselage was entirely caused by me. The Uhu was one of the Luftwaffe's most advanced aircraft towards the end of World War 2. Despite that, kit manufacturers generally shunned it off and thanks to Tamiya we can have a 1/48 kit of this outstanding aircraft.

Saturday, 31 August 2013

Evo : Gen-X


Background
Mitsubishi Heavy Industries, famed for its aero engines and aircraft during the 1930s and the 1940s (especially the A6M Zero), was also known for manufacturing land vehicles. From the 1930s till the end of World War 2, Mitsubishi concentrated on the production of  aircraft, machinery, railroad cars and ships but following the end of the war, it returned to manufacturing motor vehicles. One of its range of family cars is the Lancer, first introduced in 1973. As of 2013, it is now in its eighth generation, first unveiled at the Detroit Motor Show in 2005. The Lancer has a high-performance sports variant, known as Mitsubishi Lancer Evolution. Like the baseline Lancer, the Evo, as it is colloquially known, has gone through evolution (pardon the pun), now in its tenth generation. Each successive generation has greater power than the earlier incarnation. The Lancer Evolution X is powered by a 1,998cc 4B11T GEMA engine. Power and torque depend on the market, but at least with 276hp. The car was offered in either the semi-automatic six-speed SST twin-clutch transmission or five-speed manual transmission. It also has full-time four wheel drive system called S-AWC. 0-60 acceleration is between 4.5 to 4.7 seconds. There are a number of packages available to customers which includes specialised tuning and bodykits.

The Evo was originally intended only for Japanese markets but demand through the so-called grey market made it available around the world. It has also won accolades from the international motoring press.

The Kit
And now, for something different. All through my modeling life, I have never done 'civvies' save for two Tamiya 1/24 cars several years ago : a Honda NSX and a Mitsubishi Lancer Evolution VI at the request of my beloved wife. Now I have a new 'customer' requesting a build : my 5-year old son whom despite his age, has a crush on the eighth generation Lancer. He kept asking when I'm going to build a car model for him and when I went to Hobby HQ during the Aidil Fitri holidays, he got his wish. Right in front of the entrance were a number of Aoshima 1/24 car kits and at the top of the pile was a C-West (a Japanese car accessory/customiser outfit) Lancer Evo X. He went straight for it and there goes my P-38 Lightning! (I still managed to get myself a Hasegawa 1/48 Arado Ar 234B-2 plus some modeling material). The kit comes in a sturdy box and 11 sprue trees - some in white and the rest in black and chrome plated. The body and chassis were respectively cast as a whole. The rear lights are moulded in amber and clear red plastic, removing the need to paint them. There is also painting masks for the front and rear windshields (but none for the windows). Tyres were moulded in vinyl and a wire mesh was provided. A small decal sheet rounded up the kit. The kit is a kerbside model so there is nothing underneath the bonnet.

Construction
As usual, construction starts with the cockpitlanding gears, I mean the chassis. Before assembling the front and rear axles, I painted the brake calipers Tamiya X-7 Red and when dry apply the manufacturer's decals on them which was followed by the usual Mr Mark Softer treatment. Attaching the suspension to the chassis was easy for the rear one as it came as a single part (with separate brake discs). The front one was a bit fiddly as the left and right suspension was connected by a single shaft and the whole assembly cannot be glued so that the front wheels can be posed. It went OK in the end once the front bottom plate was in place. Next I glued the exhausts into place. On hindsight, I should have bought Gunze Metal Colours Chrome Silver as the chrome plating were sanded off at the sprue attachment point. And like building my aircraft models, the wheels were left off until later.

Next, assembly of the interior. I started off with the dashboard. I did not paint it, save for a full-width panel which was painted a mixture of XF-1 Black and X-11 Silver. Earlier on, I decided to build this model as a SST semi-auto version so the relevant parts were used such as the steering-mounted gear shift 'paddles', the gear stick and the clutch pedal-less, uh, pedal mounts. The silver trim on the steering wheel and the shift stick were painted Gunze 8 Silver. The front seats came in two halves but I'm not sure whether the real seats were seamless or not at the sides. Then decals were applied for the instrument panel, the Mitsubishi logo on the steering wheel and the manufacturer's name on the front seats (they're Recaro by the way). The dashboard seats, the gear stick and the handbrake were then glued to their places on the interior floor. This was followed by cementing the doors, making a cockpit-tub like appearance.

Attention was then turned to the exterior. I cut all the exterior part off their sprues and spray-painted them the body colour (more on this later). The front and rear bumpers has parts in black, which was painted X-18 Semi-Gloss Black. For the front bumper, a pair of canards were fitted to the corners; it should be painted black, but I left them in the body colour. The instructions have you cut the supplied mesh as covers for the openings at the lower bumper edges - but leaving the large grills uncovered. I checked the box-art and the internet for the photos of the real vehicle and found that the grills were covered by mesh. No problems here, I simply use the rest of the supplied mesh. Fit of the bumper to the body however was not good, I have to cut off the placement tabs and align the parts visually. The rest of the parts less the side mirrors were glued in place. However, I choose the street version bonnet included in this kit. The coloured rear mounted lights were very useful as they removed the need to paint clear parts - something I'm really bad at.  The last parts fitted were the wing spoilers (which I painted X-18 Semi-Gloss Black), the radio aerial and the 'glass' for the lights.

Painting and Decaling
The way Aoshima engineered this kit, you really only have to paint the front grill, the bottom of the rear bumper, window edges and the interior of some light fittings - the rest were moulded in their respective colours. However, being a kit of a commercially available car, I decided to (at the request of my son) paint it Metallic Red. Tamiya TS-18 were sprayed all over the exterior with the black-painted parts masked off. Later however, I realised that Aoshima had erred in its instructions - the vents (or whatever it is called) behind the front wheel well should be painted black. I have to mask off the surrounding areas and apply Tamiya X-18 on the vents. Then, the decals were applied. Unlike airplane models with a fairly large number of decals (especially modern planes), there were just a few for a customised motor-car (and even fewer for factory-standard ones). The instructions suggests that modelers should either paint the raised Mirsubishi logo on the boot silver or use the supplied decal. I painted the logo and once again, it would be better using chrome silver rather than the straight silver. The external parts were then sprayed semi-gloss clear (yes, gloss clear would be most appropriate) to seal everything.

Finishing
The cockpit transparencies....Ok, windows and windshields can now be fitted. But first I painted the sealants on the front and rear windshields - Aoshima provided a pre-cut painting masks to help painting the sealants.The transparencies, which was moulded as a whole was then glued to the underside of the roof. Before placing the body to the chassis, I glued the rear view mirror in its place. The body and the chassis were then mated, followed by the side mirrors. The mirror parts were cleverly plated with chrome, so they nicely imitate the reflecting surface. The wipers were next and finally followed by the wheels. my son was very delighted and I have to remind him that this Evo is definitely NOT a toy!

Conclusion
Building a car model is not really an undiscovered territory for me as I have done a couple before. However the approach is slightly different from building aircraft models (or for that matter, military vehicles). For one thing, everything's glossy, reducing the margin for error and you can't use weathering to mask any. Still the low parts count and the fact that the plastic were mostly moulded in their 'right' colours shortened the build and I did enjoy the more relaxed pace. Who knows, there might be more car models by me?

Saturday, 27 July 2013

Big Jug In Italy


Background
The P-47 was developed from Republic's earlier P-43 Lancer and (as Seversky Aircraft Company), the P-35. The P-43 had a short production run and Republic worked on a better aircarft, designated P-44 rocket and another aircraft designated the AP-10. The latter was a lightweight fighter powered by a liquid-cooled Allison V-1710 engine and armed with eight 12.7mm machine guns. The US Army Air Corps took interest in the project and gave it the designation XP-47. With the war escalating in Europe in Spring 1940, both Republic and the USAAC concluded that both the XP-44 and XP-47 were inferior to German fighters and Republic unsuccessfully attempted to improve the design as XP-47A. Alexander Kartveli, Republic's aircraft designer however came up with an all-new design which the USAAC ordered in September 1940 as the XP-47B.

The XP-47B was larger than the original XP-47, with an empty weight of 9,900lb. It was powered by the air-cooled Pratt & Whitney R-2800 Double Wasp engine driving a Curtiss Electric propeller 3.7m in diameter. Rather than close-cowling the engine, Kartveli opted a rather large, 'horse-collar'-shaped ellipse. The cowling admitted cooling air for the engine, oil coolers and the turbosupercharger intercooler system. The complicated system, along with its ducts gave the XP-47B a deep fuselage and the wings mounted relatively high. It was armed with eight 12.7mm Browning M2 machine guns in the wings. The P-47B however had a number of problems and as a  result, only 171 were ordered. The USAAF however considered that the P-47 was eorthwhile and ordered 602 of the improved P-47C, which started delivery in September 1942. With most of the troubles gone, the 56th Fighter Group with their P-47s was sent to Europe to join the Eighth Air Force.

Refinements of the P-47 continued with the P-47D, which was also the most-produced variant with 12,602 built. The 'D' were built in evolving production blocks, each incoroprating subtle changes from the earlier ones. Beginning from Block 22, larger-blade propellers were installed with the original Farmingdale, Long Island plant (whose aircraft were identified with the 'RE' suffix after the block number) using 4.01m diameter Hamilton Standard prop and the second plant at Evansville, Indiana ('RA' suffix) using a 3.96m diameter Curtiss Electric prop. Up to this block, all Thunderbolts were of the 'razorback' canopy configuration with a tall fuselage spine behind the pilot, resulting in a 20d blind spot to the rear. To overcome this problem, the RAF (which also used the Thunderbolt) devised the so-called 'bubble canopy' for its Hawker Typhoons. The Americans took note of this and along with increased fuel capacity, resulted in Block 25 of the P-47D. The cutting of the spine however resulted in yaw instability and a dorsal fin extension was fitted to Block 40 aircraft. Two other versions saw service during the war - the 'hot rod' P-47M and the long-range P-47N, built specifically for the Pacific theatre.

The P-47, nicknamed 'Jug' because of its fuselage's similarity to a milk jug, took their first combat mission on 10 March 1943. It scored it's first kill when Major Don Blakeslee of the 4th Fighter Group shot down a Fw 190 on 15 April 1943. Despite being replaced as the primary escort fighter by the P-51 Mustang, the Jugs still claimed 3,752 air-to-air kills. During the course of the war, they gradually became the most important USAAF ground-attack aircraft, armed with the built-in machine guns, 500lb or 1,000lb bombs, and 4.5in and 5in HVARs. Jug pilots claimed the destruction of 86,000 railroad cars, 9,000 locomotives, 6,000 armoured fighting vehicles and 68,000 trucks from 6 June 1944 through 8 May 1945. The P-47 also served with other Allied nations such as Brazil, Mexico and France.

The Kit
Okay, it's a 21st Century Tamiya kit - very good fit, gorgeous details and ease of construction. The cockpit is well-detailed and there is no ned to substitute it with aftermarket resin (you might want to spend money for a PE seatbelt though). The engine is also very nice with correct details. Some parts have alternatives in order to depict the marking options of the kit. This include Hamilton Standard and Curtiss Electric props (also included is the earlier skinny Curtiss Electric prop blade of the P-47C) and two different gunsights. The decking behind the cockpit is separate, allowing Tamiya to make a kit of a 'finned' aircraft (eventually released as the P-47M). For underwing stores, Tamiya provided two 150-gal tanks (appropriate for Mediterranean and Pacific theatres), two 108-gal 'paper' tanks (suitable for Europe) and a 150-gal 'flat' tank. Ordnance consists of two 500-lb bombs and two 'bazooka' type 4.5in rocket launchers.

Markings are provided for two planes: WZ-P,  Lt. Col. Benjamin Mayo, 84th FS, 78th FG, Duxford 1944 (why Tamiya chose this rather bland marking instead of Lt. Col. Mayo's 'other', P-47, MX-X / 'No Guts No Glory!' is beyond me) and VM-P / 'Kokomo', Maj. Gen. William Kepner, 551FTS, 495FTG, Mount Farm Airbase, Autumn 1944. Maj. Gen. Kepner was VIII Fighter Command's commander and his aircraft had only six machine guns and was not equipped to carry underwing stores. The instruction sheet indicates this on the relevant construction steps. Both aircraft are in natural metal with black (for WZ-P) and pale green (VM-P) anti-glare panels. Also included in the decal sheet are 'invasion stripes' to help those who are 'invasion stripe-challenged' (such as myself!)

Construction
The cockpit was assembled first, as usual. Looking at the instructions, I was perplexed - the instructions have you paint the cockpit interior in XF-5 Flat Green instead of Tamiya's recipe for Zinc Chromate. Browsing around the internet, I found that the instructions was correct (more or less) as Republic did not paint the interior Zinc Chromate. The parts were painted prior to assembly, leaving the contact surfaces unpainted. The detail parts were painted their respective colours (Buff, Red, Red Brown, Silver, Aluminium and Black) using Tamiya acrylics. The cockpit was then assembled and put aside. The next step was assembling the fuselage. Before closing off the fuselage, Parts A1 and A7 were glued together at they will act as the 'spars' for the wings and also the rear of the main wheel wells. Part B18 (part of the supercharger  I guess) was painted slightly differently. The instructions told you to mix XF-56 Metallic Grey with XF-7 Flat Red. I painted the part Gunze 8 Silver and later add a bit of X-27 Clear Red. The fuselage halves were then mated and the engine firewall glued to the assembly. The rear decking was also added at this stage. There is however a very slight fit problem here but was easily overcame with putty.

I skipped Step 4 (engine assembly) and go straight to Step 5. The horizontal stablisers were attached with no problem. I also attached the rudder at this stage instead of Stage 7. For the supercharger air outlet, I chose the closed position . Next, the wings. I decided to arm my model with ground attack ordnance and the respective holes were drilled. The panel for the machine gun barrels were glued and the wings were attached to the fuselage. I then return to Step 4 and assemble the engine and its cowling, which I chose the open position. The flaps were also added to the model and chose the 'up' position - visually it is less appealing but more correct. While all this was happening, I broke the gunsight, which however were only went inside the forward fuselage and quickly recovered. I put it aside to prevent further damage. And it was off to the paint shed.

Painting and decaling
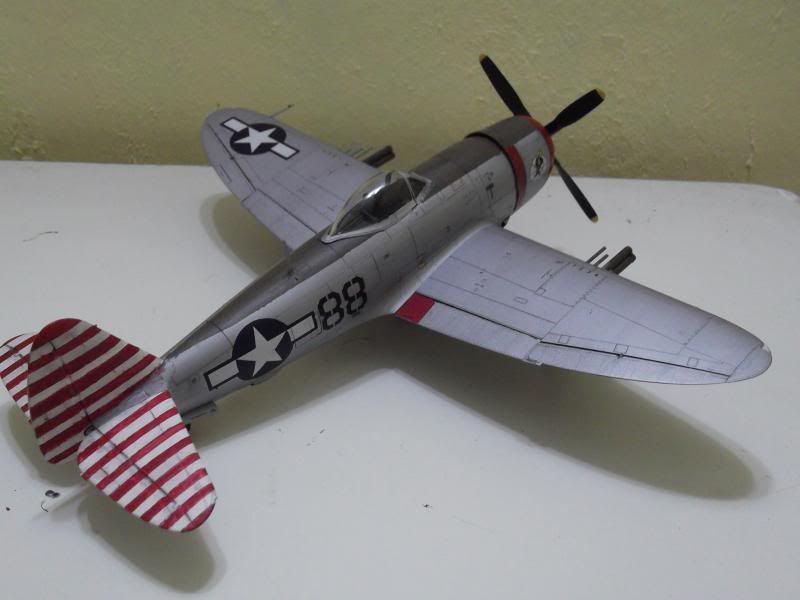
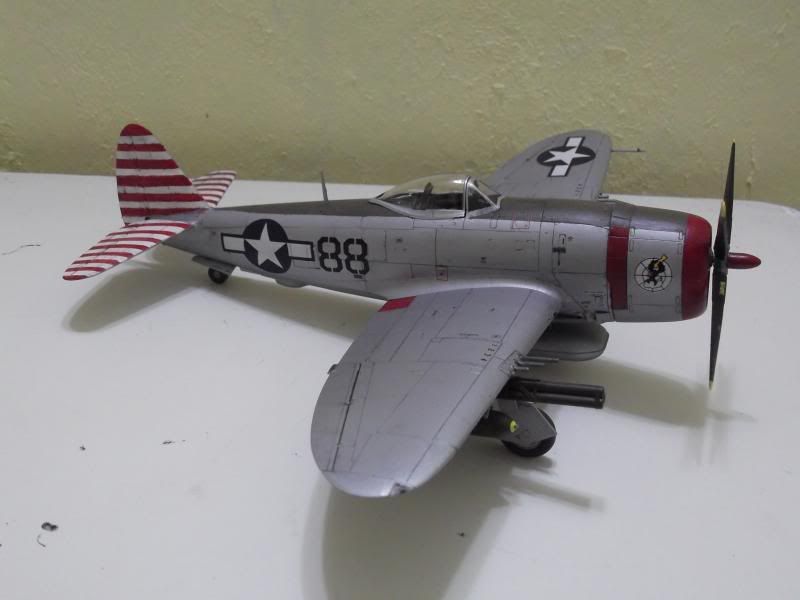
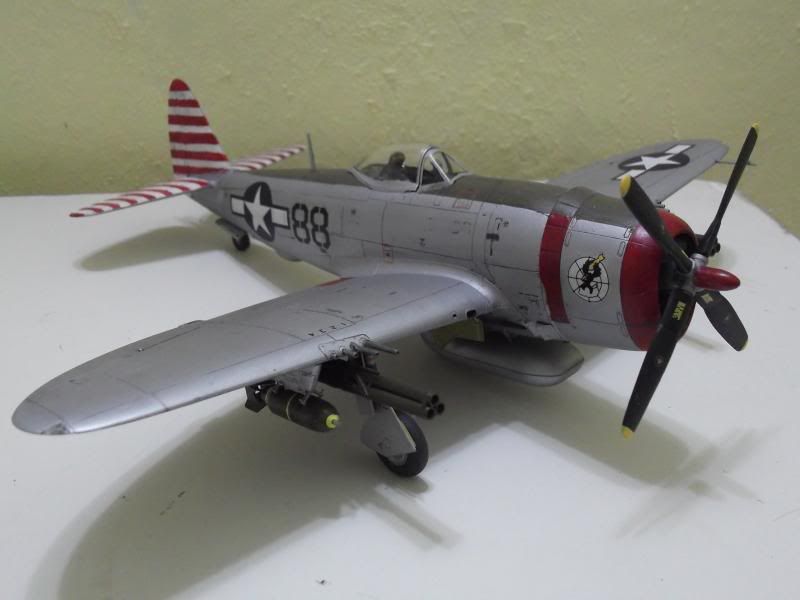
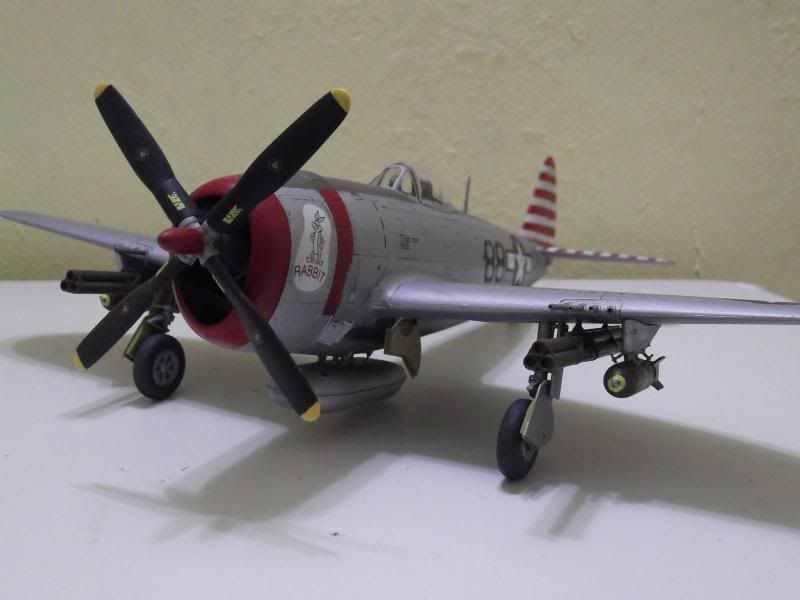
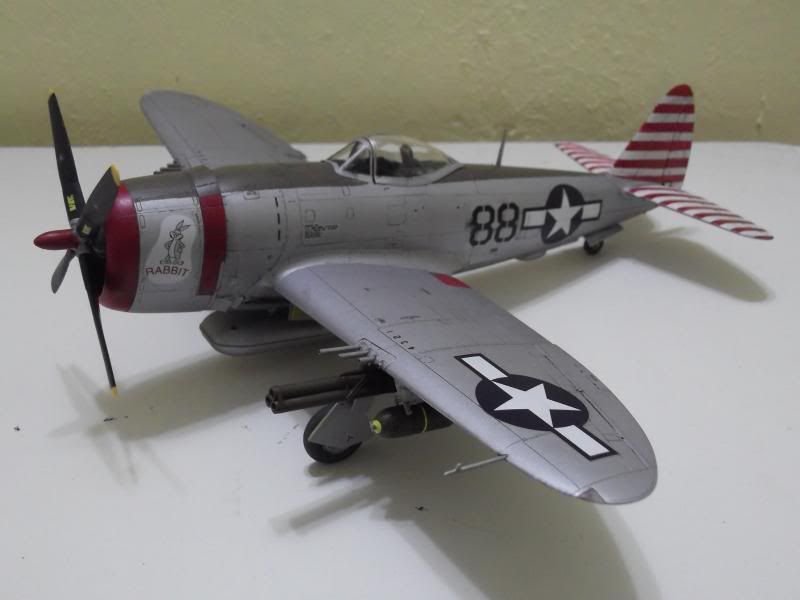
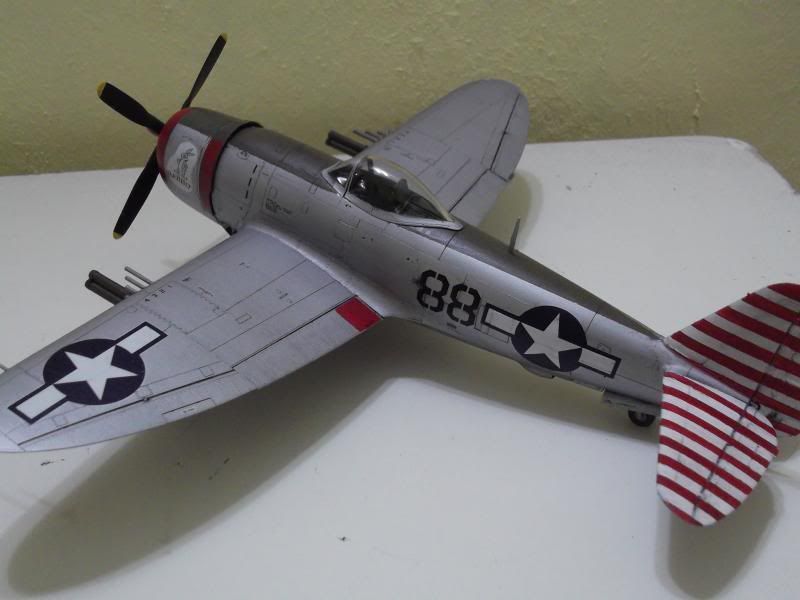
I decided not to do any of the kit markings. Rummaging through my stash box, I found leftover decals from my earlier Academy 1/48 P-47.  Since the Academy kit was built as Lt. Frank Oiler's 'Eileen', this model would be 'Rabbit', a P-47 belonging to the 527th FS, 86th FG, based at Pisa, Italy in 1944. I however have lost the decals for the stripes on the horizontal tails and to avoid any discrepancies in colour shades, I decided to paint the stripes. I first sprayed Tamiya TS-27 Flat White over the vertical and horizontal tails. Once dry, the surfaces were masked - I used the decals for the vertical tail and photos of completed models on the internet for horizontal tail as guides for masking, yeah, very sloppy but that's what I did. The red stripes were painted Tamiya X-7 Red (I have run out of XF-7 Flat Red). Once the masks were lifted, I found that there was a bad case of seepage and that the stripes were not uniform! The seepage was fixed using Tamiya XF-2 Flat White. As for the irregularity of the stripes, I read somewhere that the stripes were painted by the 86th ground staff and that neatness is of secondary importance, so there! The cowling flaps and cowl ring were also painted X-7. Once completely cured, the painted parts were masked off and I sprayed Tamiya AS-12 Bare Metal Silver on the model. Once dry, the masks were taken off and I touched up a bit of oversprays using XF-4 Yellow Green, X-7 and XF-2 where applicable. Before decaling I painted the anti-glare panel olive drab using Tamiya XF-62.

The Academy decals were old, I think I bought the kit some time in 2002. They hadn't yellowed but their integrity was suspect. I chose an unused piece and it broke when I put it in water. The best solution is to apply liquid decal film but since it was unavailable to me, I test-sprayed Tamiya TS-79 and apparently it worked. Satisfied, I sprayed it over the relevant decals. Then it was time to apply the decals. I worked front-to-rear, port-to-starboard. The 'Rabbit' nose art actually broke despite the layer of clear paint but fortunately it was salvageable. The decal however is quite translucent unlike the 527th insignia on the starboard side. Decals for number '88' went on the kit without a hitch. Kit decals were use for the rest of the kit except for the starboard national insignia. The Tamiya decal options have extra large insignia for the starboard wing, which I believe was not applied to 'Rabbit'. Fortunately, I have leftover decals from a Tamiya F4U-1A, which of the same size as a regular insignia applied to a Jug. It has yellowed a bit, but since it was applied to the underneath of the wings, it was of no great concern to me. The decals were then subjected to Mr Mark Softer treatment but the kit decals seemed to be a bit resistant to it.

Finishing
The remaining parts can now be attached to the model. I started by adding the underfuselage pylon, carefully, as it was a tight fit and followed by the underwing pylons and the 'flat' drop tank. The landing gears were then attached. For the mainwheels however, I used the spoked wheels rather than the solid disc specified for the kit markings. This was followed by the machine gun barrels and the ground attack ordnance. As for the propeller, I was at a quandary - the only illustration of 'Rabbit' (and there was no photo whatsoever) shows that it was equipped with Curtiss Electric propeller; the description mentioned that it was a Block 25 RE, meaning that it should be equipped with a Hamilton Standard prop. I settled for the Curtiss Electric prop eventually. The spinner was painted X-7 Red. Finally the aerial mast and the canopy was installed. I could not fit the sliding portion of the canopy properly however. Considering Tamiya's engineering, I guess it was me then. I sprayed Tamiya TS-79 Flat Clear to seal everything but it end up looking too dull, so I sprayed TS-80 Semi-Gloss Clear on the bare metal parts.

Conclusion
As usual with Tamiya kits, when you open the box, toss in some cement, close the box, give it a vigorous shaking out come a compeleted model. Ok, maybe not like that but their kits, including this Thunderbolt, are among the most accurate and have the best buildability in the market. The choice of markings may be a bit disappointing as there are a lot of interesting P-47 markings during the war. But then,  there are plenty of aftermarket decal sheets to choose from. 


Saturday, 20 July 2013

Shar - La Muerta Negra del Atlantico Sur


Historical Background
Following the 1957 Defence White Paper, which advocated a policy shift from manned aircraft to missiles, the majority of aircraft program in Britain was cancelled. Hawker Aircraft Ltd however quickly move on to a new project stimulated by Air Staff Requirement 345, which sought a vertical/short take-off and landing (V/STOL) aircraft for the RAF. Designed Hawker P.1127 Kestrel, Hawker worked closely with Bristol Engine Company and used a vectoring thrust turbofan system, called Pegasus to achieve V/STOL capability. Hawker then developed a more advanced aircraft, the P.1154, but this was cancelled by the Labour Government in 1964. The RAF then considered a more austere upgrade to the Kestrel. An order for 60 of this aircraft, named Harrier GR.1 was received in 1967 and it entered service in April 1969.

At the same time, the Royal Navy also entered a period of austerity. In 1966, the Labour government cancelled the projected CVA-01 aircraft carrier, signalling the end of conventional fixed-wing aircraft operations by the Royal Navy (which finally ended in 1978 when the last conventional carrier, HMS Ark Royal, was retired). However an alternative concept for British naval aviation emerged in the early 1970s when the so-called 'through-deck cruisers' were ordered. In reality small aircraft carriers, they were given the TDC designation to avoid hostile response from the government who was anti-aircraft carrier in those days. Named Invincible-class, a 7° ski-jump (in Invincible and Illustrious, 12° in Ark Royal) were added to allow the operation of V/STOL aircraft (a 12° ski-jump was also retrofitted to the commando carrier HMS Hermes). Hawker Siddeley (later absorbed into British Aerospace) designed a navalised Harrier to serve on those ships. Named Sea Harrier FRS.1 (Fighter/Reconaissance/ Strike - the Sea Harrier or 'Shar' was expected to fulfil all three roles), it was based on the Harrier GR.3. Parts made from materials vulnerable to saltwater corrosion were substituted with corrosion resistant alloys or were protected. The cockpit was raised, with bubble-type canopy for better visibility. Radar was added in the shape of Ferranti Blue Fox multi-mode radar. The prototype was first flown on 20 August 1978 and was operational with No.800 Squadron on board HMS Invincible (later transferred to HMS Hermes in March 1980)

When the British decided to respond to the Argentinian invasion of the Falklands Islands, the 20 Sea Harriers (later augmented by 8 more Shars and 14 RAF Harrier GR.3) on board HMS Hermes and HMS Invincible were the only carrier-borne fixed wing combat aircraft available. Outnumbered, and operating in adverse conditions, the Sea Harriers performed fleet defence and also offensive actions against ground targets on the islands. They also had to operate without the benefit of airborne early warning aircraft, resulting in less than complete air superiority. The British however enjoyed better training for their pilots and employed the all-aspect AIM-9L Sidewinder, which was nicknamed 'Nine-Lima'. The Sea Harrier, although slower than the Argentinian Mirage IIIs and Daggers, was more maneuverable. 20 Argentinian aircraft were shot down for the loss of zero Sea Harriers. However two were shot down by ground fire and another four in accidents. The Argentinian pilots colloquially called the Sea Harriers La Muerta Negra or 'The Black Death'.

The Sea Harrier was given an update in 1984 as FRS.2 (later redesignated FA.2). First flown in September 1988, 31 FRS.1 aircraft were upgraded to FA.2 standard and 18 were built from scratch. The FA.2 standard includes a new radar, the Ferranti Blue Vixen, Pegasus Mk106 engine, increased range, increased weapons load (including the ability to fire AIM-120 AMRAAM) and improved cockpit displays. The Sea Harrier continued to serve during Operations Deny Flight, Deliberate Force and Allied Force over the Balkans. The Sea Harrier was finally retired in 2006. India, the only export operator of the Sea Harrier (as Sea Harrier FRS.51), still operates them, at least until 2015.

The Kit
Italeri's 1/72 Sea Harrier FRS.1 is actually a reboxed ESCI kit (originally released in 1983). The kit was laid out in four sprues. Sprue 1 is the forward fuselage plus some smaller parts, sprues 2 to 3 contains the rest of the plane and sprue 4 consists of the clear parts. The panel lines are very fine, in fact, even light sanding can erase them off! The cockpit is lightly detailed and the ejection seat really need to be substituted. Like many 1/72 planes, the instrument panel simply consists of decals with flat plastic part. The kit suffered from various ejector pin marks; the worst are at the landing gear legs. External stores consists of two Sidewinders, two ADEN 30mm  gun pods and two drop tanks (modelers who wished to build an Indian Navy Shar have to search elsewhere for Matra R.550 Magics used by Indian Shars). Decals were provided for three aircraft: No.801 Squadron, HMS Invincible 1982 (post-Falklands markings); No.700A Squadron, NAS Yeovilton 1979 and No.300 Squadron, INS Vikrant 1982.

Construction
The highly simplistic cockpit, which consist of the (plain) tub, control column, instrument panel and seat got the first attention. There were just two lumps on the cockpit floor pretending to be rudder pedals. The side consoles and the instrument panel came the form of decals. Not that bad really but there should be at least some raised details to represent the dials and instruments. The cockpit tub and the dashboard was painted Light Ghost Grey (FS36375) using Gunze Aqueous, with the 'rudder pedals' painted Silver. The side console and instrument panel decals were then applied once the paint is dry. The hideous Martin Baker Mk10 ejection seat was then painted according to instructions and then sticked to its place (I intend to replace it with resin seat, so I dab just enough glue for it to remain in place, yet can still be easily pulled out for replacement). The cockpit was then sandwiched between the front fuselage halves.

The next step was concerned with the main fuselage. The main landing gear (less the wheels) was painted and stuck to one side of the fuselage. The engine consists of just one flat plastic part with a rather respectable compressor blades detail. The detail was painted silver and the rest of that part was painted white. The speed brake housing was also installed and the fuselage can be closed up. Afterwards, the front fuselage, vertical tail, horizontal stabilisers, intakes and the tailcone were attched to the fuselage. Italeri had the auxiliary intake doors moulded in the shut position whereas the real thing are open whenever the engine is shut off or during vertical hover. At the same time, I glued the speed brake shut - the real deal is open whenever the landing gears are down! I leave off fitting the exhaust nozzles but fit the rear exhaust heat shields.

Next, the wings which consisted of one-piece upper and two-piece lower. No problems here except I opted to fit the outrigger wheels and the pylons at a later time. For the lower fuselage, Italeri provided an option whether to fit Aden 30mm cannon pods or underfuselage strakes. I opted for the cannon pods. At this point I paused the assembling process and jumped to the painting stage.

Painting and Decaling
I decided earlier on to finish my model in the first option - a No. 801 Squadron machine off HMS Invincible in 1982. Admittedly, this was a rather boring colour scheme, in overall Dark Sea Grey with monocolour markings, but, hey, it was easy! The DSG was painted using Tamiya XF54 Dark Sea Grey and the radome was painted XF1 Flat Black. The still unattached parts were also painted at this time. The forward exhausts (known as 'cold' exhausts) were originally painted Gunze 61 Burnt Iron but later I decided to paint them Dark Sea Grey. Next, the decaling. There aren't any issues here - Italeri decals are thin, opaque and respond well to Mr Mark Softer. This stage went smoothly plus there aren't that many stencil decals. The very sharp but shallow engraved panel lines somewhat deterred my usual sludge wash technique so I resorted to 2B pencil. The sludge wash was only done on the flaps and ailerons.

Finishing
The remaining parts can now be attached to the model. The exhaust nozzles were first, attached in the vertical position. Next were the wing pylons. Italeri however provided minimal option for weapons load - just two drop tanks and two Sidewinders. I intended for this model to have the twin Sidewinder rails and I do have the the twin rail launchers but they were not of the same type used on Sea Harriers. So I dropped off the idea and just use the kit's single rail. I however used AIM-9Ls from Hasegawa's weapon set as the kit Sidewinders look more like the earlier AIM-9B. I laso found a BL755 cluster bomb in my stash and I placed it at the underfuselage pylon in-between the cannon pods. The wheels were then attached to the landing gears fllowed by the forward landing gear doors. Italeri's instructions had the doors in the open poistion but photos show that they are closed once the landing gears were down, so I glued them in the closed position. Finally, the most vulnerable parts were glued on, but the yaw vane became the victim of the Carpet Monster. A spray of Tamiya TS-79 Semi-Gloss Clear finished the build.

Conclusion
Italeri's 1/72 Sea Harrier is a beautiful, little (rough-ish) gem. The parts fit beautifully, the engraving beautifully done and the decals behave correctly. The cockpit however needs more work (or a resin replacement) and there should at least be a wider selection of weapons. I haven't seen Hasegawa and Airfix Sea Harrier FRS.1 but for me at least, this is the best 1/72 Sea Harrier in the market.


Wednesday, 26 June 2013

Lightning George


Historical Background
In 1940, the Japanese Navy decided that it needed a fighter aircraft capable of supporting amphibious operations in isolated areas deemed not important enough to warrant the attention of land- or carrier-based aviation. Two projects were initiated: Nakajima were to produce a floatplane version of Mitsubishi's A6M (as an interim measure, and known as A6M2-N) and Kawanishi to produce a new design, the N1K Kyofu (Allied codename 'Rex'). Powered by a 1,460hp Mitsubishi MK4C Kasei radial engine, it was a success (although the bulky floats degraded the performance). However, due to over-reliance on the Zero and a slow procurement schemer, by the time the first production aircraft appeared in the Spring of 1943, the Japanese were on the defensive and there was no longer need for such an aircraft and only 100 were built. 

At the same time however, Kawanishi had been working on the land-based version of the Kyofu and was pursued as a private venture. First flown on 27 December 1942 (just 8 months after the original floatplane), it retains the mid-mounted wing of the Kyofu. Coupled with the large diameter propeller, it resulted in a long, stalky landing gear. The powerplant was replaced with a Nakajima NK9A Homare radial engine. It was found that the new aircraft was faster than the A6M and also has a longer range than the J2M Raiden. On the debit side it was noted that the aircraft had a somehow weak undercarriage and the engine proved troublesome. The Navy was impressed nonetheless and ordered the aircraft as N1K1-J Shiden (Violet Lightning). The aircraft was armed with two 7.7mm machine guns in the nose (later deleted) and four 20mm cannons (two in underwing gondolas). 1,007 N1K1-Js were produced (including prototypes).

Just four days after the first flight of the N1K1-J, a complete redesign program was begun. The main focus of the program were centred on the weak undercarriage and the mid-mounted wing position. The wing was moved to a low position allowing a shorter, more conventional landing gear to be used. The fuselage was lengthened and the tail redesigned. The whole aircraft was made more simple, using less than two-thirds of the N1K1's parts. The end result was 250 kg lighter and more faster and more maneuverable than the N1K1. Lack of alternatives however forced the retention of the temperamental Homare engine. The prototype first flew on 1 January 1944 and was rushed into production as the N1K2-J Shiden Model 21. It was also known Shiden-KAI (Improved Shiden). Only 423 were built due to production difficulties, compounded by damage to the factory due to B-29 raids. The original Shiden was introduced into combat during the invasion of the Marianas in June 1944.

The Shiden and Shiden-KAI (codenamed 'George' by the Allies) proved highly effective against American Hellcats and Corsairs, giving an even chance to IJN pilots. In the hands of aces, it could even outfly its American adversaries. While formidable, the Shidens were demanding of its' pilots and limited in quantity. They were therefore mainly issued to elite fighter units such as the 343rd Kokutai commanded by Minoru Genda, the architect of the attack on Pearl Harbor. The 343rd was a 'squadron of experts' (as it was mainly staffed by surviving IJN aces) and fought against overwhelming odds until final surrender on 15 August 1945. On one occasion in February 1945, ten N1K2s led by Lt. Kaneyoshi Muto clashed with seven F6F Hellcats of VF-82. The Shidens managed to down four Hellcats and no cost to themselves.

The Kit
In 1993, Hasegawa released a new-tool 1/48 N1K1, replacing the earlier (but still nice, even though it has raised panel lines) ex-Mania kit dating from the 1980s. . Featuring fine recessed and raised details, including countersunk rivets,  it was met with rave reviews for being virtually flawless and basically having no need for aftermarket products. In 2000, the molds were retooled to produce the N1K2, initially in its 'Early Version' form. The 'Late Production' version, also released in 2000, is virtually the same with the original release save for parts that make up the late version. As with the original N1K1, the panel lines are very crisp, the cockpit is well-detailed and there is option for lowered flaps. Decals were provided for two options, both from the 343rd Kokutai (and as with many other Japanese aircraft, they are rather bland).

Construction
As usual, I started with the cockpit. Hasegawa specified that the cockpit is to be painted a mixture of Gunze Nakajima Green and Mitsubishi Green. I did not have those colours and painted them Tamiya XF-71 IJN Interior Green, even though technically it wasn't accurate. Detail parts were painted XF-3 Flat Yellow, Gunze 8 Silver, XF-1 Flat Black and XF-7 Flat Red. The instrument panel part was painted Flat Black before the laying the decal for instrument panel face. The cockpit assembly was then trapped between the fuselage halves. The reviews don't lie as the fit was perfect! The engine assembly was next and I painted the parts first before assembly. The sprue scar was then touched up and the engine was then weathered (maybe shouldn't bother with the cylinders as they were partially hidden from view by the reduction gear).

The horizontal tailplanes were then glued to the fuselage. This was followed by the wing assembly, which consisted of a one-piece lower wing, upper wing surfaces and the wheel wells. I then cut off a notch from the bottom part of the tail and at the wingtips and replaced it with clear parts. Hasegawa also gave an option for retracted or deployed combat flaps. While I think the flaps, as the name implies, are only deployed during combat maneuverings, I can't help but deploy them in the extended position as it was more visually appealing. The gun barrels were left off as they look very fragile (they are) and might broke during the painting process.

Painting & Decaling
Shiden-Kais were only painted in two colours : Green uppers and silver/natural metal bottoms. The bottom colour was painted using Tamiya TS-30 Silver Leaf. For the upper camo colour, Hasegawa's instructions have you mix two shades of Gunze Sangyo paints to create what is called Kawanishi Green. I did not have the required paints so I just paint the green portion using Tamiya XF-11 J.N Green.  The wing leading edge ID strip was painted using a mix of Tamiya XF-3 Flat Yellow and XF-7 Flat Red. The landing gears were painted silver using Gunze 8 whilst Gunze H77 Tyre Black was used to paint the tyres. The prop blades were painted XF-64 Red Brown.

For markings, Hasegawa provided just two options, both from the 343rd Kokutai. The first was from the 701st Hikotai, flown by Squadron Leader Takashi Oshibuchi, April 1945 and the second, a Shiden-Kai of the 407 Kokutai, flown by a Squadron Leader Hayashi, also in April 1945. Apart from individual aircraft numbers, the two options were distinguished by different fuselage marking bands: the first option in red and the second in white. I chose the second option as the white fuselage bands were more visible on a dark green background (and this rather violated my policy of 'have markings of a more famous pilot'). The decals were typically Hasegawa but like the Hayate, the white portions are really white unlike their earlier releases. They also responded well to decal setting solutions.

Finishing
I started by enhancing the panel lines using a thin mixture of enamel red brown and black and the excess was removed using a piece of cloth dampened with enamel thinner and wiped in the direction of the air flow. Paint chips were adding by dabbing silver paint, using torn sponge pieces onto the leading edge of the flying surfaces and on the boarding side (left) of the wing. More chipping was also done by painting silver paint onto areas adjacent to panel lines. The more fragile parts can now be attached to the fuselage. The gun barrels, as mentioned before, were however quite fragile: I got nervous during the clean-up and as a result, some stubs still remain on the gun barrels; one of the barrels broke. I decided to replace all barrels with plastic rods. The muzzles were removed from the kit barrels and re-attached to the plastic rods. They still look unsatisfactory but was sight better than bent barrels with traces of sprue runner still visible.

Conclusion
It was a joy to build this kit. Everything fits perfectly and the details are very good. The price might be a bit high but it was well worth it.